October 23, 2026
Problem:
Tried to updateLaunch CRP919Ediagnostic scanner but failed. It reported an error App main application program and kept stuck on "Waiting for Install."
Any solution?
Solution:
Reset device to factory reset and try again.
Follow steps below to resetCRP919X/CRP919E scanner to factory setting.
Press the power button on the top of the unit.
Hit Power off to turn off device;

Long press and Up button and the Power button until device boots.

Select Wipe data/factory reset.

Do a Factory data reset.

Factory data reset finished.

Select Reboot system now.
Device will reboot.


Posted by: jean at
06:50 AM
| No Comments
| Add Comment
Post contains 101 words, total size 6 kb.
October 22, 2026
User feedback:
VW Golf 7 all keys lost is done with theAutel IM608.
Cluster JCI type D70F3426.
Read cluster data with IM508 andAPB131 adapter.
Read engine ECU data with g-box2.
Read gearbox TCU with gbox.
Load Cluster, engine ECU and gearbox TCU data to get sync data for free.
Then generate and learn keys.


Posted by: jean at
07:00 AM
| No Comments
| Add Comment
Post contains 65 words, total size 6 kb.
October 21, 2026
Lonsdor K518 Pro and K518ISE series key programmers also support copying 2018- Jaguar Land rover smart keys without KVM removal.
Here we will show how to copy 2018- JLR new style smart key using Lonsdor devices.
Model example: 2019 Land rover Discovery.
Tools required:
Original key
New original key orLonsdor JLR smart keyto be copied.
Procedure:
1. Generate Lonsdor key
Must generate Lonsdor key first before copying a key.
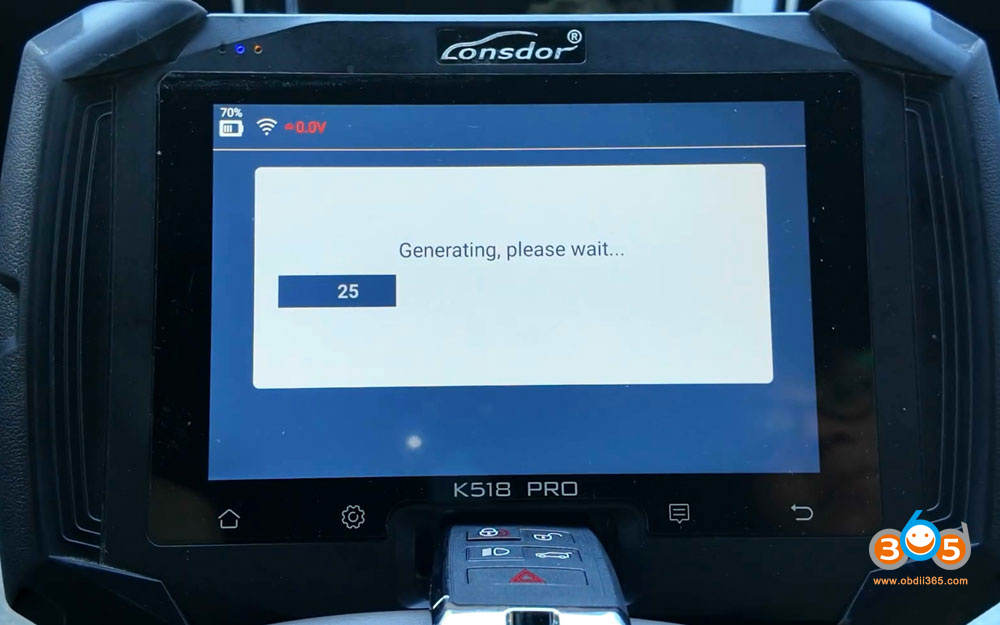
Generate Lonsdor remote under the correct remote program (2018- ID49).

2. Read Original Key Data
Go to IMMO & Remote- Land Rover- Select from vehicle- Land Rover 2018 onwards- Key copy (No KVM removal).

Read vehicle information.
Lonsdor detects that this vehicle does not have UWB function.

Select Add key (No KVM removal) function.
NOTE:
This function can copy and add key in the position of the working key.
For models without keyless entry, the generated key function is complete and can be used directly.
For models with keyless entry, the key has RKE and Emergency Start functions ONLY (no smart/UWB function) after copying is finished.
Disassemble the original key shell.
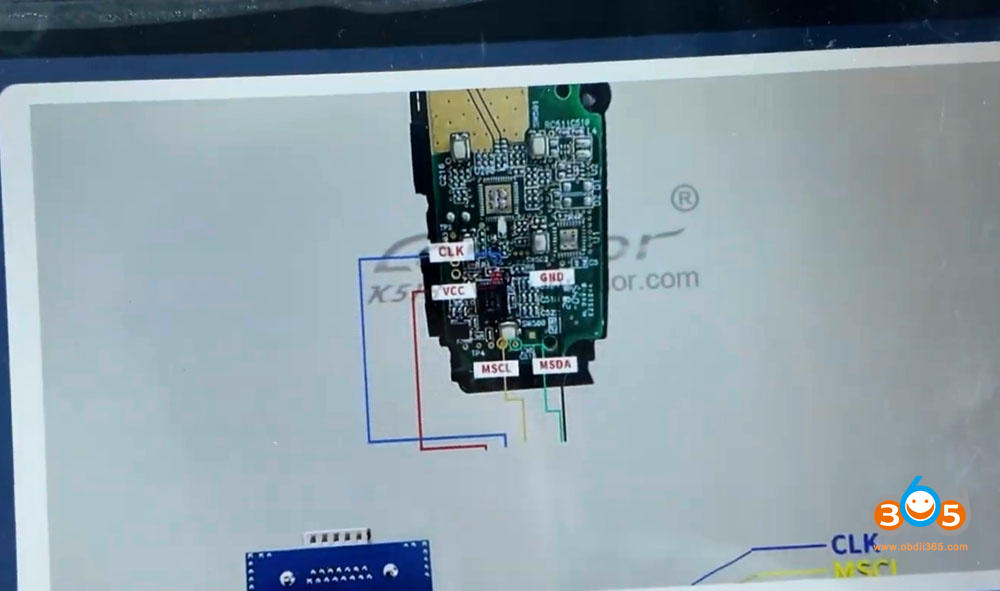
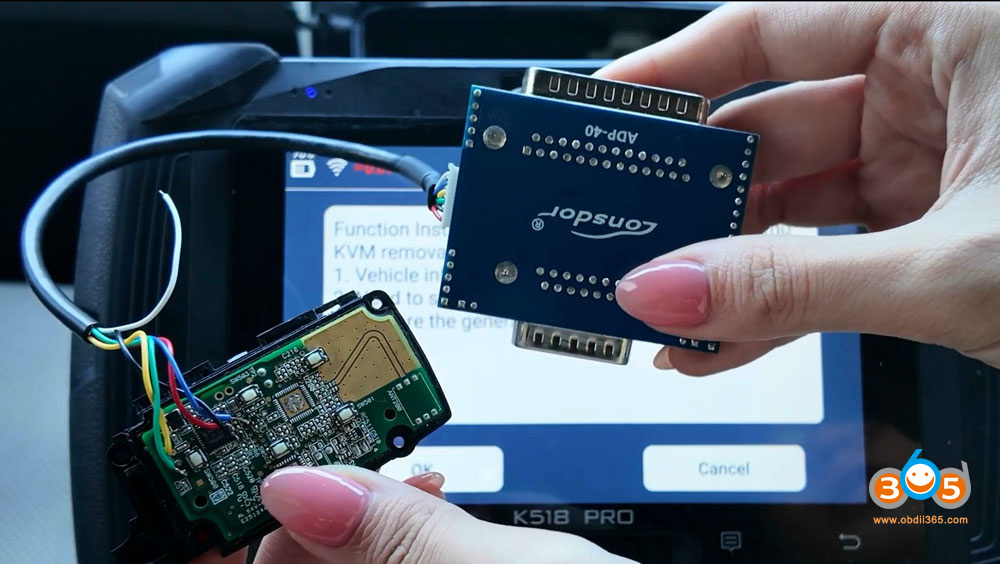
Follow K518 key wiring diagram to solder ADP40 adapter wires to the original key circuit board.
Then connect ADP40 adater wth K518 PRO.


Read and save original key data.
3. Write key/Copy key
Lonsdor will read key IDs.
The first ID is the original key ID.
Select the second key ID to write a new key.

Select copy a Lonsdor smart key.

Remove ADP40 adapter
Place the generated Lonsdor smart key into K518 key slot.
And write original key data to the new key.

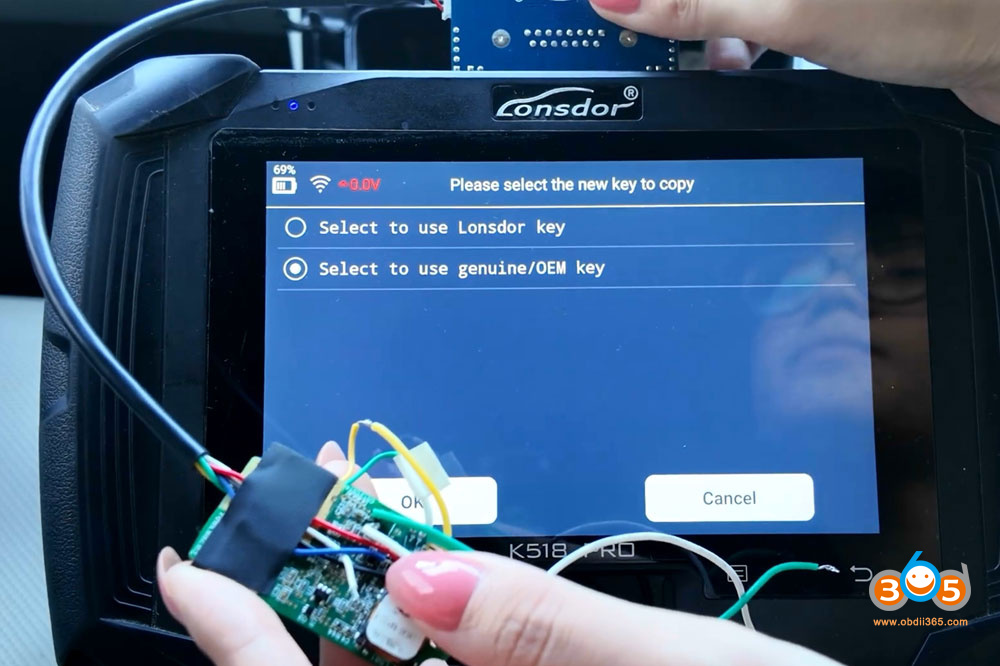
If you copy an OEM key.
Select to use OEM key.
Remove key shell of the new original key.
Solder ADP40-40 wires to the new key and write key.


Posted by: jean at
07:32 AM
| No Comments
| Add Comment
Post contains 309 words, total size 11 kb.
October 20, 2026
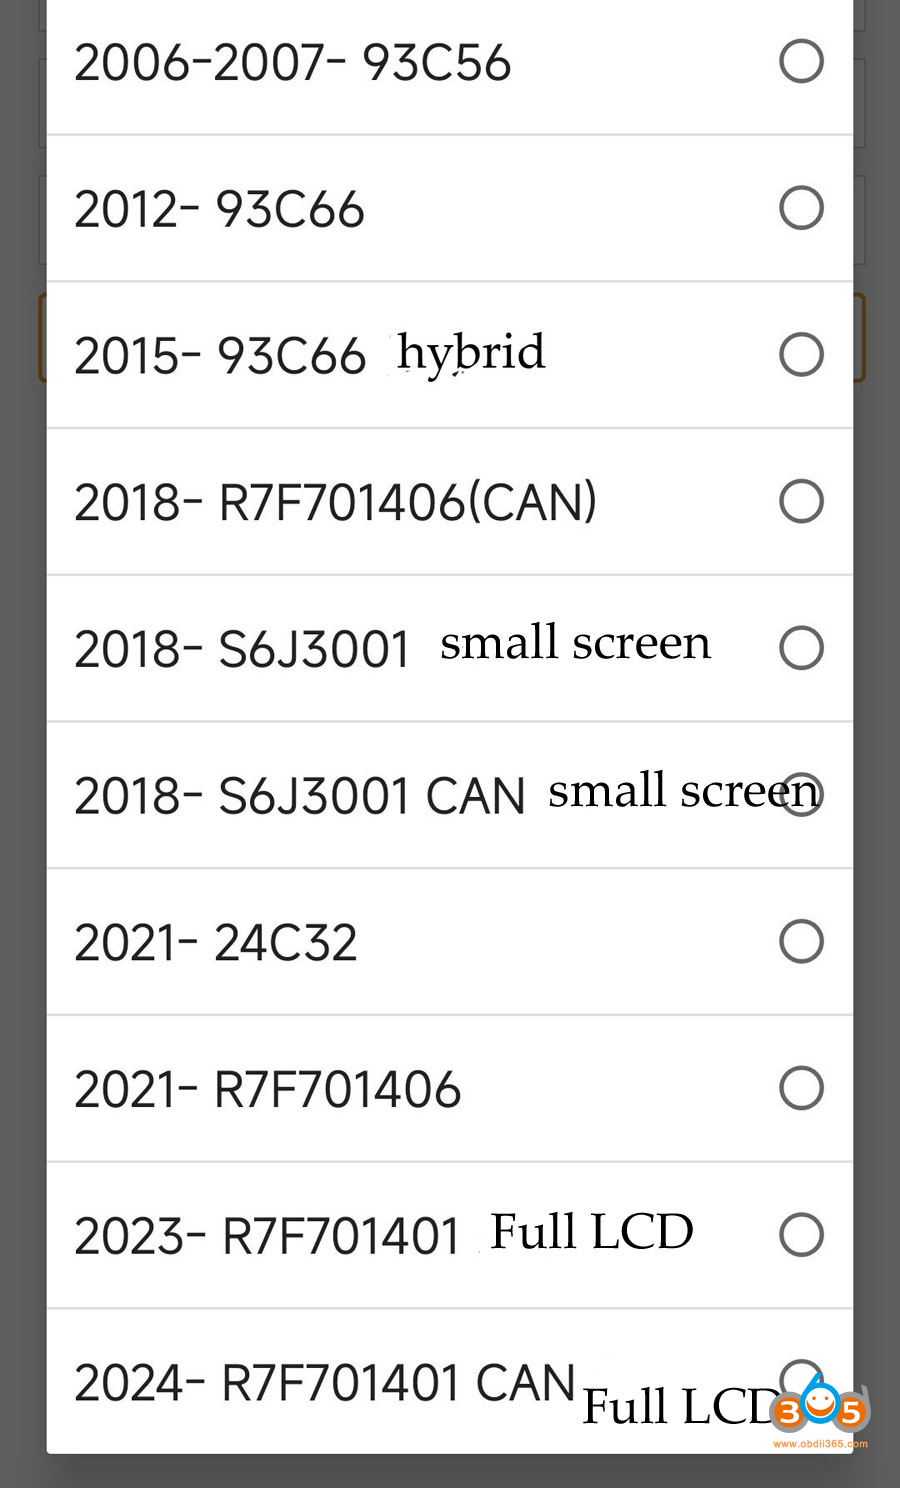
We have collected the wiring diagrams for dashboard mileage correction on the2015-2024 Toyota Camryusing theCG100X programmer. This includes the following dashboard types.
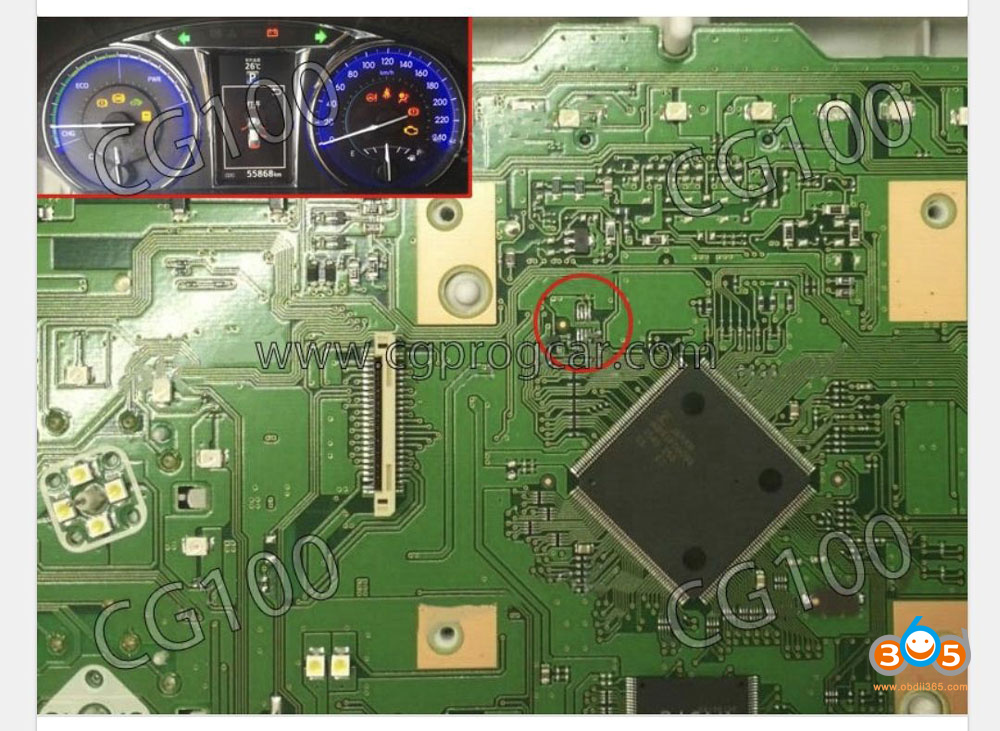
2015- 93C66 hybrid cluster
Make sure to check if the chip model and mileage data are read accurately.
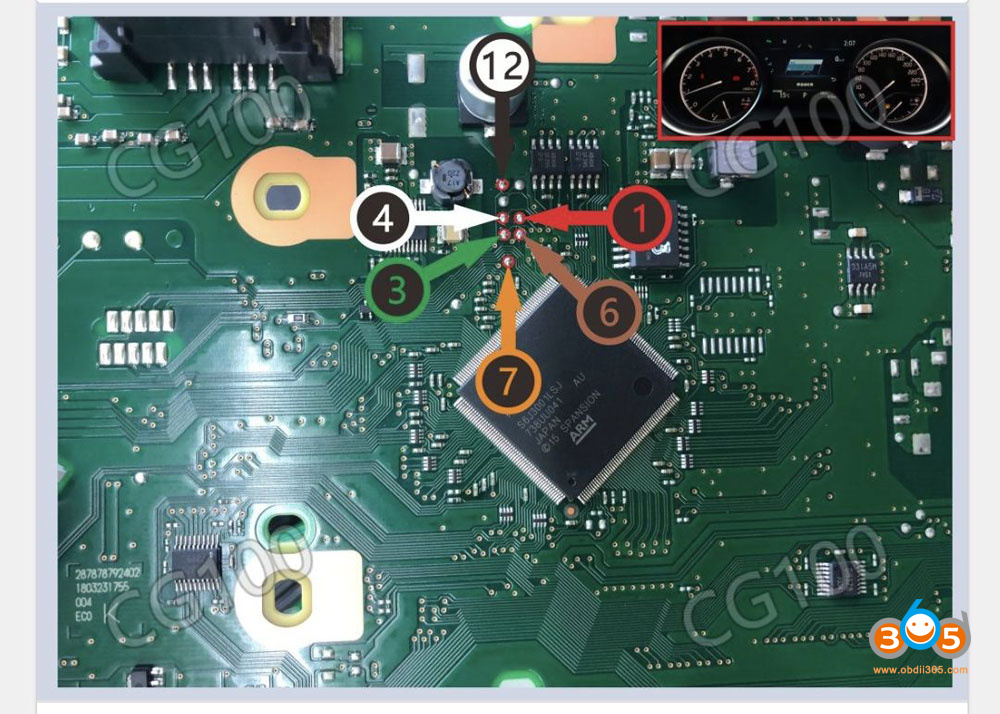
2018- S6J3001 small screen
Make sure to check if the chip model and mileage data are read accurately.
We recommend using the S6J3001 CAN option for the correction first.
2018- S6J3001 CAN small screen
This function requires network connection.
Make sure to check if the chip model and mileage data are read accurately.
Some dashboards are not supported. If a reading error is prompted, you need to disassemble it to confirm the chip model and operate by soldering wires.
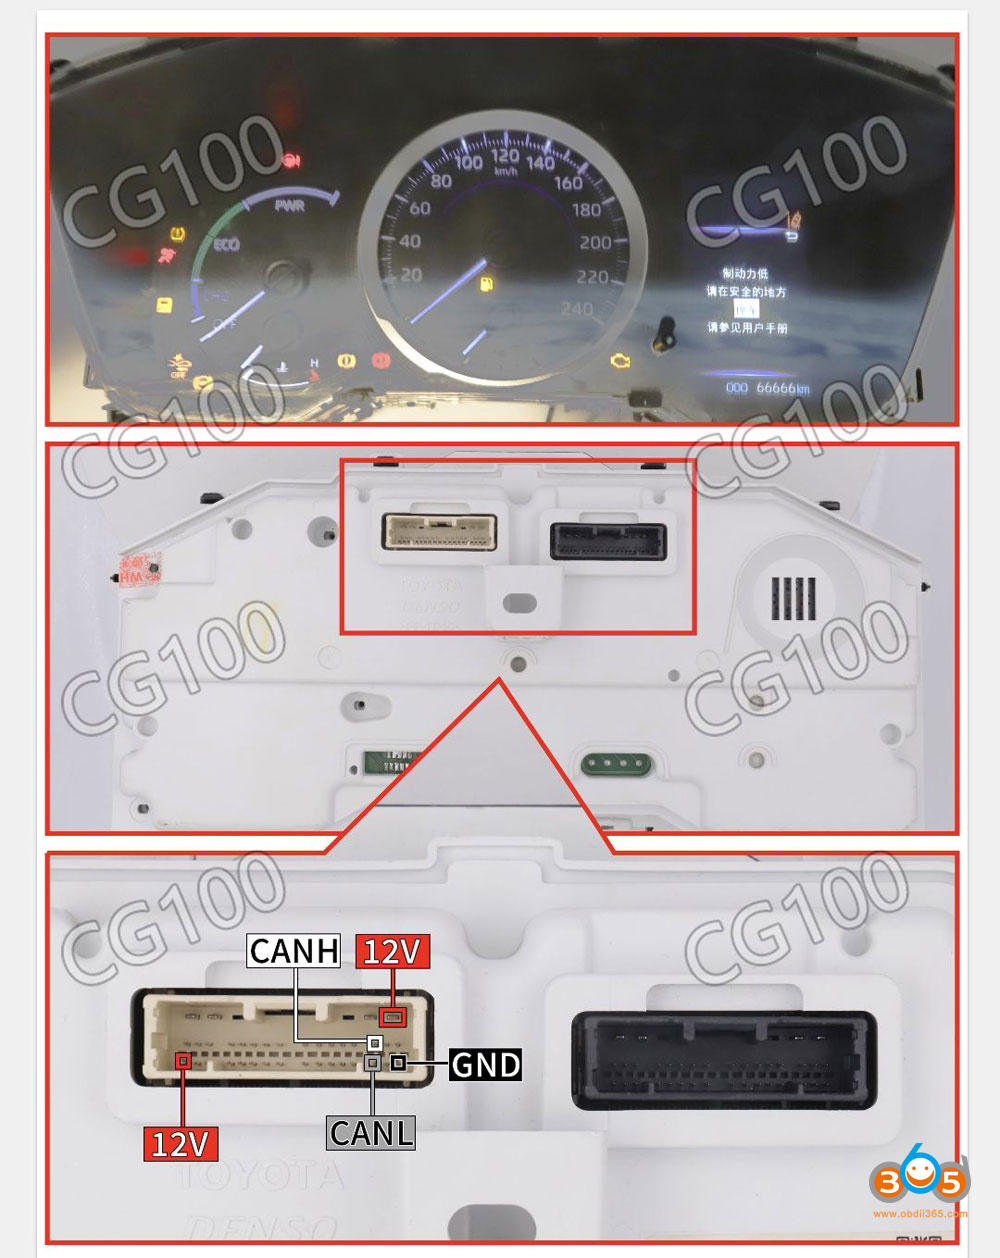
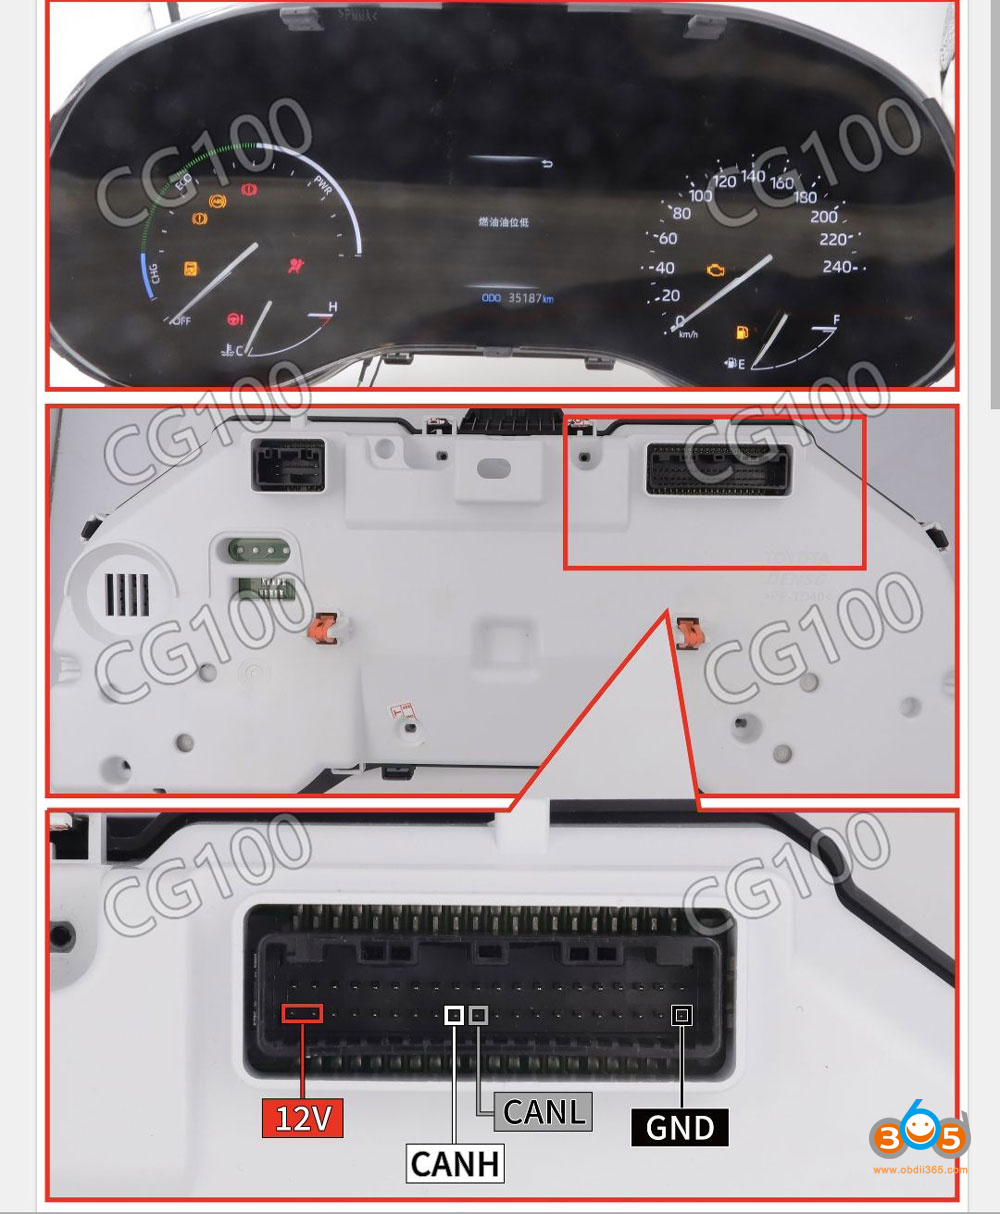
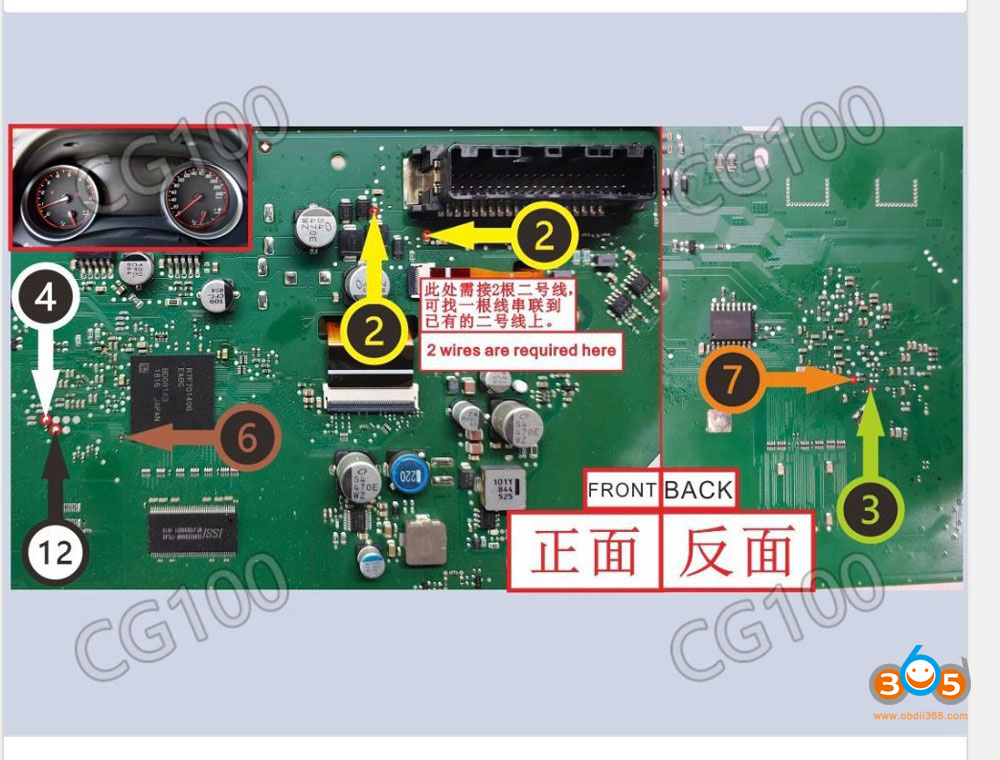
2018- R7F701406 (CAN)
Currently, only theK40andM4clusters are supported for mileage correction by CAN mode; you need to contact after-sales service to modify the data.
Please make sure to check if the chip model and mileage data are read accurately.
If necessary, you can use a universal programmer to loacate the chip, read it, and save the original data.
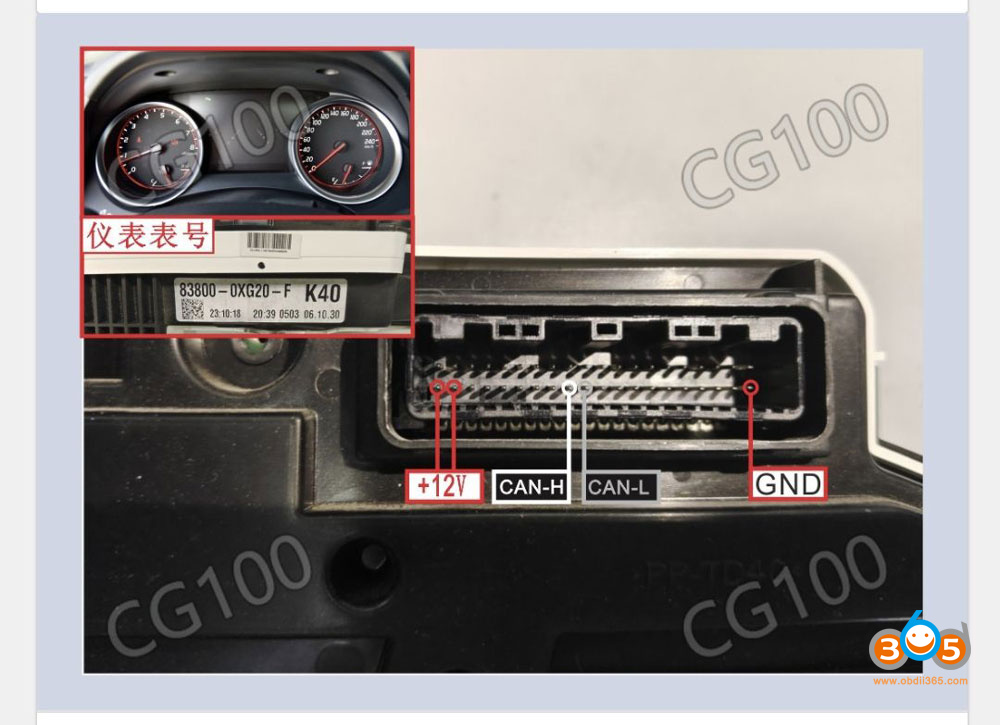
2021- 24C32
Please make sure to check if the chip model and mileage data are read accurately.
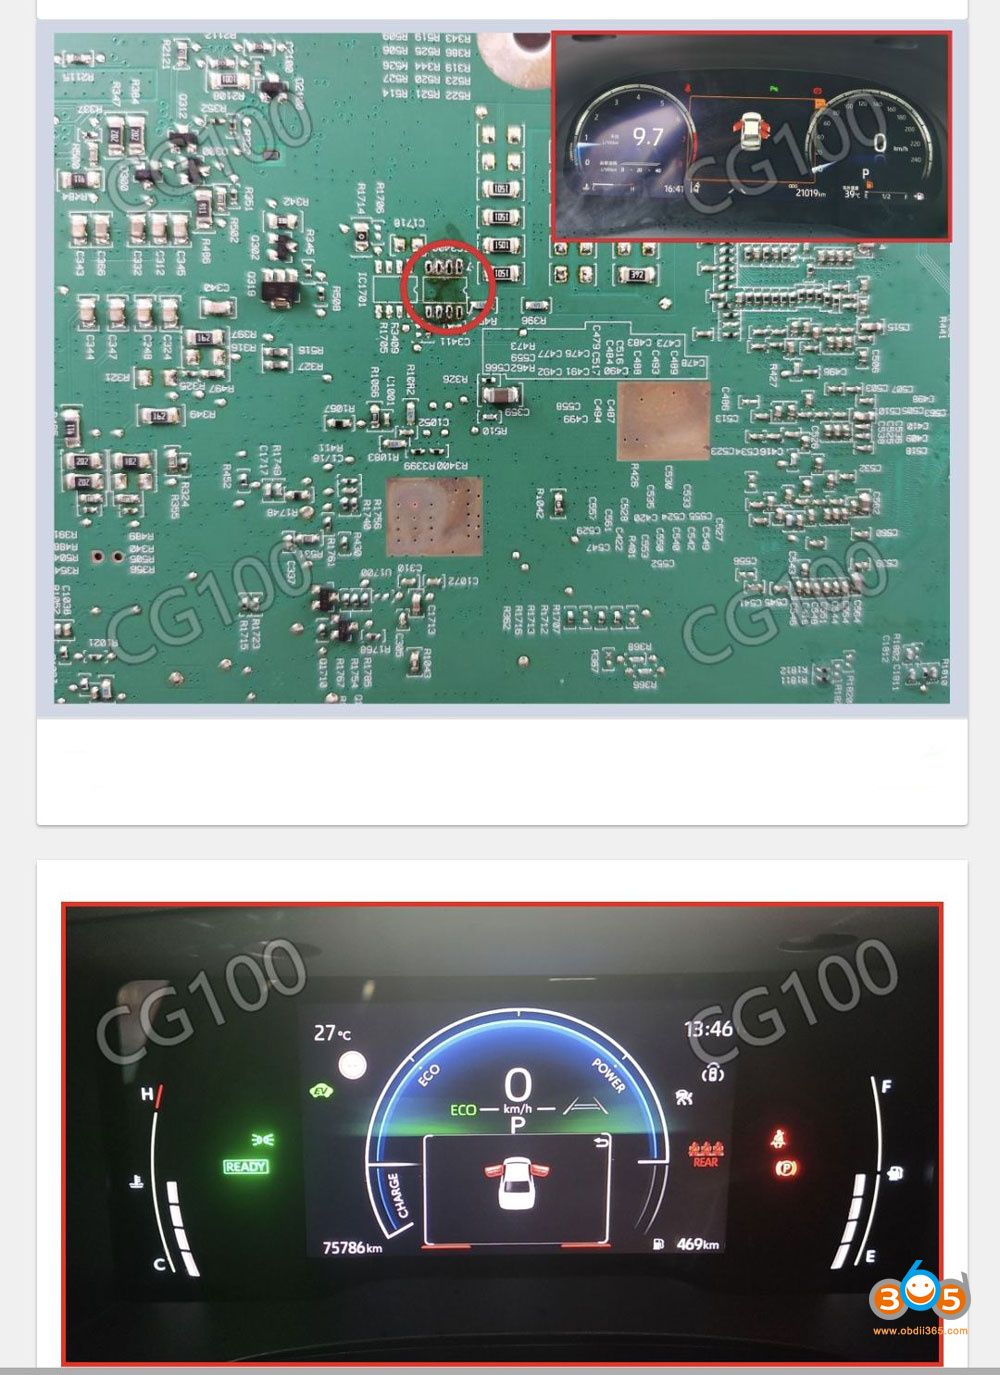
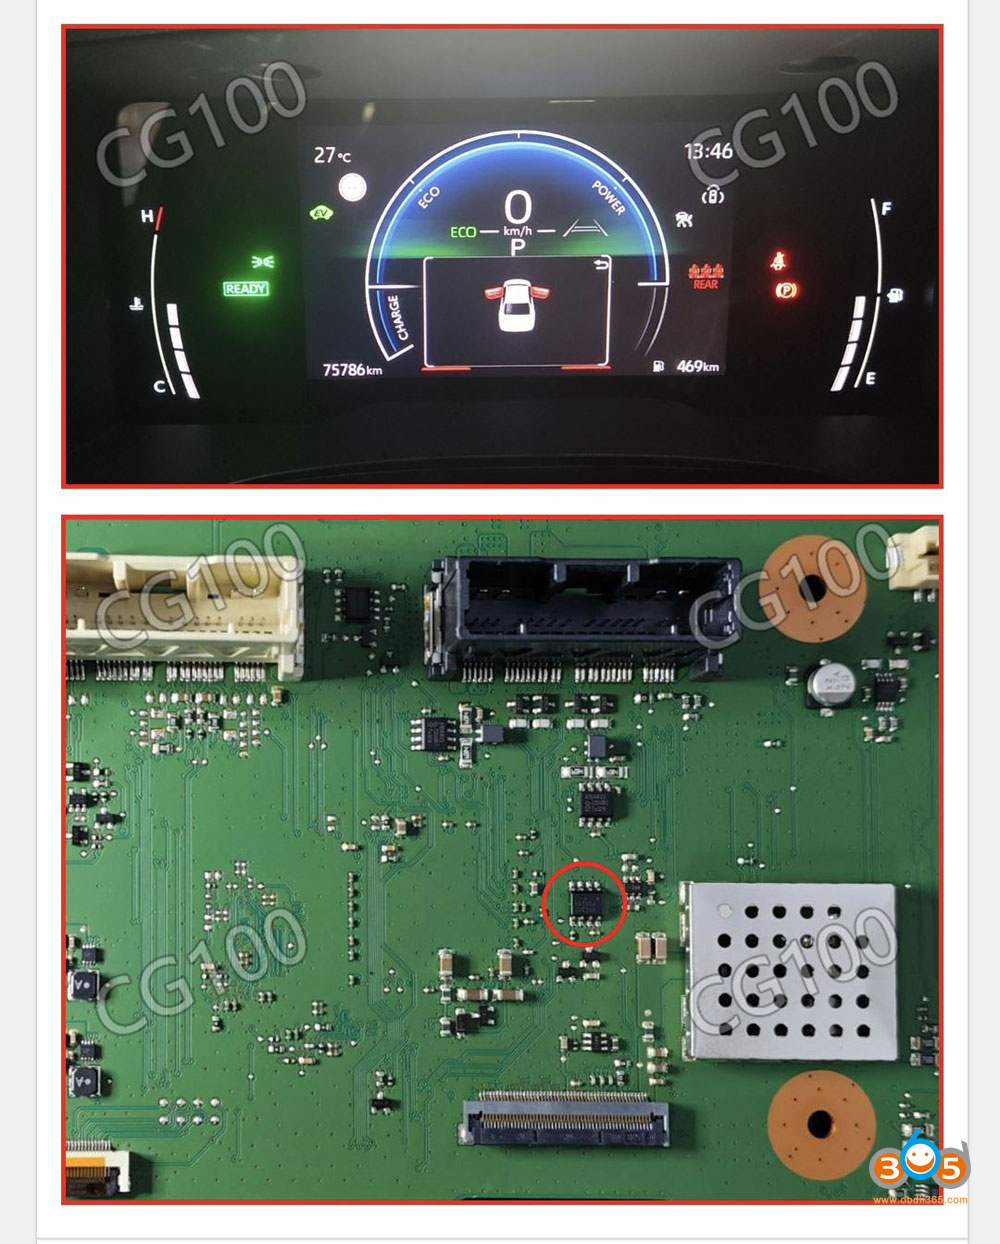
2021- R7F701406
Make sure to check if the chip model and mileage data are read accurately.
If the dashboard number is K40, use the 2018- R7F701406 (CAN) method to correct the mileage.
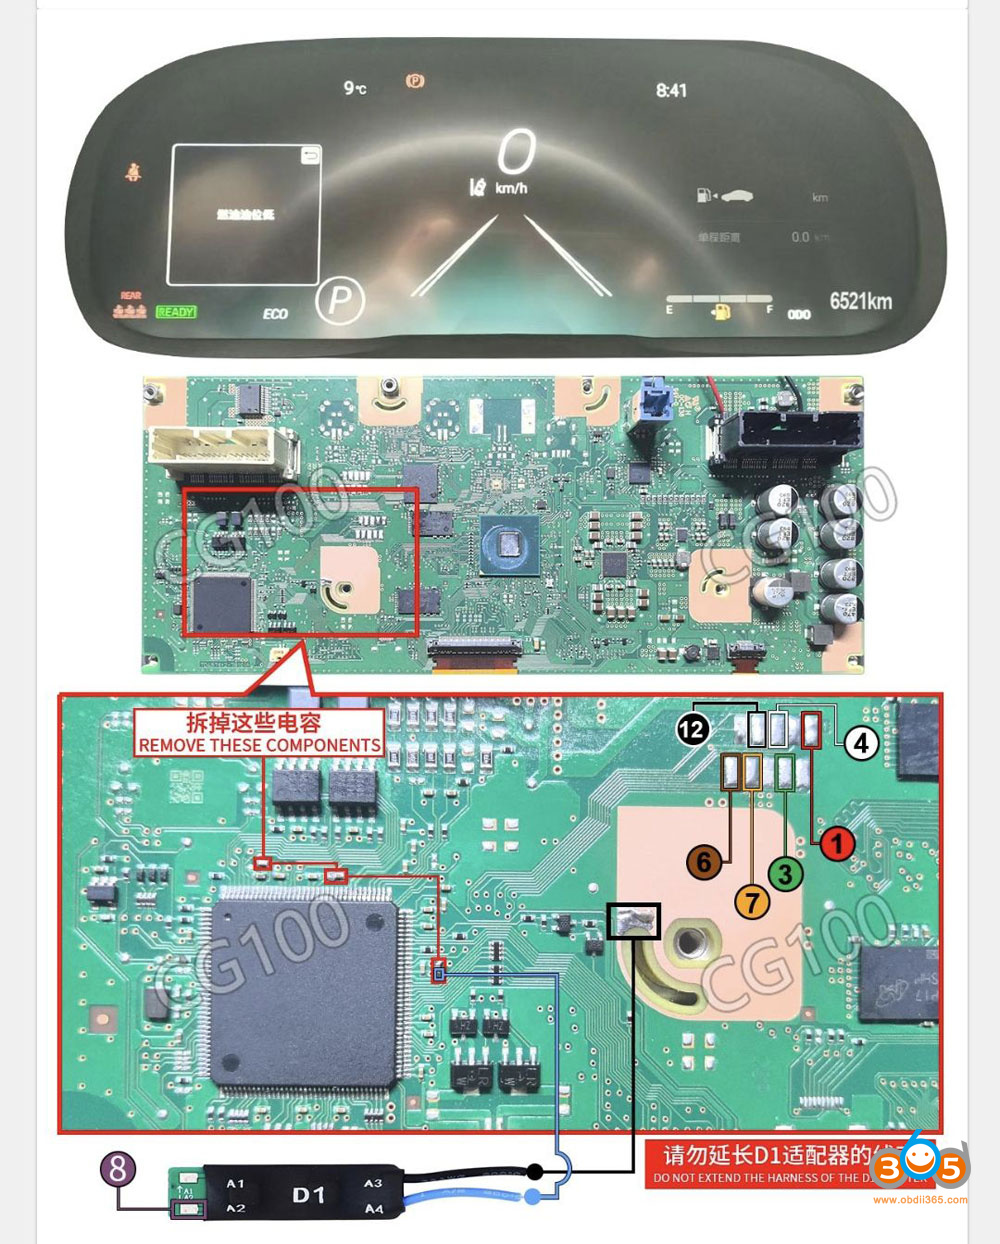
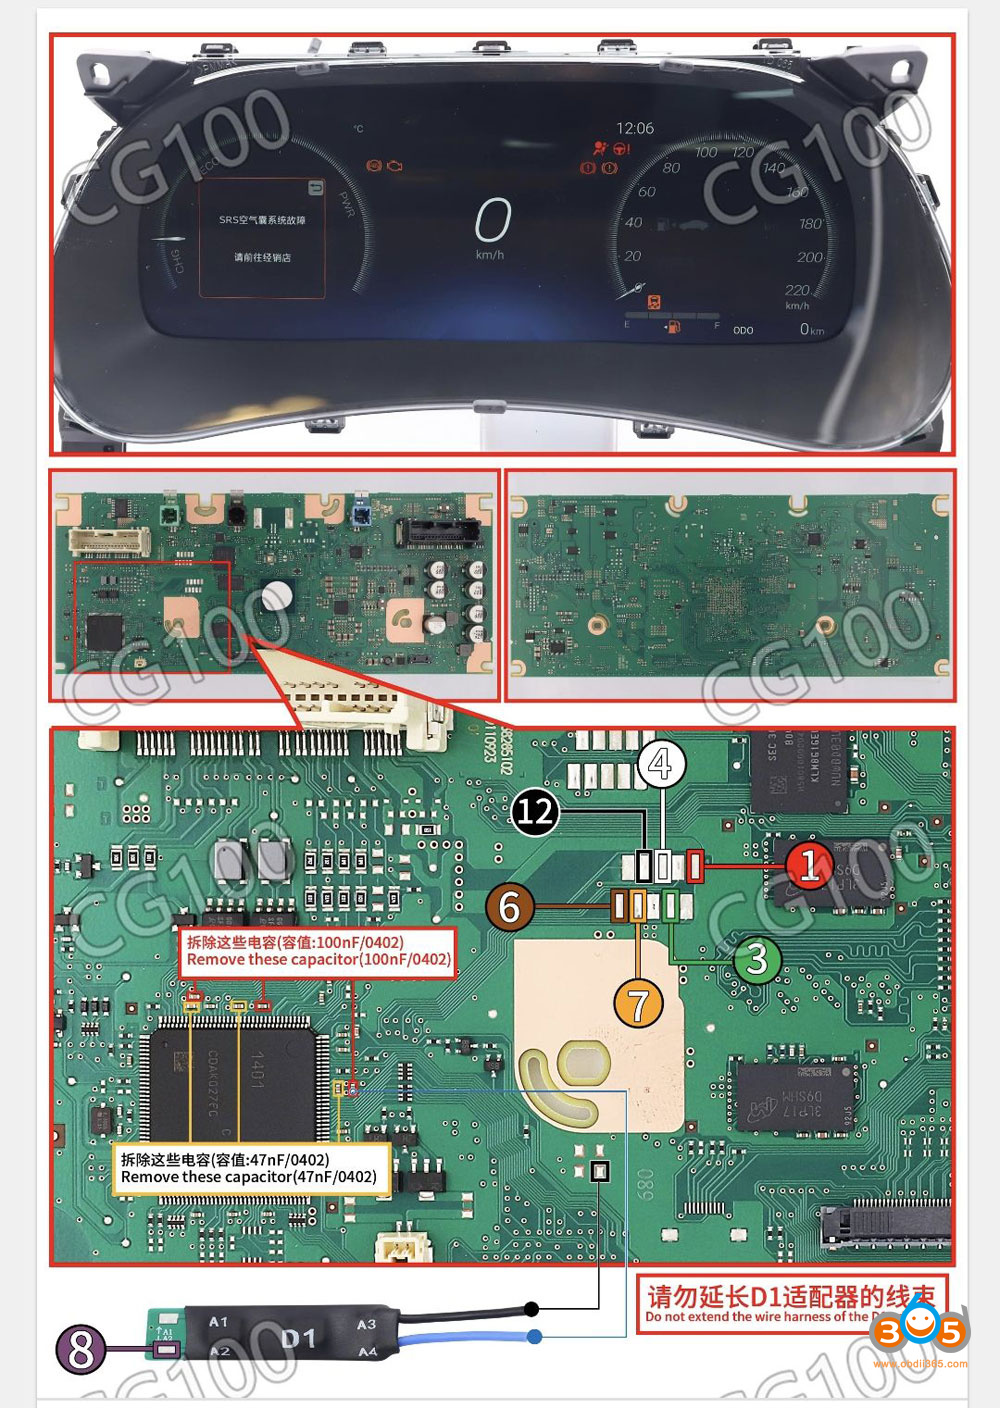
2023- R7F701401 Full LCD
This function requires network connection.
Make sure to check if the chip model and mileage data are read accurately.
Requires removing capacitors and connectingCG100X D1 adapter.
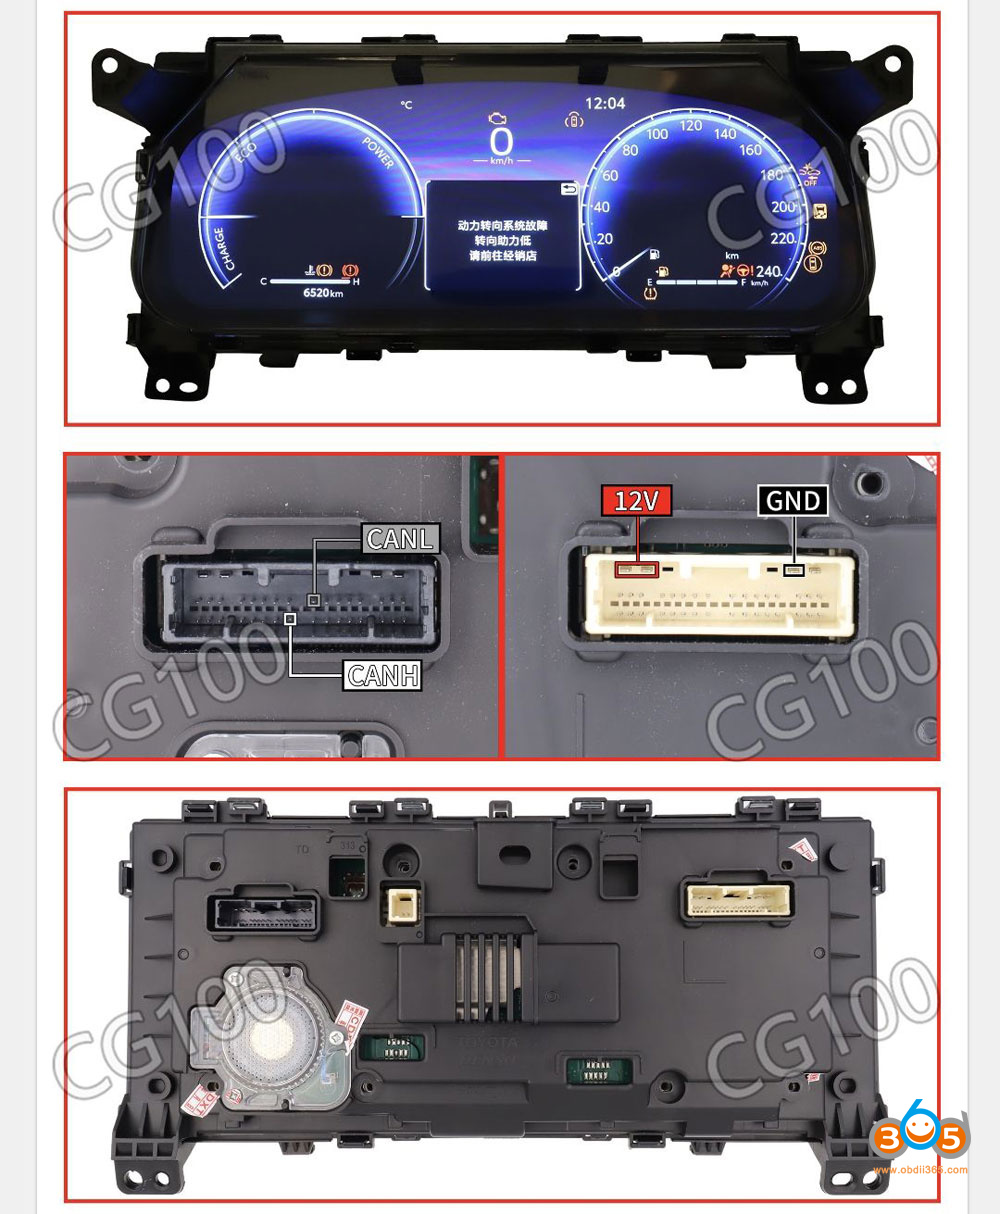
2024- R7F701401 CAN full LCD
This function requires network connection.
Make sure to check if the chip model and mileage data are read accurately.
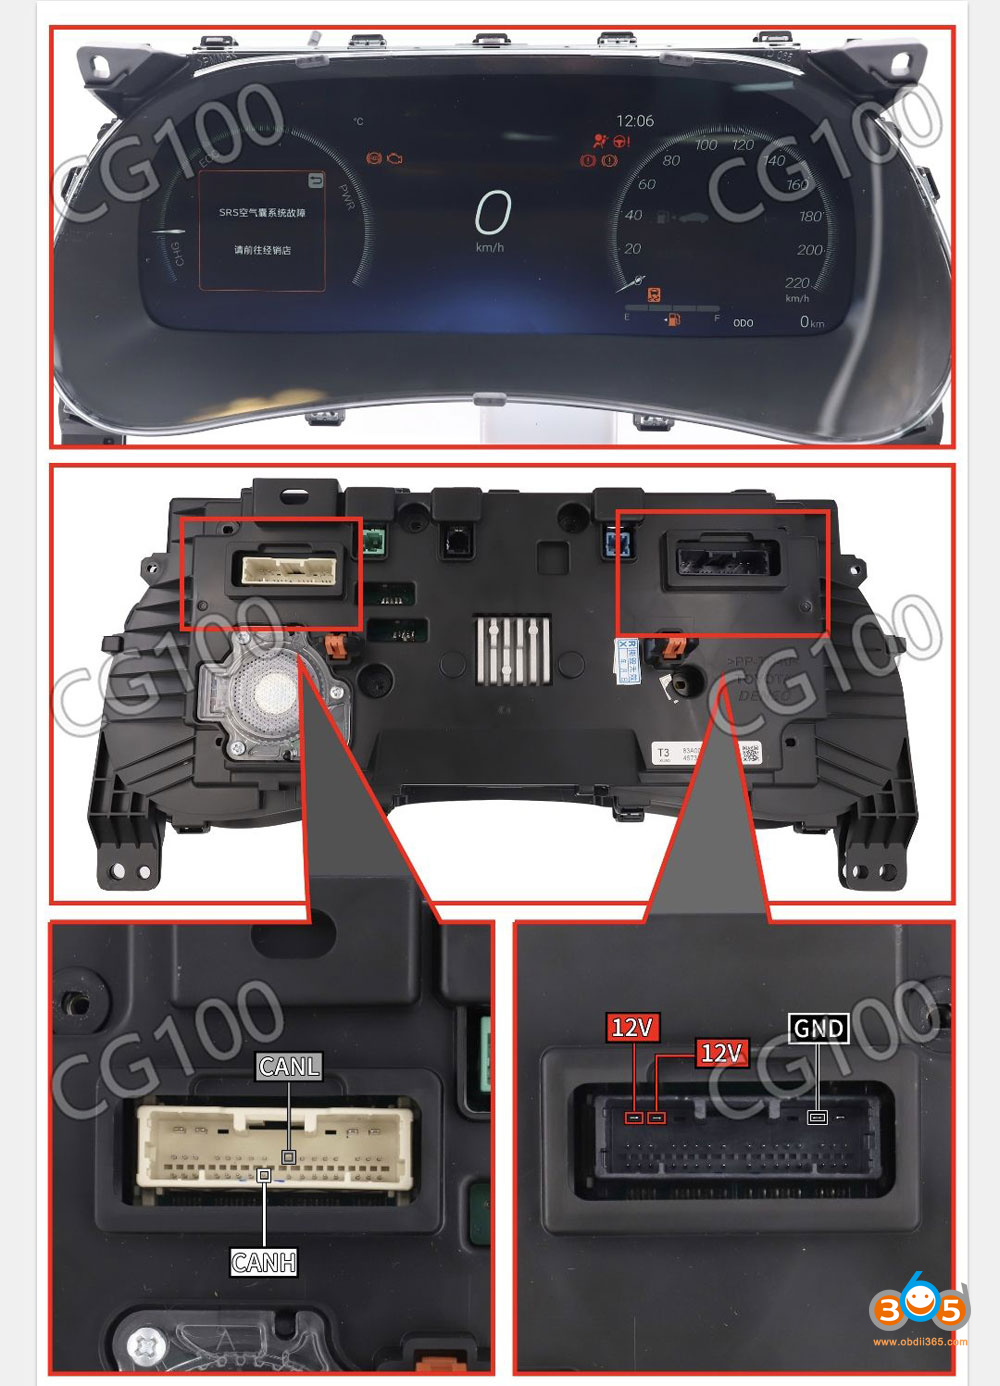
Posted by: jean at
09:52 AM
| No Comments
| Add Comment
Post contains 286 words, total size 11 kb.
October 19, 2026
As titled, here we will show how to program a spare 8A B8 smart key for 2025- 2026 Toyota/Lexus using Keydiy devices.
Model example: 2026 Lexus ES200.
Same procedure applies to other 8A B8 models.
Tools required:
- Keydiy KD-X6/KD-X4
- OBD extension cable (If use KD-X4, no OBD extension cable is needed)
- KD TIB smart remote(don’t use KD ZB remote)
- Keydiy Toyota 30 pin cable
- Original smart key
Procedure:
Step 1: Generate TIB remote
Open TIB remote shell and insert a battery.
Connect OBD extension cable with KD-X6 and connect the other end to the OBD main cable.
Connect the OBD main cable to the vehicle’s OBD connector.

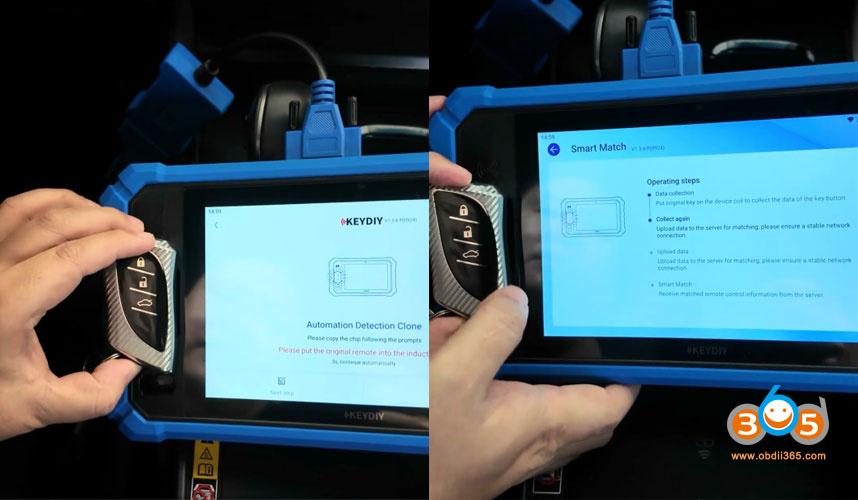
Go to Remote Function-Smart Match- Smart Match (Toyota 4D/8A).

Place the original key in the device’s sensing area.
Follow the prompts to collect original key data.

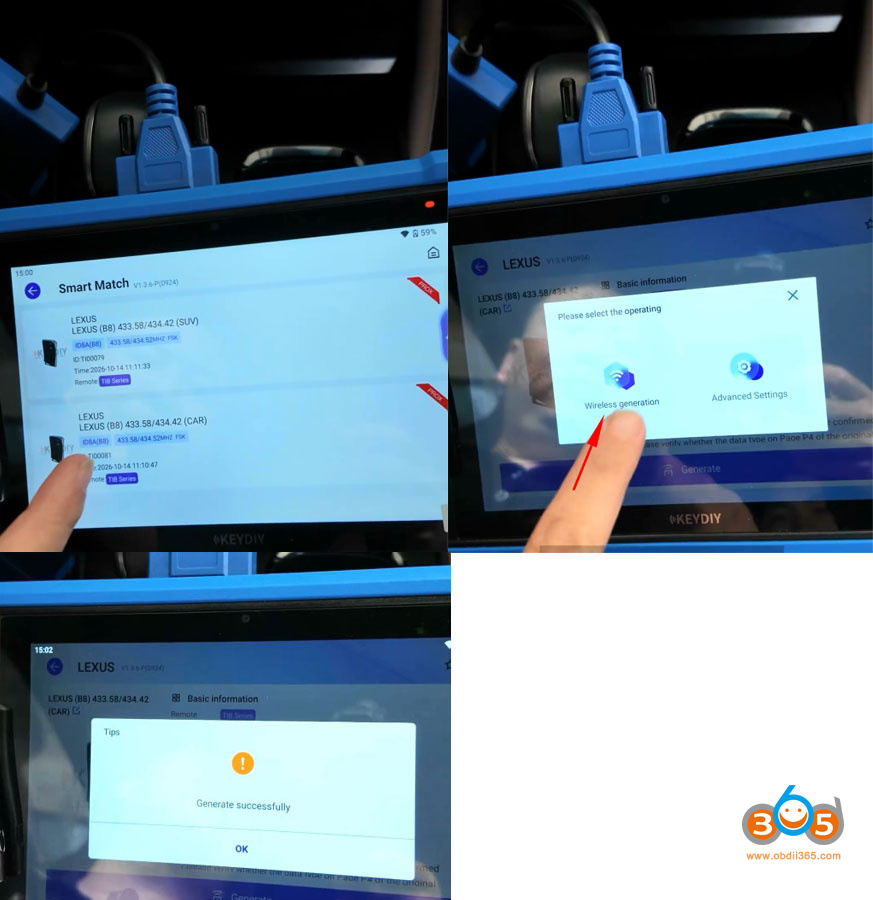
The detected result is Lexus B8. Frequency is 433.58/434.42MHz
Generate the program with KD TIB smart remote.
Choose Wireless Generation.
Put the KD TIB remote into the induction coil, press OK and proceed to the next step.
Press remote control any button to generate.
Generated TIB remote successfully.

Step 2: Back up immo data
Return to Home page.
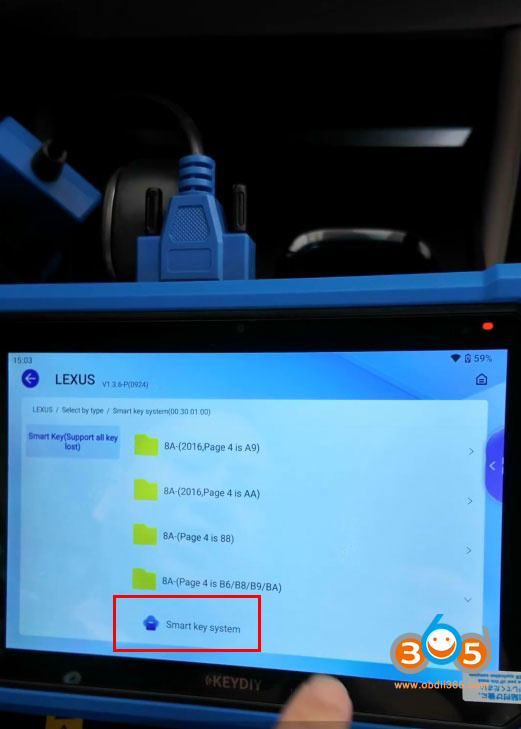
Select Programming function- Immo Programming- Lexus- Smart Key System.
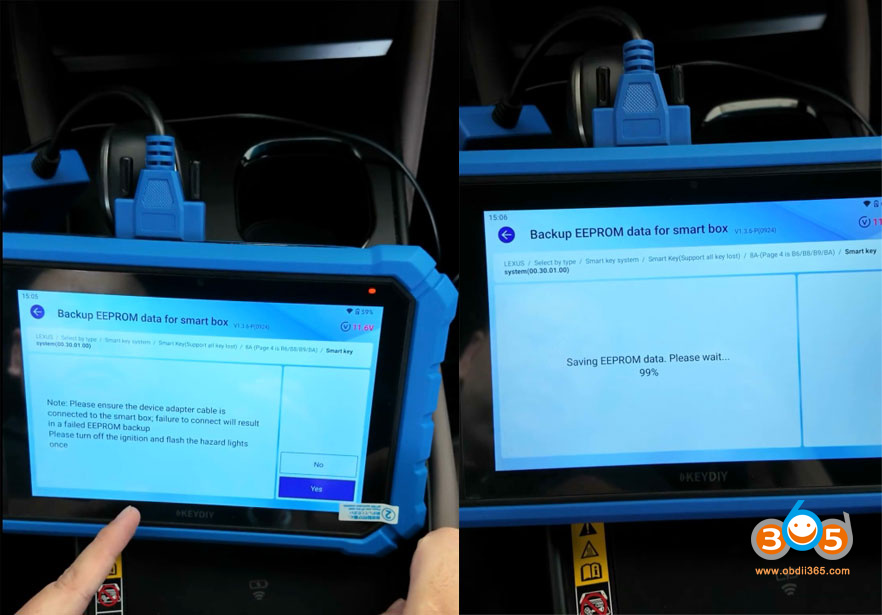
Back up EEPROM data for Smart box.


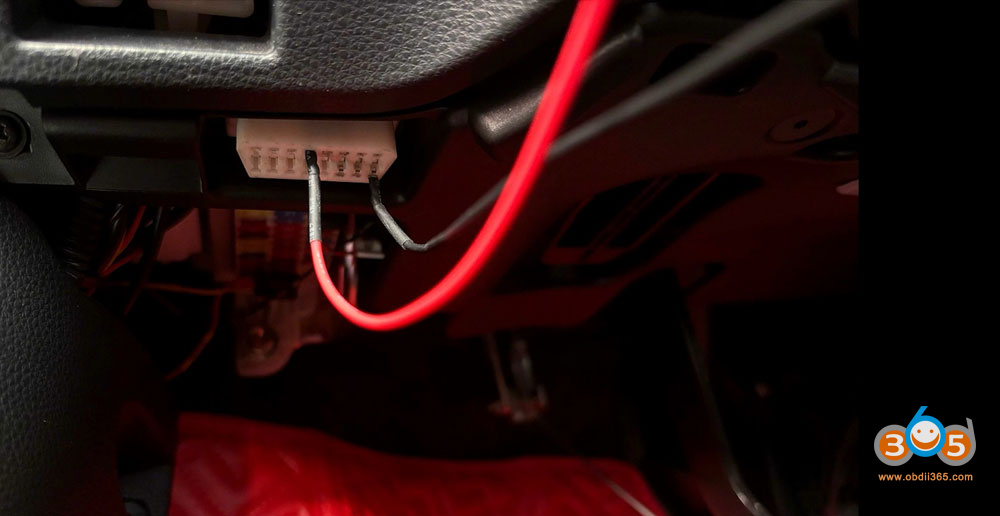
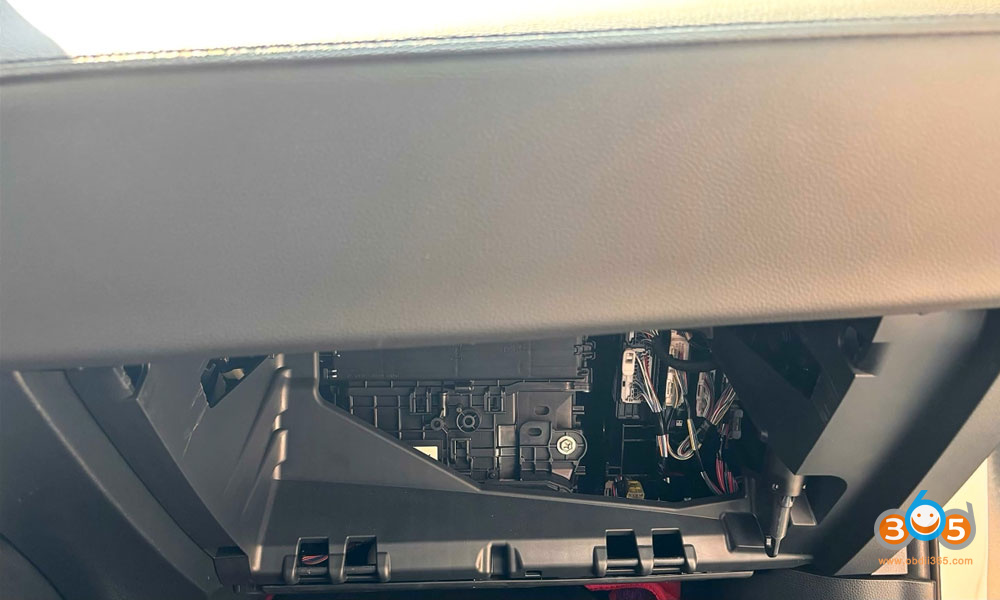
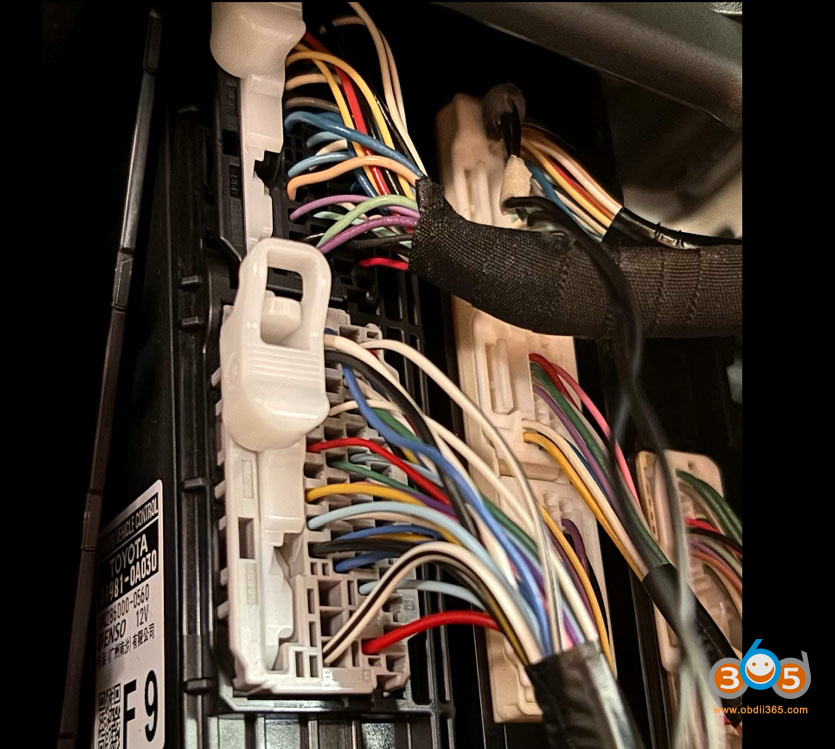
Connect the Keydiy Toyota 30-pin cable to the smart box under the cluster on the passenger side.
Then connect the adapter cable to the OBD function extension cable. Don’t use other Toyoa 30 pin cbale in case it does not fit the OBD extension cable.

Turn off the igntion.
Turn on and flash the hazard lights once and turn them off.
Read and save EEPROM Data.

Step 3: Add Smart Key
Then choose Add Proximity Key function.
We have backed up the eeprom data, hit Yes to continue.
Turn on the ignition switch.
The ignition switch turns on when the dashboard lights up.
Select we have a backup EEPROM option.
Load the EEPROM file we just backed up.

Hold a working smart key close to the start button.
After the buzzer sounds once, remove the key from the start button.
Then hold the generated KD TIB key close to the start button.
After hearing two beeps, remove the key from the start button.
The KD TIB key has been programmed successfully.

Test both keys and check if they are working properly.
Posted by: jean at
07:34 AM
| No Comments
| Add Comment
Post contains 397 words, total size 12 kb.
October 16, 2026
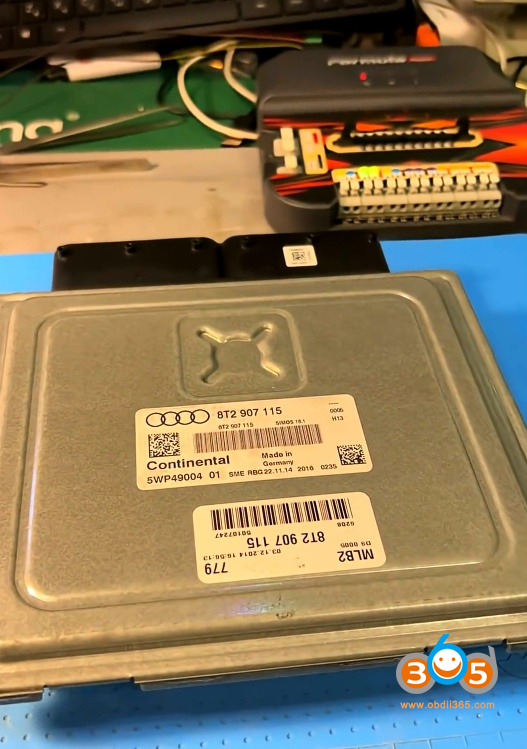
The Task: SIMOS 18.1
On the table we have an Audi SIMOS 18.1 ECU. Virtual reading doesn’t work in this case. We need to save data inside.

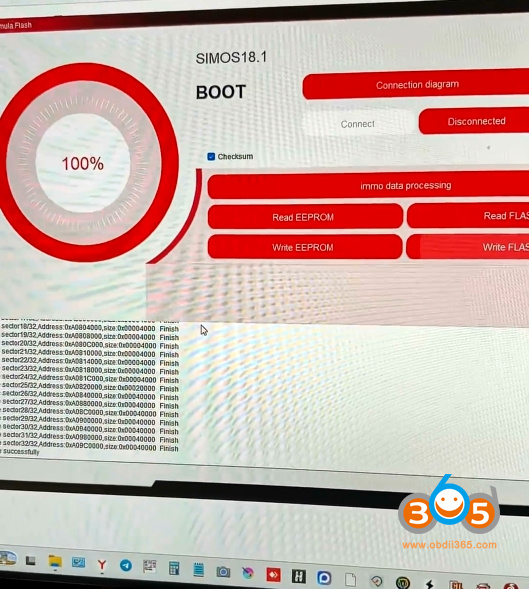
The Process: Boot Mode Reading withFormulaFlash
We’re waiting for the unit to heat up, then we’ll open it and pull everything out in boot mode — everything that’s inside. For the tests, we used the first unit and all the wires we possibly could.
Let’s check it. Right now we have this menu. Let’s try to connect. Power to the unit is on. It’s jumping. The process is underway. Waiting for a connection.
Power supply 13.6V.
Well, it read the EEPROM quickly. Now it’s reading the flash. Everything — let’s save it.


Checksum Verification
Formulaflash informed us that the checksums after the modification are naturally incorrect. It asked: "Should I fix it or not?” We answered: "Yes.” So it fixed it.
Now let’s check how well it calculates the checksum.

The Verdict
The FormulaFlash handled the job flawlessly in real-world conditions. From reading the eeprom and flash in boot mode to correcting the checksums after modification, the unit performed exactly as needed. A new beast in the gang, and it’s already proven itself in the field.
Posted by: jean at
08:35 AM
| No Comments
| Add Comment
Post contains 212 words, total size 7 kb.
October 15, 2026
Here obdii365.com lists top tools to add BMW F series BDC SWFL 085 version key by OBD.
1.Xhorse VVDI Key Tool Plus/VVDI2
Xhorse supports OBD pre-processing for BDC 085 key programming.
No E-NET, no DoIP. The patching takes about 10 minutes.
It cannot support mileage reset by OBD.
It is easier to work with the FEM/BDC unit using key tool plus than with Abrites.
.jpg)


2.Yanhua Mini ACDP2/ACDP1
Yes. ACDP providestwo optional methods to add BDC 085 key via OBD: DoIP and CAN method.
ACDP also has a data restore function. If 085 coding data is lost, go to Restore function.
Select original coding version and write coding data. There is always a risk but with ACDP it’s greatly reduced and has the capability to fix it when it happens.
ACDP is the only one that supports085 mileage reset.
Check instructions here:
3.Lonsdor K518 Pro
K518 Pro also does BMW BDC 085 Pre-Processing and add key via OBD.


4.Autel IM508/IM608 + XP400 Pro
Autel also supports pre-processing and adding the BDC 085 key via OBD.
Step 1: Back up coding
Step 2: Pre-processing ECU
Step 3: Read secret key
Step 4: Restore data
Step 5: Restore coding.


5.AVDI Abrites
Abrites has added support for key programming for BMW vehicles with BDC versions 85 and higher, by OBDII via the new BN015 license.
This license allows performing key programming for F-series vehicles with BDC modules COMPLETELY BY OBDII.
Supports ALL F-series vehicles with BDC module (BMW, MINI and Rolls Royce)
– BMW X1 (F4
– BMW X2 (F39)
– BMW X5 (F15)
– BMW X6 (F16)
– MINI Clubman (F54)
– MINI Hatch (F55/F56)
– MINI Convertible (F57)
– MINI Countryman (F60)
Other functionalities:
Mileage Calibration (dashboard excluded)
ISN read/write/change
6. Xtool Tablets +KC501
Xtool have made it possible to program BMW BDC I keys via OBD without disassembling the BDC module from the vehicle.
whether you’re using the affordable Xtool IP616 ($329) or the more advancedXtool X100 PAD3, H6 Pro orD9S Prowith the KC501 programmer.
Main steps:
Back Up Coding
Pre-Processing FEM/BDC
Add Key
Here is the instruction guide:
In sum:
Yanhua ACDP2 Yes, also does mileage reset
Xhorse VVDI Key Tool Plus/VVDI2 Yes
Lonsdor K518 PRO Yes
Keydiy KD-X4 No
Zed-FULL Plus No
Autel IM508S/IM608 II Yes
Smart Pro No
Abrites AVDI Yes, also does mileage reset.
Xtool X100 PAD2/PAD3 Yes
APPRO2 Yes
Posted by: jean at
07:30 AM
| No Comments
| Add Comment
Post contains 425 words, total size 11 kb.
October 14, 2026
Autel MaxiIM IM508S and IM608 II series now support programming Toyota 8A_BA and 4A_BA proximity all keys lost. Take an example of a 2024 Toyota Frontlander HV.
Tools requires:
- Autel IM608 II/IM508S+ XP400 Pro
- Autel APB112 emulator
- 4 jumper cables
- new key to be programmed

Main steps:
- Back up immo data
- Generate analog key
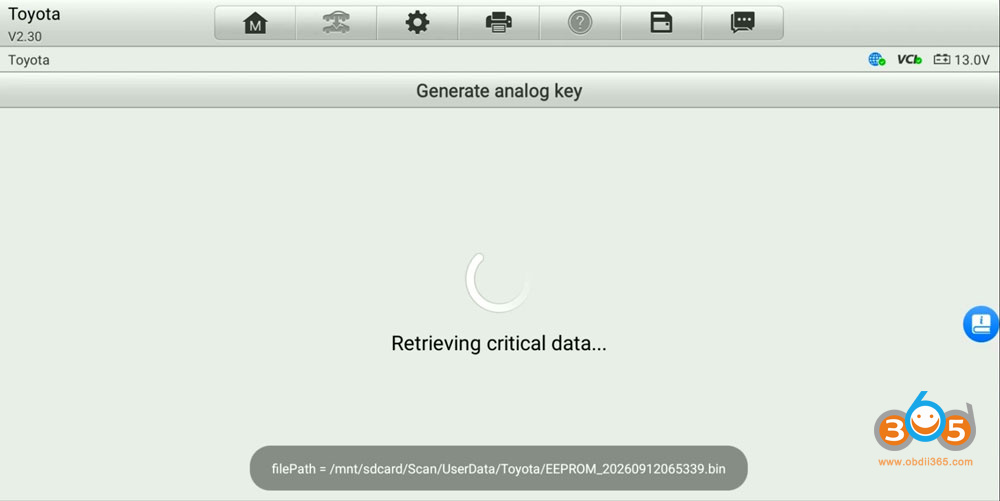
- Add smart key
Procedure:
Step 1: Back up IMMO Data
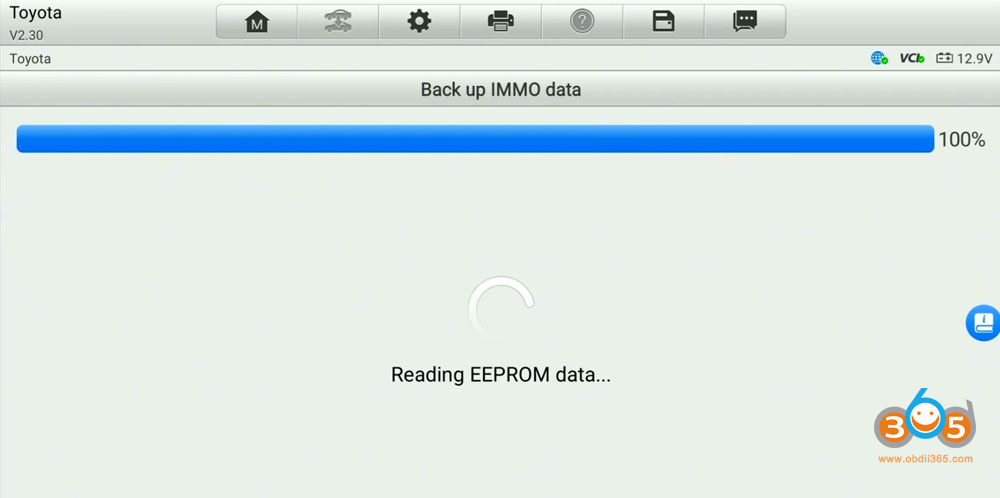
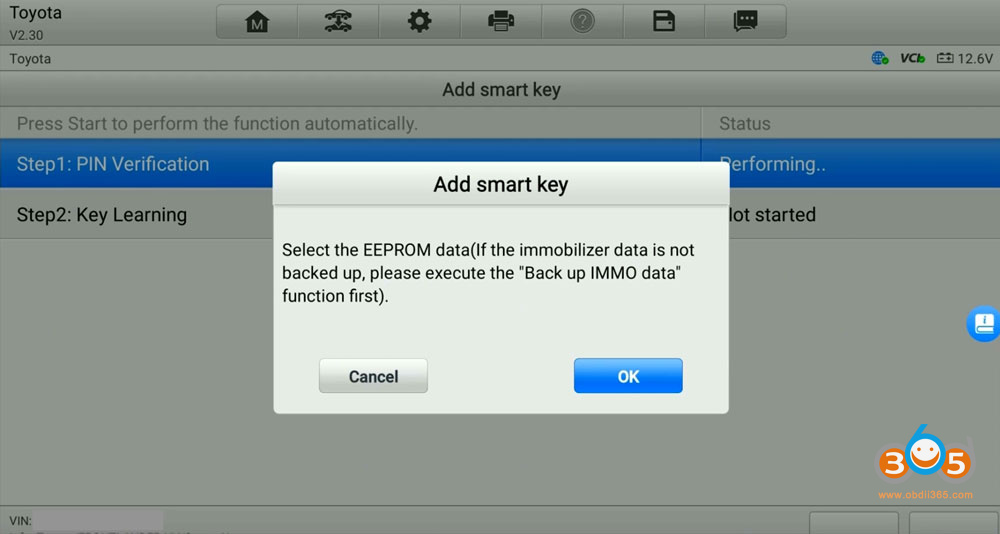
Perform the "Back up IMMO Data” function to obtain the vehicle’s eeprom bin file, which is used to generate an analog key and facilitate the PIN-free process.
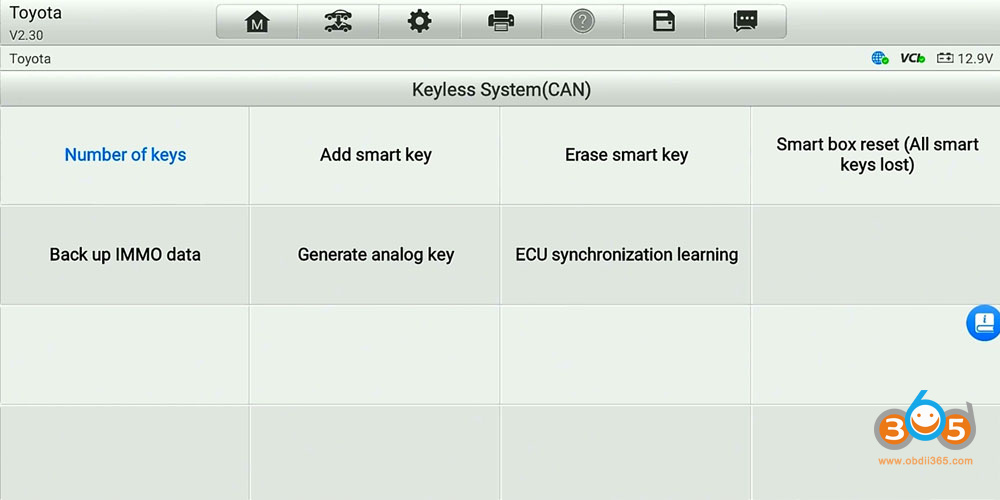
Menu path: Toyota- Manual selection- Other- Frontlander HV- Smart Key-4A- Control Unit- Keyless System (CAN).


Select Back up IMMO Data function.

This function supports models with 4A Smart key as of 2022.

Enable network connection.
Turn the ignition off and turn the hazard warning lamps on and off once.
Follow the operation guide to connect jumper wires to the smart box.
Connect the OBD-II diagnostic connector of the vehicle, the smart main control module A connector and the main test cable using flying wires as shown in the figure (Note: Location of the smart main control module may vary with vehicle model):
Connect the main test cable to the OBD-II diagnostic connector of the vehicle using a flying wire and connect the power supply (+12 V) and ground (GND).
Connect the main test cable to the smart main control module A connector using a flying wire and connectCAN-H and CAN-L.As shown in the figure, connect CAN-H to the smart main control module A connector pin 1 cable and CAN-L to the smart main control module A connector pin 2 cable using spliced wires.


Connect the jumper cable with smart box.


Read and save immo data.

Step 2: Generate Analog Key
Perform the "Generate analog key” function by loading the backed-up EEPROM bin file, generate the analog key and verify that its emergency ignition function works correctly.

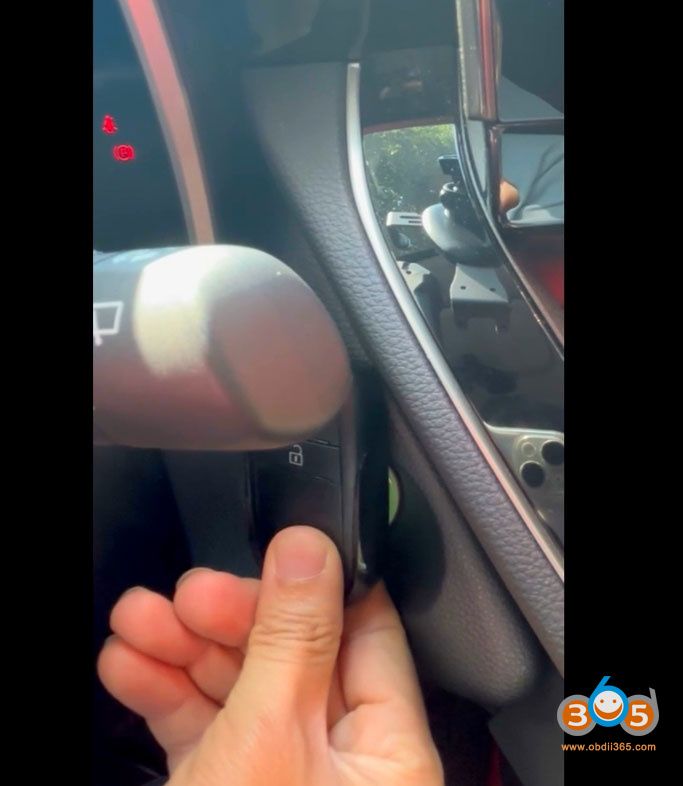
Connect APB112 emulator.

Put the APB112 emulator on the Start button.
Generate the analog key successfully.

Step 3: Add smart key
Disconnect the jumper wire and connect the diagnostic connector directly to the vehicle’s OBDII port.
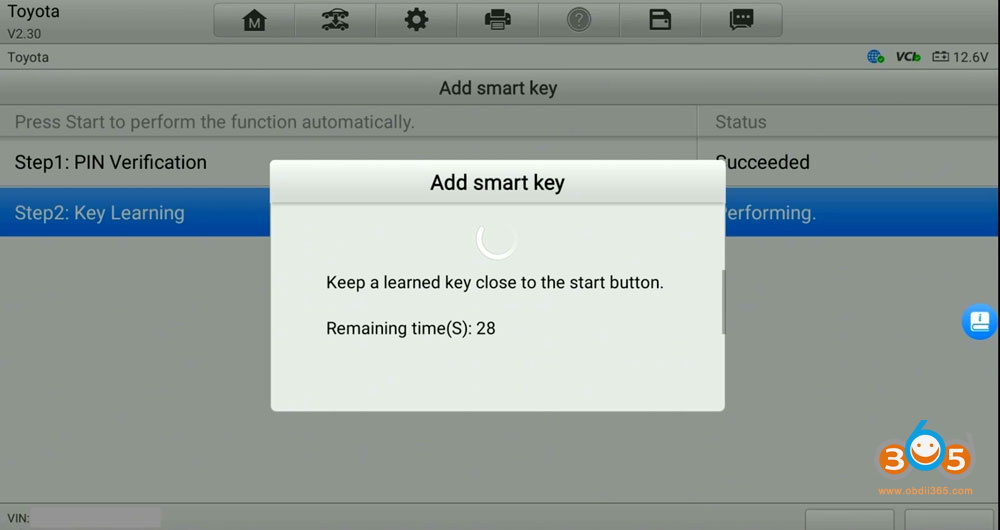
Perform the "Add smart key” function by loading the backed-up EEPROM bin file to enable PIN-free operation.
Follow Autel prompts to verify PIN and learn key.


Test the new key.
Posted by: jean at
07:20 AM
| No Comments
| Add Comment
Post contains 396 words, total size 20 kb.
October 13, 2026
Register a G3 (Must be full configuration) between Oct 15–31 — whether it's a new device or a previously unregistered one. Submit the serial number of your old OBDSTAR tablet (DP Plus, X300 Pro4, DC706 or P50) to us. You will get6 months of G3 update service for free.
The extra 6-month update service applies only toX300 CLASSIC G3 FULLversion devices registered from Oct. 15–31, 2026; it extends the update period only, with no hardware replacement or software package included, and is non-cashable, non-transferable, non-extendable, and cannot be carried over.
If the device was shipped during the event but the customer hasn't received it yet, an order screenshot can be submitted instead. The 6-month free update will be added once the customer receives the device and completes registration. Note: This must be done within one month.
Eligible Old Models (OBDSTAR Only)
- X300 DP PLUS
- KEY MASTER DP PLUS
- X300 PRO4
- KEY MASTER
FAQ
Q: Do I need to return my old device?
A: No. This is an upgrade benefit program. Only the old device serial number needs to be verified, and the old device does not need to be returned.
Q: Can the extra 6-month update service be used on another device?
A: No. The bonus update service is bound to the newly registered X300 CLASSIC G3 and cannot be transferred.
Q: Can I still get the extra 6 months if I purchase G3 after the event ends?
A: No. This offer is only available during Oct. 15–31, 2026 and is a one-time exclusive offer.
Q: Can I participate if my old device serial number is invalid or cannot be verified?
A: No. Only valid and verifiable serial numbers are eligible for the bonus update service.


Posted by: jean at
07:43 AM
| No Comments
| Add Comment
Post contains 309 words, total size 2 kb.
October 12, 2026
Programmed Seat Leon 2016 MQB48 all keys lost using OBDSTAR X300 Classic G3 and MP001.
Blade key. Manual gearbox.
Tools used:
MP001
New key to be programmed
Read MQB48 cluster with G3 and RH850 adapter.
Read gearbox TCU with G3.
Read engine ECU MED17.5.25 with G3.
Load cluster, gearbox and ECU data to get sync data for free.
Load cluster and sync data to generate dealer key.
Then learn key in car.
Done.


Posted by: jean at
06:30 AM
| No Comments
| Add Comment
Post contains 91 words, total size 6 kb.
30 queries taking 0.1614 seconds, 214 records returned.
Powered by Minx 1.1.6c-pink.