


February 14, 2023
One of obdii365.com customers got thebmw icom software hddbut when run E-sys Plus 3.8.1 it asks for a certificate license. Where to get the license and how to activate it?

Obdii365.comhere provides E-sysPlus 3.8 free download resource.
Free download E-sys Plus 3.8.1 with Keygen
Files list:
E-Sys_Setup-3.35.3-b27465a_64bit.exe
ESysPlus3.8Setup.exe
readme.txt
keygen->
EsysPlus38KeyGen.exe
gz.exe
HardwareID38.exe
libeay32.dll
Plus.Token
Languge: English, Germany
OS Requires:Win7,Win8 and Win10
Compatible devices: BMW ENET cable,VXDIAG VCX SE BMW, BMW ICOM/ICOM Next,OBD ENET WIFI/USB Cableetc

Step to install and register Esys Plus 3.8.1 software
1.Install e-sys 3.35.3.
2.Install e-sys plus3.8.1.
3.Run e-sys for first time, and then close it.
4.Run e-sys plus, add the e-sys shortcut and then "launch e-sys”.
5.Copy all files in "keygen” folder to the installation location of e-sys plus.
6.Run HardwareID38.exe and copy the request code andafterwardclose table.
7.Run EsysPlus38KeyGen.exe and paste the request code on last step.
8.Run Gz.exe, Done!


Posted by: jean at
08:01 AM
| No Comments
| Add Comment
Post contains 155 words, total size 5 kb.
February 13, 2023
Problem:I have anAutel IM608 JVCI j2534, Why do I only get these 2 options to pick from, when I go on YouTube they have more then 10 on there, trying too reprogram a tcm with gm new software techline.

Drivers are missing.You'll need to download Autel's Suite, drivers will be able there. Windows 10 PRO is required.
https://www.autel.com/u/cms/www/202211/040800364oh9.zip
Posted by: jean at
07:21 AM
| No Comments
| Add Comment
Post contains 86 words, total size 2 kb.
February 10, 2023
Autel M*808 series scanners have similar features and functions of the same brand. Many people become bewildered when it comes to choosing one of these scanners. They cannot be differentiated by just looking at them.
The article will help you decide on which scanner to pick for your needs.
Part I: Autel MK808 vs MX808 vs MP808
First of all, check a table comparison below:
| Autel MaxiCOM MK808 | Autel MaxiCheck MX808 | Autel MaxiPro MP808 | |
| Price |
$369 |
$449 |
$578 |
| Update Cost | $110/ year | $110/year | $350/year |
| OBD2 Functions | 10/10* | 10/10 | 10/10 |
| System Diagnostics | 10/10 | 10/10 | 10/10 |
| Service Functions | 25+ | 28+ | 30+ |
| Bi-Directional Control | Yes | Yes | Yes |
| Coding/Programming | Injector coding Key programming. |
Injector coding Key fob programming. |
ECU coding Injector coding Key fob programming TPMS programming (TS version) Key Programming. |
| RAM | 1GB | 1GB | 1GB |
| Storage | 32GB | 32GB | 32GB |
| Battery Storage | 3.7 V/5000 mAh lithium-polymer battery. | 3.7 V/5000 mAh lithium-polymer battery. | 3.7 V/3200mAh lithium-polymer battery. |
| Operating System | Android™ 4.4.4 powered by Cortex-A9 processor (1.5 GHz). | Android™ 4.4.4 powered by Cortex-A9 processor (1.5 GHz). | Android™ 4.4.4 powered by Cortex-A9 processor (1.4 GHz). |
| Supported Vehicles | OBD2 cars, SUVs, 12V trucks | OBD2 cars, SUVs, 12V trucks | OBD2 cars, SUVs, 12V truc |
Similarities
TheAutel MK808, MX808, and MP808 have 25+, 28, and 31+ service functions, respectively.They have most of these functions in common.So, you don’t lose much for choosing one over the other. However, if you want more reset and maintenance functions, you may consider the MP808. It has the most number, making it the best for mechanics, though it’s also the most expensive.
The Autel MK808, MX808, and MP808 are not advanced tools regarding coding and programming.Autel MK808 and MX808 can only code injector and program keys, but MP808 can code injector, program keys and key fobs, program TPMS, and codeECU.With its more advanced IMMO capability, MP808 can rewrite smart keys, replace smart key ECU, replace KNOB IGNITION, and relearn a key.
Part II: MP808 Series
First of all, check a table comparison among MP808 series
Autel MP808 vs MP808K vs MP808BT vs MP808TS
| Product | MaxiPRO MP808BT | MaxiPRO MP808 | MaxiPRO MP808k | MaxiPRO MP808TS |
| Basic Diagnostic Functions | ||||
| Read Codes | √ | √ | √ | √ |
| Erase Codes | √ | √ | √ | √ |
| Live Data | √ | √ | √ | √ |
| ECU Information | √ | √ | √ | √ |
| Active Test | √ | √ | √ | √ |
| Special Functions | √ | √ | √ | √ |
| Complete OBD Diagnostics | √ | √ | √ | √ |
| Services | ||||
| Oil Service Reset | √ | √ | √ | √ |
| EPB Reset | √ | √ | √ | √ |
| Steering Angle Sensor Relearn | √ | √ | √ | √ |
| Battery Registration and Reset | √ | √ | √ | √ |
| DPF Regeneration | √ | √ | √ | √ |
| Tire Pressure Monitoring System | √ | √ | √ | √ |
| IMMO Key Coding | √ | √ | √ | √ |
| ABS Bleeding | √ | √ | √ | √ |
| Throttle, Injector,Odometer…. | √ | √ | √ | √ |
| Complete TPMS Functions | ||||
| Advanced TPMS Diagnostic | √ | √ | √ | |
| Activate 98% TPMS Sensors | √ | √ | √ | |
| Program Autel MX-Sensors | √ | √ | √ | |
| OBD Relearn Coverage | √ | √ | √ | |
| On-Screen Relearn Procedure | √ | √ | √ | |
| Supported Languages | 13kinds | 13kinds | Egnlish | 13kinds |
| Vehicle Coverage | 140+ | 80+ | 80+ | 80+ |
| Hardware Configurations | ||||
| Processor | Cortex-A9 quad-core processor (1.4 GHz) | Cortex-A9 processor (1.5GHz) | Cortex-A9 quad-core processor (1.4 GHz) | Cortex-A9 processor (1.5GHz) |
| OS | Android™ 4.4.4, KitKat | Android 4.4.4 | Android™ 4.4.4, KitKat | Android 4.4.2 KitKat |
| SSD Hard Drive | 32GB | 32GB | 64GB | 32GB |
| Touch Screen Display | 7″ LCD | 7″ LCD | 7″ LCD | 7″ LCD |
| Connectivity | Mini USB 2.0,USB 2.0,Wi-Fi,Micro SD card | Mini USB 2.0; USB 2.0; Wifi; Micro SD Card |
Mini USB 2.0 USB 2.0 Wi-Fi Micro SD card |
Mini USB 2.0; USB 2.0; Wifi; Micro SD Card |
| Internal Battery | 5000mAh | 3200 mAh | 5000 mAh | 5000 mAh |
| Camera (Rear) | × | × | × | × |
| VCI Connection | √ | × | √ | √ |
| Vehicle Communication Method | Wireles | Wired | Wireles | Wired, Bluetooth |
| Auto VIN Technology | √ | √ | √ | √ |
Autel MaxiPRO MP808 Pros and Cons
Pros
- Diagnose all systems, including powertrain, transmission, and more
- Performs active component tests
- Save, access, and print reports through Data Manager
- 7” touch-screen offers smooth, intuitive navigation
- Service functions include ABS bleed and DPF regeneration
- Compatible with all OBD2 protocols and 80 manufacturers
Cons
- Reset and programming functions less extensive than with MS906
- No compatibility with OBDI vehicles
Autel MaxiPRO MP808TS Pros and Cons
Pros
- It is easy to use as it comprises an intuitive user-interface
- Autel MP808TS is simple to read and interpret results.
- It operates fast and efficiently.
- Performs various functions
- It has superior functions for TPMS.
- Autel Maxipro MP808ts features an automatic system and software updates.
- It supports wireless connection.
- Cloud-based MaxiFix offers diagnostic tips and fixes.
Cons
- It is slightly costly.
- Several users have complained about compatibility problems.
- The update fee after the free update is quite costly.
Autel MaxiPRO MP808K Pros and Cons
Pros
- Extensive vehicle coverage
- Performs a variety of functions
- It is sleek and compact
- Easy to use with a user-friendly design
- 12-month free updates
- 1-year warranty
Cons
- It has compatibility problems
- It is somehow slow
Part III: MaxiSys MS906 vs MP808
Posted by: jean at
07:41 AM
| No Comments
| Add Comment
Post contains 1429 words, total size 17 kb.
February 09, 2023
2018+ new Toyota RAV4/Corolla/Yaris (hybrid and not hybrid) has secured processor spansion mcu S6J3001LSJ. There is also a RH66 chip but the km data is not stored in it.
What tool allows you to adjust the mileage of Denso panels with MCU S6J3001LSJ?


Check options below:
1. The cheapest option will beCG100 Prog IIIprogrammer.
Corolla 2020- S6J3001 MCU pinout to cg100 prog

RAV4 2019-2021 S6J3001 pinout to cg100

Yaris S6J3001LSJ pinout

If need S6J pinouts for other Toyota models, openCG100software and check.
cg100 will read, modify and write data. If failed to modify data, send original mcu data to CGDI engineer to modify manually (contact sales@obdii365.com)
The detailed procedure can be found here
Option 2: iProg pro original
iprog pro original +cardiag script.
The script allows you to adjust the mileage of Denso panels with MCU S6J3001LSJ in Toyota Camry V70, RAV4, Corolla, Altis, Lexus LS, Honda Accord, Hyundai Kona, Hyundai Kona Electric (UART) .
The script reads / writes the WorkFlash dump, the built-in calculator automatically determines the mileage.
NOTE:Iprog clonewill not do s6j mcu.

RAV4/Corolla S6J3001LSJ pinout to iprog

Option 3: DigiProg 4
digiprog4 will do follow S6J mcu mileage correction
- TOYOTA CAMRY 2018 DENSO (S6J3001LSJ) – programming – Program nr. 114.
- TOYOTA RAV4 2019– DENSO (S6J3001LSJ)
- TOYOTA COROLLA 2019– DENSO (S6J3001LSJ) – programmingvia C21– Programnr. 152.

Option 4: Other tools
Xtool, mtool stool cpt ori., SMOK jtag, enigma, dashcoder4 etc.
Dashcoder4 have already new update fusjitsu and spansion just 30/40 seconds.
Posted by: jean at
06:57 AM
| No Comments
| Add Comment
Post contains 261 words, total size 9 kb.
February 08, 2023
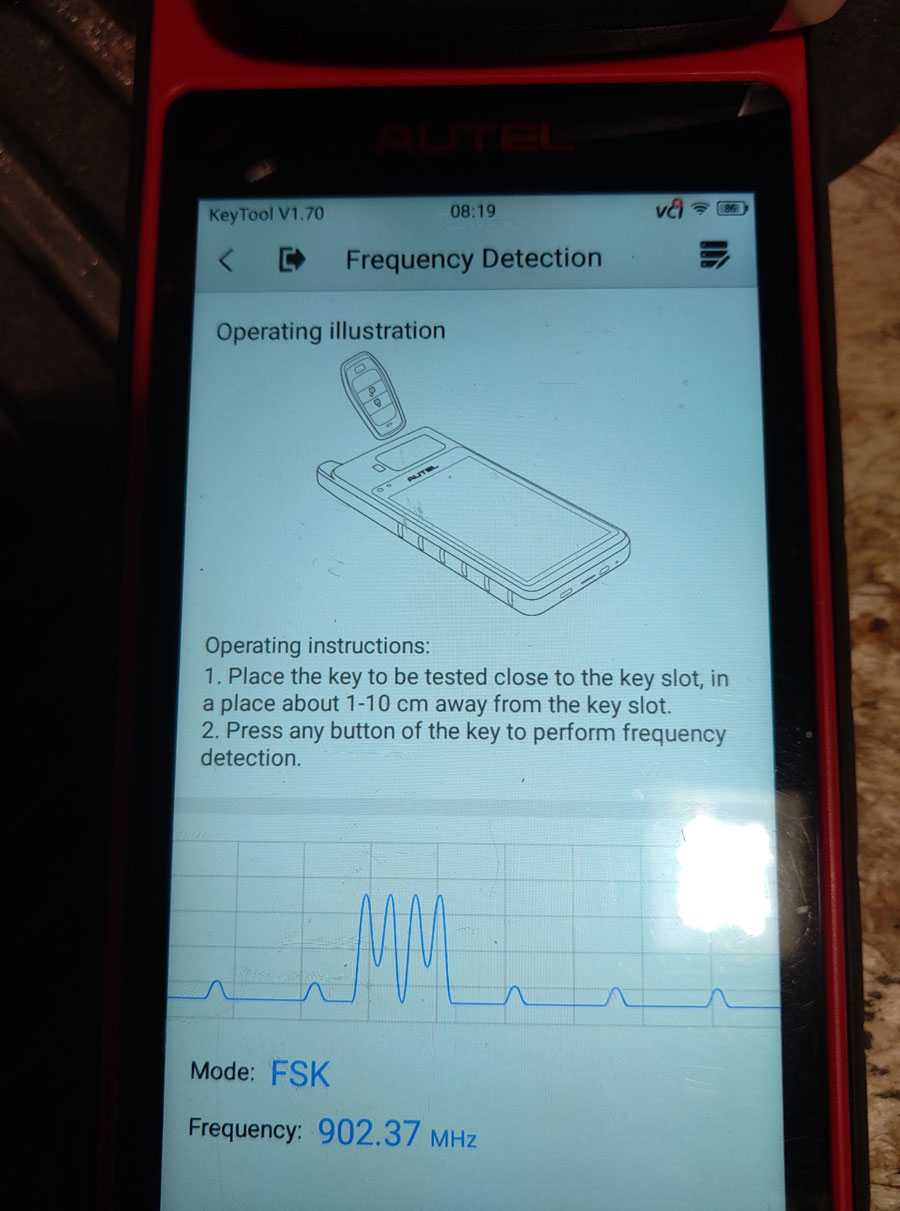
If you are generating 902 mhz for ford you have to use the right fobs.
If you are trying to prevent the future purchase of OEM smart key fobs for newer Ford vehicles running 900+MHz FSK ID49, Autel is the solution.
Autel keys will save you $300-450 for a dual set of OEM fobs.
How to Generate Ford ID49 902MHz Remote withAutel KM100/IM508/IM608/IM608 II?
Go to Universal Key Generation function.
Choose correct model FCC and ID to generate Ford ID49.
Key is very important.Must generateAutel universal ikey smart key.
Has to be the right one. "H” part number not "L”. MAKE SURE TO ORDER "H”.

The other ikeys are 315/433mhz, you will get this message (hardware does not support the frequency) if trying to generate those remotes for Ford ID49 high frequency.

With the right key, the 902mhz would get addressed pretty quick.
Successfully generated 902 mhz with universal obtained.
use CR2450 battery

Check here for Autel/iKey coverage
https://www.obdii365.com/upload/pro/22081016601970593974.pdf

Posted by: jean at
07:48 AM
| No Comments
| Add Comment
Post contains 168 words, total size 5 kb.
February 07, 2023
Problem:
Just did and add key on a 2022 Toyota Camry push to start withAutel IM608 proand the keys start the car but the remotes don’t do anything.
key is brand new from Toyota and customer’s original key starts the car but no remote. It is not the problem of key.
Solution:
I had this same problem a while ago with Camry 2023 AKL and had to use smart pro to re synce the keys and then it worked.
You need to sync remotes again. You have to register the ID’s back to the smart box.
It’s a common problem with those new style Toyota keys. Have to re-register remote id’s.
Autelhas the feature you have to go under Diagnostics->Control module->Special function, click on the ECU communication ID registration.
The ECU communication ID should be registered when the transponder key ECU and/or the ECM is replaced in order to match it to the ECM COMMUNICATION ID.

Posted by: jean at
07:02 AM
| No Comments
| Add Comment
Post contains 165 words, total size 2 kb.
February 06, 2023
Autel and sync data for VAG MQB system:
If someone will save withAutel MaxiIM IM508/IM608/IM608 PRO/IM608 IIthe syncdata after preparing the dealer key, here are the instructions.
Works only if original key is available.
- read immo data and save the CS
- generate with CS and data from original key a dealer key
- do not learn the key
- go into key menu read the key and read the eeprom from the dealer key and save it
- now you can learn the dealer key to the car.
If sometime this car have an All keys lost situation you can program/learn the key (or aftermarket keys ) with CS and sync data which you have saved.
Here you find the sync data in the key eeprom which are readed after generated dealer key.

It’s for Autel users.
Xhorse VVDI key tool plusandVvdi2generate sync data automatically.
NOTE: Neither Autel nor Xhorse will retrieve sync data. You need to obtain from 3rd party.
Posted by: jean at
07:45 AM
| No Comments
| Add Comment
Post contains 168 words, total size 2 kb.
February 04, 2023
Special programming clip can be used to connect to BMW FEM and BDC 95128 / 95256 chips without soldering. It also eliminates the stress of trying to hold down the clip while reading and writing the chip, since the clip holds itself in position safely and reliably.
Traditional solution for burning chip needs: First disassemble the chip, then re-weld it back after burning. The operation is very troublesome and very easy to damage the chip.
Obdii365 here listed the top BMW FEM/BDC clip adapters in the year 2023.
Top 1. NewYanhua BMW FEM/BDC Clip Adapter
The safest one- YANHUA FEM/BDC special programming clip is used to connect 95128/95256 chip without removing and soldering the chip when pre-processing BMW FEM/BDC module.

Advantages:
- Program FEM/BDC to add keys/all keys lost/change km
- Clamping fast, safe and reliable, not easy to slip, and has simple positioning
- Function is as same as FEM/BDC puncture socket, butmade easier and more stable with a clip
- No need to worry the thickness of the paint on the chip
- Compatible withYanhua ACDP,CGDI,VVDI,Autel, Xtool, Launch X431 and many other FEM/BDC programmers together
How to Install the Yanhua Clip Adapter?


Video reference:
Top 2. Classic BMW FEM/BDC Clip Adapters SOP8
This SOP8 clip is a great solution for burning the chip without disassembling the chip, saving soldering time and making flash BIOS simpler and more efficient.
There are many different classic BMW FEM/BDC SOP8 clip socket adapters for around $15. These are common ones.
VXSCAN FEM/BDC Clip adapter SOP8
Yanhua FEM/BDC Clip adapter SOP8(better quality)

Advantages:
1. Cheap
2. Easy to install, easy to use, no complicated operation is required, just plug and play, convenient for using, save your time and energy.
3. Compatible with multiple ecu/key programming tools.
Disadvantages:
1. cheaply made and less reliable
2. The clip was easly worn out. need these pliers to fix bios chips on mainboards quite often. Pins from the clip come off the plastic way too easy. Soobdii365.comdoes not have these clip adapters for sale.
Do not forcibly press down when clamping, first open the clip and clip it from the left and right sides of the chip.
When disassembling, please don’t pull it out directly. First separate the clips left and right, then take them out otherwise they will break the tip of the clip.
Connect example, i.e withxhorse key tool plus


Top 3:Autel BMW FEM/BDC Clip Adapter
The Autel AP103 eeprom adapter comes with the xp200/xp400/xp400 pro for eeprom chip read and write.
It is similar as SOP8 clip adapter.

How to connect Autel FEM/BDC clip adapter?

FYI: It is recommended to get the GoDiag test platform as well when doing BMW FEM/BDC all keys lost on bench.
Godiag BMW FEM/BDC Test Platform

Posted by: jean at
07:40 AM
| No Comments
| Add Comment
Post contains 466 words, total size 14 kb.
February 03, 2023
DIY tutorial: LCI Tail Light Upgrade Coding for BMW F80 M3 thru Bimmercode andVgate OBD2 scanner.
Once installed, I was left with the coding part.
My car was previously coded and as much as I like the service, I don't like to pay if I can do it myself. Coincidentally I heard about the Bimmercode app. With the help of a Vgate Wi-Fi Obd2 device you connect to the car. The app. has an expert mode, which I used to code the car.
Starting point were the values given by EAS in the DIY mentioned above, but after coding I still had flickering. After some digging it turned out that some values were missing, hence I decided to do this thread and take the opportunity to explain how you can code these lights yourself.
PLEASE READ THRU THE ENTIRE THREAD PRIOR TO ANY CODING!
So here we go:
1. Install lights as per EAS and purchase the EAS harness with it
1. Purchase BimmerCode App and unlock feature within
2. BuyVgate Wi-Fidevice
3. Plug in Vgate into OBD2.Connect your phone to the vgate network like any WiFi network


4. Connect with your phone to the signal of the Vgate just like any other network you would use
Note: To avoid interference in the signal have the phone set to Airplane mode
5. open Bimmercode app and press connect, the app will read out the Vin and ECU
6. The different modules will appear. Chose: Rear Electronic Module (REM_01)
The App will read out the values in that module
7. The screen that opens gives you simple features to easily turn on/off or change features without any hassle or danger. It's like the dummy mode for people like me. But unfortunately in this case you need to be the "Expert"
So chose "Expert mode" on the bottom left of the screen
8. Now find and select folder: 3061 LceOutputChannels
9. The fun part. Find the below channels and change the values within to what it reads below.
Do this step by step:
e.g. you click on: REM / 3061 / BL_L_KALTUEBERWACHUNG
a new window open and should read: aktiv (0x01) with a blue check mark next to it. Since we need to change this value to nicht_aktiv (0x00), just simply select/click on 'nicht_aktiv (0x00) and the blue check mark will appear
next to it.
NOTE: Take your time!!! You don't want to code something you weren't supposed to and than the car won't work correctly. Maybe even take screenshots or better a screen video in case you can't remember what you were doing or what the value was prior to your change. I was distracted by doing mine and thankfully I knew that i have ADD and came prepared when i made a mistake.
9.1. go back with the blue error on the top left hand side. That will bring you back to the channel list and you can select the next line to code.
I list the Channels in the order as they appeared on my phone, so you can just go from the top to bottom.
REM:
Brake lights outside:
REM / 3061 / BL_L_KALTUEBERWACHUNG /nicht_aktiv (0x00)
REM / 3061 / BL_L_WARMUEBERWACHUNG /nicht_aktiv (0x00)
REM / 3061 / BL_L_IS_LED /aktiv (0x01)
REM / 3061 / BL_R_KALTUEBERWACHUNG /nicht_aktiv (0x00)
REM / 3061 / BL_R_WARMUEBERWACHUNG /nicht_aktiv (0x00)
REM / 3061 / BL_R_IS_LED /aktiv (0x01)
Break lights inside:
REM / 3061 / BFD_L_KALTUEBERWACHUNG /nicht_aktiv (0x00)
REM / 3061 / BFD_L_WARMUEBERWACHUNG /nicht_aktiv (0x00)
REM / 3061 / BFD_L_IS_LED: aktiv (0x01)
REM / 3061 / BFD_R_KALTUEBERWACHUNG /nicht_aktiv (0x00)
REM / 3061 / BFD_R_WARMUEBERWACHUNG /nicht_aktiv (0x00)
REM / 3061 / BFD_R_IS_LED: aktiv (0x01)
Rear Fog lights
REM / 3061 / NSL_L_KALTUEBERWACHUNG: nicht_aktiv (0x00)
REM / 3061 / NSL_L_WARMUEBERWACHUNG: nicht_aktiv (0x00)
REM / 3061 / NSL_L_IS_LED /aktiv (0x01)
REM / 3061 / NSL_R_KALTUEBERWACHUNG: nicht_aktiv (0x00)
REM / 3061 / NSL_R_WARMUEBERWACHUNG: nicht_aktiv (0x00)
REM / 3061 / NSL_R_IS_LED /aktiv (0x01)
Reverse lights:
REM / 3061 / RFS_L_KALTUEBERWACHUNG: nicht_aktiv (0x00)
REM / 3061 / RFS_L_WARMUEBERWACHUNG (0x00)
REM / 3061 / RFS_L_IS_LED: aktiv (0x01)
REM / 3061 / RFS_R_KALTUEBERWACHUNG: nicht_aktiv (0x00)
REM / 3061 / RFS_R_WARMUEBERWACHUNG: nicht_aktiv (0x00)
REM / 3061 / RFS_R_IS_LED: aktiv (0x01)
Indicators Rear:
REM / 3061 / FRA_H_L_KALTUEBERWACHUNG: nicht_aktiv (0x00)
REM / 3061 / FRA_H_L_WARMUEBERWACHUNG: nicht_aktiv (0x00)
REM / 3061 / FRA_H_R_KALTUEBERWACHUNG: nicht_aktiv (0x00)
REM / 3061 / FRA_H_R_WARMUEBERWACHUNG: nicht_aktiv (0x00)
REM / 3061 / FRA_H_R_IS_LED: aktiv (0x01)
REM / 3061 / FRA_H_L_IS_LED: aktiv (0x01)
10. Now that you successfully changed all needed values go back with the blue error on the top left.
11. Press Code on the top right hand side to get the car coded
12. If the coding was successful it will give you a pop up saying so
13. turn off car completely for 20sec.
14. start up and check for any errors on the dash
15. If no errors, do a visual on flickering (bulb check every 36sec or so) as well as Brake lights, indicator, reverse light etc. Yes, you will need someone to help you, unless you're Inspector Gadget and can press the brake and view the Tails at the same time.
Disclaimer: I am not responsible for any damages on your car. I am no expert on coding either nor on the APP described and used in this example.
Make sure your car is hooked up to a battery charger and ensure that the car won't go to sleep. e.g. by putting the Driver seat belt. The above is just write down on my experience going thru the process myself. My car is 15 F80 build in late 14 in case that makes any difference.
Posted by: jean at
07:32 AM
| No Comments
| Add Comment
Post contains 947 words, total size 8 kb.
February 02, 2023
TOYOTA TIS Techstream V18.00.008 (02/2023) diagnostic software crack was tested working fine. The software can be downloaded free here.
Version: Techstream V18.00.008
Release Date: 02/2023
Region: All regions
Type: Diagnostic tool Software
OS: WinXP, Vista, Windows7, WIN8, WIN10, Win11 32bit & 64bit
Language: English, German, French, Spanish, Italian, Russian, Chinese, Turkish.
Vehicle coverage: 1996-2022 Toyota Lexus
Compatible devices:VXDIAG VCX NANO Toyota(don’t need MVCI driver), Mongoose pro,Openport 2.0, SM2 Pro,Godiag j2534, Mini VCI J2534 Item #SV46-D,SV46-D1

Free download Techstream 18.00.008 software incl. loader
Free download techstream 18.00.008 setup here
https://disk.yandex.ru/d/_RosgIIDNM9vrQ
Download drivers & patch here
https://mega.nz/file/TvBXGKpD#BE-KXfkz_S6EeqZRGNtINdfQRMcQhIEw9psQd1UJ5oM
it contains older version 17.30.011, driver and patch.


Include:
- Techstream v18.00.008 setup.exe
- Patch 32bit & 64bit
- Drivers.rar (MINI VCI driver 32bit & 64bit, VXDIAG driver and Godiag j2534/VNCI NANO driver)
How to install:
Run Techstream v18.00.008.setup
Select setup language
Accept license agreement
Install Techstream software InstallShield Wizard
Randomly input the customer user name and password
Wait until setup installation is completed.
Then install driver 32x or 64x bit
Finally run software from patch
Posted by: jean at
06:31 AM
| No Comments
| Add Comment
Post contains 174 words, total size 5 kb.
32 queries taking 0.048 seconds, 210 records returned.
Powered by Minx 1.1.6c-pink.

