


March 31, 2023
How to configure Vediamo for J2534 Devices (Heremini vci j2534specifically).
If you do not know what anything in the title means, you probably should not try anything on this post.
Notes:
1. We will not be providing a link to download Vediamo or any J2534 products, just explaining how to configure the program settings in order to connect to your car.
2. Vediamo is a programming software that allows you to edit the code within the different onboard computers. This post will only focus on configuring a certain cable – Mini VCI J2534 with the program.
3. You are at your own risk. We are not responsible for the damage.

STEP 1.
Get an activated version of Vediamo 4.2. HAS TO BE 4.2 otherwise you will not be able to configure a J2534 device likeopenport2.0or MVCI with the program. You can find links to cracked versions on MHHAuto or you can buy a copy on ebay with a keygen for around $10. Not sure how trustworthy ebay is.
We have explained why only Vediamo 4.2 can be used with j2534 and how to configure 4.2 with openport in the previous post.
How to Configure Vediamo with OpenPort 2.0?
STEP2.
Buy aMini VCI cable. I got mine on for less than $30. Spend as much or as little as you would like in order to make yourself feel comfortable with attaching it to your benz.
STEP3.
Plug in your MVCI and download any necessary drivers. If your computer recognizes it in Device manager as "Serial bus converter” then you do not need to use any install disk that came with the cable. It will be in Device manager – Universal Serial Bus controllers. There should also be another tab in device manager that says "Serial ports” and have your device listed along with "(COM3)”. Make sure it is COM3, otherwise you can right click, go to properties, and change to COM3.
STEP4.
Download Autokent MVCI MultiDriver x64 2.0.1. This can be found online (search our blog), you will have to turn off threat/virus protection in order to get it to work. Go through the install process and run the application as admin. The Splash screen should be a picture of a dude holding a gun with the words "Autokent” across the bottom. When prompted, select 2.0.1 from the dropdown menu and install.
STEP5.
Now comes the configuring part. Open your Vediamo file location (probably C:->ProgamFilesx86->Vediamo.
Then go to Caesar->driver, and right click on "slave”. Go to properties, security tab at the top, edit, add, and then type "everyone” in the box, and select check names on the right side. Then check off the boxes to allow everything. This will allow you to edit the file.
STEP6.
Open the "slave” file, scroll down to the "Part J” section. Under the "Device name:” section. Change whatever is inside the quotes to The name of the autokent driver you previously installed. The name should be "XHorse – MVCI Autokent-X64 – 2.0.1”. But, to be sure, you can find the driver name in Registry editor (Windows button, regedit). The location of the driver may be different, but you can find it by going to HKEY_LOCAL_MACHINE -> SOFTWARE and then doing ctrl+f and searching for "Autokent” and finding the next instance. You can then right click on the folder with that title, click rename, then ctrl+c to copy it exactly and paste it into the part J configuration device name inslave.ini. Save the slave file and close.
STEP7.
Open Vediamo start center, on Vediamo Server, select update. Uncheck all the boxes except for "Part J” and "Pinmapping”. Select Update. If prompted, select the Autokent MVCI driver from the dialog box as your part J. When working correctly, you should have a box that says "Part xxxxx” with some number as the x’s underneath the Vediamo server box.
STEP8.
Select the notepad icon 2 from the left at the tools window on the bottom right of the start center. Select Ecoute options -> format of the variant code string -> change decimal to hex.
Everything should be properly set up now. You will need to have the proper .CBF files (look up vediamodata downloads) and from there you can find youtube videos on the possibilities for working on the computer modules on your car.
IMPORTANT NOTE – When connecting to your vehicle, there will be a tab at the top left that shows a connection icon. It will default to saying "KLine1 Communications”. Right click on this, select properties, and then from the dropdown menu, select CANHS. You will have to do this every time otherwise you will not be able to connect to your car properly.
Posted by: jean at
06:36 AM
| No Comments
| Add Comment
Post contains 788 words, total size 6 kb.
March 30, 2023
VAG ODIS-S service software V11 downloaded for free.
Password: 8888
Software version: ODIS V11+ PostSetup

Operating system: Win7, Win10
Language: English, German, Spanish,French and Korean
Supported car brands: Audi, Skoda, FAW-Volkswagen, Volkswagen, Shanghai Volkswagen, Volkswagen Commercial, Bugatti, Lamborghini, SEAT, MAN, Bentley
Compatible device:VNCI 6154A

Free to test it with svci 6154a, vas 6154a etc by your side.
NOTE: This ODIS v11 does not work withvxdiag vcx se 6154because it uses different driver.
VNCI 6154a vs VAS 6154a vs other 6154a

What’s new in VNCI 6154A?
- Work with original driver, Don’t need driver manager.
- Supports DoIP & CAN FD protocol
- With base station/hotspot mode switching button.
- Free license until 2030 year
Posted by: jean at
06:02 AM
| No Comments
| Add Comment
Post contains 120 words, total size 4 kb.
March 29, 2023
Q: I used anAutel MaxiCOM MX808scanner on my BMW that was incredibly useful but it did not work with my Mercedes Benz 2002 W210 E320. It will not scan any of the modules, apart from the ECU for W210.
A: To connect to W210 38 pin socket it uses solid state multiplexer like this

You can get the 38-pin adapter fromobdii365.com
https://www.obdii365.com/wholesale/mb-38pin-to-obd2-adaptor-for-benz.html
Here’s the proof that this MX808 obd2 scanner works with a 38-pin adapter

Feedback:
I bought theAutel MX808 scannerand I have to say that I’m very impressed.
Checked out my 07 Town and Country first. Very impressed with the increased depth of scanning I get vs the Bluetooth/WiFi dongle.
Plugged it into the Benz. Auto VIN detector didn’t work, so had to enter it manually. Then it asked me whether I had left or right hand drive. Then told me I’d get more scanning info and could communicate with more modules if I used a 38-pin connector.So I was able to get into the TCM which I wasn’t able to do plugged into the under dash OBDII port.

It does produce reports in PDF format. Larger screen allows to view more data without scrolling.
Initial screen.

Adapter selection.

Live data from ME2.0, suction fan.
Just after engine start. AC off.

Engine hot, AC full blast.

Live data from random control modules.
ME2.0 DAS.

EIS, DAS.

ESM.

PSE, state of door contacts.

It works with all W210 as of 07/97.
Posted by: jean at
06:13 AM
| No Comments
| Add Comment
Post contains 252 words, total size 11 kb.
March 28, 2023
After nearly two years of owning mine, I'm still very happy overall. It brought all the features I needed it to, plus some features that I didn't know I wanted. But I'll be the first to tell you that it's not perfect.
Love it
-Code scan speed.There's now a strong list of manufacturers that support their Autoscan 2.0 feature that makes getting that initial code scan painless. I'll have to get a screencap up here at some point. It's FAST. From no codes to all modules scanned in seconds.
- They've also added the ability to share code reports via email or text message straight from the scanner. Super handy when sharing info with other technicians, shop management, customers, whoever.
-The wireless scope has become invaluable.Super easy to get the scope set up in the engine bay, jump behind the wheel and crank the engine or snap the throttle as needed. Much less likely to trip over cables. Way more convenient than getting another tech to stop what their doing and help. Easier to use -> More likely to get used.
- Ignoring the wireless function, the scope itself has still been a great addition to the arsenal. Again, easy to set up, quick to get squiggly lines on the screen. Enough power user functions available to keep geeks like me happy. It's not Pico-equivalent, but it'll easily do 95% of what most auto techs need a scope to do.
- Updates aren't cheap, but they're frequent and valuable. There's new model years added, sure, but the real value is in the features that get added (Autoscan 2.0, Cloud Reports, like that). Using a currently updated Ultra is far different from two years ago.
- The J2534 function has always worked well for me. No issues when using FJDS, FDRS, Techline Connect (none related to the interface, anyway), NERS, HDS. The VCMI firmware gets updates regularly, just like the scan tool itself.
Cons:
- The bus inspection tool isn't quite as game changing as I thought it would be. Maybe it's where I'm working? Or the cars I'm seeing? But there just haven't been that many times that Bus Inspection was a benefit. At best, it might have saved a trip or two to the toolbox for a breakout box. If it could measure network resistance, I might move it up to the Pro section.
- Waveform generator and actuator drive are largely the same way. Definitely cool. But I've had to go out of my way to find applications for both in the day-to-day of auto repair. Used the signal generator to test ABS wiring a few times. Used the actuator drive to run a fuel pump relay by remote once. Not saying they're stupid or useless. If you're using these features regularly, please chime in.
- Storing and retrieving scope waveforms needs work. For example, there's an easy-to-use system available for tagging your captures with the YMME and waveform specifics. But the vehicle list is missing years, models and several big manufacturers.That makes your captures difficult to search for later. You can tag a scope trace as a solenoid or a fuel pump, but there's no option for pressure transducers of any kind. And there's almost no options for exporting your captures. There's an option to upload your capture to an online library, but I can't find a single benefit in doing so.
- Surprisingly, bidirectional tests and resets. One of the big reasons I got the Ultra was to fill in the gaps in Snap-On and Launch coverage. It's done that for the most part. But I still need to reach for another scan tool at times. More often than I thought I would. For a tool company famed for its magic button pressing abilities, this is a bit frustrating.
Ugh
- Graphing scan data. It's just... Not good. Especially if you come from Snap-On. Yes/No, On/Off, True/False PIDs can't be graphed. The scaling options always leave something to be desired. There are no cursors, so taking measurements from your data is a chore. Definitely not my first choice in scan tool when graphing data is needed.
- Reviewing your saved data isn't much better. No options for exporting your captures.
- It's big, no innuendo intended. Spends a lot of its life in the way. Takes up a lot of space on top of your toolbox, and in the car. This VCMI holder has helped.
Had another lead short the signal and the ground circuits to each other inside the insulation. Found that out when I stuck a fuel injector wide open inadvertently.
Posted by: jean at
07:35 AM
| No Comments
| Add Comment
Post contains 817 words, total size 5 kb.
March 27, 2023
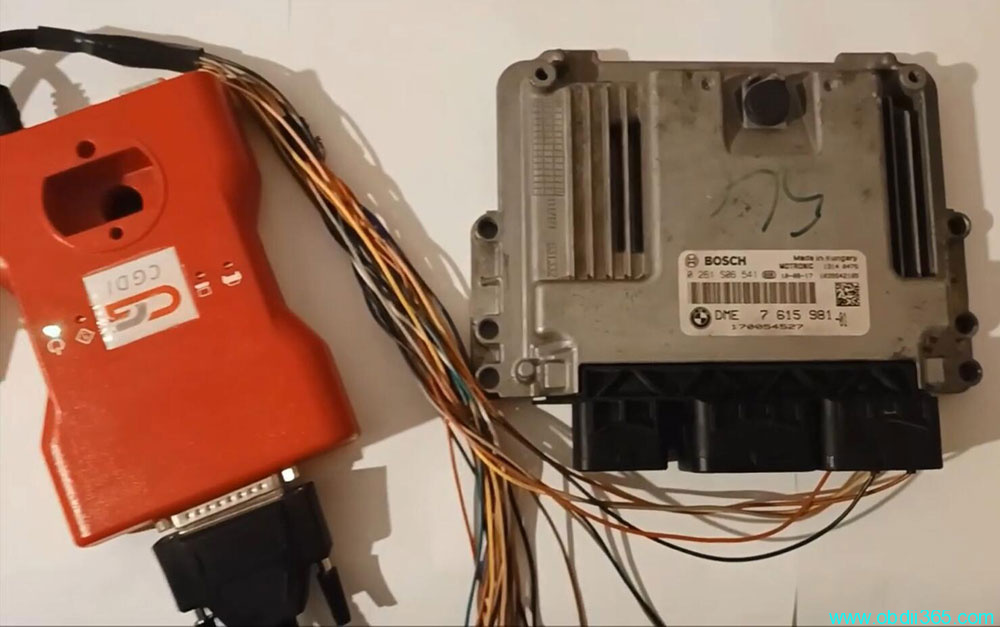
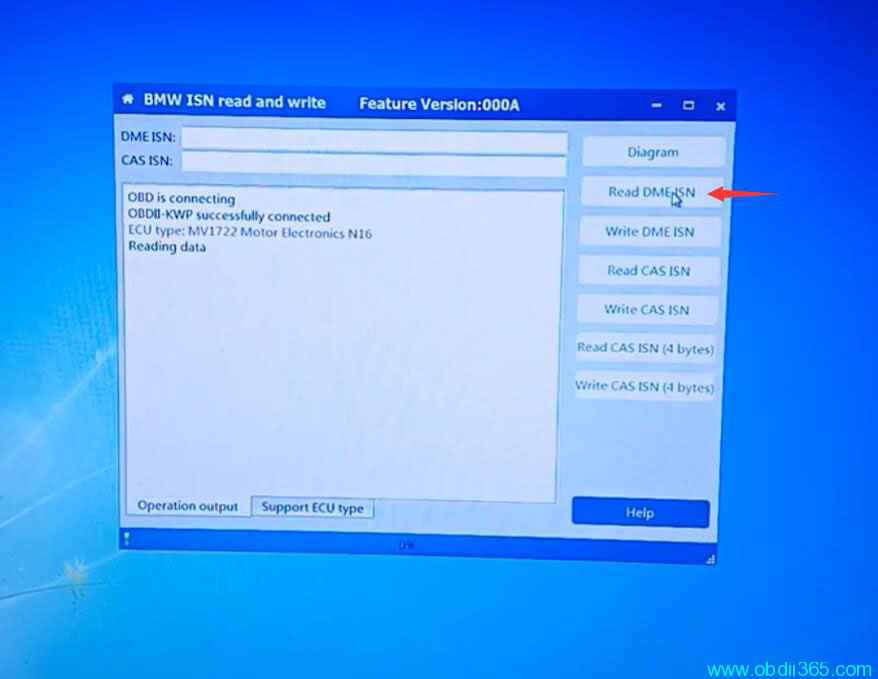
Easy guide to read ISN code from MINI Cooper MEV17.2.2 Engine ECU usingCGDI Prog BMWkey programmer.
Run CGDI BMW software, SelectBMW ISN Read Write
Select engine ECU MV1722 and check wiring diagram


Connect DME with CGDI BMW followed the wiring diagram

Read DME ISN

Read ISN success

Posted by: jean at
06:39 AM
| No Comments
| Add Comment
Post contains 57 words, total size 6 kb.
March 24, 2023
For VAG Micronas Cluster all keys lost you cannot do it via OBD, you’ll need to read cluster and remove a resistor to do it. Or get third party to get immo and sync data.


Pull the cluster and try to put in service mode.
You need remove cluster, desolder eeprom make service mod with vvdi solder back to cluster and put the car and you can read immo data and dealer key make with 7byte cs after need ori eeprom write back in obd and you can key learn to car.
Or read cluster dump file (micronas) with xprog-m and program new key with tango.
Xhorse VVDI2can easily do it, if you prepare 24C32 eeprom. It will damage the immo data to get access to bootloader for patching Micronas. After that you will get access via OBD to rewrite eeprom backup and extract all Immo data to make key.
Here are the tips to program VAG Micronas Cluster Transponder with all keys lost by xhorse vvdi2 in ABS service mode, i.e 2009 VW Tiguan. The procedure can also be applied to these login type include (CDCxx+24C32, A3/TT/R8 (CDC32xx), NEC24C32, NEC24C64, NEC24C64(2012 TFT color display), NEC24C64(2013-), NEC24C64(2013 TFT color display), Audi A1, Audi Q3). All tt and a3 2007-2012 are micronas.
- Open the dash, read the eeprom with programmer.
- Upload the binf le to the vvdi2 and mofidy.
- Write the modified file to the eeprom
- Connect the dashboard on the car and write the original file back by OBD
- Then read the immo data and program the key.
Don’t forget to SAVE ABS coding with VVDI before the process. You can restore with VVDI2 too.
This function is in the same menu of vvdi2 as eeprom update section,dash with micronas + 24C32.
Xhorse VVDI2 Service mode
All login type have similar operation for lost all keys,
backup ABS coding->read EEPROM with BDM programmer->Prepare a service EEPROM data->write service EEPROM data to cluster->Put instrument in car->select correct login type->Load
original EEPROM file->activate car OBDII communication->write EEPROM via OBDII->read immo data->save immo data->make dealer key->add key->reset instrument.

Service mode all Keys lost:
Some login type cannot read immo data while lost all working key. Login type include (CDCxx+24C32, A3/TT/R8 (CDC32xx), NEC24C32, NEC24C64, NEC24C64(2012 TFT
color display), NEC24C64(2013-), NEC24C64(2013 TFT color display), Audi A1, Audi Q3). This type can make dealer key with following steps:
1) Activate OBD communication by open dangerous light, press on the brakes for several times. Backup ABS coding, you can run backup function on bottom right corner, or enter diagnostics 03 ABS, backup abs coding
2) Find EEPROM chip from instrument, usually use 24C32 or 24C64 chip, read EEPROM dump with BDM programmer and save as original EEPROM dump
3) Enter "Service Mode”, load original EEPROM dump and prepare service EEPROM dump.Attention: DON’T overwrite the original EEPROM dump
4) Write service EEPROM dump to EEPROM chip (24C32 or 24C64)
5) Restore dashboard to car
6) Back to main window and select right login type
7) Load original EEPROM dump (IMPORTANT!!!)
![]() Activate OBD communication by open dangerous light, press on the brakes for several times
Activate OBD communication by open dangerous light, press on the brakes for several times
9) Press "Write EEPROM” write original dump to dashboard via OBDII (IMPORTANT!!!)
10) After write success, read immo data and save (IMPORTANT!!!)
11) Make a new dealer key and add to immobilizer system
12) If car use keyless key, learn the dealer key with learn method (with immo data support)
13) Start engine with new dealer key, complete.
Posted by: jean at
07:09 AM
| No Comments
| Add Comment
Post contains 587 words, total size 7 kb.
March 23, 2023
WillYanhua Mini ACDPclone Audi gearbox DQ500? Which module?
Yes,module 19adds DQ500 0DE/0BH gearbox cloning.
How to Clone VAG DQ250 Gearbox with Yanhua Mini ACDP?
Menu path:
VW->Gearbox Clone->VW/Audi/Seat/Skoda


ACDP mini will clone following DQ500 TCUs
- Audi DQ500 (0DE)
- Audi DQ500 (0BH Bosch)
- Audi DQ500 (0BH Continental)
- VW DQ500 (0DE)
- VW DQ500 (0BH Bosch)
- VW DQ500 (0BH Continental)
- Skoda DQ500 (0DE)
- Skoda DQ500 (0BH Bosch)
- Seat DQ500 (0DE)
- Seat DQ500 (0BH Bosch)
For example, Audi DQ500, press Help for ACDP connection.

DQ500 0DE/0BH (Bosch) wiring connection
Method 1:
1).Prepare ACDP, DB15-LAN adapter, interface board and gearbox
2).Connect the interface board correctly to the gearbox interface
3). Short the CAN resistor on the DB15-LAN adapter to the "CAN-R”
4). Connect ACDP, DB15-LAN adapter, interface board and gearbox.


Method 2:
Connect ACDP, PTCU cable and gearbox as image shown below

NOTE: DQ500 0BH (Continental) only has method 1 connection only. Same as above.
After connectingYanhua ACDPwith gearbox, select the correct TCU type, then perform cloning function.
Full backup data, then full Write Data

Posted by: jean at
07:08 AM
| No Comments
| Add Comment
Post contains 180 words, total size 10 kb.
March 22, 2023
Launch X431 vs Autel vs PIWIS III which is a better diagnostic system for 2021 Porsche 992? Check user unbiased review here:

The Launch X431 (i.eX431 Pros Mini) setup process involves downloading all of the latest software that they have available. It also included reading the owners manual/instruction booklet that comes with the tool.
Most of the setup was either fairly straight forward or intuitive if one has had any experience with these sorts of pc driven diagnostic tools.
When I connected this tool to my 2021 Porsche 992 it did recognize the car correctly. Year, Make, Model and VIN (which is how Y.M.M. information is determined) were correct. What data it could read was accurate and easy to obtain.
Make sure you have v23.90 or above Porsche software loaded to the X431 scanner.
I must say that the SEARCH function is stellar compared to what is available on PIWIS and available at every turn.
Working bothPIWISand Launch is a recipe for an enormous waste of time. Things are not in the same place WHILE some items are there others are not. I’ve not really given it the time it deserves, but snow is falling again… so here is a brief summary of what I tried just to see if it would communicate and write to my 2021 992
* It seems to be able to do SRI (Service Information Reset) and modify service intervals
* You are able to modify the steering wheel temperature
* You are able to disable seat belt warning
* You are able to perform battery registration (I went up to the menu where you input data which is as far as I felt comfortable since I don’t need my LiFeO4 replaced now…)
* I wasn’t able to find where to change the flasher control which is in BCM2 in PIWIS and should be in Rear End Electronics in Launch.
In most of these cases the item may be present but is just called something different. For example, to enable rear lights with DRLs on the x431 (and Macan just FYI) this is located in Front End Electronics but if you look for Daytime Running Lights it’s not there as they’ve called it Daylight Driving Lights. No longer present so I don’t know if the name changed (I didn’t stupidly search for DRL this time) or it’s just not available inLaunch X431for 992.
* Steering Wheel Electronic as I mentioned you are able to change the temperature but not able to link it with heated seat as on the Macan. Choices available are scant compared to on the Macan and PIWIS.
* It also read/accessed the changes I had made to the car (at least those I was able to find) like Speedo RED
So depending on what you want to do this is a VERY BRIEF overview I wanted to share for those wondering whether to buy this or not. For the casual user (tire changes, oil service, SRI…) this is more than adequate. It’s a heck of a lot simpler but doesn’t obviously drill down as deeply as PIWIS does.
It’s also self contained with a WiFi/BT that works – that Porsche still doesn’t recommend WiFi meaning you have to perform all your work tethered to a USB cable in 2021 is pathetic. The x431 feels comfortable in your hand and certainly easier to work with than a laptop. Performing actuations on rear light for example with x431 is a cinch as you walk the hand held to the back. With PIWIS either someone is there, you place a mirror in back or balance the laptop on the dash hoping not to rip out the USB connector while you go check.
For SRI and oil change I will use Launch X431 as well as other pointed mods, for the rest I will have to rely on PIWIS.
As for Autel scanners, here is another review on mp808.
The good news is that the Autel scanner (MP808specifically) does clear the Maintenance and Oil Change Reminders.BUT it, unfortunately, has a number of other issues, due to which, I must rescind my implicit recommendation of yesterday:
1.) The use of some Active (bidirectional) functions particularly pertaining to the PCM must leave little bread crumbs behind that disable the PCM entirely or disable some functions Ex: Volume control, station selection, Car Play Launch Control, etc. Restoring the PCM is a rather circuitous and time intensive process, to say the least.
2.) Many bidirectional functions do not exist or do not work at all or the scan tool reports that the VIN Number is not accurate. FWIW the Scan Tool reads the VIN and it is correctly being read when compared with the actual VIN for the car.
3.) Some of the selectable Buttons when navigating their menu driven system are occasionally in German. IMHO, in the scheme of things, I dont find this to be a major fault.
4.) The Scan Tool had a Button to Delete Data. Which should clear existing records of accumulated history. Ex: How many times a switch has been closed or opened. I never did find anything this Button would actually do.
5.) Etc.
Finally I spoke with Autel Technical Assistance. They were very pleasant and were able to retrieve the various screen captures and data logs of the above and other items. However, they are relatively clueless and offered maybe a beta software version. So in a nutshell the software clearly isnt ready for prime time.
In a nutshell, Autel is not really good on latest Porsche. Launch X431 can do a lot but you still need PIWIS tester.
Posted by: jean at
08:28 AM
| No Comments
| Add Comment
Post contains 944 words, total size 7 kb.
March 21, 2023
Here are some free programs for immobilizer without password.
Password: 212136AAA
IMMO Programs includes:
1. AE Tool FULL
2. B-Chip
3. BMW Editor 3.2.0
4. Carsoftware 5.2
5. Dash ECU Teacher
6. Data Explorer Manager Tools
7. ECU Calc 2
8. Ford Connect
9. Ford ECU Licensed
10. Ford Fiesta SIM210 v1.1
11. IMMO 3
12. IMMO Decoding 3.2
13. IMMO Killer 1.10
14. IMMO Nissan
15. IMMO SCP
16. Komatsu Time 1.2
17. ME 17.9.7 VAZ Remover
18. Opel Pin Repair
19. Opel VIN decoder
20. PATS
21. Peugeot Code
22. PSA Dump2Pin
23. PSA ECU PIN
24. Renault PIN Extractor 2
25. Renault PIN-Code On Key Number
26. TM100 1.23
27. Toyota 4 DKeyTool 1.2
28. VAG EDC16 IMMO Bypass
29. VAG Eepromer 1.18p
30. Visteon 2.3
31. Volvo ECU 2.3
32. Volvo Synchro 1.4

Virus total show this for 90% of the cracked software used with Windows.
For more security you can use virtual machine.
Auto key programming tools are available here:
https://www.obdii365.com/wholesale/key-programming-tools/
Introduction of Some Software:
AE-TOOL:
AE-TOOL is software for turning off IMMO function, virginize ECU dump, decode ECU, disable EGR, calculate PIN, editing Flash/EEPROM dump file, support many cars ecu.
B-Chip Pin Code Calculator
B-Chip Pin Code Calculator is a mini software for FIAT,Citroen,Benz,Opel,Peugeot,Renault,VW pin code calculator,it can calculate some pin code form dump.
BMW Editor 3.2.0
B-MW EWSEditoris designed to work with factory anti-theft system (immobilizer) EWS. Immobilizer EWS has been installed on the B-MW AG vehicles since 1996.
Car Software v5.2
Car Software v5.2 EPRO Mmicro77 with crack file CarSoftware 5.2 ( immo off, EGR off and hot start fix tool)
Dash ECU Teacher
A program for cars of the VAG group, which allows you to:
1. Bind a new dashboard by ECU dump
2. Change PIN, VIN, checksum and MAC in dashboard and ECU dumps
3. Replace the ECU with transferring data from the old block
4. Enable or disable immo on EDC16 blocks
5. Register keys or erase
Data Explorer Manager Tools
Data Explorer Manager is a useful software which provides important tools and information for cars ECU:
1- ECU decoding, to disable the immobilizer system (IMMO OFF) for different cars made/models, you only need to read bin or flash file from car’s ECU (EEPROM or MCU) by using a serial programmer (UPA-USB prog, X-Prog,….etc) then, run Data explorer manager, select the correct car made/model/ECU ID then open up the saved bin file, click decode button to disable the immobilizer system, save the decoded file to write it back to the ECU EEPROM to get immo off for this car.
2- Data explorer manager provides important technical information supported by pictures for big number of cars ECU.
3- Also use it to manage your important files and programs and link them to data explorer manager for easy accessing and data exploring.
4- Also it has nice map editor. For viewing ECU maps files and other bin or flash files.
Read also:
Free Download DTC Remover 1.8.5.0 + Lamdba Remover 2017 + Immo Universal 3.2 + Immooff17
Posted by: jean at
07:29 AM
| No Comments
| Add Comment
Post contains 514 words, total size 5 kb.
March 17, 2023
Question:I see there is "Switch Activation Function” inobdstar x300 dp plus, Can you give me a list of which module can be activated?
Answer:
Instrument Cluster Activation is a bonus feature of OBDSTAR X300 DP plus/key master DP.
Switch activation function
(Today many instruments or audio of vehicles activate secondary power supply to go into power-on status by relevant module CAN communication on the vehicle, but sometimes an instrument or an audio is separated from vehicle CANBUS network, causing startup failure when it needs to be repaired by an auto technician. This function can simulate CAN communication to activate secondary power supply, so the instrument or the audio enters into power-on status. In this way, it not only can test and verify the instrument or the audio, but also save an enormous cost for an auto technician to purchase a large number of startup platforms of various vehicles and wiring harnesses!)
Muti-functional Jumper is required when performing cluster activation function.

Here comes the Cluster Activation car list of x300 dp plus.
Audi
Mercedes
Jaguar
Dodge
Ford
Lamborghini
Land rover
Porsche
VW
Volvo


OBDSTAR has a standalone instrument cluster activation device- MT502 which has much more coverage than X300 DP Plus.
Check coverage here
https://www.obdii365.com/wholesale/obdstar-mt501-bench-test-paltform.html
Posted by: jean at
07:51 AM
| No Comments
| Add Comment
Post contains 239 words, total size 10 kb.
32 queries taking 0.1995 seconds, 210 records returned.
Powered by Minx 1.1.6c-pink.

