


July 30, 2016

Posted by: jean at
06:02 AM
| No Comments
| Add Comment
Post contains 1849 words, total size 15 kb.
July 26, 2016

Code:
MCDDiagService id=240900, job=com.bmw.psdz.jobs.common.MCD3_ActivateProgMode , service=RC_GAC – RoutineControl GetActualConfig, description=error: timeout, link=Physical request to ECU with address 0×10>
*Use direct connection via gateway url instead of via vin to tcp://ip addressof your car:6801 eg tcp://169.254.30.100:6801
*In Tal Processing | Parameters uncheck "Switch gateway(s) to programming modeâ€

Posted by: jean at
02:48 AM
| No Comments
| Add Comment
Post contains 205 words, total size 3 kb.
July 22, 2016


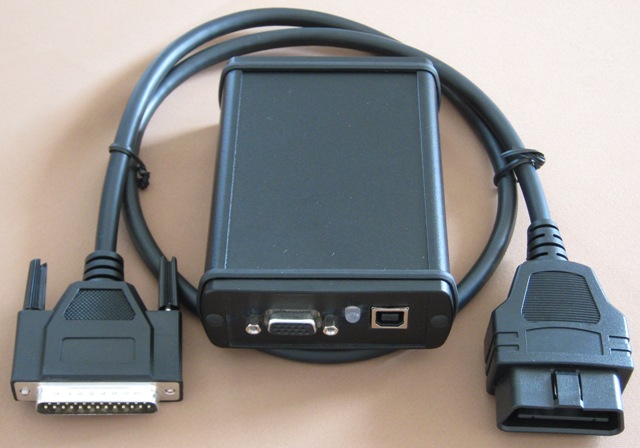
What I basically did is hack a TP-Link TL-WR802N, an 38-pin OBD2 connector (see picture below), buck converter and miscellaneous parts to build the final product. I tried the concept before I integrated all the parts and armed with Wireshark, I devised a configuration for the wireless router to work with the car.

I may still need to tweak few things for the box but overall it works really well, and I don't have to sit anymore in my garage to code or diagnose! It was too much miniature soldering in tight areas, if a product like this exists I'd gladly buy it and not build it!
Posted by: jean at
06:34 AM
| No Comments
| Add Comment
Post contains 194 words, total size 5 kb.
July 21, 2016
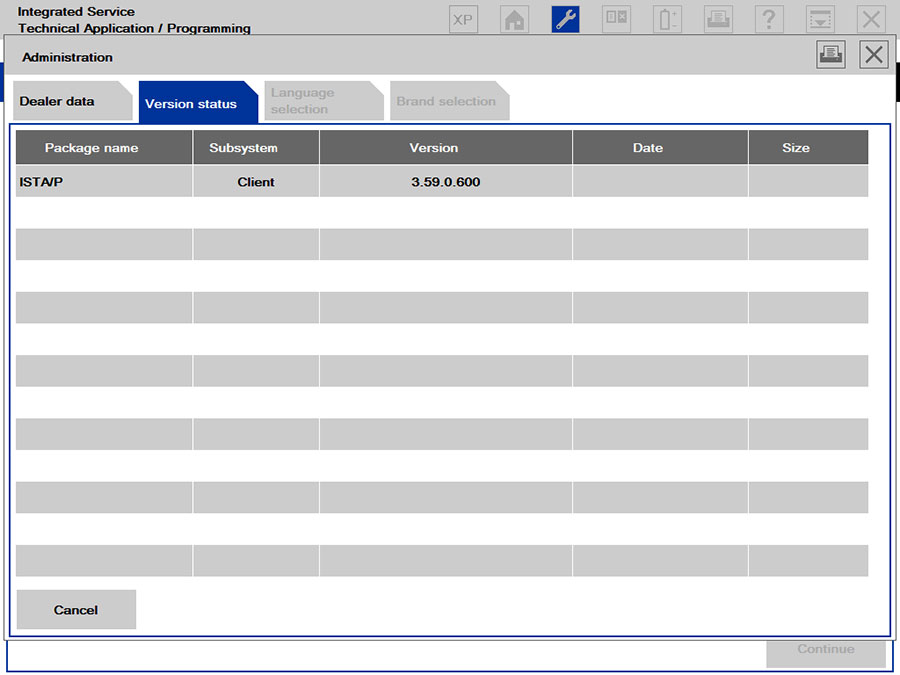
Although slightly out of date, software is now at v54 I believe, it's very powerful. I still use Standard Tools for most things but ISTA-D is a great diagnostic tool. The native install can be updated by simply replacing the ISTAP folder from a newer version. WSM will not be updated of course and ISPI NEXT will soon take over anyway.
Best of all, both work with a $18 INPA K+DCAN cable. Albeit ISTA-P will require a free ICOM Emulator. If you do not have free one, you need to buy.
I have tested this on a 500gb HDD 8gb RAM laptop running win7 x64. Results are very good. Don't worry about ISTA-P MOST requirement. With expert mode you can select which modules you program.
Download is via torrent:
Torrent link for ISTA-P:
https://drive.google.com/file/d/0B0h5IAukkZZwOHd6ZlJGYXVKbVE/edit?usp=docslist_api
BMW ICOM Emulator Registration XMLS:
Link
Magnet Link for ICOM Emulator:
magnet
 408C34EB285E48CB3AB61C1448911 9C836BC50C&dn=BMW%20ICOM%20emulator%20v3.1%20Rev%2 8b%29&tr=http%3a%2f%2fbt3.rutracker.org%2fann%3fuk %3dTsC40pcY55&tr=http%3a%2f%2fretracker.local%2fan nounce
If the torrent does not work,hereis a good place to buy.
Below is copied from another forum, I don't take any credit for it, but happy to answer queries.
Instructions:
Works on XP, Windows 7, Windows 8, Windows 8.1 & Windows 10
(32bit/64bit)
Notes:
Unblock the rar archive before extracting i.e right click > properties > click "unblock".
Use WinRAR V5 to extract.
Ediabas 7.3 needs to be installed
Disable firewall to avoid blocking issues - This is not needed as you can allow all service requests access when the popup appears.
Voltage constant has been added - to remove this form Emulator use:
---------
Delete IFS.ServicesImplementation.dll in:
\apps\ISTA-P\Taurus\ISOM\bin\
then rename _orig_IFS.ServicesImplementation.dll to IFS.ServicesImplementation.dll
-----------
Compatible with Chinese ICOM A1 & ICOM A2, Original ICOMs and Emulator will need registering
Basic Instructions:
***Setup your HDD into 3 partitions C - D - E***
C or D can be used as the main install location.
If you choose C for main install then D and E need only be 2GB partitions.
1. Put the large "apps" folder in the root directory of disk C:
C:\apps
2. Copy the file "WindowCleaner.exe" to C:\Windows\System32\
3. Copy the "ISIS" folder to C:\ProgramData\
Note: ProgramData folder may be hidden. If so go to folder options in control panel to unhide.
4. Copy the "WorkUser" folder to C:\Users\
5. Copy the files START-ISTA.exe and STOP-ISTA.exe to your desktop
6. Rename your Network Card to "Eth0"
7. Write down your PC network card mac address and in file:
D:\apps\WSM\apps\agent\data\DeviceInventory-ISTA_P_53_5_000.xml
change the mac address to match your own
8. Run "Setup.exe" asadministrator(also disable your firewall/temporarily disable anti virus)
9. Restart your computer
Notes:
Register your ICOM if needed (ICOM A1 clone is already set up).
Start ISTA using icon on desktop.
**YOU MUS USE 'STOP-ISTA.EXE' after closing the application.
--------------
How to run ISTAP native with K+DCAN interface using ICOM emulator
1. Disable firewall.
2. Remove voltage constant.
3. Extract and copy the ICOM emulator xml files to:
*:\apps\wsm\apps\agent\data\
4. In VMware network editor, ensure "VMnet0" is set to "bridged" and your LAN network adaptor is selected in the drop down menu.
5. In VMware network editor, add a new network called "VMnet3" and set it up as shown in the picture below:
Note: Click "apply" and "ok" and close down VMware.
6. Open VMware again and start emulator using the k+dcan snapshot. Once it has loaded up, go to the vm settings and change network adaptor 1 to "VMnet3(host only)". Click "ok" then wait 30 seconds for network to re-initialise.
note: you can now create new snapshot if you want.
7. Connect K+DCAN cable to emulator and car and run "ifhsrv32" using icon on emulator desktop.
note: ensure k+dcan cable usb icon is active in the vm.
8. Start ISTAP native, start a session and choose "ICOM emulator" in connection manager screen.
note: if everything is ok, the led on your cable should start to flash after a minute or so. If not, recheck emulator settings (i.e. com9, latency timer set to 1 etc.).
Posted by: jean at
07:00 AM
| No Comments
| Add Comment
Post contains 686 words, total size 6 kb.
July 15, 2016


| No. | Software Name | Software Function |
| 1 | ISPI-NEXT Admin Tools | ISPI-NEXT authorization software |
| 2 | ISPI Admin Client | ISPI-NEXT authorization management and environment Configuration software |
| 3 | ISTA-D(Rheingold) | Diagnostic and repair guide, including Diagrams and disassembly Figure |
| 4 | ISTA-P(ISSS-NEXT) | Programming and coding software system |
| 5 | HDD-Update | Navigation software upgrade back-office services (function with ISTA-P, need to Import map files) |
| 6 | KSD | Work software |
| 7 | ETK | Accessories Catalog |
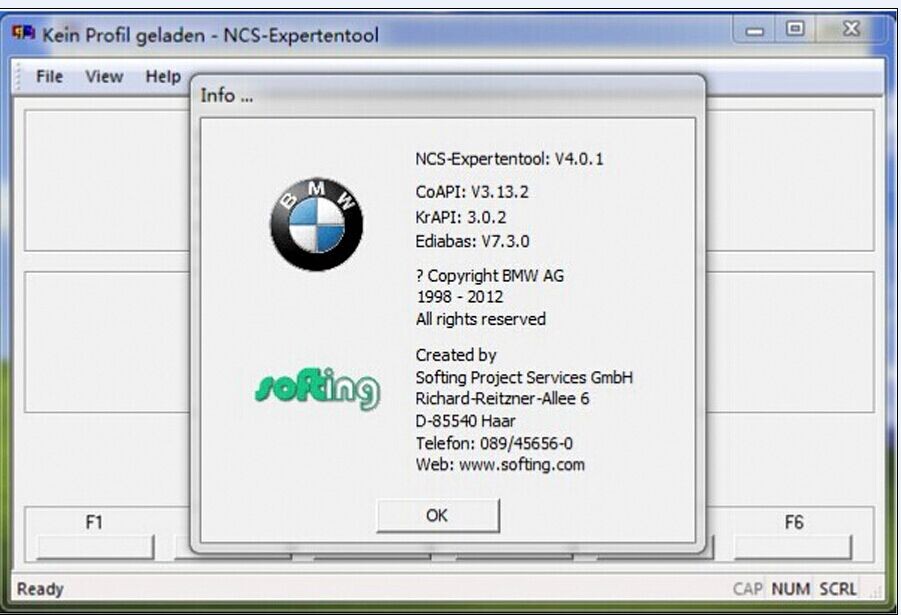
| 8 | E-SYS | Engineer Software for F series (available for programming and coding) |
| 9 | WINKFP | Engineer Software for E series, for programming |
| 10 | NCS-Expert tool | Engineer Software for E series, for coding |
| 11 | INPA | Engineer Software for E series, for diagnosis |
| 12 | Tool32 | Engineer Software for E series, able to run directly |
| 13 | BMW Coding Tool | Auxiliary Software of Engineer Software for E series (Available to import model data to WINKFP and NSC) |
| 14 | NcsDummy | Auxiliary Software of Engineer Software for E series (Available to modify NCS data) |
| 15 | IToolRadar | Used to recognize ICOM, activate or release ICOM Port |
| 16 | EasyConnect | Used to Configure the Environment Parameter of Engineer Software for E series, can activate or release ICOM Port |
System Requirements:
Support Model:
Posted by: jean at
01:41 AM
| No Comments
| Add Comment
Post contains 314 words, total size 6 kb.
July 07, 2016
Here, you can free download different versions of BMW F-series characteristic coding software including E-sys v3.22.5, Esys 3.26.1, and E SYS v3.27.1.
Where to free download E-sys program?
(newest) E-sys 3.27.1
https://mega.nz/#F!E1YzzSxQ!DRr7BE8YL7GWEX8YqBbH9g
(unknown secirity) E sys 3.26.1
https://mega.nz/#!Z5dgGZRC!uovkspjgtekOvk9tzrhnxUQUQ8hLIF26YDxwSo1740c
(safe) E-sys 3.22.5
http://www.obdii365.com/wholesale/bmw-enet-interface-cable-e-sys-icom-coding-f-series.html
Only E-SYS V3.22.5 is tested by obd365 engineers among all the E-sys versions above. Other versions are shared in the forums; just put it here for share and TRY AT YOUR OWN RISK.
Why to use E-sys v3.22.5?
It is the NEVER-EXPIRE version.
There are many free download links online, but usually, it will expire in a few days or ask you to pay for continuous use or buy tokens.
What to use ENET with E-sys v3.22.5?
DIY an ENET cable BMW with the help of the following guide- it’s easy but requires a bit technique. You can have a try and then decide to whether buy a new one if you fails to DIY.
If you wanna buy enet interface from vendors, don’t spend too much on it- that is, just buy a cheap knock-off online:
http://www.obdii365.com/wholesale/bmw-enet-interface-cable-e-sys-icom-coding-f-series.html
this is a reliable vendor with lots of good reputation talking about in the forums.

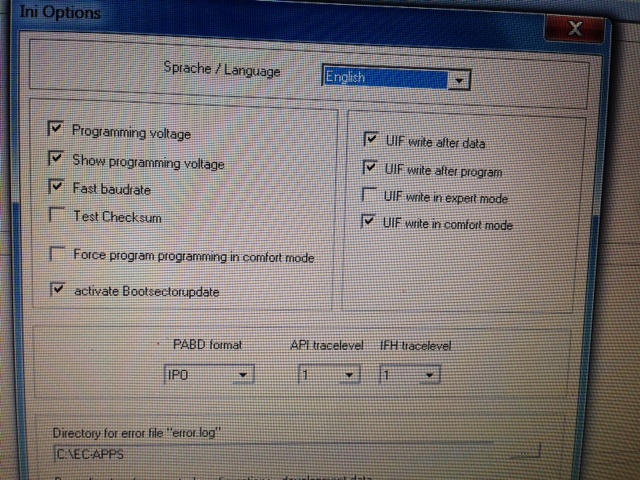
How to setup E-sys 3.22.5?
– In Windows system
—————————————————————————————————-
01) Run "E-sys\E-Sys_Setup_3_22_5_b34057.exe†to install program to default location "C:\EC-Apps\ESG†(i.e. "C:\EC-Apps\ESG\E-Sys\â€)
—————————————————————————————————-
INSTALL E-SYS EST TOKEN(NOT INCLUDED)
—————————————————————————————————
-05) Create subfolder "E-Sys EST†under "C:\ESysData\†(i.e. "C:\ESysData\E-Sys ESTâ€)
—————————————————————————————————-
INSTALL PSdZData(NOT INCLUDED)
—————————————————————————————————-
– In MacBook OS 10 Xoperating system
Successfully make BMW ENET cable E-Sys 3.22.5 run inaVirtualWindowsenvironmentrunningunder
MacOSX.
NOTE:
theseinstructionshavebeenpreparedfromaMacBookProrunning
MacOSversion10.7.4,alongwithVMWareFusionversion4.1.2(notinbootcamp
mode),runningWindows7(x86)SP1.
TheconfigurationandinstructionspreparedforE-Syscanbefollowedexactlyasthey
havebeenpreparedfortheWindowsenvironmentherewithinthevirtualwindowsas
well.
PleaseconfiguretheVMWareNetworkAdaptertohaveabridgedconnectiontothe
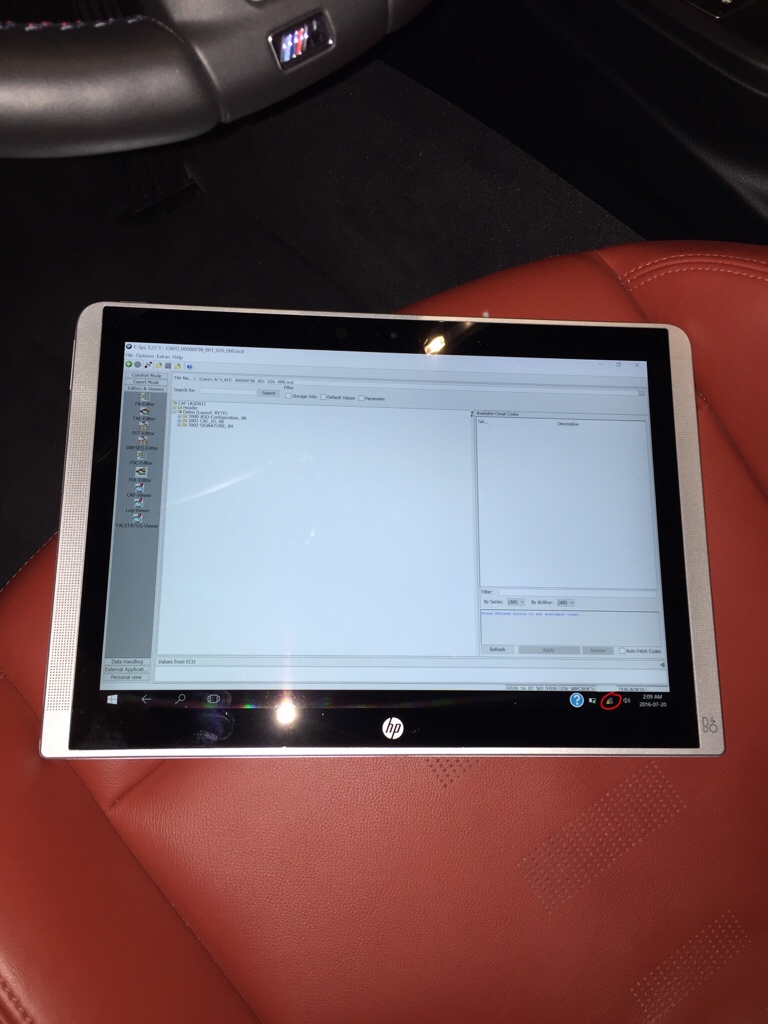
OSXphysicaladapter,asinthefollowingscreenshot:

Note:
at the time this screenshot was captured, the Ethernet wire was not connected to the car, hence it is shows a red circle in front of the title "Ethernetâ€. Once connected to the car (or any active ethernet wire), the circle will be green.
Ifdiskspaceisofnoconcern,thentherestoftheinstructionsbelowcanbeignored.However,consideringthesizeofthepsdzdatafolder(approximately15gigabytesandgrowingperrelease),andusuallyvirtualmachinesdonothaveasmuchdiskspaceavailabletothemastheparentOS,onecanstorethepsdzdatafolderontheMacsideandallowE -Systoseethefilesfromwithinthevirtualwindows.
EnsurethatWindowsisabletoseeafolderontheMacOSenvironmentasastandardsharedresource.TheeasiestwaytodothisistoenableSharedFoldersandMirrortheDownloadsfoldertobethesamebetweenthevirtualWindowsandMacOS:

Now, create a folder called "BMW†or anything else that is desired on the Mac’s Downloads folder. The contents of the MacOSX downloads folder will be available in Windows via Z:\Downloads under Windows Explorer.

Inthe~/Users/username/Downloads/BMWfolder,createafoldercalled:"ESysDataâ€,
andcopythecontentsofthefolder"C:\EsysDataâ€tothe"Z:\Downloads\BMW\EsysDataâ€
folder.Nowextracttheentiredownloaded"psdzdataâ€foldercontentinthepsdzdata
folderoftheMacOSenvironment.Lastly,copy(notmove)thecontentsofthefollowing
folder:~/Users/username/BMW/EsysData/psdzdata/swe
tothefollowingfolderwithintheEsysDatafolderstructurecreatedabove:
~/Users/username/BMW/EsysData/SWE
Pleasenotethatthe"usernameâ€thatappearsintheabovetwopathswillbetheMacOS
User’susername.Also,consideringthefactthattheWindowsfilesystemdoesnot
supportcase-sensitivity,thefoldernamecasesspecifiedabovedonothaveany
significanceotherthanreadability.
InE-Sys,fromthe"Optionsâ€menuselect"Settings…â€andthenselectthe"Programâ€tab.
EnsurethattheEsysDatafolderpathiscorrectlyspecifiedwithrespecttowherethey
areontheMacOSXenvironmentandtheWindowssharedfolderpath.Seescreenshot:

The EST file also needs to be mapped to E-Sys, and this file can be stored on the Mac side as well. Although it does not have a significant file size, it is advantageous to have this file on the Mac side for those who use Time Capsule as a backup solution and would like these files to be backed-up. In this case, the following illustration shows where the location of the EST file can been configured:

The rest of the instructions that have been prepared for windows need to be followed in order to alter the coding of a BMW via E-Sys running in VMWare Fusion and MacOSX.
How do people think of ENET cable?
Coding F10 sport display – Success
"As always open upEsys 3.22.5, Read FA, Read SVT and activate FA. Then read the coding data from HU_CIC or HU_NBT and the KOMBI module and edit the FDL to make the changes. I have managed to activate sport display for my F10â€
DIY enet cable is easy – Success
"I myself did a ENET cableas online shops display, only using a CAT5 lan cable, a 510-560 ohm resistor and a OBD male plug, or, purchase it online. Only four wires are connected and there is no need to ground anything… anyone can try itâ€
coding auto start stop off notification on 2012 F30s – Success
"I changed the build date on my VO to 0712, VO coded KOMBI and it all works! When auto start stop is not running, I get a notification on my instrument cluster just like on the 2013 models!â€
F30 video in motion coding – Success
"good at video in motion coding.. I used this cable to enable it for the passenger to enjoy watching a DVD that help me save a lot!â€
Reactivate F30 FSC codes – Success
"it helped me reactivate FSC codes without problemsusedE-sys programto read all FSCs and certficates.and usedTool32to clear the FSC store and then use E-sys to reload all FSC’s and certs and activate them.â€
It can run on MacBookPro– Suceess
"i managed to coding via E-Sys running in VMWare Fusion and MacOSX. (aMacBookProrunningMacOSversion10.7.4,alongwithVMWareFusionversion4.1.2(notinbootcampmode),runningWindows7(x86)SP1)â€
http://bmw-icom-a2-wifi.blogspot.com/2016/07/how-to-install-bmw-enet-e-sys-on.html
Posted by: jean at
05:51 AM
| No Comments
| Add Comment
Post contains 891 words, total size 14 kb.
July 05, 2016
DIY Guide to Flash Alpina B3 Flash:
WARNING...If you don‘t know what your doing, dont be brave and blindly go into this advanced flashing of software into the TCU module.. If your not too confident in doing this, either pay someone or just do without it.....WinKFP is a very dangerous tool but yet its awesome and in terms of coding its pretty advanced.. Proceed after reading this warning if you choose to do so...
This flash will make the transmission run smoother, gear change will be more precise and crisp, rev match downshift is unbelievable, rev limiter is increased and overall driveability is increased. You will have a new indicator for gear selection in D mode which display D1, D2, D3 ,D4, D5 and in DS mode you will see S1, S2, S3, S4, S5 and the same for the M mode. This single flash will make the car change gears more refined and crisp. You will no longer feel the lurching when the tranny shifts and it goes through the gears without even the slightest hesitation. It is indeed a must have flash if you own a E9x with a N54 engine...
This Alpina TCU flash works for model years 3/07 till present N54/N55 engine (some N55 engines which are rare, exhibit the rpms jumping down to zero on each shift but acts normal in every other way..This can be addressed if you update your DME version if you have this erratic rpm issue after flash). If your production date is before 3/07, your out of luck and cant flash your car! Before you attempt this you should have some knowledge in coding and setting software. You need to confirm INPA software is working and communicating with car. If you dont have INPA communicating, dont move beyond this point and go back and do some more research on getting it to work.. There are plenty of DIY guides for setting up INPA, Ediabas, NCSexpert and WinKFP,
You can purchase a proven INPA K+dcancable that works...
http://www.obdii365.com/wholesale/bmw-inpa-k-can-with-ft232rq-chip.html
Once you have configured your laptop properly with INPA, NCS expert and WinKFP, you need to download Spdaten 53.0 which I have provided a link to download a condensed form for the strict purpose of this Alpina flash. The link for the SPdaten 53.0 is not the entire version and doesn't have the other data files needed to flash other modules if you need them, this is strictly for Alpina flash which makes the download much quicker...
https://www.dropbox.com/s/sb0bm1he0j7hto9/53.0.rar
If you failed to download link, you can also buy ISTA hard drive containing INPA, Ncs expert,winkfp etc for BMW ICOM.
Follow the guide how to import the SPdaten 53.0 data into Winkfp by downloading the PDF I have provided below..Once you have the data imported into Winkfp then you need to configure the Winkfp..follow this
Once Winkfp is configured correctly your ready to begin the flash of your new Alpina B3 software into your car!!
IMPORTANT..For those using Procede or JB4 make sure the tune is set to VALET map 0 before you start the flash..
Here we go:
-Make sure your battery is good if not get a battery charger
-Open drivers door and turn ignition ON (cluster guage on) Basically hit the start button twice without starting car..
-connect cable to obd connector of car
-Load Winkpf software
-Press (F1) comfort mode
-Press (F3) Update ZUSB
-Choose ECU GKE215
-Press (F2) Choose ZUSB
-Choose ECU GKE215 and next to it there will be ZB-Numbers..Find 7615835
-Click ok
-If you have done it correctly so far you will see at the top Assembly Identification number 7615835 (Alpina software ) and it will automatically reference 7591971
-Press (F4) Enter VIN ( make sure you double check you have entered the correct VIN numbers)
-click ok
-Press DONE (F
-Press (F3) Program
-Pop up window will say you can code the ECU 63 more times, click ok
-Flashing begins and you will have to wait till it reaches 100% twice..The first bar will finish rather quickly and then another bar progress of 100% will take about 3-4 minutes
the most and it will be completed...
-If everything is done correctly, then you will get a pop up screen saying programming done, click ok
-Shut off car by taking key out. Lock car with key, wait 5 minutes and start the car..If everything works correctly you will not
have any warning signs or check engine lights...Enjoy your newly transformed AT Alpina B3 software
NOTE:
For newer build cars after the flash the paddle shifters no longer works...If this is the case you would follow part II of this DIY..
Alpina B3 flash Part II: DIY for NOT-working paddles shifters after flash
Alpina B3 flash Part II: DIY for NOT working paddles after flash
The Alpina B3 flash has been a huge success so far for performance gains as well as fixing many issues that has plagued the N54 platform for years. It has undoubtedly given the performance gains in which everyone could enjoy. The only minor glitch during the flashing was on new model years in which once the car is flashed the paddle shifters now longer worked, unlike the earlier build model years which didn't exhibit this. This was quite bothersome to me so I had to find a fix as it seemed unthinkable it wouldn't work. Here is your solution!
You guys need to use NCSexpert and have the latest SPdaten 49.3 or even 48.1 loaded up to both NCSexpert and Ediabas. There are tons of literature on this so do a search on it. If you not comfortable doing this or the actual coding, you can find a local coder and pay to have this coded....
Warning: If you don't have the Spdaten 48.1 or 49.3 updated correctly into Ediabas and NCS expert, after doing this coding the car will be Dead and show a gear warning on cluster but this can be fixed by correctly updating the NCS-expert...
Here is what you do:
0-Start ignition with cluster lights on
1-Load NCSexpert
2-File Use EXPERTMODE profile and click ok
3-(F1) Vin/ZCS/FA
4-(F3) SG ausw
5-Choose E89 chassis click ok
6-Choose CAS click ok
7-(F6) Back
8-Choose ECU and pick EGS
9-Press F3 (execute JOB)
10-After it says coding ended your done!
11-Close out NCSexpert
At this point 3 things can happen:
**A)There are no errors and the car starts fine and the paddle shifters are working and your happy!
**B)The car starts but then when you drive off, the shifting of gears are all screwy and changing incorrectly.
**C)The car starts but you get the dreaded GEAR error and it wont even go into drive at all..
.
If you have either B or C then you issue is the update of the Spdaten 48.1 or 49.3 was incorrectly done...Go back and check installation and start again
Reverting back to stock software...
Anyone that wants to go back to stock software for whatever reason, its really simple to do...Follow the same procedure and choose 7601492 as the ZB number instead of the 7615835 (alpina software zb number).
Posted by: jean at
02:20 AM
| No Comments
| Add Comment
Post contains 1222 words, total size 10 kb.
July 01, 2016

VERHALTEN_DRL_TFL
drl_s
DRL_TFL_MIT_BFD
nicht_aktiv
DRL_TFL_MIT_NSW
nicht_aktiv
DRL_TFL_MIT_BLK_V_GED
nicht_aktiv
DRL_TFL_MIT_SML
aktiv
DRL_TFL_MIT_KZL
nicht_aktiv
DRL_TFL_MIT_RL_BL_2
nicht_aktiv
DRL_TFL_MIT_RL_BL_1
nicht_aktiv
DRL_TFL_MIT_RL_BL
nicht_aktiv
The blue ones are the lines I had to change but I've copied the others just to make sure. Once this is done, just go into the OBC and enable the DRL - Voila!
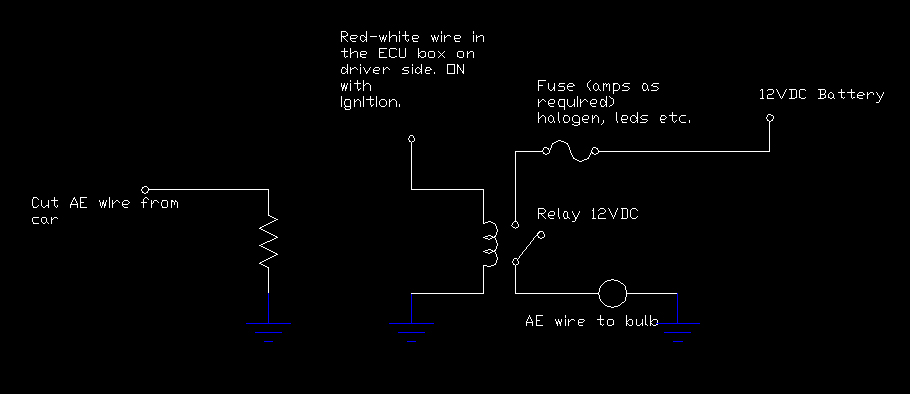
If you want to do it the hardware way, like I did, just rewire your DRL like the schematic I put below.
When there is 12v coming from the car (flashing to pass), the 12v relay kicks in and send that 12v to the halogen bulb. When running normally, there is 6v going to the relay, but it is not enough voltage to trigger the relay, so no voltage to the bulb. The 10 ohms resistor is there to put a load and avoid the burnt light indicator. You will need to install a resistor on each side L-R, but the relay circuit can be used to feed both DRL.
For the Angel Eyes, it is similar. You need to use the red-white wire in the ECU box (red wire with white stripes). You will see many wires with that color, just use the one with the biggest size. They are all ignition 12v feeding different parts of the car. Disconnect your battery before doing connections in the ECU box to be on the safe side. Without cutting the wire, just skin a portion of the insulation, and feed a new wire in the rubber grommet into the ECU box and solder it to the red-white wire and tape it.
Again the resistor circuit needs to be repeated on both sides but the relay can feed both AEs.
I did that modification on my E46 (2004-2011) and my E53 (2011-now) and it works very well.

Posted by: jean at
01:25 AM
| No Comments
| Add Comment
Post contains 543 words, total size 6 kb.
32 queries taking 0.0853 seconds, 206 records returned.
Powered by Minx 1.1.6c-pink.

