


December 27, 2017
Model example:BMW F10 USA 535i 2011
(Credit to GermancaraTVO. You are at your risk)
Tools used:
Xprog m box ecu programmer
BMW ENET cableand E-sys coding software
From beginning to end - reset (mileage, VIN) => coding. Quickly and specifically according to the case. Finally - a happy owner!
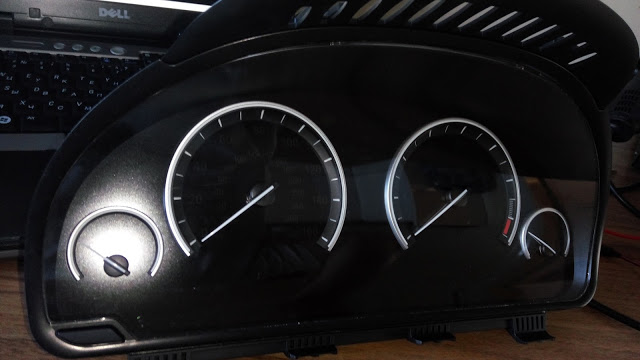
The real mileage before zeroing - 75103 km (according to VIN the meter lived earlier)

Next, disassemble the meter to get the proper access to the elements with which I will work


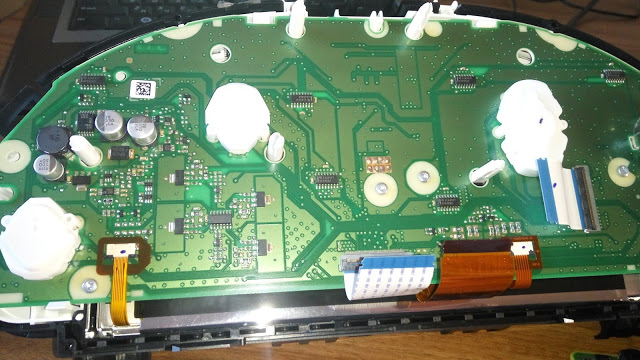
Next comes theXprog-mprogrammer, by means of which I gain access to the meter's memory and do zeroing.

Now with us on the table a ready to program / coding counter in the car withE-sys

Actually, the issue of coding for a specific car


And the end result without any kind of errors

Posted by: jean at
03:51 AM
| No Comments
| Add Comment
Post contains 161 words, total size 6 kb.
December 25, 2017
On the BMW F10, it is possible to code Internet / BMW Live with 6VC Combox and 609 Nav by disabling BMW Assist and using a fake VIN with factory 614 Internet written to Combox, and then updating BMW Services.
I detailed that process here:
Change your VO as follows:
– 612 (or 633 or 639 if present)
+ 644
+ 614 (Required but already present)
+ 615
+ 6AL
+ 6AB
VO CODE HU_CIC
VO CODE CMB_MEDIA
FDL CODE CMB_MEDIA:
– TELEMATIK_VIN = Coding_VIN
FDL CODE CMB_MEDIA:
Use modified VO with VIN that has factory options 614 and 615 as explained below:
it is very simple to write a VIN to the Combox inE-Syscoding software
Spend time in Tool32, CMEDIA.prg and E-Sys trying to figure it out.
First you must code CMB_MEDIA / TELEMATIK_VIN = Coding VIN using your real FA VIN. Then, open your FA up in the FA-Editor, change the VIN, Caluclate FP just to make sure there are no problems with it, and then save the FA with a new name, i.e. FA_VIN_FAKE. Lastly, go to the coding module, and under Vehicle Order load your new FA_VIN_FAKE, activate FA, and then FDL code CMB_MEDIA. Lastly, read CMB_MEDIA coding data, and verify the new VIN in brackets. In the attached picture, you can see my Combox and Head Unit are showing two different VIN’s.
Afterwards, either shut down E-Sys, or load your original FA back and activate it before coding anything else. DO NOT code anything else with this FA, and DO NOT write this FA to the car.
For Internet and BMW Live to work, you need a VIN with factory options 614 and 615.
*** Use only to FDL Code CMB_MEDIA; DO NOT write this FA to the Car
1) Enable Data Transfer Option Under Phone
2) Enable Bluetooth Data Tethering on Phone
3) Under Connected drive; Update services (should show BMW Live and Internet services)
4) Go to BMW Live and Internet and make sure it it working
After it is working:
Use original VO with car VIN:
FDL CODE CMB_MEDIA:
– TELEMATIK_VIN = MOST_VIN
Read CMB_MEDIA and verify Short VIN in brackets [xxxxxxx] is car VIN.
DO NOT update services again or you will loose BMW Live and Internet.
*** If you do not return the Combox VIN to car VIN, you will encounter problems with future dealer programming, as the Combox will not be recognized, and programming will hault.
All done with aBMWENETcablewith Esys. $11 did all.
Posted by: jean at
02:09 AM
| No Comments
| Add Comment
Post contains 426 words, total size 3 kb.
December 14, 2017
The BMW ICOM ISTA standalone version is a version that disables some hardware checks and server checks that are unnecessary for individual users.
As you know,ISTA-Dcan receive the data related to the vehicle maintenance from the BMW server. If you are a general individual user, you can not access the BMW network anyway.
The installation process is similar to the basic ISTA-D installation process, and the required files are almost all contained within the archive.There is only an RCleaner that initializes the registry, which is included in the ISTA-D download link, so download it if you need it.
version
- RheingoldISTA + Standalone: ​​v4.09.13
- SQLiteDBs: v4.09.12
Posted by: jean at
06:22 AM
| No Comments
| Add Comment
Post contains 123 words, total size 2 kb.
December 11, 2017
Here’s the expert solution to cannot accessE-sysBMW F-series coding software read FA failed problem.
If you are new to coding, here are a few mistable you make.
The most common mistake is network configuration.
The following message is displayed when connection is not possible due to improper setting.
Read FA failed! Possibly there is no FA Stored in the VCM (C060)
negative response error:
code: the result contains an error
description: Service RDBI_FA has error in result: (Severity=2051) (Error Code=53311)
ErrorCodeDescription=module offline (Vendor code= 20039) (VendorCodeDesction=link is no longer active)
ECU:VCM_ETHERNET

If you read it all the time, you can see that there is no link module.
That is why they did not connect.
The first thing to check when connecting is IP allocation.
Lock at the lower right clock.

Are you seeing this computer now?
Of course, those who hold a wireless AP with a router do no apply.
Those who are experiencing the above problems cannot use the wireless AP.
Is not there an X on that computer?
If X is displayed, the computer and the car are not connected.
Could be a bad cable.
(The exclam ation point on the computer is normal)
Or it maybe fixed allcation, not IP auto allcation.
Please follow the steps below.
Right-click the computer’s appearance in the photo above and click Open Network and Sharing Center.

Next, click Change adapter settings.

Right-click your wired network card and click Properties.

In Local Area Connection Properties, select TCP/IPv4 and click Properties

Then select Obtain and IP address automatically and Obtain DNS server address automatically and click OK to close all the windows you just opened and working.

If this does not work, then turn off the firewall!
From the Start menu, select Control Panel.

Select Windows Firewall.
If you do not see any of them, you can change the view criteria to a big icon or a small icon

Click on Windows Firewall on the left or off

And turn off all firewalls. (BMW ENET cablefor F-series coding.)

If you are using a company or a public computer and you disable firewall,
If you can not turn off the firewall, you need to set the inbound settings seperately in
Advanced Settings.
It’s too difficult to explain this.
If you do not allow the program to be selected as an inbound rule,
You have to open the port number on the wire shark,
This should not be happening.
Do not code it on your company’s computer.
But if it is the same.
So you did not read my blog.
You shoud have pressed Connect as below.
Then no, no, no
You should see if your VIN number is on the Via Connection as VIN and select that option to connect.
If you see No ZGW Available as shown in the picture below, press reflash.

Hope it helps.
Note: The document was translated from Korean.
Posted by: jean at
03:29 AM
| No Comments
| Add Comment
Post contains 490 words, total size 20 kb.
December 08, 2017
E-Sysyou can delete the warning light of these vehicles through.Of course, the one-off error caused by coding mistake is that the warning light does not come on again after deleting the warning light, but if there is a fault in the vehicle, the warning light will come back on again.External Application > External Applicationselectfrom the E-Sys left screen.TransmitterDouble-click on theright side.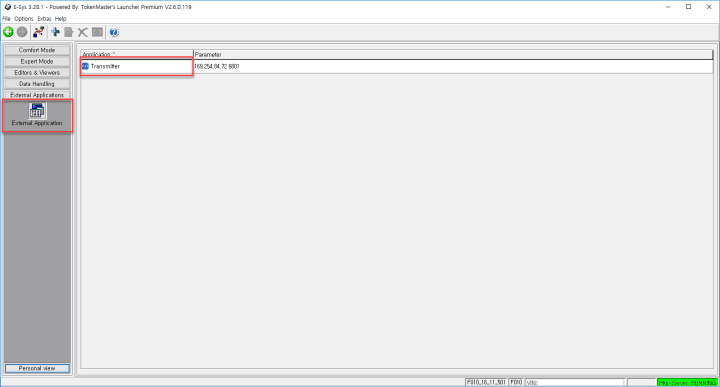
Connectpressthebutton at thebottom of the screen(if you press the Connect button, the connection will be displayed.Predefined ServicesAt the bottom of the listClear all DTCs...., select the item that starts with.SendPressthebutton at thebottom of the screen.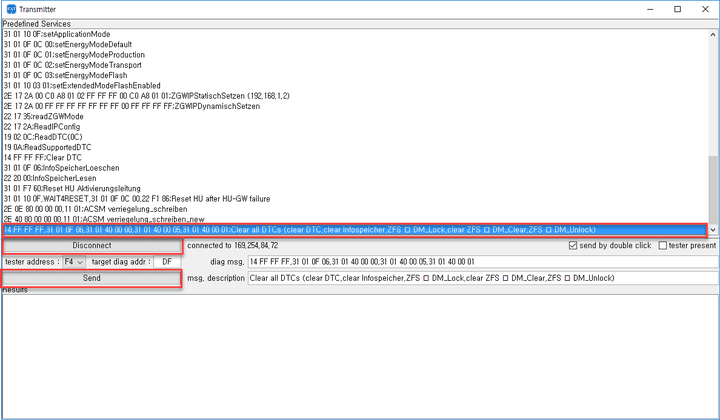
Posted by: jean at
06:09 AM
| No Comments
| Add Comment
Post contains 222 words, total size 3 kb.
December 07, 2017
Disable driver/passenger seatbelts warnings (audio and in display):
acsm2
3001 -> Gurtzustandsanzeige_Beifahrer (Driver) -> nicht_atkiv
3001 -> Gurtzustandsanzeige_Fahrer (Passenger) -> nicht_atkiv
3001 -> SeatBeltReminder_Fahrer -> nicht_atkiv
3001 -> SeatBeltReminder_Beifahrer -> nicht_atkiv
3001 -> Initialwarnung -> nicht_atkiv
3001 -> SBR-PreWarning_Fahrer (Driver) -> nicht_atkiv
3001 -> SBR-PreWarning_Beifahrer (Passenger) -> nicht_atkiv
(some settings may already be set nicht_aktiv)
turn car off when driver's door is opened (removes need for second start/stop push to turn car off):
bdc_body
3020 -> TCM_LOGIC_R_OFF_DOOR -> aktiv
mirrors fold immediately when car is locked, unfold when car is unlocked, and windows can be opened/closed from key:
bdc_body
3056 -> KOMFORT_SCHLIESEN -> 00
3056 -> KOMFORTSCHLIESSUNG_FB (Comfort Access ONLY) -> aktiv
3110 -> ASP_BEIKLAPPEN_BEI_KOMFORTSCHLIESSEN -> 1
3110 -> ASP_AUSKLAPPEN_NACH_KOMFORTSCHLIESSEN -> 1
reduce to 20 km/h the speed at which mirrors automatically unfold (useful to me even if the mirrors set to automatically unfold when unlocking since I sometimes fold the mirrors when parked in my garage but I don't lock the car):
bdc_body
3110 -> ASP_GESCHWINDIGKEIT_AUTO_AUSKLAPEN -> 14
change lane change turn signal to 5 blinks:
bdc_body
3068 -> BLINKZYKLEN_ANZAHL_TIPP -> 04
change frunk open function on remote to unlock rear hatch (med and long press):
bdc_body
30D0 -> RC_DEFAULT_IDG_3RD_BUTTON_MID -> 02
30D0 -> RC_DEFAULT_IDG_3RD_BUTTON_LONG -> 02
turn on ventilation on med press of panic button (not sure how long ventilation stays on, presumably there is setting for that somewhere):
bdc_body
30D0 -> RC_DEFAULT_IDG_4TH_BUTTON_MID -> 07
(note that by default a medium press is greater than 0.5 seconds and less than 2.0 seconds, the setting RC_TIME_DELAY_PANIC defines the maximum medium press time).
turn on door handle lights in reverse:
bdc_body
3070 -> OVT_BEI_REUCKFAHRLICHT -> aktiv
disable legal disclaimer:
hu_nbt
3001 -> LEGAL_DISCLAIMER_TIME -> kein_ld
add rex hold mode menu item to settings:
hu_nbt
3000 ->EV_MENU_AVAILABLE -> rex
add lock door after driving away setting to door lock menu:
hu_nbt
3000 -> DOOR_LOCK_AFTER_DRIVING_AWAY -> aktiv
(Interestingly if you set this back to nicht_aktiv the option will be removed from the menu but the car will continue to not lock the doors if the option was unchecked).
reduce volume to 50% of max when turning car on (defaults to 25%):
hu_nbt
3002 -> VOL_MAX_ON -> 32
change fuel tank to euro size:
bkombi
3005 -> TNK_LITER_RECHTS -> mcv_rex_liter_kl_rechts
3005 -> TNK_OHM_RECHTS -> mcv_rex_ohm_kl_rechts
3005 -> TNK_VOL_ANZEIGE -> 8_litre
sync car clock to GPS (requires clock to be initially set to within 2 (?) minutes of correct time):
bkombi
3000 -> GPS_UHR -> aktiv
A setting I haven't found yet is the delay of turning off the PDC display when shifting out of reverse (my i3 does not have the parking assistant, so has no camera and rear sensors only). The PDC display switches to iDrive when driving forward based on speed and distance but both of these are too long for my preference. Googling finds a multitude of posts discussing how to permanently disable PDC and how to enable PDC after retrofitting but I haven't found any related to configuring it.
Finally, it would be nice if the arm/disarm sound could be made more subtle, i.e. my Audi makes a 'boop' sound when arming and nothing when disarming. But I suspect this isn't something that can be coded.
Posted by: jean at
09:50 AM
| No Comments
| Add Comment
Post contains 559 words, total size 5 kb.
December 06, 2017
After reading all the coding below,wait a while before coding!Please back up and restore your data, and proceed with the coding while you are backed up !!!
Note: The guide was translated from Korean. Credit to Mr.JIHUNX.
Summary
If you are ready to install all the coding programs and the coding cables, we will start coding in earnest.The coding is roughly done in the following order.It would be easier to understand the following outline after drawing the overall outline first.
- Connect your car and laptop to each other with a cable.
- Run the coding program to connect to the car (this is the process of connecting the coding program to recognize the car)
- Download coded data from my car to my laptop (eg download the data set to ‘Beep if the seat belt is released!’).
- Change the settings on my laptop and save them to my computer (eg change the setting to ‘Do not beep if your seatbelt is released!’)
- Upload the coding data you saved to my computer to the car.
Connect your car and laptop to each other with cables
Firstconnectyourvehicle and computer with theBMW ENET cable.
Andturn on the vehicle start.If the vehicle is powered off when the coding can be communication is lost in the middle of coding, we recommend that you turn on the ignition coding.However,off the case of a DME / DDE module startup supposed to be (ACC On) Turn on the power only in the state code, which isthe error How to resolve due to the DME / DDE module initialization, please refer to the article.It is recommended that you do not code DME / DDE modules.
Run a coding program to connect with cars
If you have connected the vehicle to the cable and started up as above, runtheE-Sys Launcher.

Choosethecode for your car from the Car Series.The code you choose here is a generic code name for your car.In other words, select F010 for a 5-Series sedan and F030 for an F30.

Tendeyo it is displayed if the program is executed, the following screen,press the connect button to connect to the vehicle.

Press the connect button to display the connection setting screen.Youmustselect Target and Interfacehere.Code Name andE-SysTarget when usually call the model number of the vehicle may vary.
Please check theE-Sys access codeI have uploadedand select the correct Target.If there are several F010s as below, you can choose the one with the latest version of Direct.Usually the latest version is at the bottom of the list.
In theInterface, select Connect via VIN.
Select Target and Interface and pressConnect button.

If the vehicle is normally connected, the following message will be displayed.Click OK to close the window.

Download car-coded data to my laptop
On the left side of the program screen, if Expert Mode is notselected, select Expert Mode and select Coding.

Click the Read button in Vehicle Order.

Right-click on the FA folder and selectActivate FA.

PresstheRead SVT buttonon the right side of the screen.

The modules of the car are displayed in the SVT area.
As an example, let’s show you how to modify one coordinate.I want to change the coordinates ofKOMBIthecoordinates totheHUD_SPRACHEINGABE_ENABLEvalue ofaktiv.

First locate the KOMBI module in the SVT area, select the CAFD with the green V icon on the left side of the KOMBI submenu, click the right mouse button and selectRead Coding Data.

When you read the coded data on the vehicle, the following message will be displayed.Close button to close.

Change settings on my laptop and save it to my computer
CAFD will be changed to a folder, and another CAFD list will be created under it.Select the list, right-click,Edit FDLand select.

The FDL Editor screen will open.Enter coordinates in the search bar to find the desired coordinates.You can find some of the keywords by typing them without having to type in all the coordinates.

I found exactly the coordinate I wanted.
Let’s expand the folder of coordinates and change the value that this function now works.Expanding the Ausgelesen folder hasnicht_aktiva value of.This value is the setting value of the existing functionaktiv. To changethis value to, press the right mouse button and press theEditbutton.

This will bring up the select box so you can select a value, thenaktivselect it.

For some coordinates, you may need to enter a value directly instead of selecting it as above. After selecting Edit,Values from ECUenter the value in thelower area of ​​the screen and thenclick the Exit button on the right of the screen.

If you modified the value well, the save button at the top of the screen will be activated.This is not the step of storing the value in the vehicle, but the step of temporarily saving the value to the current computer.After saving, press the Back button to exit the FDL Editor screen.

Upload coded data from your computer to your car
Now it’s time to transfer the coding values ​​you temporarily saved to your computer to the vehicle.Code FDLButton.
Note:
CodeThis is a button, not aCode FDLbutton.CodeButton is a button that initializes the coding.

I am transferring modified coding data from my computer to my car.

A message will be displayed indicating that the vehicle has successfully transferred the changed values ​​and completed without errors.Report 0 errorAnd if there is an error, there is a problem during coding, it is recommended to return the modified value to the original value.

Quitting coding
The coding is finished.Please make sure that the value you just edited is correct.There is no procedure to terminate the coding separately. Normally, the connection button that is clicked before will be changed to the disconnect button. Pressing the button or disconnecting theBMW ENET cableis not a big problem.
Posted by: jean at
06:07 AM
| No Comments
| Add Comment
Post contains 955 words, total size 36 kb.
December 05, 2017
1st : you doesn't need iCOM NEXT to flash the G series...but It actually Lot better & save up your times becauseICOM NEXThas build in Gigabit connection.
2nd : old iCOM working find. It just take a lot longer.


Stateside,ASSissettomemoryfromfactory.ForEUvehicles,thesametrickscanbeused;butmostneverlookinthekeymodule.
DVDinMotion>63kph&ManualinMotionaswellasNGHBareafewthathavenotbeenabletounlockyet.
Otherwise,Ihaveover200FDL'schangesprogrammedintoLauncherCheatCodes.
BMWstoppedthememorysettingfortheMSA-greetingstoVW.
Thewaytoswitchitoffisnowdifferentfromtheoldcars.
Posted by: jean at
03:22 AM
| No Comments
| Add Comment
Post contains 764 words, total size 11 kb.
December 01, 2017
- For those who do not normally download SQLiteDBs, pleasedownloaditafter installing Megadownloader.After installing the program, copy the download link address here to the clipboard and the download will start.

How to install
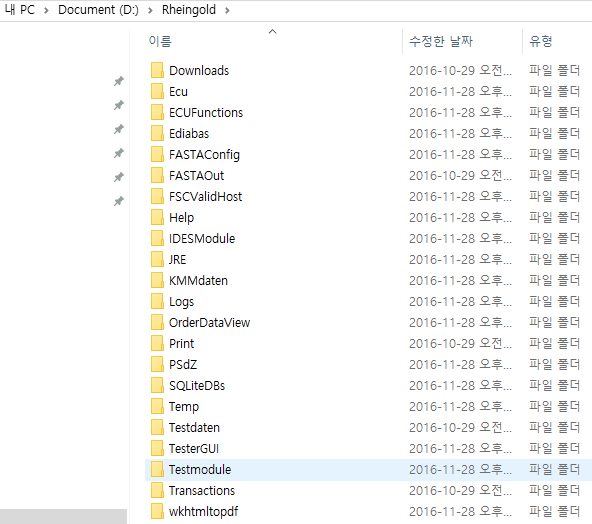
SQLiteDBsPut all of the files in the folder into the folder of the unpacked folder aboveSQLiteDBsand extract it.You do not have to create folders for each language, just unzip them into that folder.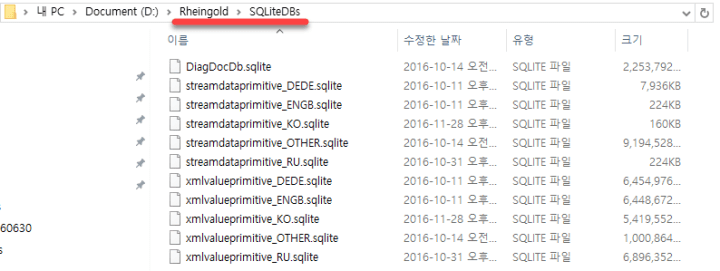
RCleanerV4.4.exe.The reason for running RCleaner is to initialize the registry associated with the program registration.When prompted to reboot, reboot the computer.
4.04.31 standalone reg fix (xOO).regDouble-click the file to register it in the registry.If your OS is 32-bit, register x86. If you have 64-bit, register x64.
ISTAGUI.exefile and run the file.
Rheingoldtherheingold-license.txtfilein the folderand copy and paste the full text.
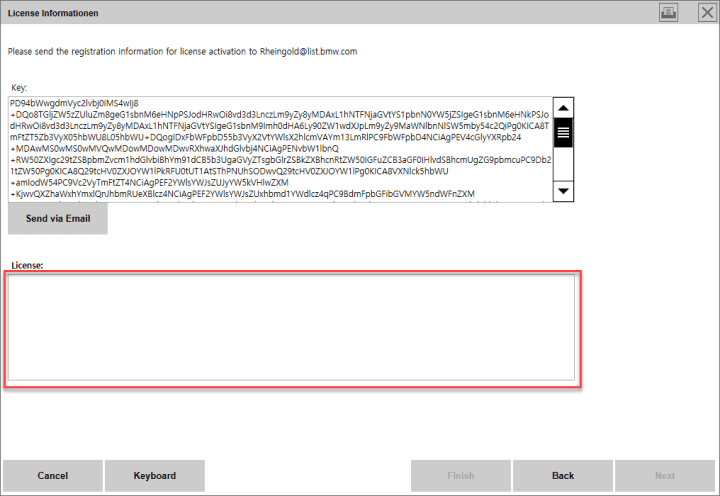
1, you are prompted to enterISIS, justtype and ignore the warning message.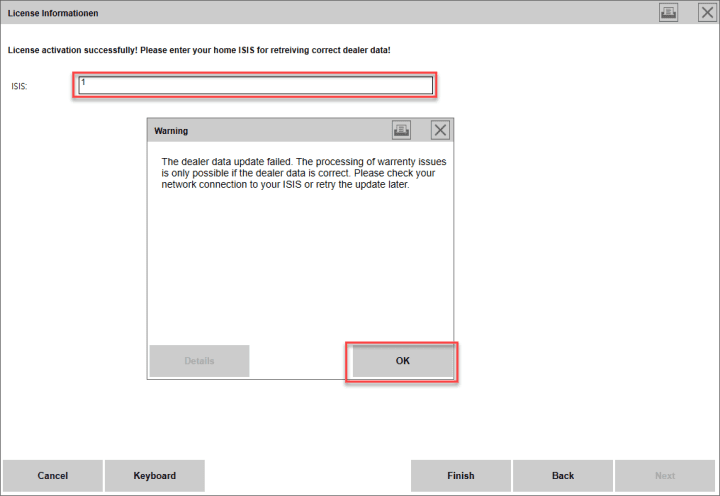
Workaround whenISTA +is not running
- .Net Framework 4.5.2 or later: in Tools folder
- Microsoft Visual C ++: Download from official website
- vcredist 2010 and 2013: in the Tools folder
- vs90_piaredist: in the Tools folder
- Patched_EDIABAS: in the Tools folder
- java
 ownload from theofficial homepage(but the probability of the cause is low)
Posted by: jean at
06:53 AM
| No Comments
| Add Comment
Post contains 436 words, total size 8 kb.
Here we list types and main functions of BMW coding programs, including ISTA, E-sys, INPA, Ediabas, ETK etc.
| PROGRAM NAME | MAIN FUNCTION | APPLICATION MODEL | REMARKS |
|---|---|---|---|
| E-Sys | Module and VO coding | F, G, I | |
| NcdCafdTool | NCD, CAFD, FA, FP analysis | F, G, I | |
| ISTA + | Car diagnostics, maintenance, programming, update | E, F, G, I | Merge function of ISTA / D and ISTA / P |
| ISTA / D | Vehicle diagnosis, maintenance | F, G, I | |
| ISTA / P | Programming, update | E, F, G, I | |
| Dr.Gini | Diagnosis | E, F | |
| ETK | BMW Electronic Parts Catalog | E, F, G, I | |
| INPA | Diagnostic and vehicle service functions | E | |
| NcsExpert | Module and VO coding | E | |
| WinKfp | Module and VO coding | E | |
| Tool32 | Carry out the ECU file function? | E, F, G, I | |
| ZGW_SEARCH | Easy connection monitoring | E, F, G, I | |
| BMWAiCoder | Simple coding | F,? |
Posted by: jean at
06:37 AM
| No Comments
| Add Comment
Post contains 157 words, total size 2 kb.
32 queries taking 0.3657 seconds, 210 records returned.
Powered by Minx 1.1.6c-pink.

