


August 30, 2016
Here is the instruction on change BMW VO (Vehicle Order) by using BMW Ncs expert coding software.
Instruction:

Before NCS Expert can be used a Profile must be loaded.
Select File/Load Profile from top menu bar

Select Expert Mode, then press OK

One a profile is loaded, the bottom buttons become selectable.
Select F1 to read vehicle data first

Select F3 to read FA from ECU.
This needs to be done before any coding can be performed.

Select the model you are working with.
For this example "E65″
Select OK once highlighted

Choose the ECU to read the Vehicle Order from. In this example "CASâ€
Select OK

The Model,VIN and VO should then be displayed
Select F2 to modify VO

Select the mode you are working with, i.e "E65″
Select OK once highlighted

Verify that the VIN is correct
Note:latest digit is a checksum
Select OK

Enter SA or Service code,then select Add
Enter FA SA codes must begin with $
Service codes must begin with +

Example: Enter$655
Select "Addâ€
Scroll down to check


Example: Enter +EVER
Select "Addâ€
Scroll down to check
Select OK

After you have successfully changed the VO you will see this screen
Select F6 (Back)

Select F4 Process ECU

Select the CAS

Select F2 Change Job

Select "FA_WRITEâ€

Vehicle jobname is "FA_WRITE†and CAS is ECU selected
Select F3 Execute Job

Select F1 Change ECU to select LM
This will ensure that new VO is written into CAS and LM

Select "LMAâ€

Verify Jobname is "FA-WRITE†and LMA is ECU selected
Select F3 Execute Job
Done.
http://www.obdii365.com/wholesale/new-bmw-icom-a2-b-c-diagnostic-programming-tool.html
http://obd2expresscouk.bcz.com/2016/08/30/ncs-expert-change-vo-for-bmw-step-by-step/
Posted by: jean at
09:59 AM
| No Comments
| Add Comment
Post contains 273 words, total size 9 kb.
August 26, 2016
How to install BMW ENET cable E-sys coding software on Windows XP?
01) Run "\\E-sys 3.18.4\E-Sys_Setup.exe" to install program to "C:\EC-Apps\ESG\E-Sys\E-Sys.exe"
(Install Password is "lo8F3lsVVg" if prompted)
02) Copy "EDIABAS" folder from "\\E-sys 3.18.4\E-sys 3.18.4\EDIABAS" to "C:\EDIABAS"
03) Make sure "C:\EDIABAS\Bin\EDIABAS.INI" is set to Interface = ENET (it’s possible it has a different value, in that case just change it)
04) Copy "est" folder from "\\E-sys 3.18.4\est" to "C:\ESysData\e-sys est"
05) Copy all "psdzdata" subfolders (all 7 Folders) from "\\2_46.3 psdzdata\" to "C:\ESysData\psdzdata\"
06) Copy the contents of the "C:\ESysData\psdzdata\swe" folder into the "C:\ESysData\SWE" folder.
07) Make sure that there is a "Dist" folder in each of the Chassis (F01/F10/F25) folders etc. (e.g.
"C:\ESysData\psdzdata\mainseries\F010\F010_12_03_511\odx\dist") (should already be set, but check anyway - if not there - create empty "Dist" folders)
0![]() Turn Car's Auxillary Power On (Engine Off) and make connection to car with OBDII-Enet Interface Cable (Wait a few minutes until the network adapter icon shows a Connection with the yellow exclamation point over it)
Turn Car's Auxillary Power On (Engine Off) and make connection to car with OBDII-Enet Interface Cable (Wait a few minutes until the network adapter icon shows a Connection with the yellow exclamation point over it)
09) Launch "C:\EDIABAS\Hardware\ENET\ZGW_SEARCH.exe" to verify cable and connection are working (IP Address, MAC Address, & VIN will be displayed verifying actual communication to the car) (ZGW_SEARCH.exe works intermittently on 64-Bit Windows - Not necessarily a problem if the ZGW_SEARCH window is blank, so long as the computer's wired network adapter shows an IP Address assigned to the computer from the car)
10) Run "C:\EC-Apps\ESG\E-Sys\E-Sys.exe" (It will take E-Sys a while to write the log file) and Under Options, Settings: On the ODX Tab, set the ODX Rule Path to "C:\ESysData\Rules" On the EST Tab, set the Developer-Soft-Token EST Path to "C:\ESysData\est\Code Away.est"
11) Hit the Connect Button on E-Sys Select Target Vehicle (e.g. TargetSelector![]() roject=F020_12_03_503m VehicleInfo=F020) NOTE: Target vehicle for F30 is F20!
roject=F020_12_03_503m VehicleInfo=F020) NOTE: Target vehicle for F30 is F20!
12) Select Connection via VIN, and click Connect (Window should pop up confirming successful connection)
(The program will remember the "connection via VIN" for future connections)
13) When you connect for the first time to your car you will need the E-Sys PIN, which is 2690
14) Please see other how-to documents regarding coding itself.
15) Miscellaneous:
a. Some modules take a long time before the changes begin working (e.g. trunk and mirror close). If still not working after an hour or so, try recoding the module again, even if it looks like the correct parameter (e.g."nicht_aktiv") is set.
b. Share any undocumneted codings with the community.
c. If Coding for an extended period of time (>30 minutes or so
Posted by: jean at
06:07 AM
| No Comments
| Add Comment
Post contains 415 words, total size 3 kb.
August 20, 2016
Here is the very detail guide on retrofit BMW E90 NBT into factory CIC by a Canadian BMW expert.
Car infomation:
2006 E90 330i
For equipment relevant to the retrofit, my car was equipped with CCC /w voice control, telematics, Logic 7, heated seats, and ALU satin trim. Your car may be different and may require parts suitable for your equipment package.
Disclaimer:
You ar at your risk. I am NOT responsible if you buy parts that do not fit your car or if you damage your car in the process.
Acronyms and Definitions
CCC – Car Communications Computer iDrive Generation 1: dino era to ~2008
CIC – Car Information Computer iDrive Generation 2: ~2009-2012
NBT – Next Best Thing (aka CIC-High) iDrive Generation 3: ~2012+
K-CAN1/2 – Car Area Network communications protocol
MOST – ring topology fiber optic communications protocol
ALU – aluminum (referring to my aluminum interior trim)
ECU – electronic control unit
TCU – telematics control unit for telematics and BT (TCU also stands for transmission control unit, but were not working on the transmission here)
TRSVC – control unit for rear and side view cameras
quadlock – main square wiring harness on the HU
kombi – instrument cluster
fzd – front courtesy light
Required Parts

eBay NBT kits:
NBT HU (I have HW:07 with internal gyro, although any HW version will work with the emulator I got, including HW:21)
NBT CID (must be 8.8″ from a F20, F25 or F30)
iDrive Controller (see below)
iDrive Controller:
NBT kits on eBay typically include either the F-series standard controller or the touch controller. These run on the newer K-CAN2 protocol, have different mounting points, and have slightly different dimensions than the CIC iDrive controller.
CICcontrollersuse a separate frame (the black trim you see in pictures)
F-Series controllers have a built in frame
F-series controllers are NOT plug and play on my emulator and will require moving the two iDrive controller CAN wires from before the emulator to after the emulator. They also require your own ingenuity to mount and, at least on mine, a few mm needs to be shaved off from the CIC controller opening in the ALU trim. It’s about 2 mm longer.
My CCC controller with haptic feedback would not register scrolling. You can try your luck with a CCC controller without haptic feedback but you’d be missing the bestpartof the newer controllers – the shortcuts!
Needless to say, I used a CIC controller and saved the headache. Touch can always be a later project. There are many CICcontrollersavailable on eBay with different part numbers. Not sure what the differences are but they should all work.
If you’re going the touch controller route, it also requires the touch ECU, which is specific to your language.
Whichever route you go, here are some handy part numbers:
CIC Controller Frame 51169170917 (only for <2011 CIC controllers)
Touch ECU English 65829320275 (not confirmed)
Emulator:
E-series cars use K-CAN (100kbps) while F-series cars use ENET K-CAN2 (500kbps). The emulator does nav activation and video-in-motion, but more importantly, acts as a CAN bridge to adapt the communications between protocols. There is no way to use NBT in an E-series without an emulator that does CAN bridging. An F-series activation emulator will not be sufficient.
OEMcomponentscoming from CCC (not needed if you have CIC):
CIC HU FrontPanel6 Button+AM/FM+Mode 65129270248 (More info later)
OREuro CIC HU Front Panel 8 Buttons 65129270250 (not available in NA)
CIC HU Front Panel Knob 65129114289 (CIC front panel came with the knob)
CIC Dash Cover 51459120979 (This has heated seats cutout. Find a different part if you don’t need the cutout.)
E90 LCI Center Console Trim ALU Satin (for CIC controller. Different PN for diff finish.) 51169145143
5x MQS Pins (for eNet) 61131393703
5x OBD2 Pins (for eNet) (No part number since I was given these. Ask at BMW parts counter.)
OEM components coming from either CCC or CIC:
4-6x MQS Pins (for microphone rewiring) 61131393703
Bluetooth Arial Cable 61120137616 (this is from an X5)
Aux/USB center console socket (4 pin version) 84109237653 (you’ll have this if you have USB already. There’s some 6 pin versions but not sure what they’re used for.)
USB cable 61119129360
CAT5 network cable (I used these wires for eNet and microphone rewiring, although any wire would work.)
My car already had AUX so no new AUX wiring to HU was required.
(NBT does not officially have a glovebox USB akin to CIC’s, but one can be hooked up if desired to USB2
OBD2 pins on the bottom and MQS pins on the top

OEMcomponentsto remove TCU (since BT is built in to NBT):
If you have a TCU, MULF or Combox, you’ll need to remove it.
MOST Termination Loop 61136917541
MOST Termination Plug 61136917978 (I didn’t need this but other modules might have a combined MOST plug with 4 conductors.Buyit anyways. It’s a few dollars.)
(Optionally you can also disconnect the MOSTconnectionfrom the MOST junction under the rear seats, but this just seemed easier.)
Aftermarket Components:
NBT CID DisplayCable70CM+ (from the emulator seller)
There is no OEM NBT display cable that I’m aware of that’s long enough to use in an E90. Your other option is to purchase an OEM F30 cable and extend it yourself. It has 4 shielded conductors plus two power lines.
(NBT F30 CID Display Cable 61129261850)
2x #8×3/8″ tapping screws (for CIC faceplate mounting –homedepot sku 887480010213)
2x #6 washers (for CIC faceplate mounting – home depot sku 887480024517)
Backup Camera (optional)
Since my NBT emulator emulates the TRSVC unit, I can use any el-cheapo eBay backup camera. I purchased an E90 rear CCD camera that replaces the trunk handle for ~$50 oneBay. NBT takes standard NTSC composite video. Everyone should do this when you retrofit NBT!
The NBT emulator I purchased does notsupportdynamic parking lines. Neo also has another unit that will superimpose the parking lines based on steering wheel angle. I wish I knew he offered this when I made my purchase!
Random Stuff:
Trim removal tools (ebay)
Cheapo multi-meter
Dremel with cutoff wheel
zip ties
fabric tape
electric tape
heat shrink tubing
torx screwdriver bits
random common tools
Posi-Taps and Posi-Locks (for those who want to avoid soldering. available on amazon)
0.5A fast blow fuse and inline holder (for rear view camera)
Coding Hardware and Software:
ENET cable
INPA K+DCAN USB Cable (comes with pin7&8 switch, do not need to solder pins 7&![]()
Laptop running 32bit windows (use vmware if necessary)
eSys + PSdZDATA (and token and/or patched esys jar files)
NCS Expert + datan(to decode any removed modules)
Installation
I’m not going to cover everything. Instructions to remove specific parts can be found all over the internet. All you need to do is google "bmw e90 remove [part]â€. I’ll only cover areas that are not well documented or I had trouble doing as others suggested.
Most of the pins, including the quadlock, are standard MQS pins. The exception is the OBD2 port, which uses different pins. See eNet section for pictures.
Remove existing HU
This has been well documented with the CIC retrofit threads.
Wire eNet if coming from CCC
CIC equippedcarsare already prewired with eNet wiring. CCC cars need 5 new wires.
On mycar, pin 29 on the quadlock was already occupied by a positive fan power line for the CCC unit. This won’t be needed since we’re taking out CCC. In it’s place, you can wire up ETH_A.
Match up the wires from the quadlock to the OBD2 using these two pinouts diagrams.


Wires can be pulled under the carpeting in the driver footwell. Remove the driver foot panel and the panel covering the obd2 port. 3 torxs screws on the foot panel. 2 philips screws on the obd2 cover. Careful with the MOST diagnostics port connected to the foot panel. As always, treat fiber optic cables with the utmost respect! Do not bend them any more than absolutely necessary!
Wire microphone from courtesy lights to quadlock
Remove FZD (courtesy lights) by taking out the two sun visors. You can get your hand between the headliner to release the two clips right above the circular lights. I tried using the screwdriver prying method others talk about online to no avail.
Remove A-piller.
Remove glovebox
Pull wire down, making sure the wire in the A-piller is where the existing wires are bundled and not in front of the curtain airbag. Wires went behind the square metal bar used to hold he glovebox in place. If wiring is above, below or in front, I would expect trouble reinstalling the glovebox.
Microphoneand quadlock both use MQS pins. Mine had two conductors although some may have three.


Wire BT antenna from driver footwell to HU
Remove driver side foot panel. It’s three torx screws. BT module is the little black box towards the left mounted on the backside of the panel. You’ll need to shave off one of theflanges on the NBT Bluetooth connector to fit the BT cable. Look carefully and you’ll know which one needs to go. No modifications necessary on the BT aerial end.
Wire USB from center console to HU
Remove rear air vent by pulling the back or using a trim tool. Pull air vent back as far as possible by releasing the retention clips on the sides. Stick your hand between to push out the aux faceplate strait up and out. This was a real punisher with lots of pain.
Take out the gear shifter by pulling strait up. Pull up the black plastic frame surrounding the gear shifter by grabbing the edge through the faux leather. Take out the centerconsole trim by grabbing through the gear shifter hole and pulling strait up hard. Pull the new USB wire to the HU.
Note: USBcableneeds to be rotated 180 degrees. You can do that by shaving the connector and cutting off the clip on one side.


Wire backup camera from trunk lid to HU
Instructions are all over the internet for installing it on your trunk. Pull the compositevideo cableup to the quadlock and plug in the two MQS pins.
To get wiring past the backseat to the cabin, remove the seat cushion by pulling it strait up near the corners. You can pull this wire without taking out all the trim on the right side of the car. Simply slip it under the black plastic edging. Here, you’ll be up to the glovebox.
Inner wire on the composite cable is the positive.
I got a switched positive lead from pin 13 from the quadlock using a posi-tap on the plug and play harness. This is a radio_on trigger line with a 0.5A current load. Although the camera consumes <100mW, make sure to add a 0.5A inline fast blow fuse to protect the head unit. Ground can come from most nuts and bolts in the trunk. Use a multimeter to test for power.


Retrofit NBT LCD to CCC/CICmonitorframe
Get the CCC or CICscreenout. See CIC retrofit threads if needed. It’s only held in by two torx screws at the top.
Take off the back plastic cover from the NBT CD screen by releasing the clips. The LCD is attached to the front glass by double sided foam adhesives. You’ll need to break the bond with brute force. Grab the LCD and pull directly out as hard as you can. You’ll break the outer glass in the process. After it breaks, just keep pulling until you get the screen out. The inner frame will take the stress off the LCD panel and you won’t damage the LCD in the process.
Next, cut off the lower edge andmetalhooks with a dermal.
The NBT LCD had a thinner bezel than my CCCscreen. Shave or dremel out anything that prevents the LCD from sitting flush in the frame, namely the two edges where the wings are different. Remember to use masking tape and paper/bag/something to seal the LCD opening in the CCC frame to prevent shavings from entering the area while you’re trimming the edges.
Take a look at the screen in the frame to feel out the "center†position for the LCD screen. Cut and stick 3M double-sided foam adhesives to the LCD frame. Stick. Done. You’ll only have one shot. Get it right! If you want to go crazy, dremel out everything that’s preventing the back plate from clipping back together.


Install NBT head unit in dashboard
I used a plug and play wiring harness instead of tapping and cutting the original wires. This was by far the most painful part of the installation. It took me 4 hours and a lot of scrapes. At the end, I had to remove the radio/climate frame and put all unnecessary stuff to the empty space on the right. I also needed a zip tie to hold up the bundle of wires to clear the USB, BT, and video connectors.
I haven’t made new mounting points to screw in the HU yet. It should require drilling two holes and moving themetalclips that the screw threads catch on to.
Note: If you have Logic 7 and going for the plug and play wiring harness, you’ll need to transfer the fiber optic lines from the original quadlock to the new quadlock. Be gentle with the fiber optic cables.

Remove redundantparts(TCU, MULF, Combox)
My TCU was in the trunk under the removable bottom panel. I didn’t take any pictures in the process but it’s pretty simple. Just unplug everything, plug the MOST line in to the MOST terminator and wrap everything up with foam to prevent rattles. This took me at most five minutes.


Installnew CIC front panel and dash cover
Cut upper pins. Cut clips. Shorten guides and screw in frontpanel.


Coding
You’ll need your emulator provider to do the coding or provide instructions. The coding to get it working at a bare minimum level is beyond me and probably specific to the emulator’s implementation.
I did some coding myself with e-sys. There’s no DHCP server handing out IP addresses to the NBT. Connect via gateway URL using default IP: port 169.254.199.99:6801 withwindowsEthernet IP set to 169.254.199.100 and gateway 255.255.0.0. I had to make my own VO file before e-sys would code successfully.
I should have needed to remove TCU VO to prevent SOS error. However, for some reason, mine didn’t throw an error on the kombi so I didn’t do this step.
Open Issues with Coding/Firmware
I’m sure most of these can be corrected with coding.
- [FIXED with firmware update] North America 2015-1 NEXT maps don’t map addresses correctly in my area. NA 2014-2 seems better.
- RDS-TMC traffic not working
- [Fixed with coding] Can’t seem to remove BMW Assist menu items (probably some coding issue)
Observations about NBT in E-series
[FIXED with firmware update] Reads but cannot play MP3s from USB. Oddly, can copy to harddriveand play without issues.
[FIXED with firmware update] Navigation arrival time wrong. Makes the nav unit just about useless.
Emulator supports video in motion.
Sports display units do not stick. Will need to change to HP & lbs/ft each power cycle.
CIC front panel backlights are lit when I enter the car. Apparently this is to match cars with FRM2 and FRM3’s welcome lights that turn backlights on on unlock.
US CIC faceplate with 6 buttons, AM/FM and Mode buttons. 1-6 are touch sensitive, and AM/FM and Mode act as shortcut 7&8. Coding to 6button_us only disables AM/FM. Fix, buy euro faceplate?
[FIXED with firmware update] Service required menu shows two blanks for sparkplug and microfilter. Apparently these fields were removed from F-series vehicles. Can be coded out of kombi on E-series to remove the blanks.
Next Steps
[Done] Drill new holes in dash bracket to secure NBT head unit.
[Done]Cleanup rear view camera wiring.
[Done] Reinstall dash trim.
Done!
NBT is great! Best thing you can do foryour carif you’re looking for something refreshed from CCC or CIC. Not much more I can say asides from the system being absolutely wonderful to use! It has all the bells and whistlers of any modern media system.
Posted by: jean at
02:43 AM
| No Comments
| Add Comment
Post contains 2665 words, total size 27 kb.
August 18, 2016
Clone BMW Creator C110 code scanners flood into market. If you buy the clone C110, you will not be able to enjoy the free technical support.
Original C110 scanner vs. Clone one
1) Update
Original C110: Can be updated online
Clone C110: Cannot be updated
2)Appearance difference:
Left: Original C110
Right: Copy C110
The original C110 code reader comes with raised OBDII mark andthickness lines, the Clone comes withrecessed OBDII mark and fine lines.
 Original C110 comes withtrademark, the clone does not havetrademark.

Original Creator C110 scanner has a notch on the connector, the clone does not.


http://www.obdii365.com/upload/pro/201608/how-to-tell-original-bmw-c110-scanner-from-clone.docx
Posted by: jean at
01:36 AM
| No Comments
| Add Comment
Post contains 105 words, total size 3 kb.
August 17, 2016
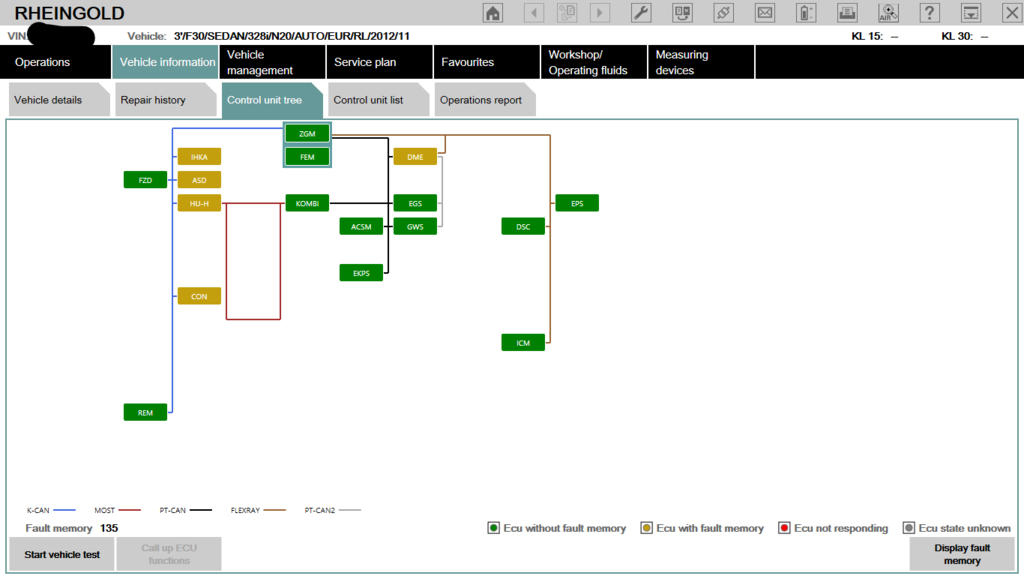
F30 owner complaints:
I have a problem with my BMW F30 2014
I change the FEM ( buy a new FEM by BMW)
And now i try with Ista P (Icom a2) to coding the FEM. But always failed to that.
Below is a the suggestion of BMW FEM coding… Wish helps
You need:
An BMW ENET cable for connection (Ethernet to OBD)
Working E-SYS to save the FA from the old FEM. Don’t think you can with ISTA.

E-SYS vsISTA:
With E-sys you can read and save VO to a file.
If you don’t have ISTA license and you are not online, this is the way you can transfer the car VO to the new FEM.
If you haveISTAlicence and you are connected to BMW servers, then ISTA-P will download VO automatically and insert it into the new FEM.
How to code a new FEM:
1. plug your old FEM (I hope it is not completely dead and you can still read VO from it) read VO and save it to a file with E-sys.
2. Disconnect old FEM and plug new FEM, then connect with ENET cable to the car, go to VCM and load VO from the file you saved previously. Then go to master tab and click "write FA†which will write the car VO to the new FEM.
3. Start ista-p and when you see window for replaced modules click Yes and when you see the list, in the bottom tick FEM. ISTA-p will code(configure) and initialize the new FEM to the car.
How to code an old FRM:
I have read both, that Immobilizer (EWS4) is an issue for FEM, and that it is not. For sure it is an issue for DME replacement. I don’t think attempting to flash FEM would do anything to DME. Worst case is FEM takes VIN, and still won’t sync / decrypt key with DME.
New FEM coding vs old FEM coding:
Theeasywayistoorder a newFEMfromBMW,which theythenputVIN andEncryption Key inforyourcar.
BMW FEM coding FAQ:
Q: IfthemethodwithflashingusedFEMwillnotwork,itwillbepossibletoget backto originalFEMfrommycar?
A: IstillhavethisoriginalFEM.
FlashingusedFEMwillhavenoaffectonyouroriginalone.
Q:IsoriginalFEMwillbestillcompatiblewithflashedmodules?
A: YoucouldalsotryflashingoriginalFEM,andseeifthatdoesn’tsolveyourproblem beforeresortingtotheusedFEM.
Q: What charger is good for flashing to avoid interruption during process ?
A: Use any charger good for 50 amp minimum.
Q: Need VIN change during FEM flash?
A: VINisalsotakenfromFAduringvoorfdl-coding,usuallynoneedtoflashformatching vin.
ButUpdateVCMandMSMIdon’tthinkhavetobechecked.Thisisforotherpurpose. Theyarenotneededwhenchangingvinduringaflash.Stilltheyarerequiredwhencodingareplacedmodule(afterinstallingit),otherwisesvtinvcmwillnotbecorrected.
Above isgoodpointaboutSVT.
Q:During flashing car engine should be running?
A: No,itshouldnotberunning.Youneedpowersupplywith13-15voltsand50amps. Otheroptionistouseanothercarwithenginerunningandjumpstartcables.
Q:What if during flashing process ignition will switch off?
What damages to the car this may do?
A: Itwon’tturnoffaftertheflashinghasstarted.
That’s it. Happy coding.
http://bmw-icom-a2-wifi.blogspot.com/2016/08/how-to-code-bwm-f30-fem-with-enet-e-sys.html
Posted by: jean at
06:35 AM
| No Comments
| Add Comment
Post contains 424 words, total size 5 kb.
August 16, 2016
​
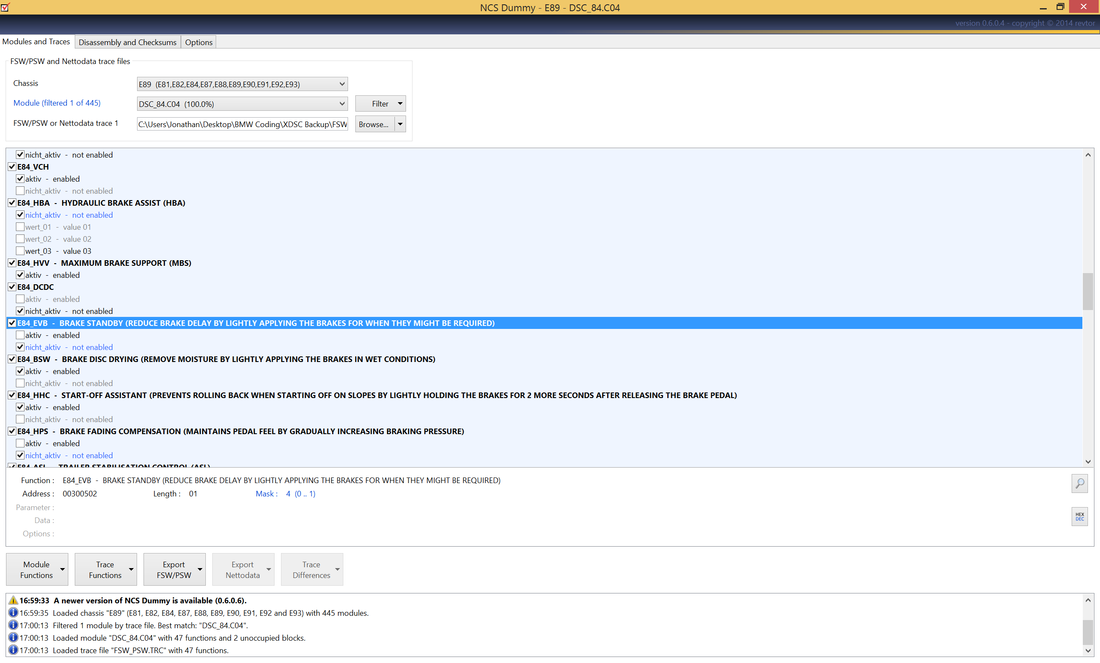
I used two software programs here,NCS Expertto actually pull the files from the car and write them back, and NCS Dummy to view the files with English translation and to see the available options. You can set up these programs on BMW ICOM A2 or cheap INPA K+Dcan cable.
Engine Power Reduction to Prevent Brake Disc Overheating (FLR)
N55 X1 Parameter: e84_FLR
N54 335i xDrive Parameter: FLR_C0F
This is the worst of them all. Modern BMWs will actively cut the throttle in the middle of your track day if it has reason to believe that your brake pads are overheating. Normally, this wouldn't be such a bad thing - nobody wants to crash into ARMCO going 140mph. The problem is, your BMW doesn't actually have temperature sensors anywhere in the braking system. The computer relies on a "calculated" brake disc temperature based on several inputs including ground speed, brake pedal application force, and the frequency with which the electronic differential applies "torque-vectoring" braking. Your BMW has no way to know that you installed a Stoptech Big Brake Kit with Castrol SRF fluid and Performance Friction PFC01 pads. It just assumes you are running the stock system and cuts your throttle based on values that would overheat the OEM brake pads. Unacceptable to say the least, and occasionally dangerous. It was not a good experience braking from 145mph down to 45mph with a GT3 three feet off my rear bumper, only to have zero power coming out of the turn. This could very plausibly cause an accident on track.
To disable, set to "nicht_aktiv."
Brake Fading Compensation (HPS)
N55 X1 Parameter: e84_HPS
N54 335i xDrive Parameter: HPS
It is insane that a "performance" car has this feature. Brake fade compensation "calculates" the temperature of your fluid in a similar manner to the above "Engine Power Reduction to Prevent Brake Disc Overheating" parameter does. The higher the calculated temperature of your brake fluid (remember, there is no real sensor), the more hydraulic assist will be added to your brake pedal. In theory, this masks brake fade on the street. On the track, it makes a consistent brake pedal literally impossible. If you are tracking the car, you should have upgraded pads and fluid; you should never experience brake fade. Disabling this feature maintains the pedal's linearity and enjoyable feel throughout an entire 45 minute track session.
To disable, set to "nicht_aktiv".
Hydraulic Brake Assist (HBA)
N55 X1 Parameter: e84_HBA
N54 335i xDrive Parameter: HBA_DXC_8
In the event of an emergency braking maneuver, the average driver does not brake hard enough to sufficiently stop the car. Thus, BMW implemented hydraulic braking assist. This feature monitors ground speed, brake pedal pressure, and rate of deceleration to understand when the car is in an emergency braking situation. It then increases pressure up to the threshold of ABS to assist the driver in stopping safely. Once again, on the street this is a good idea. In Cincinnati, there is utter carnage on the highway whenever the slightest rain falls. The Ohio River runs red with blood from traffic accidents, and the roads look like a battle scene from Game of Thrones. Implementing an additional safety feature such as this probably helps most people, but on the track it is a disaster. It ruins your ability to brake hard and quickly, assuming the end of each high speed straight is an impending accident. Disable this feature for a super-linear pedal that will require noticeably more effort towards the end of the pedal travel. Be careful with this on the street the first few times you use it - you will find that it activates more often than one would expect. You will have to use a bit more braking pressure towards the end of the pedal than you are used to, but you will be rewarded with a wonderful, linear feel.
Brake Standby (EVB)
N55 X1 Parameter: e84_EVB
N54 335i xDrive Parameter: EVB
This is another ridiculous feature that works well on the road, but terribly on track. If your car detects an aggressive throttle lift-off, it will pre-tension the brakes in anticipation of a hard braking maneuver. This would actually be great if it wasn't for what it does next - if you don't brake within 8 seconds of throttle lift-off, it un-tensions the brakes. I have a theory that people who think they are experiencing pad knock-back on the track are actually just being victimized by this "feature." Turn it off for a more consistent brake pedal that responds predictably.
To disable, set to "nicht_aktiv".
Maximum Brake Support (HVV)
N55 X1 Parameter: e84_HVV
N54 335i xDrive Parameter: HVV
This feature alters the front/rear split of the ABS braking system under emergency braking. At threshold braking when the front tires get into ABS before the rears lock, maximum brake support will increase the brake pressure on the rear pistons to equalize with the front. In theory, this reduces stopping distance. On the street, it probably does - particularly when the car has a heavy cargo load. On the track, it can upset the balance of the car and reduce reaction time. During threshold braking, sometimes one activates ABS accidentally and quickly backs off; maximum brake support will interfere here and get you "stuck" in ABS for a second or two. I recommend turning this off on the track, but it does not have as big of an impact as the other settings do.
To disable, set to "nicht_aktiv".
​
Dynamic Performance Control (FDB)
N55 X1 Parameter: e84_FDB
N54 335i xDrive Parameter: FDB
This feature encompasses two things - corner braking designed to "torque vector" and redirecting the power through the xDrive system for a 20/80 FWD/RWD torque split. I am conflicted on this option, and need to do more testing on the implications. Without a doubt, this feature accelerates brake pad wear - if you are driving with a decent amount of slip angle, it will be almost constantly corner braking. Traditional logic holds that corner braking is a worse way to torque vector than mechanical LSDs are and that's probably still true, but recently supercars such as the McLaren 650S started coming with corner braking torque vectoring. Granted, the software in a McLaren is hopefully more advanced than that in an entry level sedan (BMW 335i) but the point holds - there must be something to it if supercar manufacturers are going in that direction. What is frustrating about the X1/335i is that you can't separate the 80% RWD bias (an unquestionably good thing) from the brake-based torque vectoring (possibly a bad thing)? So, what's the upshot? I think it probably goes something like this:
1. Base car without this option - code it on for a nice performance boost!
2. M-sport pack that comes with it enabled, but no mechanical LSD - leave it on
3. Car with an upgraded mechanical rear LSD - ?????
I will experiment more with this feature, but my gut says that with a mechanical LSD installed in the rear, having the 80% RWD split will outweigh the drawbacks of the corner braking in terms of lap time.
To disable, set to "nicht_aktiv".
Electronic Differential (AX_Ref_Diff_Lock)
N55 X1 Parameter: e84_AX_Ref_Diff_Lock
N54 335i xDrive Parameter: AX_Ref
Let's be honest, this is really why you're reading the blog. Everyone who has installed a mechanical limited slip differential wants to disable the rear electronic differential. This option is similar to the X1s "Dynamic Performance Control," but on a more basic level. The premise is that with an electronic differential, your BMW will brake the spinning wheel to send torque to the wheel with traction. The problem is, this isn't a very good torque transfer in terms of mechanical efficiency. Installing a mechanical limited slip differential such as a Wavetrac (my choice) in the rear will allow you drastically better traction and mid-corner adjustability. The problem is, unless you disable this e-diff it will be fighting the mechanical LSD and never really allow your actual differential the freedom to do it's thing. If you have a mechanical LSD installed, do yourself a favor and disable this. If you don't have a mechanical LSD, leave it on. At least, until you immediately run out and buy a real LSD (you should).
To disable, set to "nicht_aktiv".
Here is an example of what the stability control module coding looks like in the program NCS Dummy. There are many more options than I have identified here, but I believe I have highlighted everything that has an impact on performance driving.
Turning all of these options off gained me about two seconds on a 1:45 second track. More importantly, it made my car extremely fun to drive. There are not many crossovers that you can kick the back end out at 100mph, drift into a decreasing radius corner, and then dance with it via throttle inputs as you adjust mid corner and power through. Thanks to the magic of "coding," my X1 is now one of them. Hopefully, this helps you enjoy your car just as much as I enjoy mine.
Thanks for reading.
Posted by: jean at
03:41 AM
| No Comments
| Add Comment
Post contains 1620 words, total size 12 kb.
August 15, 2016

2. open NCS expert
3. load Expertmode profile
4. choose your chassie E60 i gues?
5. choose from where you want to get VIN and FA of your car it’s like LM,KMB,CAS…
6. choose "back†and then "process ECUâ€
7. choose EKPM
8. choose "change job†and select SG_CODIREN
9. choose "execute job†button
10. after a minute or two you’re done
1.Installed the old module, navigated to UIF screen in INPA and made a record of KFP ZB number.
2.Installed the new module and programmed it using the ZB number from the old module.
3. Verified VIN number and ZB number were programmed correctly (INPA UIF screen). I did try to fire the engine, but it turned off shortly after it started.
4. Used NCS Expert "Expert†mode to code EKP module
5. Cleared errors with Rheingold.
DONE. The virgin EKP3 module had wrong ZB number (it says right on the sticker), most likely for another car (335i?) as that ZB number wasn’t available in E60 assembly line.
Posted by: jean at
03:56 AM
| No Comments
| Add Comment
Post contains 321 words, total size 3 kb.
August 05, 2016
Theprogress was tested on328i. You are at your risk.
To start off with I ordered the module. It has various part numbers, but apparently they are all the same: 65129352264*; 65129326555; 65129343317; 65129353021; 65129362445; 65129362445; 65 12 9 322 712 (03/12 -> ); 65 12 9 302 536 (03/12 -> 07/13).*
I could not get a part number for the connector so I will be making up my own.
Next up I got the pin assignments from BMW ICOM A2 and ISTA Rheingold:
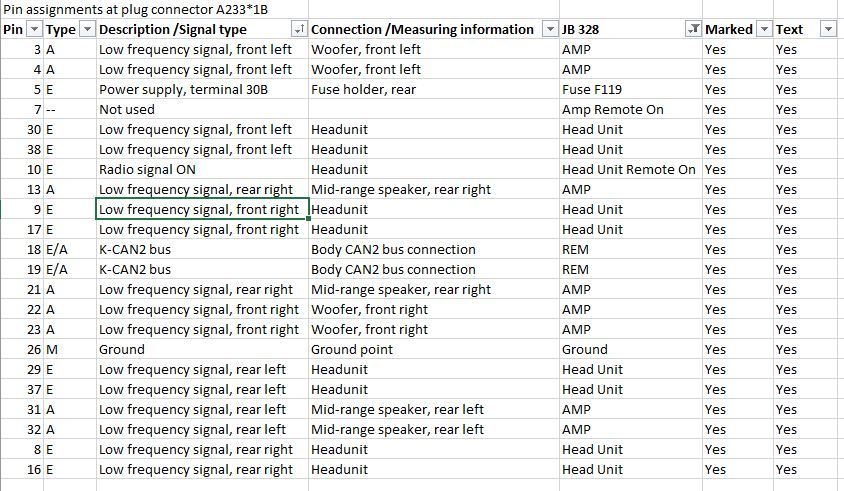
Here is the inside of the connector:

I then transposed all the pin assignments onto an image to make my life easier:
I then continued to only connect power and the CAN signal.

BMW ICOM ISTA detects the new module
ISTA before:

ISTA after:
E-SYS coding software detects the new module:

After this I flashed the ASD module. I used a modified FA where I changed the production code typekey to 3C17 to ensure it is a production code that included ASD.
Here is the FDL edit view afterward:

Next thing I must connect the feed from NBT head unit and output to the AMP. I first need to spend some time to make proper connectors so will update all you guys once I progress further.
Very excited to see this retrofit work!
Posted by: jean at
06:05 AM
| No Comments
| Add Comment
Post contains 244 words, total size 5 kb.
August 03, 2016
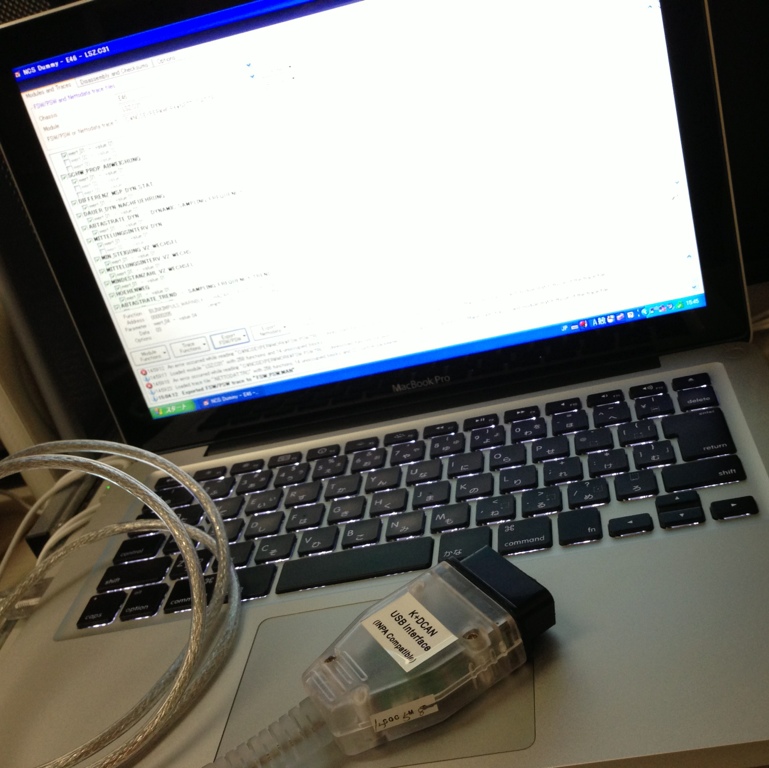
First, i checked the firmware; it’s the new version 1.4.0. So, two points i wanna say:
First, it is ICOM A2 with build in usb-ethernet adapter.
Second, it is K+D CAN interface built in A2 casing.


Anyways, it is not an official product by BMW AG.
Only the official BMW Icom from Actia is an official product by BMW AG - otherwise all the Icom’s are cloned. The price for the clone; it’s okay.
Some inside pictures of the new ICOM A3 hardware, same kind of assembly in ICOM A2
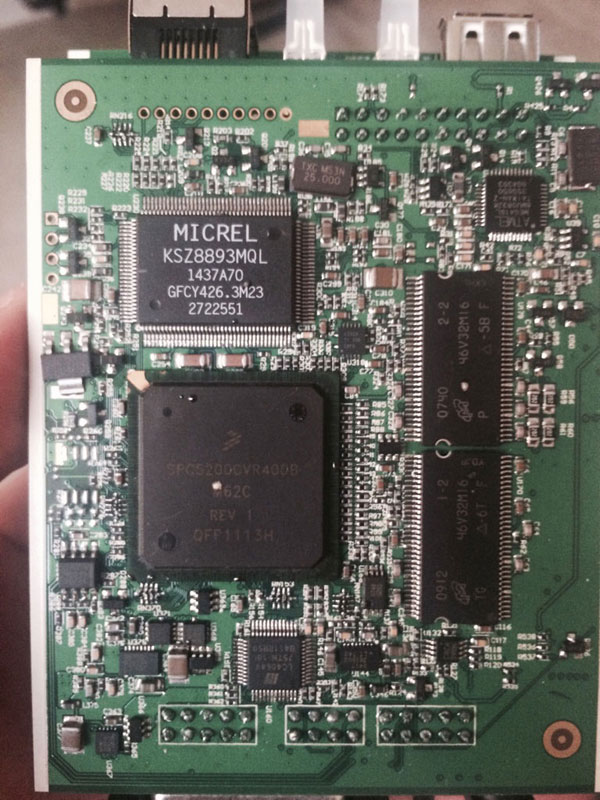

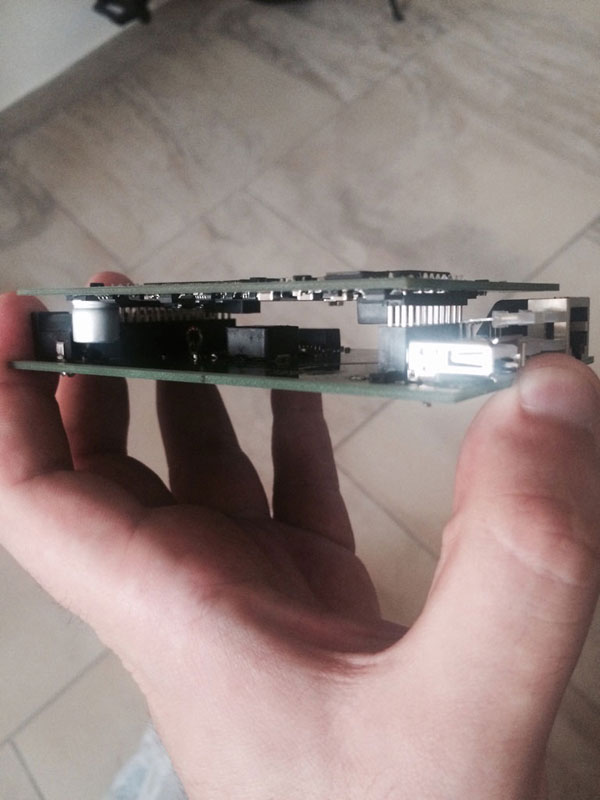
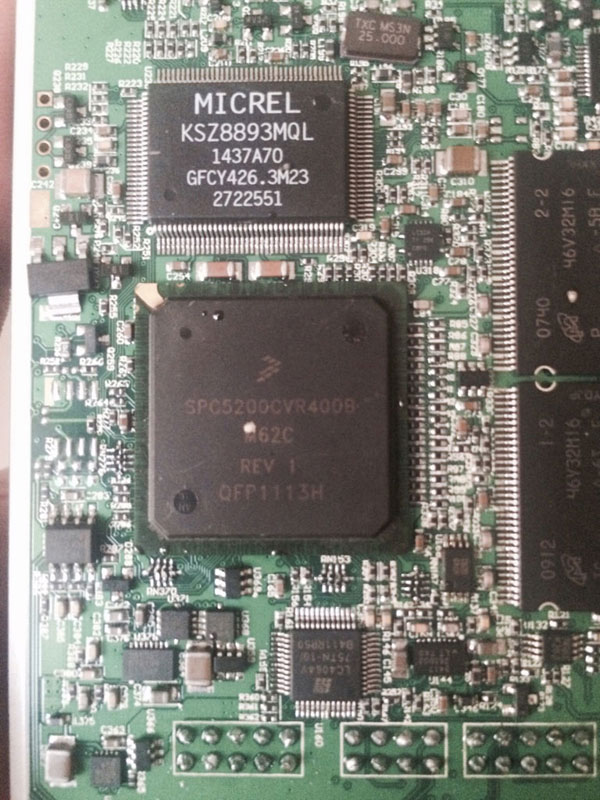

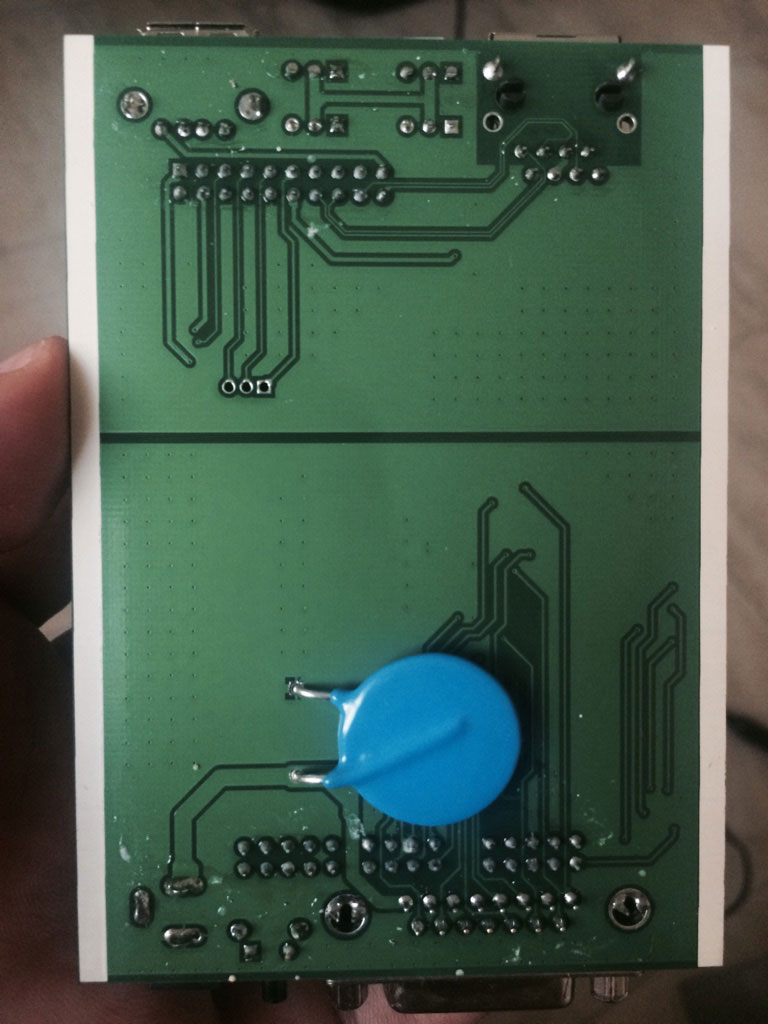


But still had some minor issues - it was still getting hot when intensively used. But worked OK for flashing cic cid etc.
Posted by: jean at
08:27 AM
| No Comments
| Add Comment
Post contains 197 words, total size 7 kb.
32 queries taking 0.0731 seconds, 208 records returned.
Powered by Minx 1.1.6c-pink.

