


August 31, 2023
How-to: program Toyota RAV4 US model from 2019-2023 8A-AA all smart keys lost withAutel MaxiIM KM100by OBD free pin code.
The procedure is the same as AutelIM508/IM608, the difference is that KM100 has built-in emulator, so you don’t need anAPB112 emulator.
Read the immo data directly via obd, No ABP112. No cable, no incode or outcode. OBD only. The tool takes the pin from the immo file.
Procedure:
Go to IMMO->Toyota->Manual Selection-> USA->RAV4->2019-2023->Smart Key->Control Unit-> Keyless System (CAN)


Check the number of keys: 2


Back up IMMO Data->Bakcup immo data via OBD
This function is used to back up EEPROM data of the smart box ECU which can be used to perform IMMO related functions without PIN. This function supports models with 8A-AA smart keys as of 2018 equipped with TMLF15 smart ECU.

Ensure network connection is good.
Turn the ignition off and turn the hazard warning lamps on and off once.
Turn off the bluetooth function of the device and connect VCI to the diagnose tool with USB cable otherwise the function may fail
Backup immo data successfully and save data


Select Generate analog key
KM100 has built-in emulator, so you don’t need APB112.
select the EEPROM Data just backedup
Generate analog key completed


keep the device antenna close to the push start button and press Start button.
If the instrument turns on, press OK to continue.


The analog key must be powered on. use the analog key as the registered key to perform Add key function.

Select Add smart key function
Press Start button
Confirm VIN

Turn the ignition off and turn on the emergency indicators
Upload eeprom data
Read pin from immo data

KeepAutel KM100close to the start button, the buzzer will beep once.

Keep the new key close to the start button, buzzer will beep twice.

Turn on ignition
Put a learned smart key close to the START button. When learning is completed, you will hear buzzer beep once.
Learning completed, test the new key.


Done.
Posted by: jean at
06:36 AM
| No Comments
| Add Comment
Post contains 342 words, total size 22 kb.
August 30, 2023
GODIAG GT108 is an OBDI to OBDII universal converter to convert the OBDI diagnostic interface of cars, trucks, tractors, mining vehicles, generators, boats, motorcycles, individual ECU control units, etc. into standard OBDII diagnostic interfaces through DIY wiring Interface.
It is convenient for car maintenance personnel to connect to OBDII diagnostic programming equipment for data stream reading, fault code diagnosis, programming, activation and coding…

GT108 has 3 configurations:


Posted by: jean at
06:44 AM
| No Comments
| Add Comment
Post contains 446 words, total size 16 kb.
August 29, 2023
Problem:
bmw 2016. I tried to read EDC17CP45 engine ecu isn withAutel IM608 II, but failed. Now the device is locked and said error code 106. How to solve it?


Possible reason:
The number of server calculations has exceeded the limit.
Autel bench reading ISN needs a server calculation that’s special. after 30 times it’s shuts you down. up to 30 calculations per day.
Same as some other devices, i.e Yanhua ACDP, it will calculate ISN from DME up to 6 times per day.
Solution:
Send log data inIM608 II. Also provide serial number to your dealer to manually check if it is an operation error or improper operation (unintentional).
If yes Autel technician will help unlock the device.
Posted by: jean at
08:00 AM
| No Comments
| Add Comment
Post contains 126 words, total size 5 kb.
August 28, 2023
Work Smarter withAUTEL‘s intelligent diagnostics function, it’s a Repair Guided Assistance by autel that guides the maintenance technicians to solve vehicle faults by providing reliable and professional information to solve a car issue without the need to have extensive technical and professional experiences
Autel’s Intelligent Diagnostics vs Traditional Diagnostics
TRADITIONAL DIAGNOSTICS
is the routine diagnosis of the car system it includes the basic functions diagnosis (version information, fault codes, data streams), action test, special functions, maintenance, programming, coding and other related services. Whether the maintenance technician can solve Vehicle failures rely mainly on the technician’s own maintenance experience.
INTELLIGENT DIAGNOSIS:
it’s a DTC (Diagnostic Trouble Code) and Symptom Based Repair Guided Assistance that guides the maintenance technicians to solve the vehicle faults by providing richer information to solves the problem of lack of technician experience. In particular, AUTEL intelligent diagnostics can guide maintenance technicians to follow the process step by step, therefore, Solving the problem and greatly reducing the maintenance threshold.
In particular, AUTEL intelligent diagnostics can guide maintenance technicians to follow the process step by step in a convenient and easy way.
With intelligent diagnostics, you can navigate and test components quickly and with more confidence. Find the repair issue faster, get repair tips from professionals and Autel experts so that you can worry less about a returning customer and focus more on your business. Take your time and discover Autel’s 8 intelligent diagnostics functions below.
Supported car makes: Bmw, Audi, Chrysler, Ford, Benz, Honda, Hyundai, Kia, Nissan, Toyota, VW, Buick, Cadillac, Chevrolet, GMC GM, Renault, Subaru, Volvo, GM China
AUTEL intelligent diagnostics are supported on:MaxiSysMaxiSys Ultra,MaxiSys Ultra EV, MaxiSys Ultra ADAS, MaxiCom Ultra Lite,MaxiCom Ultra Lite S, MaxiSys MS919,MaxiSys MS909, MaxiSys MS909EV, MaxiSys MS909 Lite, MaxiSys MS909C,MaxiSys MS909C EV,MaxiSys Elite II,MaxiSys MS906Pro,MaxiSys MS906Pro-TS.

If you’re looking for a way to improve your automotive repair business, Autel Intelligent Diagnostics is the perfect solution.
1. TECHNICAL SERVICE BULLETINS
Technical Service Bulletins, or TSBs, is document recommended procedures that provide technical guidance to various automobile repair service stations for repairing vehicles, issued by a vehicle manufacturer when there are several occurrences of an unanticipated problem. Technical bulletins generally include fault symptoms, applicable models, and fault finding and solutions tips, helping maintenance technician who are dealling with the some similar fault codes and providing ideas and solutions.
+130,000 TSB technical bulletin, 680 car brands, +400 PCBU code

2. DTC ANALYSIS REPAIR ADVICE FROM OE REPAIR LIBRARY
DTC analysis is a DTC (Diagnostic Trouble Code) detailed document specially generated for a certain DTC. It is also
to help maintenance technicians provide references for a specific DTC repair. It includes the following components:
DTC definition, Fault description, DTC generation conditions, failure effect , and possible solutions.
+15000 Diagnostic Trouble Code
15 car makes, VW, Audi Chrysler, Ford, Benz, Honda, Hyundai, Kia, Nissan, Toyota, VW, Buick, Cadillac, Chevrolet, GMC)

3. REPAIR ASSIST OE REPAIR CONTENT LIBRARY ACCESS
Repair Assist is an ABL generated for one or more fault codes, including specific possible causes of faults, solutions and supporting documents. Through these guidance processes, the problems encountered by maintenance technicians can basically be solved to a large extent. it contains the following components:
Trouble code location, solution process
• Circuit diagram (circuit diagram, location diagram, terminal diagram, etc.)
• Reference documentation
• DTC Details
• Freeze frame
80% coverage for BMW, Benz, Audi

4. FAULT LOCATION
it recommends data flow, action tests, and special functions related to the fault code to the maintenance
technicians, and helps them to narrow down some functions that may be performed to locate and solve the faults.
+3000 Diagnostic Trouble Code,
11 car makes: (GM, Ford, Chrysler, Renault, Toyota, Honda, Hyundai,Nissan, Subaru, Volvo, Gm China)

5. RELEVANT CASES OE REPAIR HISTORY LIBRARY ACCESS
Relevant cases are collections of summarized Documentation of relevant operations performed to successfully repair the fault, to help maintenance technicians by providing ideas for maintenance of similar related problems.
+2000 cases, +180 case videos

6. ODOMETER CURVE
Odometer Curve is a graph showing the relationship between a vehicle’s mileage and the probability of a certain fault code.

7. COMPONENT MEASUREMENT GUIDED TEST PLANS
It is the component measurement related to the fault code, which guides the maintenance technician to measure the component quickly and accurately.

8. REPAIR TIPS MAXIFIX COMMUNITY USER BASED ADVICE
Shows the detailed steps of detecting and clearing faults for the reference of maintenance technicians

https://www.obdii365.com/service/autel-intelligent-diagnostics-introduction.html
Posted by: jean at
06:27 AM
| No Comments
| Add Comment
Post contains 737 words, total size 14 kb.
August 25, 2023
Are you looking for an affordable Ducati motorcycle diagnostic scanner to
Reset service intervals
Reset Pin
Reset ECU
Reset stored codes?
OBDSTAR iScan Ducatiis an ideal tool to start with. Here are some real unbiased reviews on OBDStar Ducati scanner.
Before starting, here are direct links to the compatible bikes for diagnostics/immobilizer/odometer:
OBDSTAR iScan Ducati Diag List.xlsx
OBDSTAR iScan Ducati IMMO List.xlsx
DUCATI Odometer motorcycle list (Optional).xlsx(Needodometer license)
Review 1:
The process isn’t all that scary and they are pretty forward with communication. Once it did ship, and it took a week or so, DHL got it here is three days. Its an Android OS pretty easy to navigate. When you first power on the device you need to connect it to your Wi-Fi.

Click the home icon then the one with the 6 dots.

From here you can see what’s on the device. QuickSupport gives you access to TeamViewer so you can remotely use the device and is how I’m getting all of the screenshots. For Wi-Fi, click settings.


Pick your network then enter your password. Easy enough. Now onto registering the device. As it turns out the device was attempting to send the login details of the account I was attempting to create unencrypted. This caused my Wi-Fi router to block it. Once I realized what was going on, I allowed it on my routers app and all was good. To get started with account creation, click Personal Center.

Here you click Register and enter a username, password and email address. The next screen will prompt you for name, company and address. Then send this unencrypted info off to places unknown. On that note, don’t reuse a username or password. You could even go as far as to create a spoof email if you’re that into internet security. After your account is created you’ll land on this page.

The only surprising thing is that there’s an expiration date. I presume its for updates but I guess I’ll find out in 2023.
Lets get into the meat and potatoes of it. Click the DP on the bar. If you go into MOTO DIAG all that will show up initially is OBD-II which is the same OBD-II and code reader can pull. You have to update the software to get the Ducati specific functions.

Click Upgrade and follow the prompts. Its pretty basic. There’s a few files but they are small and it goes relatively fast.

Now when you click MOTO DIAG you have a Ducati icon. Plug the device into your bike diagnostic port using the OBD-II cable and the appropriate adapter. It comes with a 3-pin and a 4-pin. If you have a newer bike, 2021+ you likely have a red 6-pin connector under the seat. You will need to buy aOBD-II to Euro 5 adapter. They are on obdii365.com and aren’t very expensive.
Click on the Ducati icon and on the next screen click enter in the lower right corner.


Auto Identify VIN is self explanatory but make sure your VIN is detected correctly.

I got an error message since my VIN while detected correctly didn’t match up with the software. It couldn’t determine my make and model from the VIN.

Now we’ll do Select from vehicle, It should be simply Select Vehicle. I scrolled down until I got to P for Panigale. I clicked P then enter.

Now it asks for a model year. I have a 2021, but I picked the 2020 option.

The amount of data you have access to is amazing. This would have saved me some troubleshooting but I can see the clutch switch value.

As I’m working through some DQS issues, I can even see a value for that. Of some interest is that the bikes tracks the number of miles you’ve driven with the MIL lamp on.
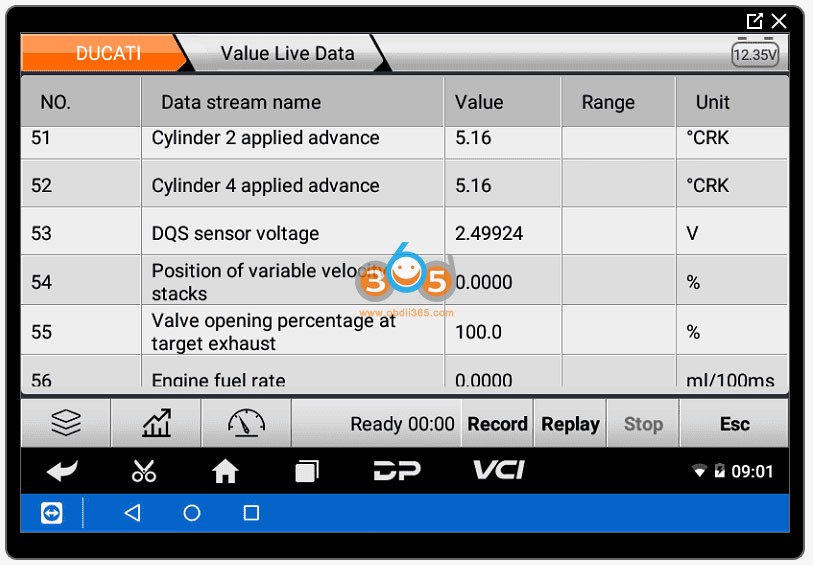

APS Accelerator Opening is the throttle grip percentage so I can verify that mine reads a 0 when its closed.
I’ll skip to service system (Service Lamp Reset) since I know a lot of riders would be interested in that. Its under the special function menu.


You can even disable the DRL if that’s your thing.

Here is adaptives reset. Easy to do, you just click the item you want to reset then hit enter.

There is also a setting where you can test the DQS.
The OBDStar iScan does the exact same DQS functionality test as the Ducati/Texa DDS.
Maybe all the OBDStar device does is read Ducati’s CANBus. The menu layout is different, but all the features and text are the same.
this is a successful test.

Review 2:
I wasn’t sure what to expect when I ordered mine. (OBDSTAR Iscan). Until a few months ago, I never even heard of this company until I started looking into diagnostic scanners etc. The unit I ordered has impressed me throughly. I was able to reset the odometer with the Totalizer function.
This got rid of the dashes my odometer was showing and brought back the mileage (kms) that was stored in the BBS.(It will restore the odometer reading with the higher mileage reading stored in either the dash or the BBS from what I understand.)
There were a few error codes I cleared but I sort of wish I hadn’t, or at least I wish I had taken a print screen so I could keep track of the codes the bike has thrown. Between the oil change service light reset, which I think will be coming on at 15,000kms and restoring he odometer in my instrument gauge I’m pretty sure I’ve made back what the dealer would have charged me for labour and DDS time here in Calgary. I’ll probably buy one for my KTM as well.
Review 3:
The tool works well and also covers a bunch of Ducati models (model list is on their website) and can provide and record live data etc. I’ve so far used it on mine and a friends Monster 810.
Review 5:
I ordered it from one of the sellers onobdii365for $369. I have not seen the actual Ducati DDS, but this appears to be pretty full featured. Probably with all the features of the DDS. gear learning can be performed with the Obdstar Ducati tool, as I successfully did it with the tool. I am happy with the purchase so far.
Review 6:
Mine arrived yesterday and for some reason I thought I’d have to go into the special 123 menu to clear my service light since I convinced my dealer to get the first service done because my ride home would exceed the mileage for it. (I live 4 hours from closest dealer). I’m now at just over 1200 miles and I’ve decat, Austin slip ons and custom map. This service light was the last to get done and I did it last night by just clearing all codes.
Review 7:
There is a brand new (affordable) option for service reset, reading out and resetting errors and a few other functions.
I ordered the device and it was delivered yesterday.
My Panigale V4 is disassembled in the workshop and I’ve been waiting for the delivery of the right shims for a good two weeks to complete the demo service.Waiting until the parts are delivered, then reassembling the vehicle to test the OBDSTAR iScan is not possible.Put all the plugs together, put the battery in and put on the tank
Functions!
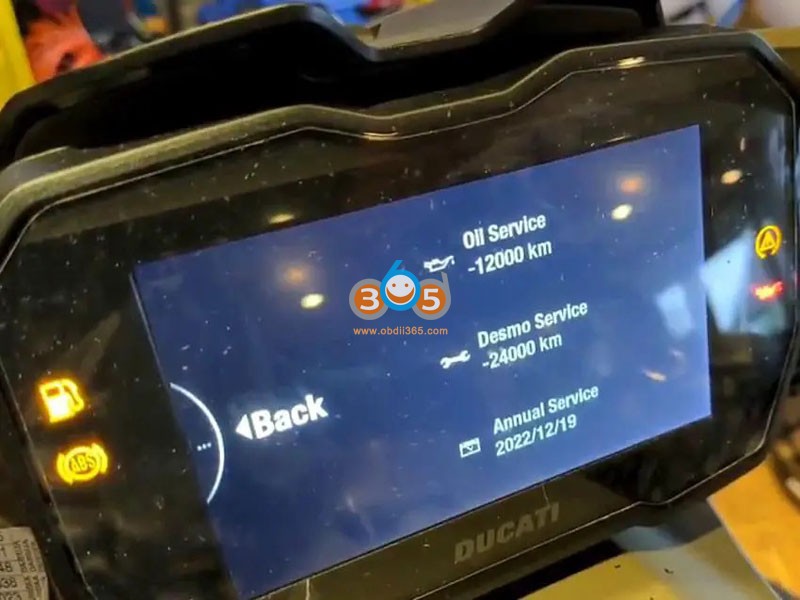
As an example I reset the Desmoservice and Service.

Supplied in a practical box

Content with all necessary adapters
A 3pin and 4pin adapter (Euro 4) is included in delivery.
the Euro 5 connection is different, need to be purchased separately.

home screen

Annual service notification in Dash

read data
Service reset
The device can do a lot more, such as learning the gear sensor or similar.
Review 8:
I have one of these and it does desmo, annual service and oil service reset as well as diagnostics…comes with all the plugs you need , it works great on my 2016 DVT.
Review 9:
Review 10:
I ended up buying one after the dealer hosed up my DQS. You can reset all of the adaptives, see every sensor on the bike in real-time and log it on a ride if needed. It can also access the test modes for the various controllers, ABS, Ohlins etc.
you can do all the service resets. I think it works for every Ducati model. I double checked, the 1198 is listed in the software.
The only issue I had is that my wifi router was blocking it since when it was sending the login it was unencrypted. So for sure use a unique password. Once I figured out what was going on and set an exception it downloaded the OBDStar/Ducati software.
I also had to get a OBD-II adapter to 6-pin Euro 5 to work with my 21 Panigale. The older ones still had the 4-pin diagnostic plug. I had a bad experience at my dealership whereas they very drastically overfilled the oil. I pulled almost a quart out of it to get the sight glass to where it needed to be. I’d rather just buy the tools and do it on my own.
Review 11:
I can confirm this OBDStar diagnostics tablet works fine on Monster S4rs.
Model selection

Limited options for S4rs, to enter into these the bike needs to be hooked up to the diagnostics tablet

Tech bulletins shows one for TPS reset

Top of TPS tech bulletin

Bottom of TPS tech bulletin


Review 12:
TheOBDstar ducatiscan tool is all set up now
Charge the unit, connect to wifi – register the unit and let it run its basic updates
Then plug it into the Ducati, switch on the ignition and hit the upgrade button to download the correct Ducati software. Then it was off and running
After that – its fairly intuitive, service resets are hidden under special functions and it does give a warning that you can break the ECU if you fuck up (very reassuring), but again, its pretty straightforward.
I reset my annual service light easily enough. (Normally I would not do that, but as before its only done 487 miles since it was serviced last year)
It will do the Desmo reset and anything else etc should they be due as well.
I have no error codes, but it will read and reset those, perform endless other functions too. It has an onboard manual if it’s needed
It will even jump on and download any tech bulletins relevant ..
I haven’t explored everything yet, but it does seem to have all the functions expected
All in all, pretty decent.
Keep updating.
http://blog.obdii365.com/2023/08/25/obdstar-iscan-ducati-motorcycle-scanner-reviews/
Posted by: jean at
07:28 AM
| No Comments
| Add Comment
Post contains 1957 words, total size 40 kb.
August 24, 2023
The all-newLaunch Super Chipis a virtually universal transponder chip that, when paired with the Launch X431 key programmer, has the ability to be converted into a wide variety of automotive transponder chips. The software is still very much in active development, but the results thus far appear EXTREMELY promising. Below you will find a list of chip types that users have reported success in generating.

| 7935 33 40 41 42 43 44 |
| 7930 46 |
| 7930 47 |
| 7930 4D on board |
| 7930 45 on board |
| 7937 46 on board |
| 7937 47 on board |
| 4D 60 63 70 80 83 82G 67 |
| 4E 64 |
| 4C |
| 8C |
| 8A Toyota H/Hyundai |
| 43 VAG/Hond |
| 8E Audi/Honda |
| T3 Buick Model |
| T1/T2/T3 |
Compatible device:
Launch x431 key programmer(the device cannot be used standalone, it should be used with X431 tablets, it is compatible withLaunch X431 IMMO PlusandIMMO Eliteat present)

How to useLaunch X431 Super Chip?
1. Go to Key Programmer menu

2. Select [Set type of super chip] function

2. Select the corresponding key chip type and insert the super chip into the anti-theft induction coil.


3. Once successfully generated, it can be used.

Posted by: jean at
06:12 AM
| No Comments
| Add Comment
Post contains 191 words, total size 8 kb.
August 23, 2023
Lonsdor released LT20 8A+4D series smart keys for K518ISE, K518S and KH100_.

Function of the newLonsdor LT20 smart key:
1. Get Version Info
2. Read Button Type
3. Convert Button Functions
4. Unlock key
5. Upgrade Smart Key
6. Modify Frequency
7. Smart Key Copy
8. Convert Smart Key Type
9. Modify Remote Count Data
10. Generate Emergency Key
11. Generate Smart Key
Lonsdor LT20 series smart keys vehicle list:
Board number: 3370, 0410, A433/F433, 5290
Vehicle List:
IS300C 2009
IS300 2008, 2010
RX350 2011, 2015
GX460 2010-2011, 2013
GX270 2009, 2011-2015
RX450 2009
RX450H 2015
CT200 2012, 2014-2015
CT200H 2012
GS430 2006
GS300 2008
ES240 2010-2012
ES250 2008
ES350 2006-2009, 2012
Toyota Camry 2006-2011
Land cruiser 2008, 2010-2015
Prado 2006-2013
Prius 2010-2015
Crown 2009-2011, 2014
Highlander 2008-2010, 2014
Reiz 2010-2011
Board number:
5801 7000
Vehicle List:
Subaru STI 2019-2021
Subaru WRX 2019-2021
Subaru Legacy 2018-2021
Subaru Outback 2018-2021
Subaru Ascent 2019-2021
Subaru Crosstrek 2018-2021
Subaru Foester 2019-2021
Subaru Impreza 2017-2021
Board Number: 0780
Vehicle List:
Previa 2007-2014
Alphard 2006-2013, 2015
Vellfire 2009-2014
LT20-04
Board number: 2110 0020 0010 0101 7930 0182
Vehicle List:
Prado 2015-2015, 2017
Reiz 2012-2014
Crown 2012-2013, 2015-2019
RAV4 2013-2018
Land Cruiser 2013
Levin 2016-2018
Highlander 2013, 2015-2021
Camry 2012-2016
Prado 2013-2016, 2019-2021
Corolla 2014-2018
Board version: 5691
Vehicle List:
Toyota Sienna 2010-2019
Board number:
5380 0120
Previa 2012-2014, 2016-2022
Alphard 2012, 2016-2021
Vellfire 2015-2021
Board number: 0440
Lexus ES200 2018-2020
ES300H 2018-2020
LS500 2019
LS500H 2017
LT20-08
Board number: 0410
Vehicle List:
Camry 2018-2022
Avalon 2018-2022
Posted by: jean at
06:13 AM
| No Comments
| Add Comment
Post contains 264 words, total size 5 kb.
August 22, 2023
Lonsdor K518ISE and K518S series released new update- adding Honda 2022 smart key programming by OBD on Aug. 22nd, 2023..
Supports Add Key and all keys lost free pin code.
ZRV 2022-
Vezel 2023-
Breeze 2022-
CRV 2022-
Accord 2022-
Odyssey 2022-
Xrv 2022- Integra 2022-
Avancier 2022-
URV 2022-
Inspire 2022-
e:NP1 2022-
Civic 2022-
Elysion 2022-
e:NSP 2022-

Posted by: jean at
06:32 AM
| No Comments
| Add Comment
Post contains 67 words, total size 2 kb.
August 21, 2023
This is a 2023 Toyota Sienna with 8A-BA proximity. We are going to doing add key withAutel IM508bypass pin code.

This is like an alternative to that 30 pin cable.
It is just a harness that from an old GPC unit T hardness.
I’m extending the OBD down here. What I’m also doing is I’m taking my can high and can low from here rerouting it up here and tapping into can high and can low on this plug behind the driver’s Dash now.


Because myOBDSTAR 30pin cabledoes not plug in so one of the thing that we got to do is try and figure out where all these things are obviously the bz4x behind the glove could be behind the glove on this.
maybe the style has changed you know so it doesn’t exist.
I just saw somebody on Facebook say that the Tundras on the driver’s side not the behind the glove box so we’re just going to kind of go through this.
This end of the plug was plugged into my scan tool the cannon the high and can low coming from this ends gets cut not connected to this end anymore.


rerouted over here and into my green and white pin one and pin two one’s low two’s high and then I was just plugging this into OBD just so the tool saw power and ground can G-Box whatever. now this 30 pin is very very similar to the OBD star 30 pin except for there’s these little tabs on the side here that are different and it won’t allow that plug to plug in.
If you don’t have toyota 30 pin cable or DIY cable, just connectgboxfollow the wiring diagram inIM508.
The exact same way back up Immo data.
Read and decode VIN.
Go to Control Unit->Keyless System (CAN)->Backup IMMO Data


Read and save immo data


Then add smart key
PIN verification: get pin from eeprom data


Key Learning


Learn key successfully.
Posted by: jean at
09:03 AM
| No Comments
| Add Comment
Post contains 339 words, total size 18 kb.
August 18, 2023
Godiag GD101 J2534 new software driver 2.3 passed Nissan software tested.Obdii365.comengineer has tested it with Nissan consult iii+ v75.15 software and verified it is working fine.
How to configure and use Nissan Consult+ withGodiag J2534?
1.Download and install Godiag j2534 driver 2.3
Free Download Godiag J2534 Driver 2.3- Supports Renault/Nissan
Connect godiag gd101 cable with laptop
Install driver 2.3


Launch J1979 tester driver, check update

2. Install Nissan software and patch
Free Download Nissan Consult III PLUS 75.15 Software Driver and Patch
3. Run Nissan patch.exe

Press ‘Yes to All’ to replace DiagnosticTool.ini

4. Run Nissan Consult iii+ software


Test Video:
Read also:
Posted by: jean at
06:25 AM
| No Comments
| Add Comment
Post contains 121 words, total size 10 kb.
32 queries taking 0.0557 seconds, 210 records returned.
Powered by Minx 1.1.6c-pink.

