


July 30, 2021
Problem:
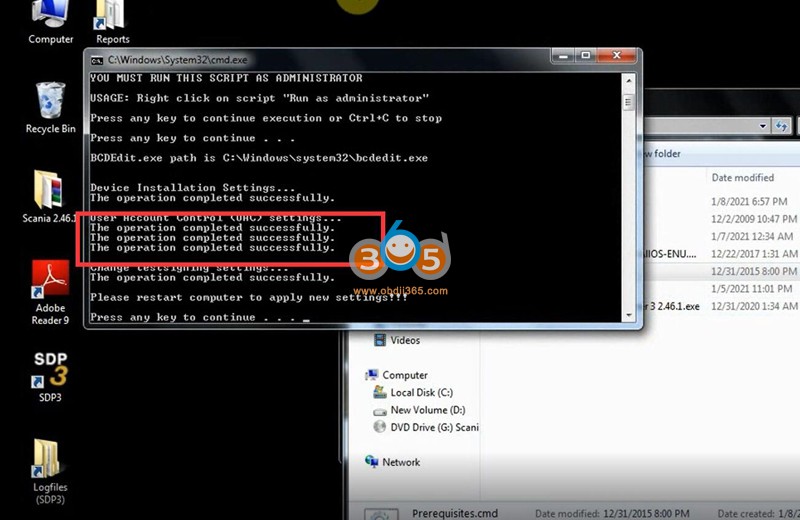
I was required to send a hardware ID to activate theScania SDP3 4.28.2software for myVCI3interface. I did provide the ID but was told the ID is incorrect. How to find the correct HWID?

OBDII365 Solution:
The wrong ID may be caused by not well-installed Prerequisites.cmd file or incompatible operating system.

Windows 7 or 8 is recommended.
Windows 10 is not recommended because some of it's releases does not support it.
Pay attention to the warning message after runPrerequisites.cmd.
Restart the computer after the operation is completed successfully.
Posted by: jean at
07:53 AM
| No Comments
| Add Comment
Post contains 106 words, total size 2 kb.
July 29, 2021
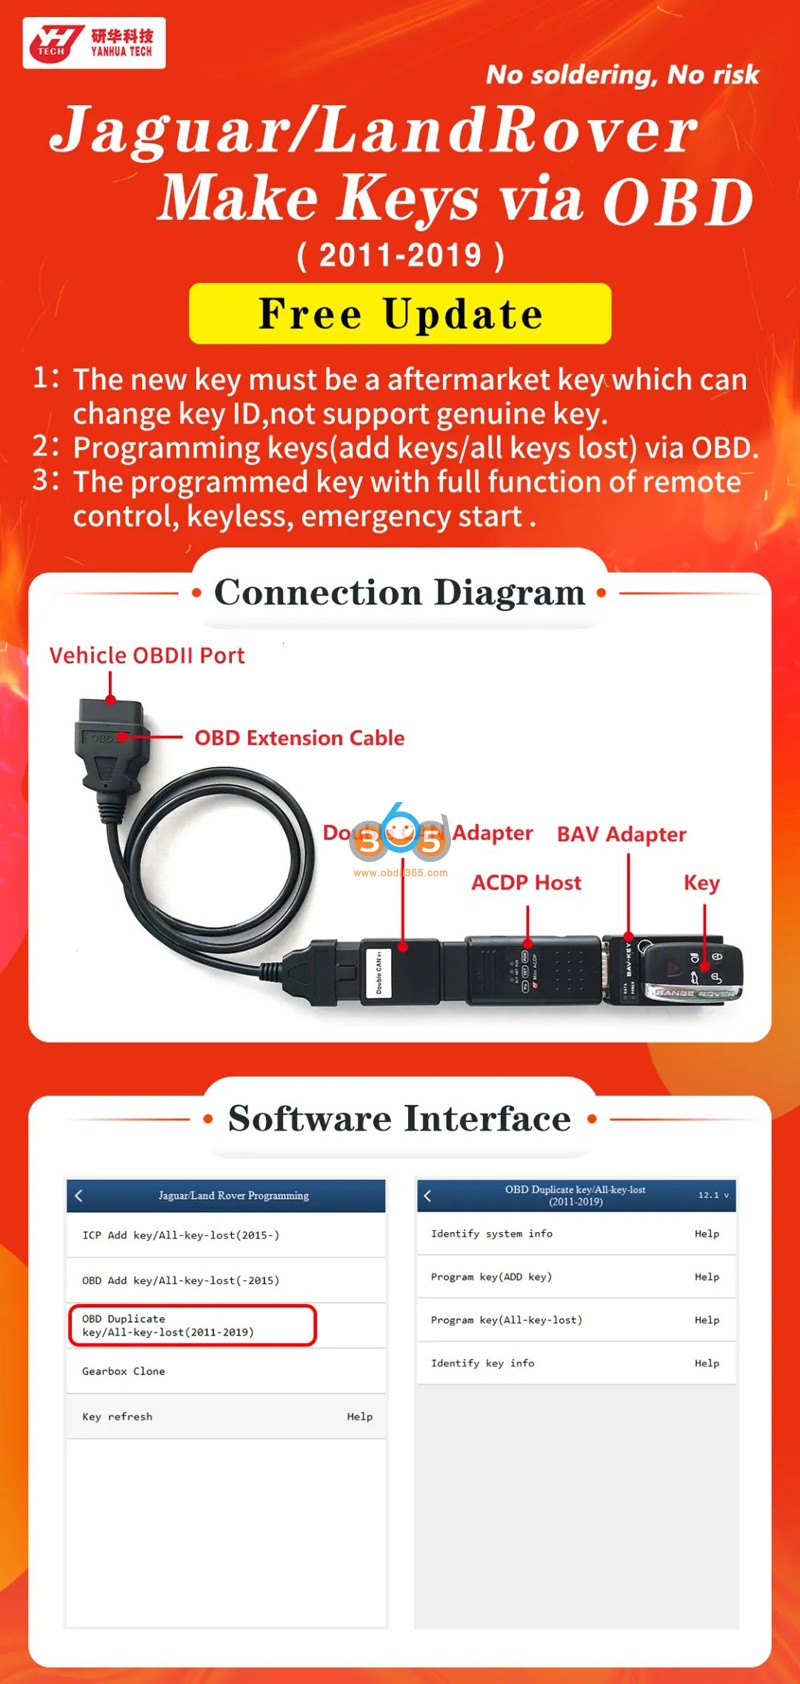
Yanhua Mini ACDP JLR Module 9free update: Jaguar Land Rover (2011-2019) OBD key programming.
1: The new key must be an aftermarket key that can change the key ID. The original key is not supported.
2: Add key and program key when all keys lost via OBD
3: The programmed key comes with remote control, keyless and emergency start.
Prepare:
Yanhua Mini ACDPunit
JLR KVM Key Programming Module 9(free update)
Double CAN Adapter(buy it at 59usd free shipping, or it is free in the package of Volvo 2009 -2018 Key ProgrammingModule 12)
How to operate in ACDP menu?
Click on "Jaguar / Land Roverâ€.
Click on "OBD Duplicate key / All-key-lost (2011-2019)â€.

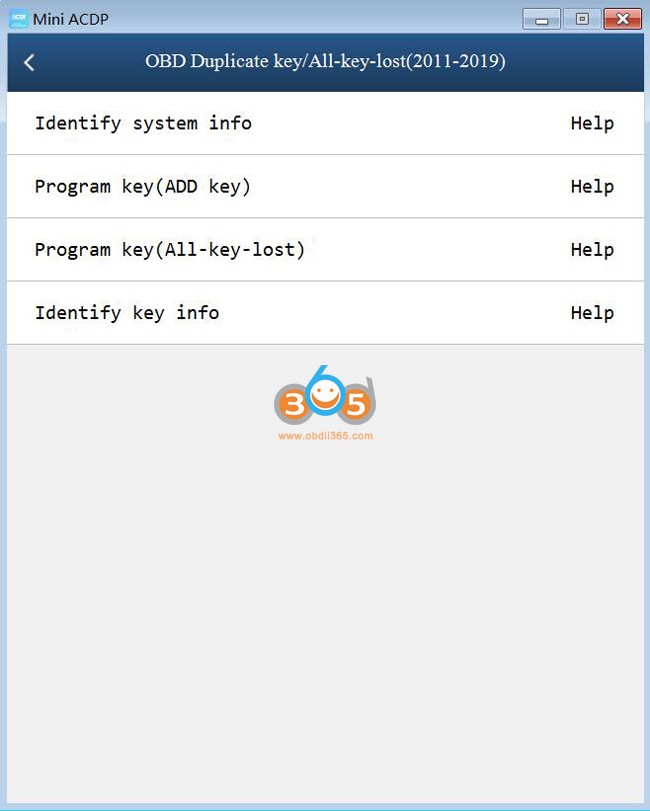
There are 4 options: Identify system information, Program key (add key) ,
Program key (All-key-lost) and Identify Key information.
Identify system information:
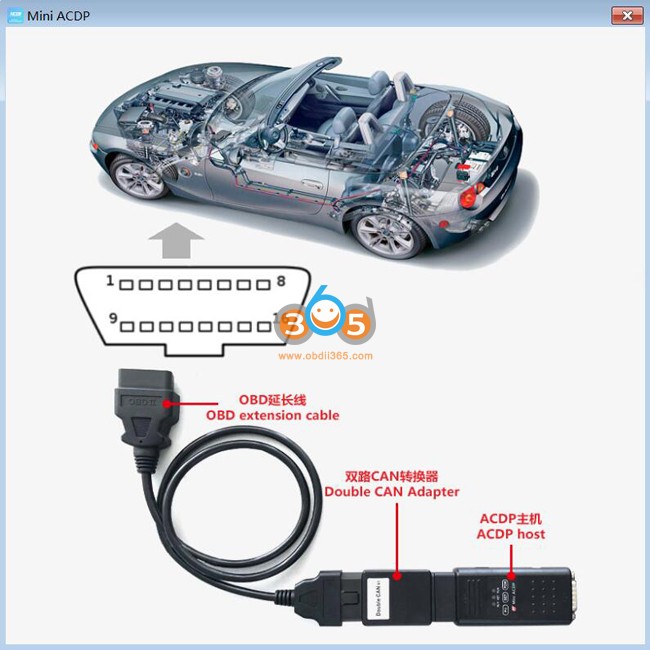
Please connect ACDP with vehicle OBDII port and BAV-key adapters correctly.
Program key (add key)
Note:
1. The add Key function will not delete the original keys, but there must be at least one unlocked working key .
2. The new key must be a special key that can change ID.
3. Must select the key channel with key ID to duplicate a key.
Please connect ACDP with vehicle OBDII port and BAV-key adapters correctly.
Program key (All-key-lost):
Note:
1. The All-Key-lost function will delete all original keys, but the unlocked working keys can be programmed again.
2. The new key must be a special key that can change ID.
3. Must select the key channel with key ID to duplicate a key.
Please connect ACDP with vehicle OBDII port and BAV-key adapters correctly.
Identify Key information:
Please connect the BAV-key adapter to the ACDP and put the key correctly on the BAV-key adapter.

Enjoy!
Posted by: jean at
06:59 AM
| No Comments
| Add Comment
Post contains 300 words, total size 5 kb.
July 26, 2021
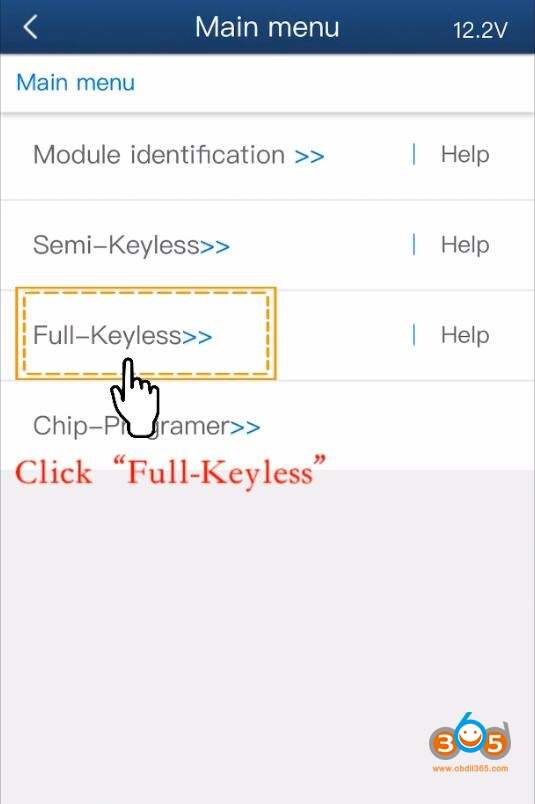
Yanhua Mini ACDP and Volvo module to program key: I only have 2 questions in the videos they show how to read the password, but they do not show how to encode the key, or after reading the password with cem or kvm, the key is encoded by obd2? and the second question. there are two cem or kvm modules in the menu can the password be read randomly from which module or depending on which module is mounted cem or kvm, does volvo just have both modules always?
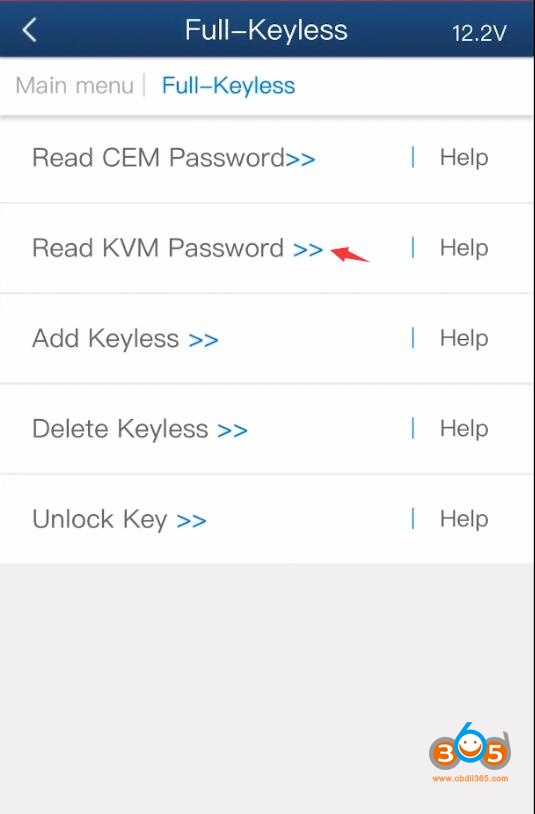
Here is the guide on how to useYanhua Mini ACDPto program key for Volvo:
For thefull-keyless smart keyprogramming, pleaseremove both CEM and KVM moduleunit, and then to read the both CEM and KVM password, then install the modules back, finally program key via OBD port.
For thesemi-keyless smart keyprogramming, just need todisassemble the CEMcomputer to read the CEM password, then install the CEM back, finally program key via OBD port.
Good to know:
Yanhua ACDP Volvo Module 20works with thenewest Volvo carsand the new Volvo car have only full-smart key, not semi-smart key.
—-Yanhua Mini ACDP Volvo 2018 – 2020 Key Programming Guide
Yanhua ACDP Volvo Module 12supportsolder Volvo carsincluding both full-smart key and semi-smart key.
—-Yanhua Mini ACDP Program Older Volvo Full-Smart Key AKL(Incl. Read CEM & KVM password)

Image 1: The key button on the side is for new Volvo cars.
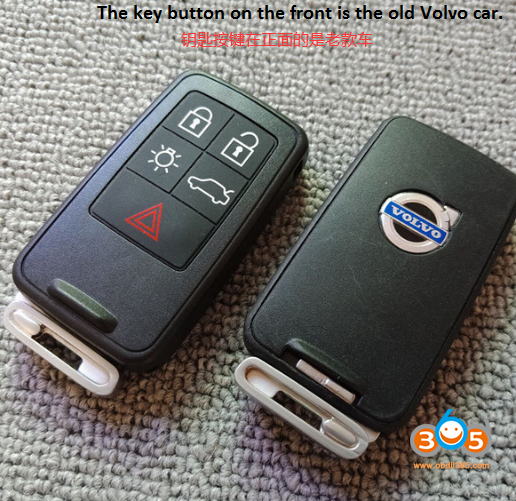
Image 2: The key button on the front is for old Volvo cars.
Enjoy!
Posted by: jean at
07:07 AM
| No Comments
| Add Comment
Post contains 254 words, total size 4 kb.
July 20, 2021
GotBMW ICOM NEXTnot connecting to ISTA because it need firmware update I try to login with internet explorer but I didn’t get the setup page. I don’t know if it’s IP problem or what.
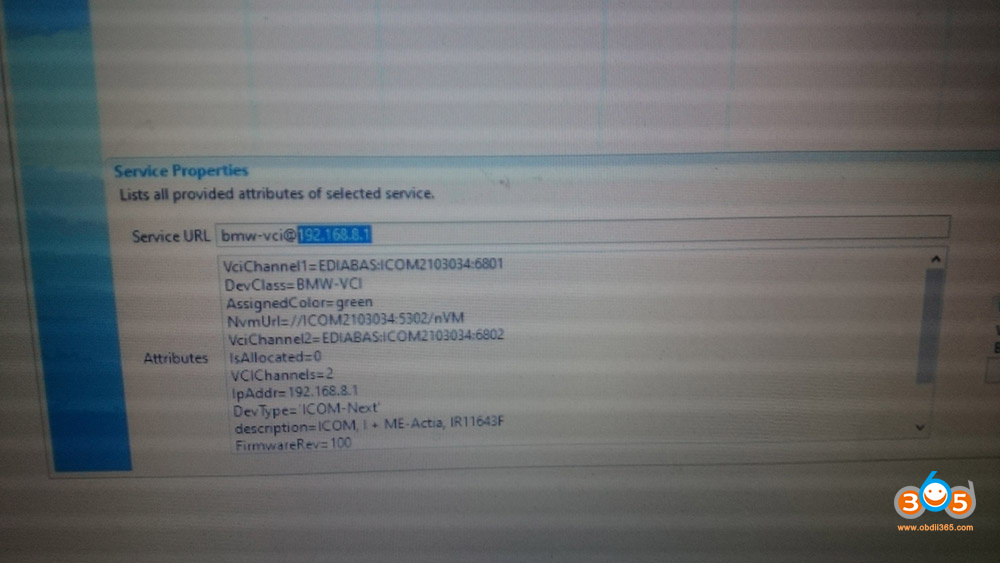
Here is the itool radar shot:

Advice:
Try that: 192.168.8.1:60080
LOG IN with following:
Username: root
Password: NZY11502 or NZY1150263
Download iTool Radar, connect the ICOM directly to your computer, and it should read the ip address from the ICOM. Once you have the IP address, then you can proceed to log onto it using chrome or microsoft explorer browser with the provided credentials above.
If you did exactly as above, but with no luck. Then make an restore usb and reflash with this!
Download from this mega: BMW_ISPI_ICOM_NEXT_FW_3.15.03_files.txt
https://mega.nz/#!UJRllQRK!UIBddM2M8dXo2D5yf8Seluz-TuHiU4yCdnjvLiZOP8A
Then create a restore USB by following the following instructions:
A portable USB mass storage device (USB stick) that is at least compliant with USB 2.0 and is formatted with the FAT32 file system is required as additional hardware.
1. Create a text file user.settings with the following content: ConnectionMode=xxxxxx * 1 (default *2 : DHCP) Ip=xxx.xxx.xxx.xxx (default: 0.0.0.0)
Netmask= xxx.xxx.xxx.xxx (default: 0.0.0.0)
Gateway=xxx.xxx.xxx.xxx (default: 0.0.0.0)
Pay attention to the upper and lower case letters!
* 1 Possible parameters for ConnectionMode: STATIC_IP, DHCP, APIPA * 2 default = factory settings
2. Copy the file user.settings onto the USB stick.
3. If the ICOM NEXT A is ready for operation (SYSTEM LED permanently lights up green), the USB stick is to be connected to the unit (a connected MOST diagnosis adapter is to be unplugged). The red light chain starts after approx. 10 seconds (see 4.2.7.).
The saved settings are persistently overwritten. The green light chain starts once all the data has been updated. In this state, the unit can be addressed at the new IP (even without a restart). If the red light chain does not start, the user.settings file on the USB stick could not be read. If the green light stays off, an error has occurred while the LAN configuration was being written. For analysis purposes, the ICOM NEXT A saves the file user.settings.log with the error description to the USB stick.
or possibly as follows after that you copy the necessary files:
1.3. Connect the USB stick to theICOM Next.
1.4. Press and hold the button located on the right-hand side of the ICOM Next, next to the OBD II cable connection socket.
1.5. Continue to hold the button, connect the device to the vehicle’s OBD II jack and keep the button pressed until the LEDs on the ICOM Next glow red.
1.6. Release the button and within five seconds, push the button three times. This starts the firmware update.
Note: The update may take several minutes. Do not disconnect the ICOM Next as long as any LED glows red.
1.7. When all LEDs on the ICOM Next have stopped glowing, the Emergency Firmware Update is complete. You can now disconnect the USB flash drive.
1.8. IMPORTANT: When the Emergency Firmware Update is finished, the ICOM Next must be connected to your network with a LAN cable in order to be reconfigured since all previous settings have been lost. If there is a "user.settings†file on the USB flash drive, it will be installed after the firmware update.
Final update:
This login is for original next or clone/orig A1, A2 for sure.
I try to login to ip: 192.168.8.1
LOG IN with following:
Username: root
Password: NZY1150263
Hope it helps!
Best source of BMW ICOM Next:
Posted by: jean at
06:17 AM
| No Comments
| Add Comment
Post contains 591 words, total size 6 kb.
July 19, 2021
Before starting to useAUTEL OTOFIX IM1to program key and diagnose all-system cars. It is required to register a member and update the newest version.
How to create Autel ID?
– Visit the websitehttps://pro.autel.com/.
– Click at Create Autel ID button on the left side of the screen to create an ID.

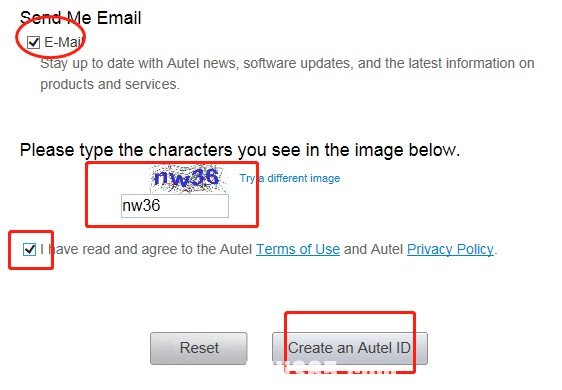
– Enter the required information in the input fields, and click the "Get Verification Code†button to get a verification code for email validation.

Note: Select your preferred language.
Input your email address to the Autel ID box
Password: you could use your email password as the Autel login password of you could create a new one.
– The online system will automatically send a verification code to the registered email address.
– Check your email to get the verification code. Input the code in the Verification Code field and complete other required fields.
– Read through Autel’s Terms and Conditions and click on Agree, and then click Create Autel ID at the bottom.
How to register the tool?
Register tools in official website:
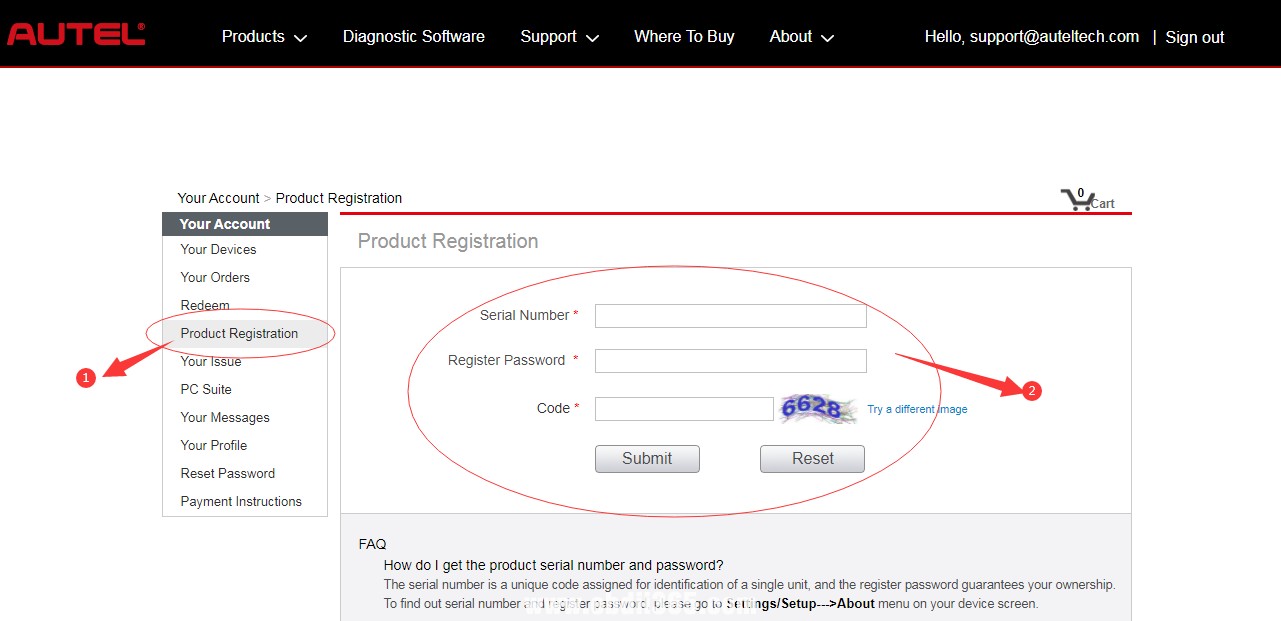
Visit the websitehttps://pro.autel.com/.
Sign in with the Autel ID and password.
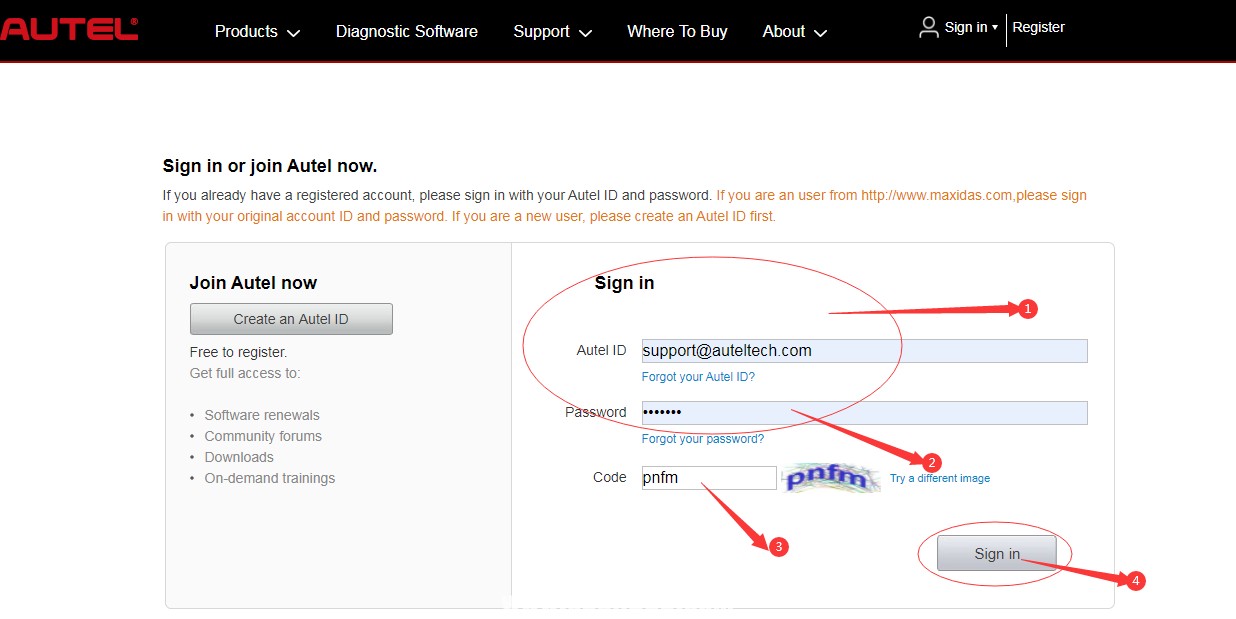
Go to "Product Registration†to register Autel tools.
Register on tool itself (Tablets only,such as for OTOFIX D1 Lite, D1, IM1, etc)
Register notification will pop up when logging into Update.
Click register to start registration process.

Sign in with Autel ID and password.

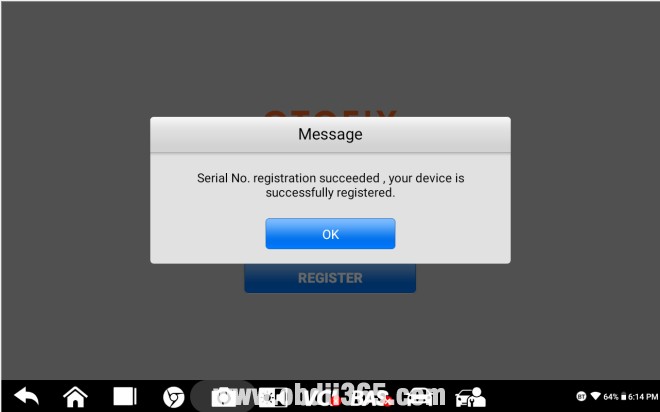
Click OK when seeing "Log in succeeded message.
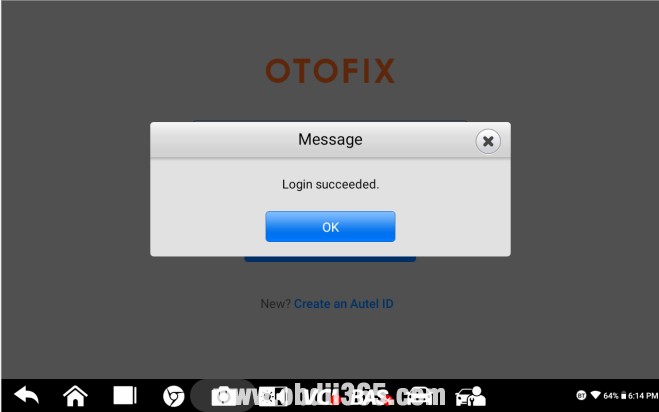
The SN and registration password will be extracted automatically.
Click "Register†for registration.

Will see registration successful info and click OK to finish the whole process.
How toupdate OtoFix IM1?
Tap Update icon, update the OS (If available) firstly, then update the System Programs and LibComms (If available), finally update vehicle software.
There are four ways to renew the subscription.
Log into "Update†and click "Renew†on top right, then select Payment methods and finish the payment.
Go to the website https://pro.autel.com/ and sign in with your Autel ID, then refer to payment instruction at the left-hand side and try.
Pay dealer to buy update.
Buy update card from dealers and then go to https://pro.autel.com/ and sign in with your Autel ID, then go to redeem and try.
How to get data log if it cann’t be uploaded from MaxiTools or Data Log menu?
- A) Cannot be uploaded from MaxiTools (Take OTOFIX D1 as example)
Connect the device to a computer;
Go to OTOFIX D1—-ES File Explorer—–sdcard—-AppLog, then you will see the data file.
Long press the file and tap the More icon on the right corner, then seclect Compress,
Copy the ZIP file on computer.
Send the file to Autel tech support via email.
- B) Can not be uploaded from Data Log menu (Take OTOFIX D1 as example)
Connect the device to a computer;
Go to OTOFIX D1—- ES File Explorer—-Scan—-Datalogging;
Select vehicle software, then you will see the dada file;
Long press the file icon, then copy it on the computer.
Send the file to Autel tech support via email.
Alright, next is to enjoy what OTOFIX IM1 key prgrogrammer brings you.
https://www.obdii365.com/service/register-and-update-otofix-im1-key-programmer.html
Posted by: jean at
07:47 AM
| No Comments
| Add Comment
Post contains 525 words, total size 10 kb.
July 15, 2021
The optional Launch X431 "X-PROG†or "X-PROG3†is required for compatibility when the unit is related to the immobilizer. What’s the difference between XRPGOG and XPROG3?
| Item | Launch X431 X-PROG
|
Launch X431 X-PROG3
|
| Read/Write EEPROM | No | Yes |
| Read/Write MCU | No | Yes |
| Mercedes Benz Keys | No | Yes |
| Key simulator | No | Yes |
| VW 4th IMMO Dump Mode All Keys Lost | No | Yes |
| Read engine in Bench mode | No | Yes |
| VW 4th IMMO enumeration all keys lost | No | Yes |
| Read gearbox data | No | Yes |
| Read and write keys | Yes | Yes |
| Read BMW engine ISN code | No | Yes |
| Replace OBD reading component | Yes | Yes |
| Read & Write BMW CAS4+ and FEM chips | No | Yes |
| Read engine in Boot mode | No | Yes |
| Read & Write Audi 5th generation steering column chips | No | Yes |
| Specification | ||
| Interface | DB15 | DB15,DB26 |
| Input Power | DC12V | DC12V |
| Working current Max | 200mA | 500mA |
| Power consumption | 2W | 5W |
| Storage Temperature | -20℃-70℃ | -20℃-70℃ |
| Working Temperature | -10-50 0℃ | 0-50℃ |
| Size | 142 x72 (mm) | 228 x120 (mm) |


To sum it up, X-PROG is the first generation X431 key programming adapter andX-PROG3is the latest generation with extra chip function and more functions shown in the table above.
Both XPROG and XPROG3 are compatible with multi X431 diagnostic tablets, X431 V, V+, V Pro, Pro3, X431 Pro GT, X431 PAD III, PAD V, PAD VII.
Posted by: jean at
07:25 AM
| No Comments
| Add Comment
Post contains 222 words, total size 5 kb.
July 14, 2021
- Install BMW Standard Tools 2.12 (EDIBAS, INPA, WinKFP, NCS Expert) and ensure they work with your car.
- WinKFP 5.1.6 (no earlier version than this)
- INPA 5 or higher
- Get the daten files (download, extract from Progman or Ista/p).
- E39 daten files:https://rapidshare.com/files/1672164095/E39_V41_Daten_Files.rar
- E46 daten files:https://rapidshare.com/files/4196534502/E46_V41_Daten_Files.rar
- See these instructions for extracting the daten files from Ista/p.
-http://forums.bimmerforums.com/forum/showthread.php?1590483-I-need-files-to-work-with-WinKPF-help-me
- Have jumper cables to another car battery supplying a minimum of 10A power.
- Connect the K-line cable to OBD port on car and USB port on computer.
- Turn the ignition key to position 2.
- Open up WinKFP.
- Select Configuration
- Uncheck Fast baudrate.
- To not increment the flash update counter, uncheck all UIF checkboxes.
- Click OK, cancel all the prompts about creating the new config files, click Ok to save to INI file.
- Select F1 Comfort Mode.
- Select F3 Update ZUSB.
- Select the ECU to update (ex: GD20, GD8604, MDS43, MDS451, etc.).
- Select F4 Enter VIN and paste in the full VIN for the car.
- Select F8 Done.
- Select F3 Prog. ZB-Update to detect current version and latest available update version.
- Click OK to begin flashing.
- It takes 43 minutes for MS45.1, 20 minutes for MS43, 7 minutes for GD20, 12 minutes for GD8604).
- After the confirmation message of flash update complete, close WinKFP.
- Wait one minute.
- Turn off the ignition key.
- Wait one minute.
- Turn on the ignition key to position 2.
- Clear adaptations using either INPA or PA Soft 1.4:
- StartINPA, select DME, Errors, Adaptations.
- Start PA Soft 1.4, select Units, select DME/DDE, select called "DME-EWS Adaptations".
- Clear any error codes in both DME and EGS. Turn off key for one minute. Try again. Do this until all are cleared.
Posted by: jean at
07:58 AM
| No Comments
| Add Comment
Post contains 341 words, total size 3 kb.
July 12, 2021
Question: Is there any tool can read ISN from EGS of BMW E or F or G chassis?
Answer:Autohex II BMW.
Autohex II is the only tool can read ISN from all EGS 8HP (E and F and G), as well as resetting ISN. You can reset ISN from all models of EGS 8HP.CGDI BMWorYanhua ACDPsupports only E and F series, not G.
Reading ISN from EGS is a very powerful function for Autohex users especially when they meet a lost DME or when they want to add a key when all keys lost (extra option to read ISN).
Reading ISN from EGS by Autohex takes less than 15 seconds job, while resetting ISN in EGS takes less than 30 seconds.
Connection with EGS via OBD will come through the gateway, which will filter the factory mode messages. So it is not possible to plug Autohex by OBD and forcing the EGS to enter factory session. You need to make a direct connection between Autohex and EGS.
on bench from EGS reset option.
Is that mean to read isn from OBD2? OBD is available for resetting only (limited support), the function we are talking about works on Factory Mode (bench mode).

Posted by: jean at
06:24 AM
| No Comments
| Add Comment
Post contains 211 words, total size 2 kb.
July 09, 2021
This article is on how to update yourBMW Inpa USB K+Dcan cablewith enhanced firmware which improves communication speed and guards against corrupt ECU flashes!
The items to use:
Besides one of the workable USB K+CAN cables listed later, you will need the following items:
- Arduino Uno (R3, doesn’t matter) or other model Arduino – $3.65
- Dupont or Arduino jumper wires (male to female) – $1.33 for 40
- 2.54mm breakout pins (6 pins total) – $1.13
- Soldering iron/solder (if flashing a generic USB cable with switch that has empty ISP pinouts)
The software to download first:
you will need two programs and the newest firmware file to flash the required software to the Arduino and cable.
Software:
ï‚· ARDUINO IDE:https://www.arduino.cc/en/main/software
ï‚· AVRDUDESS:http://blog.zakkemble.net/avrdudess-a-gui-for-avrdude/
Firmware:
Newest Ediabaslib Binary cable Firmware:
https://github.com/uholeschak/ediabaslib/releases
Credits to Ulrich Holeschak who developed this firmware and documented
the procedure for use with his open source Ediabaslib.
Enhanced firmware advantages:
- Can flash the following BMW ECUs without corruption:
ï‚· M3/M5/M6 DME (MSS6X)
ï‚· E6x M5/M6 SMG (GDSMG3)
ï‚· E9x GM Auto (GM1912)
- And more…
ï‚· Faster CAN communication (block size 0 and no separation time).
ï‚· Allows configuration of CAN mode all the time, not only after power on.
ï‚· Allows configuration of the CAN parameters (block size and separation time)
ï‚· Correctly displays the ignition status (only available for K-line mode).
ï‚· Contains a bootstrap loader that allows firmware update without opening the device.
ï‚· Reduced power consumption due to use of sleep mode.
Workable cables:
We tested 2 kinds of Inpa K+CAN cable based on ATMega162 board can be flashed with this updated firmware, we are not responsible for any other cables that are not listed below.
- ONESTOP Cable with ISP header: No soldering required

- Generic AtMega162 based USB INPA cable with switch and ISP headers on circuit board:Soldering of header pins required
Before ordering INPA USB cable, Verify with the seller that the cable does have the ISP pin
header.
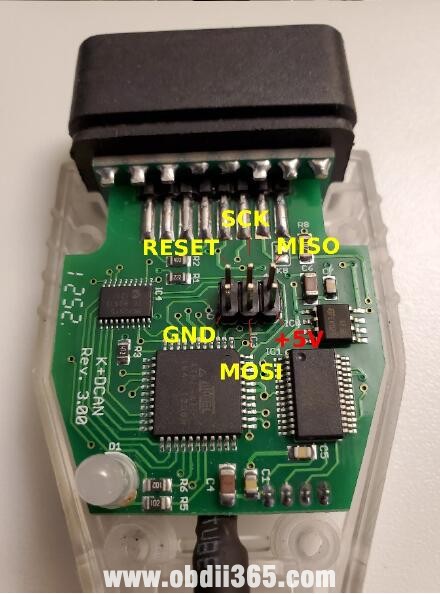
Look at the images below, the circuit board with pin header that we have already soldered on. The stock cable will not include the male pin headers, but rather empty holes which will allow you to solder on your own pins.


How to install the software for Inpa K+CAN cable?
STEP 1: Install software programs and download latest firmware
After downloading the files listed earlier in this document, install all of them using the default options.
Notes:
Arduino IDE:
When the Arduino IDE asks if you want to install any drivers from ADAfruit industries, select yes
or OK. It will prompt multiple times, but continue to agree to the driver installations.
AVRDUDESS:
Allow AVRDudess to put an icon on your desktop
Binary firmware:
Extract file with your favorite .zip archive extracting utility and save it to a folder on your
desktop.
Configuring the Arduino
STEP 2: Connect the Arduino to PC using supplied USB cable
- After installing the software above, plug in your Arduino to the computer using the supplied USB cable.
Windows will detect and install the driver for the device.

Good to know:
if it does not and it shows that windows has failed to install a driver, download and
install the driver from the following link (CH341 based Arduino boards):
https://github.com/himalayanelixir/Arduino_USB_Drivers/tree/master/Windows
- Verify the com port of the Arduino:
- Open up windows device manager and expand the ports tree to view the Arduino com
port designation (COM5). Make note of this for the next step.

STEP 3: Flash Arduino as programmer
- Run the Arduino IDE application and click OK to any prompts that show (java/firewall).
- Click the TOOLS menu > BOARD > and select the Arduino board you have (be it Arduino Uno,
mega, etc).
- Click the TOOLS menu > PORT > and select the COM port you made note of in the previous step (In this example its COM5).

Next, click on the FILE menu > Examples > 11.ArduinoISP >ArduinoISP

It will open up a new IDE window containing the code which we will upload to the Arduino.
Finally, Click the Arrow button (next to the checkmark circle) highlighted (in white) in the image below.

Clicking the Upload button will then begin to compile the sketch, and when done will tell you it is "Done uploadingâ€.
You may now close the Arduino IDE. The Arduino is now an Atmel programmer!
Connecting the Arduino to TheInpa K+Can Cable ISP Pin Header
Connect Arduino to USB cable using jumper cables
For this step you will reference the images in this document and table below to see the correct pinout designations for the type of cable you are trying to flash. It’s imperative you connect the correct pins on the Arduino to the correct pins on the cable you are trying to flash. Failure to do so will prevent the flash from completing successfully. Bear in mind it makes no difference the color of the wires, as long as the pin number on the Arduino matches the Pin designation on the ISP header on the USB cable you are trying to flash.

One stop electronics cable

Generic cable with Switch and ISP Breakout

STEP 5: Flash cable with enhanced firmware
Verify:
- The Arduino and USB cable are correctly connected together via jumper cables
- The Arduino is connected to the computer by USB cable
*Optional: Plug the USB cable into the computer to supply it with power (it isn’t necessary to
install any drivers for it).
Once the above has been verified, run the AVRDUDESS application and configure the options exactly as
shown below:
Programmer (-c): Atmel AVR ISP
Port (-P): COM PORT YOU NOTED ABOVE (COM 5 in this example)
Baud rate (-b): 19200
Bit clock (-B): blank
Presets: Default
Options: Uncheck all (none selected)
Fuses lock bits:
L : 0xFD
H : 0xDC
E : 0xF9
Set Fuses: CHECKED
LB: BLANK

Once the AVRDUDESS options have been set:
- Click the detect button at the top right corner to verify the Arduino can communicate with the
USB Cable microcontroller. If everything is connected properly, it should detect and specify the
chip in the terminal window and populate the MCU (-p) options with the correct
microcontroller.

If AVRDUDESS cannot detect the correct chip, verify the Arduino to ISP header connections and
double check soldering points.
- Next, set the cable fuses by clicking the WRITE button directly under the ‘Fuses Lock Bits’
heading. This will write the three fuses we specified earlier to the cable. AVRDUDESS will also
display a terminal message verifying the fuses as shown below.

- Next, under the FLASH section of AVRDUDESS, click the ‘…’ next to the empty space to browse
and select the ‘Combined.hex’ firmware file located in the CanAdapter folder from the archive
you extracted from the latest binary file located at
https://github.com/uholeschak/ediabaslib/releases

- Verify that the Write radio button is selected, and Auto (writing only) is selected from the
Format drop down selection.
- Click ‘Go’ to begin the flashing process.
At the end of the flash, the LED may light up on the USB cable.
That’s all.
YourInpa K+CAN Cableis new upgraded with enhanced firmware.
http://blog.obdii365.com/2021/07/09/update-inpa-kdcan-cable-with-enhanced-firmware/
Posted by: jean at
07:52 AM
| No Comments
| Add Comment
Post contains 1183 words, total size 19 kb.
July 08, 2021
What innovations makeLaunch X431 PAD VIIthe most powerful X431 ever?
- Optional ADAS calibration
- 8 extended modules functions, Xprog3, TSGUN etc
Online Programming:BMW, Benz, VW, Audi, Seat, Skoda, Porsche, Nissan, Infiniti and many coverages from Smartlink - With 32 services functions, Adds AC system relearn, ACC calibration, Engine power bbalance monitoring, GPF regen, rotation angle sensor calibration, high-voltage battery health detection comparing PAD V
Check detail Hardware and Software Improvements:
A large screen (13.3 inches) advanced diagnostic functions and Smartlink remote diagnosis, this is Launch X431 PAD VII intelligent diagnostic tool.

It makes your intelligent diagnosis faster with theoptimized chipset.

Upgrade operating systemand large memory.

Dynamic HD cameras that allow for birdeyes view (13MP Rear + 8MB front Camera)
An improveddual WiFi connectivitythat allows the VCI to maintain faster and stable connection during diagnostics.

The precision-machined outer shell is designed to work against workshop hazards such as water and dust damage and in compliancewith IP65

X431 PAD VIIis more intelligent than ever with thepowerful smartlink VCI

You are available to performremote diagnosiswithout being on-site and the limitation of diagnostic functions , tools and vehicle types.

It is able to assist technician toidentify the OBD2 port pin automatically.

And display thereal-time voltage for voltage condition monitoringduring live diagnostics.

New topology mapping gives a visual checking onfull diagnostic results and malfunctionsintuitively.


Quick accessADAS calibration featurethrough the ADAS module in conjunction with a Launch ADAS calibration product.


Expand and upgrade yourX431 PAD 7with more diagnosis software witha new module "MALLâ€.It provides members of built-in repair guides and training videos to assist technicians to track and fix the diagnostic faults efficiently.

Solve high-level faults withadvanced modules such as videoscope, Oscilloscope, TPMS, Key immobilizer and Sensorboxby adding on with X431 PAD VII.

All these innovations and more make X431 PAD VII the most powerful X431 ever.
Launch X431 PAD VII VSX431 PAD VV2.0 VS X431 Pad III
Launch X431 PAD VII diagnostic scanner is the best when compared with X431 PAD III V2.0 and X431 Pad V in the aspect of configuration (incl. screen display, memory, storage etc), Android operation system, service reset functions etc.
Launch X431 PAD VII is better than Autel MaxiSys in the aspect of online programming:
- Launch X431 PAD VII online programming:
BMW, Benz, VW, Audi, Seat, Skoda, Porsche, Nissan, Infiniti and many coverages from Smartlink.
PS: Online Programming function has not been authorized in the USA, Canada, and Spain.
- Autel MaxiSysonline programming:
The ONLY free programming that you get is BMW and MERCEDES-BENZ, from Autel’s cloud server.
All other brands you’ll have to pay the Manufacturer’s website for programming files, just like everyone else. Each brand has its own subscription licensing.
Alright, to own the most powerful X431 PAD VII here:
https://www.obdii365.com/wholesale/launch-x431-pad-vii-diagnostic-tool.html
Posted by: jean at
08:49 AM
| No Comments
| Add Comment
Post contains 472 words, total size 13 kb.
32 queries taking 0.1296 seconds, 210 records returned.
Powered by Minx 1.1.6c-pink.

