


July 07, 2021
Problem:I haveXhorse VVDI2programmer, I want to adapt PCR 2.1 and I get "security access failed. operation not completed.â€
Solution:this is how to adapt PCR and similar
- How to adapt ECU to Micronas / NEC cluster via Xhorse VVDI2.

- Read cluster IMMO data and copy to TXT file

- Read IMMO data from ECU and paste to TXT file.

- Go to adapt unit module

- Select: ECU EDC16/17
Type manually CS and PIN data and Read.
and wait till data read.

Save power class

Paste VIN, CS, PIN, you read from cluster and click "Writeâ€, confirm yes.
Completed.


To finish – go to cluster and change manually power class and write immo.

Enjoy!
https://www.obdii365.com/service/how-to-adapt-ecu-with-xhorse-vvdi2.html
Posted by: jean at
08:29 AM
| No Comments
| Add Comment
Post contains 121 words, total size 6 kb.
July 06, 2021
Xhorse VVDI Key Tool PlusVS Zed-full, which one is better becuase I have money for only one. I plan to use on BMW Toyota Benz and French cars. I have also VVDI Prog andobdstar X300 DP PLUS.

Reviews:
- The best Autel IM508 according to your budget. But if you’re going to take one of these that you ask,xhorse pad is definitely better.
- Both VVDI Key Tool Plus and Zed-full key programmerare good and excellent.
- This is what I gotAutel MaxiIM Im508 + xp400pro, and I love it.
- zedfull will cost you more. if you use or plan to use any of the xhorse remotes and chips thenget the VVDI KEY TOOL PLUS.
- I think that the zedfull is by far better than the key tool plus. But, it’s much more expensive and it’s work on token based. So it’s depends of the jobs that you doing. If most of your jobs it’s eeprom and complicated jobs so zedfull will be a good decision. But if you asked about that and you said that you can get only one of them so most likely the Xhorse VVDI KEY TOOL PLUS will be your choice…
- The next reviews are half zedful, halfxhorse key tool plus.
So VVDI Key Tool Plus and Zed-full have their own advantages and disadvantages. VVDI Key Tool Plus is much more cost-effective.
http://www.key-programmer.org/2021/07/06/xhorse-vvdi-key-tool-plus-and-zed-full-which-for-beginners/
Posted by: jean at
06:23 AM
| No Comments
| Add Comment
Post contains 234 words, total size 3 kb.
July 01, 2021
Problem withBMW ICOM Next: did an update on my motorcycle and everything went fineand today when I connect icom to OBD – all leds are just on with red color, system one is blinking red/yellow.
Please do exactly as follow:
- Disconnect the ICOM Next device from the power supply or vehicle.
2. Go to the directory
C:\ProgramData\BMW\ISPI\data\TRIC\ICOMNext\ICOM-Image-xx-yy-zz.
Note: This directory is hidden. Please see [?00045002EN].
2.1. Copy the file ICOM_Next-rootfs-xxxxxx.tar.gz to the root directory of the USB flash drive.
2.2. Copy the file ICOM_Next-app-yyyyyy.tar.gz to the root directory of the USB flash drive.
Note:
– An ICOM_Restore.bin file is not available. Please use the files from the ICOM Next firmware package as described above.
– xxxxxx and yyyyyy in the file names represent the version numbers of the respective files.
– If the directory contains more than one ICOM-Image-xx-yy-zz folder, please choose the most recent one, i.e. the folder with highest number. The ICOM Next will then be ready to use without further updates.
– It is important that the files are copied to the root directory of the USB flash drive.
3. Connect the USB stick to the ICOM Next.
4. Press and hold the button located on the right-hand side of the ICOM Next, next to the OBD II cable connection socket.
5. Continue to hold the button, connect the device to the vehicle’s OBD II jack and keep the button pressed until the LEDs on the ICOM Next glow red.
6. Release the button and within five seconds, push the button three times. This starts the firmware update.
Note: The update may take several minutes. Do not disconnect the ICOM Next as long as any LED glows red.
7. When all LEDs on the ICOM Next have stopped glowing, the Emergency Firmware Update is complete. You can now disconnect the USB flash drive.
8. IMPORTANT: When the Emergency Firmware Update is finished, the ICOM Next must be connected to your network with a LAN cable in order to be reconfigured since all previous settings have been lost. If there is a "user.settings†file on the USB flash drive, it will be installed after the firmware update.
The RIGHT reset button on Original ICOM Next the button behind the tiny black hole! (in red circle).
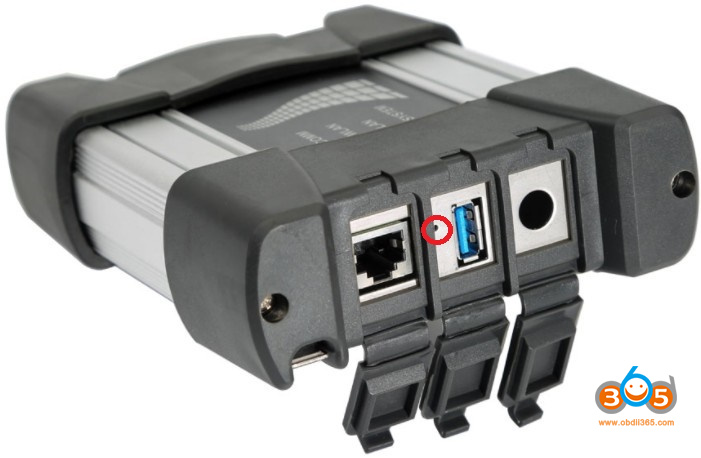
WARNING!
Not Orig ICOM NEXT has another reset button!!!!
The red circle is a NON OEMICOM NEXTreset button, and the blue is the OEMICOM NEXT reset button!!!!!

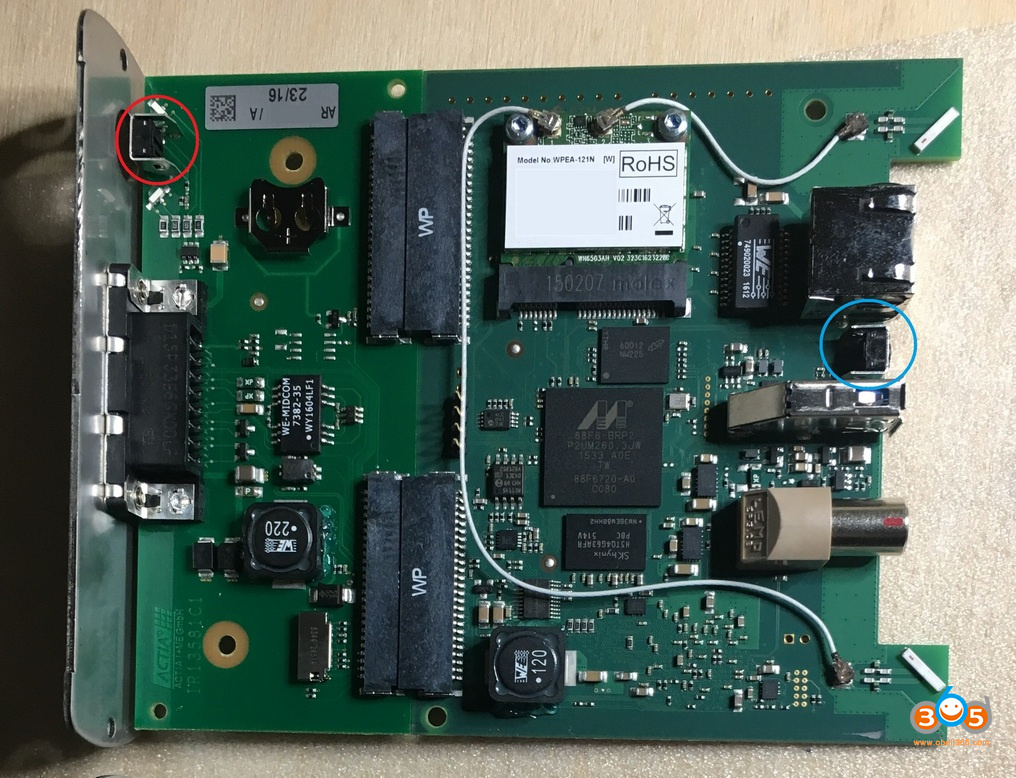
And there is one original ICOM NEXT PCB where a reset button in the blue circle! (NOT THE RED!!!)
Question: what icom_restore.bin is doing?
Answer: The existing restore.bin is for ICOM A or A2!
And here is one user’s success feedback:Yesterday out of a blue myICOM Next OEM has stopped to work, ethernet can’t find IP address.In about 2minutes ICOM was recovered and connected to the ethernet network. PS: He follow the above ICOM Next store procedure.
Best source of BMW ICOM NEXT:
https://www.obdii365.com/producttags/2021.06-bmw-icom-next.html
Posted by: jean at
08:19 AM
| No Comments
| Add Comment
Post contains 497 words, total size 5 kb.
32 queries taking 0.0456 seconds, 194 records returned.
Powered by Minx 1.1.6c-pink.

