


June 28, 2016
It’s a dummy guide to help many out and try to make sense of NCS expert with BMW ICOM A2.
All said by a ICOM A2 user at bmw forum…
He said:
Before all operation, you need a good ICOM A2 emulator, clone or original
I used clone bmw icom a2 wifi at
http://www.obdii365.com/wholesale/new-bmw-icom-a2-b-c-diagnostic-programming-tool.html

Used it for years and updated to ISTA-D 3.54ISTA-P 3.58 in SSD… Much faster and more stable
Then, i have to mention that ALL PROCEED AT YOUR OWN RISK. This is just my interpretation for educational/entertainment value only. I am not responsible for you blowing up your car or damaging your modules.
So here goes the key point:
DUMMIES GUIDE TO UNDERSTANDING NCS AND CODING
This is roughly how it works… and my dummy interpretation of it. Please read it fully if you want to understand, this isn;t exactly a quick cheat sheet guide.
On Pre ’02 cars the coding is slightly different method than Post ’02 cars. I am only going to elaborate on coding individual parameters, you can go learn how to code entire modules thru the VO later once you learn the basics below.
The first part to understand is what this stuff about ZCS/VO or "vehicle order†is. WhenBMWmakes a car, they create whats called a "vehicle orderâ€, this is basically a bunch of numbers writen into the car that tell what modules are installed in the car, regional info etc. This is like your car’s DNA! for example if the car has a sunroof, or a convertible or radio etc etc and that it was meant for US,Canada,France etc. Because each car is different with a different set of options/modules or country that its located, the "vehicle order†aka. "ZCS†or "VO†may be different. Why is it called ZCS you ask? because its abbreviated german, and its confusing as hell.
The VO is written into a couple modules of the car, usually ones that start with an "Aâ€, like AKMB or ALSZ. On some cars its written elsewhere. In my 02M3, the VO was written in ALSZ and AKMB. On my ’00 328ci it was stored in EWS, KMB. Its nothing more than a string of text/numbers stored in the flash memory of these modules, nothing special. Why is it written into two places? because if one module is failed and has to be replaced, then the other will serve as a backup so you can code the new replacement module to your car. For example ALSZ is the "light switch module†in your car, for some reason it fails. When you buy a new LSZ/LCM, you can retrieve all your settings of VO from AKMB and then code your new LCM to YOUR factory settings. The chances of both modules failing is slim, but if it does… you’ll have to contact BMW so they can give you the VO for your car from their records.
OK the one difference is pre-02 cars dont have a VO. Those cars have their ZCS (which acts like a VO) stored in the EWS or KMB modules. The stuff below is basically identical however for individual parameter coding.
Now go get into the basics of coding.
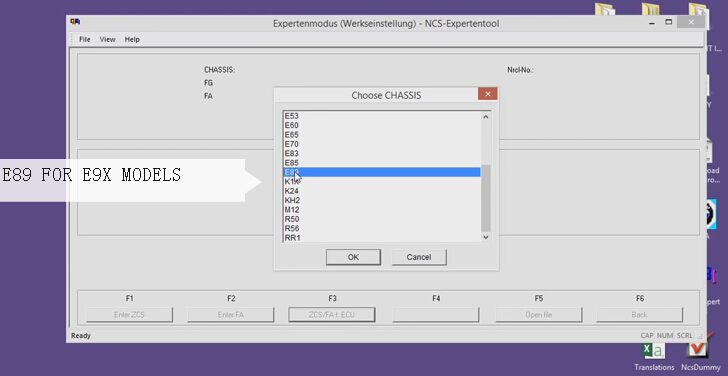
1. When you load NCS expert, you need to load a profile. These profiles just change how ncs expert behaves when you read your car. The two profiles i stick to are "expertmode†and "revtor’s expert profileâ€. if you dont have it, you can find it on the net easily. In order to code your car the first time, you should pick "revtors". This has something called "manipulation†enabled… ill elaborate on that later.
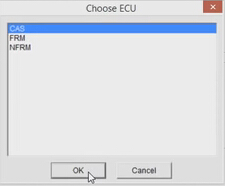
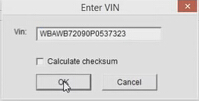
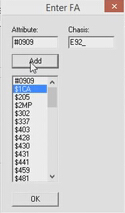
2. Once the profile is loaded, you basically need to selectVin/ZCS/FA in order for ncs to download VIN info off your car. Once it does this, it will ask you to select a module. Why? because it needs to know your "vehicle order†information. In most cases it will probably be in an "A†module. if it doesnt load, or cant be accessed, no harm done, just try a different module. When it is able to read it, you will see a long string next to "FA†starting with yourchassis"E46_†followed by numbers and text along with #’s and $’s. This is your VO. Now that NCS Expert knows it, it can code your car properly!
CODING HAS NOTHING TO DO WITH THE MODULE YOUJUST SELECTEDTO READ THE VO FROM! This perplexed me for the longest time, I didn’t understand why i selected two modules each time, or what the difference selecting AKMB or ALSZ or etc the first time was. Well… It has no bearing!! all NCS is doing is reading the text/number string that is your VO off the memory in these modules in this first step. You will actually select the desired module to code inlatersteps.
** PRE-02 cars, you wont see the long FA "VO†string, instead there will be a few lines FG, GM, VN, SA followed by numbers, its basically the same thing different format. For all intents and purposes this is referred to by me as the vehicle order or ZCS for a pre-02 car.
ON POST-02 cars select any module with "A’ in front of it, on PRE-02 the "A†modules wont work, you will need to use EWS or KMB for this step… It doesnt matter which.
Now this guide will touch on the basics to code INDIVIDUAL items on your car. The steps to add items to your VO and code your modules is different and i wont comment on that here, because it will confuse the amateur. Just understand the basics of individual coding first, then coding from your VO will all make sense later.
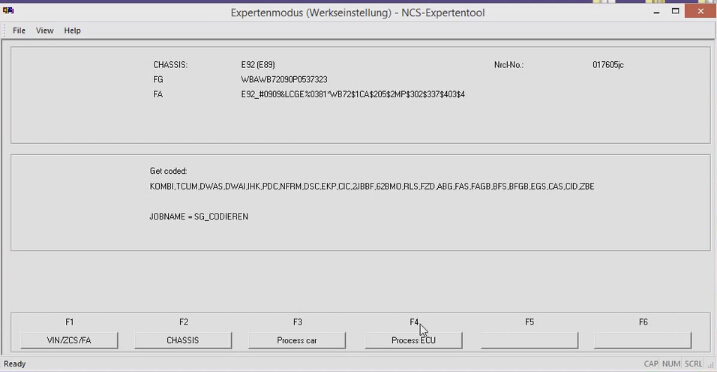
3. The next part is to download your factory settings in your car to your PC. Once you get the VO loaded, you hit the BACK button. Thedefault jobin NCS is to write SO BE VERY CAREFUL here. You will see all your modules listed, for example "EWS,ABG,ASC,KMB,APL,…..etc†and underneath "SG_CODIERENâ€
NCS at this point is set to SG_CODIEREN, which means to WRITE to ALL modules listed. You dont want to do that.
4. So now select "ProcessECUâ€, and select the INDIVIDUAL MODULE you want to code. For example LSZ (light switch module). Once you do this, it will say only LSZ (and not all the modules in your car).
5. Now you want to change the job from WRITE to READ. Select "CHANGE JOBâ€, then select "CODIERDATEN_LESENâ€. This is to READ DATA.
6. Once selected it will confirm this by indicating the module and job type on the screen. Now you are ready. Hit "EXECUTE JOBâ€.
It will say Coding Activ, then Coding Ended.
7. At this point, in your NCSexpert/WORK/ folder there will be a file called "FSW_PSW.TRCâ€
This is what we want, the coding of your LSZ module that we read earlier. IMMEDIATELY save a backup of this file, rename it to FSW_PSW_LSZ_ORIGINAL.TRC and save it somewhere incase you decide you want to revert to the original copy. Now I want you to resave another copy of this FSW_PSW.TRC file as FSW_PSW.MAN (manipulation…hint hint). Make sure it doesnt save as FSW_PSW.MAN.TXT or some crap like that, it wont work properly.
OK why all this juggling?? because NCS expert only reads modules and saves EVERYTHING as a FSW_PSW.TRC file. Regardless of what module you read in your car, this is what the filename will be. And everytime you load NCS expert, this file is constantly erased, written and re-written. So thats why we aresavingit as FSW_PSW.MAN so we can alter it safely without our copy being overwritten.
8. Now open up FSW_PSW.MAN with a text editor.
You will see a long list of stuff like this..
LEUCHTWEITENREG_AUTOM
aktiv
FEHLER_BREMSLICHT
nicht_melden
TAGFAHRLICHT
aktiv
This is where you can code. now its all in german, so you will need to run these words in a translator (google) to understand it, OR you can useNCS Dummythat translates this stuff for you and gives you all available parameters, but thats a whole different program and you ought to learn how to use it.
This is what the above looks like if translated. Now you can see how we can deactivate/activate certain things. Im going to deactivate DRLs here.
Translated…
AUTOMATIC HEADLIGHT CONTROL
active
BRAKE LIGHT ERROR REPORTING
dont report
DAYTIME RUNNING LIGHTS
active
edited…
LEUCHTWEITENREG_AUTOM
aktiv
FEHLER_BREMSLICHT
nicht_melden
TAGFAHRLICHT
nicht_aktiv
By changing to nicht_activ, it deactivates this setting. Now don’t go crazy, some codes are redundant so changing just one thing wont do the trick. This takes some time and effort to find the right code/codes to work with.
9. Once you are happy, SAVE your FSW_PSW.MAN file.
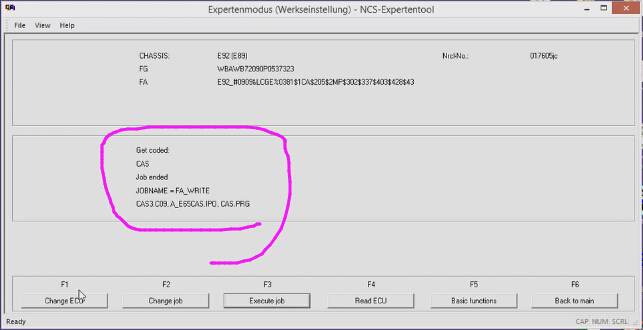
10. Open up NCS expert, load up "revtors†profile (with manipulation enabled), and reload it to the part where the VO is loaded and its asking you to process ecu (Basically steps 1-3)Look above how to do this.Once you’re there, select "PROCESS ECUâ€, select the correct module you are coding, in this case "LSZâ€. Then select "CHANGE JOB†and make sure you pick "SG_CODIERENâ€. Once this is done, you are ready to code the car.
NCS will basically now take the FSW_PSW.MAN file, and overwrite the codes in your car’s LSZ module with your new settings. It only uses the MAN file because you are using a profile with "manipulation†enabled. The other mode "expertmode†does not have manipulation, and you cannot code individual stuff like this using that profile.
11. Hit "EXECUTE JOBâ€. Wait till it says "Coding endedâ€. Now your new LSZ is coded. Turn off the car, and restart, and check to see if your results are as expected!
12. Open up the /WORK/ folder, open the FSW_PSW.MAN file, select all, delete, save and exit.
Viola! That’s it. You are now an expert on coding individual features!
Now what do you do if you screwed it up or something is behaving funny and you want to go back to original settings. Or you cant remember all the stuff you changed, or dont like the results.
To load up the ORIGINAL factory defaults if you mess up.
Go to your /WORK/ folder. Open FSW_PSW.MAN, select all, delete, save & exit.
Load NCS Expert
Select "Expertmode†profile
Hit "VIN/ZCS/FA†to load your Chassis and Vehicle order info
Hit BACK
Hit PROCESS ECU
Select the chassis, then module you F’d up on. For example "LSZâ€
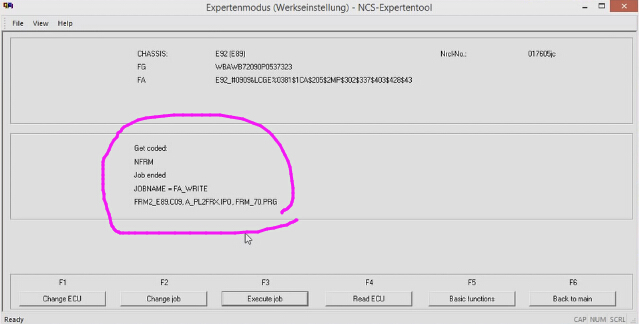
On Pre-2002 carsIt will say "LSZ†and underneath "SG_Codieren†along with some files LSZ.Cxx, LSZ.PRG, etc etc. SG_CODIEREN is the correct job you want.
On Post-2002 carsIt will say "LSZ†and underneath "SG_Codieren†along with some files LSZ.Cxx, LSZ.PRG, etc etc. Hit CHANGE JOB, Select "FA_WRITE†Job.
"xx†is usually the specific Coding index used in your default module, its a number. think of this like "firmware versionâ€.
These files are basically from your /DATEN/ folder and contain the proper coding information specific to your car. How does NCS know which files to use? Because it knows by looking at your VIN and VO, then selects the correct files. NCS will then basically read these files, then read your VO and re-write the proper codes, features, activate, deactivate everything to your factory settings.
The job is SG_Codieren or FA_Write because you will WRITE your original settings back in.
Hit EXECUTE JOB.
Viola, your original data is re-written and your car will work again. Hopefully.
That’s all my interpretation of BMWICOM NSC expert; hope this helps someone out there.
http://bmw-icom-a2-wifi.blogspot.com/2016/06/how-to-use-ncs-expert-with-bmw-icom-a2.html
Posted by: jean at
06:19 AM
| No Comments
| Add Comment
Post contains 1921 words, total size 13 kb.
June 27, 2016
Collect all customer solutions here for BMW INPA Edibas IFH-0018: INITIALIZATION ERROR. Just for sharing!! AT RISK TO TRY IT YOURSELF.
Error message 1:
ApiCheckJobStatus: Error #95
SYS-0005: OBJECT FILE NOT FOUND
API job error or no such result !

Ediabas error #95 means that some INPA script (.IPO file) is requesting a result from some .prg file that does not exist. This is most probably caused by a missing .prg file.
Error message 2:
2.5 IFH-0018: Inizialisation Error
INPA doesn’t work but Toolset yet
The error occurs if a SGBD is running by INPA or CASCADE. If the same SGBD is loaded in
the Toolset it will not occure an inizialisation error.
Reason : The communications port COM1 doesn’ exist, but COM3 yet. The Toolset is
working without the inizialisation error, because the file OBD.ini exists in the
directory C:\Ediabas\bin\. But the file OBD.ini has to exist in the direcory
C:\Windows.
Solution: Copy the file OBD.ini in the directory C:\Windows or create a new one. (Creation
of OBD.ini q.v. 3.3).
Error message 3:
Edibas error:
ApiCheckJobStatus: Error #28
IFH-0018: INITIALIZATION ERROR.
API job error or no such result!
Varuantenkonrolle:
IFH-0018: INITIALIZATION ERROR. Das Programm wird abgebrochen!

Reason: Ediabas is attempting to access port COM1. However, the port doesn’t exist, or it
has been taken by another programme (e.g. HotSync from Palm, infrared).
Solution: Install a COM1 interface or free it.
Real feedback on INPA initialization error with solution above:
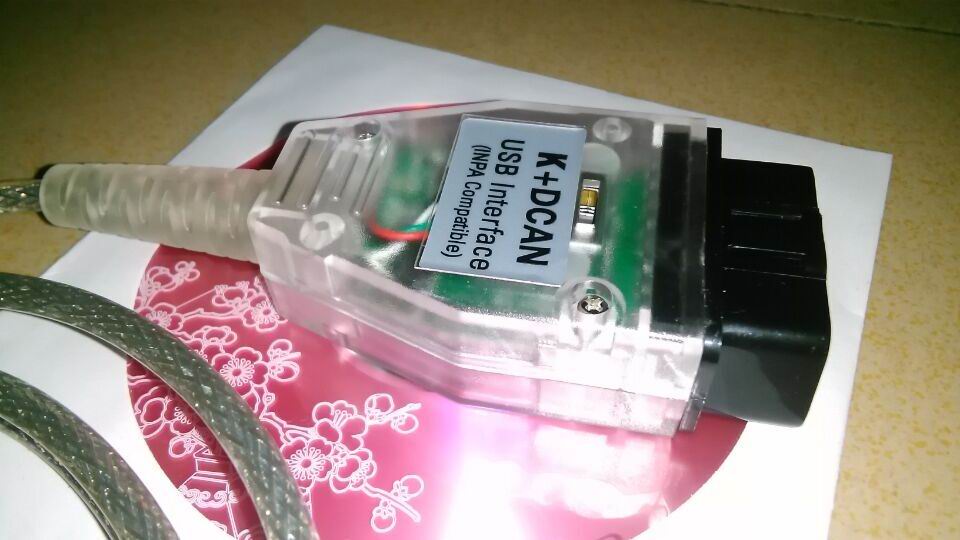
Yesterday my BMW INPA K+DCAN software showed error: INITIALIZATION ERROR. killed several hours with this knock-off. The car i connected to is BMW 2011 – e92 – LCI.
To set the COM to 1, obd.ini is also COM1.
I seek help from forums and one of them provided a solution to the problem:
(solution offered by an experienced user with K+Dcan cable)
Modify the EDIBAS.INI as follows
RemoteHost
; Description : server address/name
; Default = –
; RemoteHost = Desmo16
Desmo16 being my computer’s name (note that this must be maximum 8 chars)
and
Port
; Description : IP communication port
; Value : 1000 < port < 30000
;
; Spezialfall OP(P)S /ICOM:
; Value : 6801 ;OBD-Treiber (CAN)
; Value : 6802 ;Most-Treiber
;
; Default = –
; Port = 6801
OBD2 notice that you should be sure port is 6801 as mine was 3000. It worked like a charm after i made these mods.
Posted by: jean at
02:05 AM
| No Comments
| Add Comment
Post contains 406 words, total size 4 kb.
June 24, 2016
currently I am trying to fix a FRM3 module, therefor I have flashed the µc already and finally receive a PT-CAN signal again. The module was completly dead before due to corrupt eeprom.
My question is: Is it possible to do coding and programming on the workbench without installing it in a E9x ?
Do I really need a junction box electronic or is it possible to hook it up on the right can interface and do the programming?
CAN adapters for a bus simulation are available.
Well, I connected KL30 and KL31 of course and KL15 for ignition. The unit starts and outputs stuff on the PTCAN and then goes to sleep.
Connecting my DCAN onto PTCAN (obviously) doesn't work. I am not really familiar with the OBD interface but there are also some K Line and L Line pins, which I am not able to use because the FRM doesn't address them.
I guess I have to input the ignition signal as can frame but on which can? PTCAN or KCAN?
There is some guy on YT updating a MS45 on his desk with some kind of OBD Adapter. Does someone know what the name is? I guess I am not allowed to submit a link but you can easily find it.
Why all of this? I don't have a E9X car anymore. I have this FRM left which I would like to repair and get rid off.
Solution:
you need KCan - high and low. Here is schemethe from ISTA.
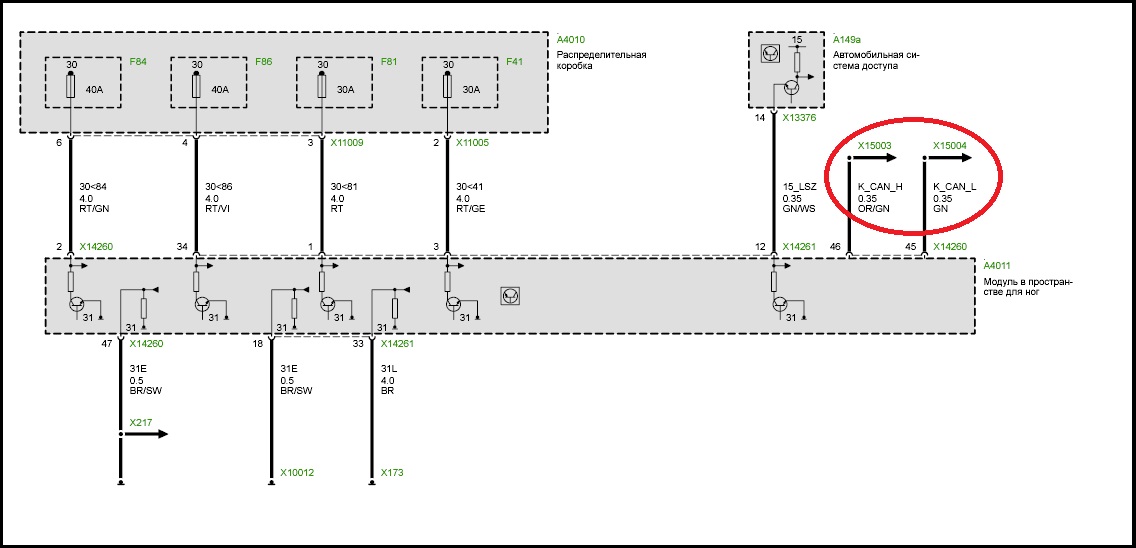
in the car:
D-Kan ( high and Low) from OBD connector goes to JBBF and from JBBF K-kan (high and low) to FRM.
you need use an adapter: D-can - K-can,
get the JBBF as well
it is kind of tcp/ip router between different networks in the car
You just need a Gateway /Body Module from say an E60, connect pins 8 & 9 of X16760 on the body/gateway to the FRM pins 45 & 46 on connector X14260 (K-Bus High & Low) . You can connect to the diagnostics output on the Body/Gateway module ( i haven't got the pin number to hand but i will check tomorrow). You need to apply a permanent 12 volts to the CAS input (pin 12 of connector X14261) on the FRM module otherwise it will shut down after a few seconds. I have used a setup like this for a couple of years now without any issues, i use all the BMW coding tools 2.12 coding software on it.
Results:
I am just now working on it and got some results:
Connected everything, FRM is running, KCAN is sending instantly.
I have checked the messages with a CAN Adapter, they seem valid.
I really need a JBE for the address translation between the different CAN's.
Are you sure I can use one from a E60? As far as I know a E60 doesn't have a FRM. The light is managed by the LCM.
Posted by: jean at
07:10 AM
| No Comments
| Add Comment
Post contains 502 words, total size 4 kb.
June 22, 2016
Packaged delivered fast within 5 days, the ISTA I use on Lenovo T420 the ISTA-P it working perfect but ISTA-D not connection and also the screen of ISTA-P is small (Picture attached ).
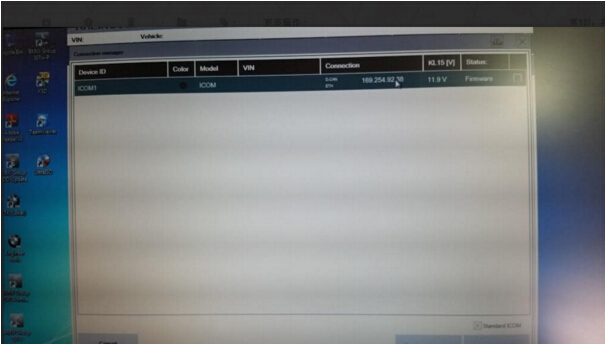
- For the ISTA-P Screen Small Problem ,please ICOM laptop do self-testing,checking if the device can connect ICOM system
- The ISTA-D not working, thepicture showing it is your firmware version is old. Need update BMW ICOM A2 firmware to the latest version V1.40
Posted by: jean at
07:56 AM
| No Comments
| Add Comment
Post contains 129 words, total size 2 kb.
June 15, 2016


Posted by: jean at
03:49 AM
| No Comments
| Add Comment
Post contains 460 words, total size 12 kb.
June 10, 2016
So one of my first jobs (on my own, been a BMW tech for 20 years) has given me a challenge. Trans MIL light on, BMW 328i E36 is obviously in limp mode. He had second hand EGS fitted. I refitted original EGS, connected Rheingold with ICOM and got CAN communications error. No signal from DME, and in live data RPM and load signals are 0%.
DME has CAN fault relating to EGS also. DME has RPM and load signals no problem.
I could clear CAN fault in DME if I disconnected EGS and that suggests EGS (as per instructions in Rheingold). Also did Ohms test on pins 86,85 on EGS (CAN H and CAN L) and the lines checked out OK.
So opened up original EGS and found one small chip to be suspect, like overheated solder joins. I checked against 2nd hand EGS and looked quite different.
So now I want to recode 2nd hand EGS to this cars VIN. I only have BMW ICOM A2 head currently. I have recoded a E39 DME before using the yellow head and SSS but i don’t have access to that equipment anymore.
Is it possible to get used EGS working on this car? With ICOM and maybe Winkfp or something?
Customer solution:
For sure you could use BMW ICOM with WinKFP to recode the EGS. Just go to comfort mode, ZUSB Update and enter VIN. Then Program ZUSB Update and the VIN should be changed.
Use OBD_ab625 of ICOM. Open WinKFP and pull down the setting menu. Make sure to check boxes to write UIF/AIF in comfort mode. Also from this menu enable BSU (boot sector update) force programming in comfort mode and fast baudrate. Also enable the option to test checksum. Close the menu and save the settings.
Choose comfort mode > update ZUSB >choose EGS > enter VIN (full 17) and finally Program update. Accept the dialog for remaining writes to the user information fields.
Posted by: jean at
03:45 AM
| No Comments
| Add Comment
Post contains 339 words, total size 2 kb.
June 08, 2016
http://wuuwza.com/en/file/628295/e60m5-smg-reprogram.zip.html
1)Open WinKFP Tool on the top left side click Import/Export>Import>PABD choose 07gdsmg3.ipo
2)Aster importing 07gdsmg3.ipo Click Import/Export>P-SGBD and choose 10FLASH.prg
3)After importing 10flash.prg Click Import/Export>Assambly Line Data and choose GDSMG3 folder
(not folder contents but the folder itself) and click import
4)Now copy contents of gdaten folder to the NFS folder browse to your
NFS folder (usually C:\EC-APPS\NFS\ or just C:\NFS\ depending on your installation If there are files already in this
directory, overwrite them with the files you copied.
Now your WinKFP Tool is Ready for Programming Gearbox (FLASHING MODULE)
http://www.obdii365.com/wholesale/bmw-inpa-k-can-743.html

In device manger where your cable is plugged into it will be "COMx" x= 1,2,3,4, etc. right click it, properties, advanced, and then set latency to 1 ms. it will come standard at 16ms.
a. Try to keep the voltage between 13-14V. If it goes below 12.5V or above 14.5V,
the flashing process could fail and result in a bricked module. Start WinKFP and click "Comfort Modeâ€.
Click "choose ZUSB Scroll down to gdsmg3 click gdsmg3 and choose 7842206 click Ok then enter VIN
by clicking (enter VIN) and click done and then Press program. WinKFP will give you a message
about having X number of flashes available – hit okay to that prompt After the flash gets to 100%
you will get another prompt as if the flash is restarting – accept that prompt again. It will look like the flash is starting over,
but this time it’ll go much faster. After this one completes your flash will be done.
Turn off the car. Wait about 5 minutes, put it in position 2 again. Using DIS or INPA clear any codes that may be stored in any modules.
Turn off and wait a few minutes again if necessary (if the transmission error light is still on)
Start the car and enjoy your improved shifts! You may need to run the SMG adaption procedures
THANKS TO VODYK CARTEK nightkrawler and krisboss.
Posted by: jean at
01:50 AM
| No Comments
| Add Comment
Post contains 419 words, total size 4 kb.
June 02, 2016
Read lots of Kombi retrofit information on the web and found many people in need of it. Here, I will share the guide of how to replace the standard KOMBI in BMW F07/10/11 cars with a used extended 6WA Kombi.
Disclaimer:
YOU AREAT YOUR OWN RISK !
KOMBI’s with the 160D0WQ chip here!
What you need:
- a used 6WA KOMBI with a mileage LESS then your actual car mileage
(if you install a KOMBI with higher mileage, the CAS module in the car will likely update to this higher mileage, and there’s no possibility to revert !!! )
- R270 BDMProgrammer
- SOIC 8 Pin Testclip compatible with the R270
- WorkingE-Sys 3.22.5with actual PSDZData (49.4 is OK) for FLASHING
- Working E-Sys 3.18.4 for CODING (if you don’t have a token for3.22)
- BMW ENET cable(Ethernet to OBD) that works with E-Sys
- A good car charger/power supply (12V/70A is recommended, although I used one with 20A).
Step 1 – Erase the VIN in the used 6WA:
–> Open the KOMBI
- Remove the 4 Torx-Screws from back cover

2. remove the "Warranty Void Label†(of course, KOMBI warrantywill be lost from now on)
- carefully unclip the 5 securing clips (without breaking them),beginning with the 2 bottom ones

- remove the front cover (paying attention to the KOMBI Buttonwhich will fall off (simply put it back later on)
- carefully unclip the back cover noses (one on the top, one on eachside) an remove back cover

- very carefully unclip the flat-wire on the right (Flip the connectorup by using a flat screwdriver, then slowly remove the wires).
DON’T DAMAGE THE CONNECTOR OR THE WIRES.

- Separate the secondary board from the main board, simply bysqueezing the white securing tips and pulling the secondary boardupwards. Watch out not to stress the lower flat wires.

- unfold the secondary board
- search the 8 Pin "160D0WQ†Chip on the mainboard (it’s rathertiny)

the top one of the 2 SOIC 8 chips
–> Erase VIN on the 160D0WQ
- Start theR270Software (supposing you did install it correctlywith all drivers before)
- On the Main Screen, click on "MCU†and select "160D/35160â€.Click "OKâ€

- Connect the SOIC Tesclip to the 160D0WQ-Chip.

4. Click "Read†: the EEPROM should be read. If not, check thetestclip position and orientation.
- Save the unmodified BIN and make a backup copy to a safe place
- Now erase the VIN
(a) Replace (not insert !!!) byte 70 0F (1 pair) with "FF†(longVIN)
(b) Replace all bytes from 80 00 to 80 0F (the whole line) with"FF†(long VIN)
(c) Replace bytes 590 0E and 590 0F (2 pairs) with "FF†(shortVIN)
(d) Replace bytes 5A0 00 to 5A0 04 (5 pairs) with "FF†(shortVIN)

(e) Save the modified BIN (choose a new filename)
(f) on the main screen, click on "WRITEâ€. The modified BIN isnow written to the EEPROM, and the data will be verified.
(g) Read the EEPROM again and check the modified bytes tobe sure everything is ok.
- Reassemble the KOMBI (be sure the flatwire is correctly fitted).
Step 2 – Bench-check the mileage
Before installing the KOMBI in the car, it’s a good idea to check themileage outside the car just to be sure the MILEAGE in the 6WA ISLOWER THAN THE ONE IN THE CAR.
- Locate the large connector on the back of the KOMBI.

2. The pins are labeled with small numbers.
3. Connect a 12V Power Supply so that PINS 1&2 are connected to+12V, pins 7&8 to GND(-). Make sure the pins are well isolatedfrom the neighbour pins!
4. Turn on the Power Supply.
5. Press the KOMBI Button : the stored mileage is shown on theLCD.

Step 3 – Install the 6WA into the car
–> Removing old KOMBI
This is an easy job. Just search YOUTUBE for "BMW Fxx removeclusterâ€. This is the easiest way to see how it’s done.
Remove the 2 attached connectors : one at the TOP (the HUD connector)and the large one on the back (on both, a tab has to be pressedbefore actually pulling the connectors).
–>Install the 6WA
This is just the reverse of the removal procedure.
Step 4 – Flash
This is the most critical part! Be careful that you follow all the stepscorrectly. Again, I will not be responsible for any faults thatcould occur to the car or anything else !!! Use the instructionsat your own risk!
- Hook up your car charger. A suitable car charger is very important.
Any power loss or low-voltage that could occur duringflashing might corrupt your car software! Also, use a fast computer
(I used an i5 3,6GHz / 16GB Ram iMac which workedfine).
- Connect E-Sys 3.22.5 to the car (when you used E-Sys 3.18 sofar, uninstall it, then install 3.22.5. Later on, you can uninstall3.22.5 again and reinstall 3.18.4)
- Before you begin, in E-Sys, go to the Menu "Options†/ "Settings…â€and make sure "Update VCM after TAL execution†is CHECKED.
(This will write the new FA to the car after flashing. If you don’t want this, UNcheck "Update VCM after TAL execution†)
- go to "COMFORT MODE†/ "TAL-Calculatingâ€
- click Vehicle Order "Readâ€.
- click Vehicle Order "Save†Choose "newFA†as filename.
- click Vehicle Order "Editâ€.
- Expand the "FA†Folder, then "FZAuftragâ€, then "TYPEâ€
- If "Zeitkriterium†of your car is anything below "0311â€, change"Zeitkriterium†to "0311†(since 6WA was available only fromMarch 2011 onâ€.
- Click on "SALAPA-Elementâ€
- add "6WA†to the "SALAPA-Element List†and the PRESS
CTRL-ENTER (or click the icon in the list header).
- click on the SAVE Icon (the Disk) in the Top-Toolbar.

13. click the "BACK†arrow in the Top-Toolbar (Select "YES†whenprompted to reload Vehicle Order) to get back to the "COMFORTMODE/TAL Calculating†screen.

- Check if 0311 and 6WA were successfully changed in the FA-List.
- Right-Click on "FA†and select "Activate FAâ€.
- In the "SVT Actual†section, click on "Read SVTâ€.
- In the "SVT Actual†section, click on "Saveâ€. Choose "SVT_ISTâ€as filename.
- In the "KIS/SVT Target†section, click on "Load†and load thejust saved "SVT_IST†file.
- In the "Calculation Strategy†(still in "KIS/SVT Targetâ€) section,choose "Complete Flashâ€
- In the "KIS/SVT Target†section, select "I-Step (ship.)†: choosean I-Level matching the one from the 6WA (if you don’t know it,choose an older I-Level)
- In the "KIS/SVT Target†section, select the latest I-Level on"I-Step (target)â€.
- In the "KIS/SVT Target†section, click on "Calculateâ€
- In the "KIS/SVT Target†section, click on "Saveâ€. Choose "SVT_SOLLâ€as filename.
- In the "TAL†Section, click on "Calculationâ€.
- In the "TAL†Section, click on "Saveâ€. Choose "newTAL†asfilename.
- Go to "Expert Mode†/ "TAL Processing†(pic.14)
- Click on the "…†button near the TAL-Line and select your "newTALâ€file.
- Click on the "…†button near the SVT-Line and select your"SVT_SOLL†file.
- Click on the "…†button near the FA-Line and select your "newFAâ€file.
- Click on "Read VINâ€
- Now UNCHECK all the "ALL†checkboxes. (This is very important…not doing this will flash other ECU’s beside KOMBI aswell.) Now, no checkbox at all should be ticked,
- Make checkboxes in the KOMBI-Line : "blFlash†/ "swDeployâ€/ "cdDeploy†/ "ibaDeploy†(only those 4 and only the ones forKOMBI)
- Click on "Check Software availabilityâ€
- Now be sure again that E-Sys is well connected (e.g. that theconnection has not been lost) and that the car charger is working,since the next step will begin the FLASHING PROCEDURE.
- Click on "Startâ€. Flashing should begin. During this, don’t beafraid of certain noises or strange behavior of the car that willoccur . The process will take about 13 Minutes. Just before theend, the fuel pump will run at high speed… don’t be afraid, thisis OK! Don’t touch your computer and the car during the flashprocess !!!.

Step 5 – Date & Time setting, KOMBI fully works
After the flash procedure, the KOMBI should reset and come backwith no errors.

Now set the DATE and the TIME in youri-Drive Menu (else the Service-Interval will not work).
You might now reinstall E-Sys 3.18.4 to code your preferences to the6WA (if you wish).
That’s it ! The KOMBI should now show your old mileage and shouldfully work.
Step 6 – Write FA to the car(optional)
The FA is automatically written to the car when"Update VCM after TAL execution†was ENABLED in step 3. If not,
you can still write the new FA (or, for whatever reason, write backyour original FA) following these steps:
- in E-Sys, go to "Expert Mode†/ "VCMâ€
- Click on "…†in the "Fileâ€-Tab and load the FA you want towrite to the car.
- In the FA-Editor, right-click on "FA†an choose "calculate FPâ€
- Click on the "VCM Masterâ€-Tab (still in Expert Mode/VCM)
- Click on "Write FA FPâ€
(Special thanks to Shawnsheridan and Hamfei)
http://bmw-icom-a2-wifi.blogspot.com/2016/06/bmw-f-series-kombi-retrofit-with-r270.html
Posted by: jean at
03:31 AM
| No Comments
| Add Comment
Post contains 1435 words, total size 20 kb.
32 queries taking 0.1927 seconds, 206 records returned.
Powered by Minx 1.1.6c-pink.

