


September 28, 2017
When replacing a battery with an amp that is higher than the original amp, sometimes I need to add a parameter to set the proper ampere .... I do not have to .... But, I want to ....
I can not see the 100 amperes parameter in BMW coding softwareNCS Dummy.
first
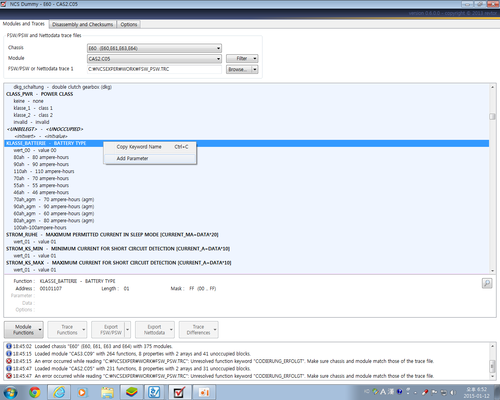
If you search for KLASSE_BATTERIE to set the battery
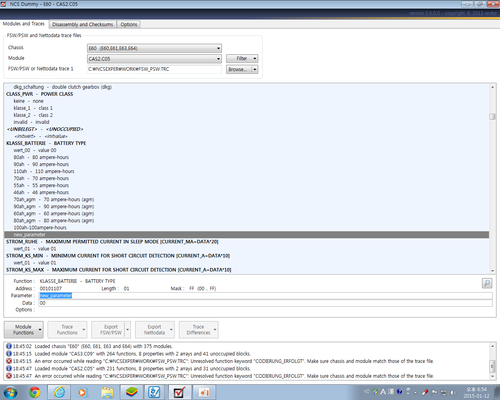
(First picture) KLASSE_BATTERIE - Select BATTERY TYPE, right click on it and select Add parameter to modify the added parameters .... (second, third picture)
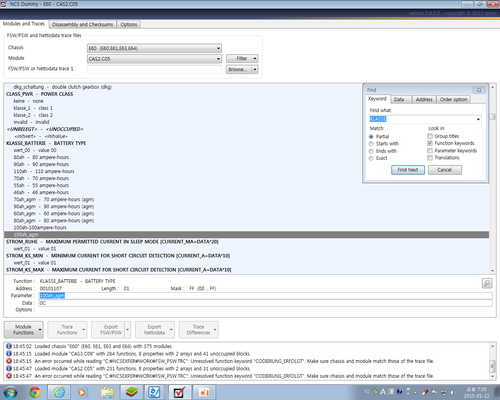
Edit the data (fourth picture) .... The modification here seems to be the menu order. 01, 02, 03, ....... 09,0A.0B, 0C.0D, ......
In the DMB lock, I modified the setting value to FF ..... It seems that the order is not so important here. So it makes sense that some people do not need to set it up.
I think the battery should be reset.
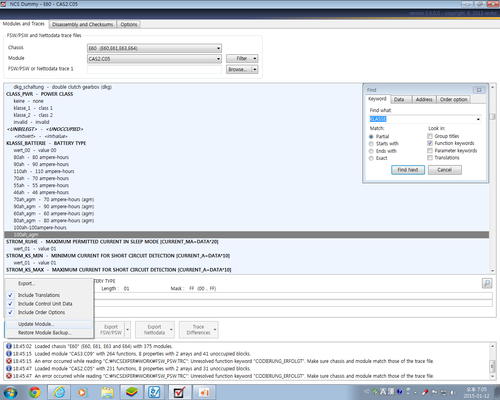
Finally (in the fifth figure), press the Module Functions button to select the Update Module.
When you start to update the module, you will be notified that you can not revert anymore.
Now go back and load the modified module and you will see the modified 100 amperes.
I have added two parameters: 100 amps in general and 100 amps in AGM batteries.

www.obdii365.com
Posted by: jean at
06:52 AM
| No Comments
| Add Comment
Post contains 277 words, total size 5 kb.
September 21, 2017
Software version:
ISTA-D 4.06.31
ISTA-P 3.62.1.003
VIN: 2017.06.12
Not connected 9000 days remaining
Software Including:
BMW ETK: 2017.08
BMW KSD: 08.2017 Multilanguage
BMW FSC Navigation Code Generator
BMWAiCoder for BMW Coding
With free BMW Engineer Software (INPA, NCS, WinKFP, E-Sys 3.27.1, e-sys plus 3.27.1, Ediabas tool32 61.5, BMW FSC code generator, newly addedDr.gini B020diagnostic software,BMW AiCoder.
Dr.gini B020 diagnostic software requires Ediabas properly installed and functional with a communication interface ( ICOM, ICOM Next, ENET, PASSTHRU or K+DCAN ),
the BMW manufactured before 2003 are not supported.
Multi-language available in diagnosing, programming and TIS diagram circuit: English, German, Spanish, Russian, Simplified Chinese


Dual-core processor, better above I3; over 4G of memory
Support Model:
It is recommended to use Lenovo ThinkPad: T61, T400, T410, T420, T430, X61, X200, X201, X220 X230 and other laptop with Intel chipset, such as I3 I5 / I7 series.
Posted by: jean at
08:44 AM
| No Comments
| Add Comment
Post contains 184 words, total size 6 kb.
September 14, 2017
Any cost-effective DIY solution of BMW diagnostic/coding/programming?
Yes,first you should know which a BMW ICOM cable you need: K+DCAN or ENET or ICOM A2/ ICOM Next.
| INPA K+DCANcable
(switch mode) |
BMW ENET cable | BMW ICOM
|
|
| Image |  |
 |
 |
| Price | $17.99 | $11.99 | $300 around |
| Vehicle | For Exx cars | For Fxx cars | For ALL Exx & Fxx cars
(BMW E, F, G, I, Alpina series cars, MINI and Rolls-Royce from 1985 – 2017) |
| Software | Inpa 5.0.2
Ediabas |
E sys 3.23.4
Psdzdata |
Ista-D
Ista-P BMW ETK NCS Expert WinKFP E-Sys 3.27.1 BMW AiCoder BMW FSC code generator |
| Diagnostic | Yes | Yes | Yes |
| Coding | Yes | Yes | Yes |
| Programming | No | Yes | Yes |
In summary,
It depends on your purpose (diagnostic or coding or programming) and model (Exx or Fxx or others).
For Coding, you need differentTools,NCS Expert / SP-Daten for E-Series and E-Sys / PSdZData for F-Series.
All Diagnosis and Coding can be done with cheap DCANCablefor E-Series and cheap ENET Cable for F-Series.
For Programming(Flashing ECU’s with new Firmware), then you need ISTA/P for for both E-Series and F-Seriescars, or you can use WinKFP for E-Series and E-Sys for F-Series.For E-Series Programming, you will need anICOM, but for F-Series Programming, you can use ENET Cable.
ForExx- Series:
Interface =K+DCAN Cable(OBDII to USB) or ICOM
ECU Data Files = SP-Daten
NCS Expert = Coding Software
WinKFP = Programming (Flashing) Software
EDIABAS = Low-Level ECU Communication Software used by NCS Expert & WinKFP
ForFxx- / Ixx- / Gxx-Series, Mini, & Rolls-Royce:
Interface =ENET Cable(OBDII to RJ45 Ethernet) or ICOM
ECU Data Files = PSdZData
E-Sys = Coding Software
E-Sys = Programming (Flashing) Software
About:BMWICOM
ICOM A(alsoICOM A2,ICOM A3,ICOM Next A): main interface
ICOM B: adapter for programming multimedia in E series
ICOM C: adapter for old BMW with round 20 pin diagnostic plug
ICOM D: adapter for motorcycles
ISTA+ (AKA Rheingold or ISTA-D)
DIAGNOSTICS for All Vehicles
PROGRAMMING for F/I/G/RR & MINI, butrequiresan ICOM
ISTA-P
PROGRAMMING traditionally for all chassis, but is being phased out by August 2017, except for legacy E-series.
Replacement ECU’s must beNEW
YOU HAVE TO KNOW before you buy ICOM A2 or ICOM A3 or ICOM Next:
BMW ICOM NEXTvs the old ICOM
->muchfaster inBMWF and G series ..
->supports gigabit Ethernet too to be future proof, there currently is not gigabit Ethernet protocol defined yet for autos. Also it has USB3.0 instead of USB2.0 and a better wifi card.
ICOM NEXT A vs ICOM A2
-> more stable during programming
-> be necessary for the future Gbit cars
-> faster start-up times and high throughput
-> through high-performance,low-power ARM SoC
-> improved handling
-> more flexible OBD cable
-> lighted button for logs
…
ICOM A vs ICOM A2 vs ICOM A3
Modified ICOM A2 for vehicles with OBD access receives a significantly more powerful processor and more storage capacity. And robust aluminium case will help to avoid damage when using in harsh environments. It works better in cooling, runs faster and works more stable, not easier broken than older ICOM A.
ICOM A3 can program all units for all BMW series expect media system, and work more stable and has stronger compatibility than ICOM A2, A1.
Posted by: jean at
06:26 AM
| No Comments
| Add Comment
Post contains 539 words, total size 7 kb.
September 12, 2017
Here is the expert solution to BMWDME/DDE module initialization problem
(Note: The document was translated from Korean. Credits to Mr.JIHUNX)
Background:
TheDME(Digital Motor Electronics module of theBMW automobile isa very important module that controls the main operation of the engine (Diesel vehicles include DDE and Digital Diesel Electronics modules).Unlike other modules, the DME / DME2 / DDE module must be coded with the power turned on (ACC On) without coding while the power is turned on at the time of coding.If theinitialization is done by pressing the button with theignition onCode,or the coding is done, the DME module will be blown and various warning lights willappear.Most of the beginner coders initializeECUs it, and after selectingall,Code it seems that these problems are caused by pressing.CodeIf you need to initialize by pressingCode, select the individual module and press to initialize it for each individual module.

If the DME module is blown, the starting will be turned off while coding, and if you try to start, there will be a phenomenon that the driving device error will not start.Then, various warning lights are turned on as shown in the figure below.

Solution
By default, the preparation process is the same as theBMW ENET E-syssoftware coding procedure.I am going to tell you about the theory, not the actual experience.Please note that the names and numbers of the coding files are different because they are synthesized by combining all screenshots.
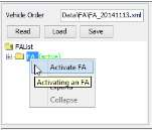
- Read SVT (VCM) Activate FA (VO) => Read SVT (VCM)),then proceed to the process(ACC ON state).
- SVT With theDME module selectedin the area,Detect CAT for SWE clickthebutton on theright.

- After selecting the most recent CAFDOK, press.The currentF020-13-11-504 CAFD list is selected becauseitis the most recent versionon the current capture screen.

- TheDME modulewill probablyhave been changed to a blue, red color folder on the SVT list as shown below.

- DME With the module name selectedCode, clickthebutton on theright screen.Oryou canDME right-click on the module nameCode and select the same.

- If you continue to coded while the green bar is stretched as if you are coding, it is restored normally.
http://www.obdii365.com/producttags/bmw-icom-next.html
Posted by: jean at
06:37 AM
| No Comments
| Add Comment
Post contains 350 words, total size 11 kb.
September 05, 2017


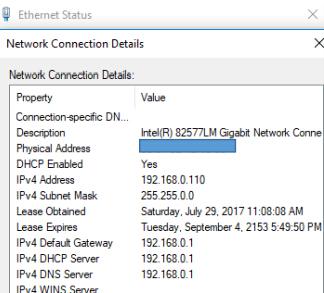


Ip = 192.168.68.85
Netmask = 255.255.255.0
Gateway = 192.168.68.99
IPPOOL_1=192.168.68.1-254
IPBIND_1=192.168.68.99
AssociateBindsToPools=1
Trace=1
DeleteOnRelease=0
ExpiredLeaseTimeout=3600
LEASETIME=86400
NODETYPE=8
SUBNETMASK=255.255.255.0
NEXTSERVER=192.168.68.99
ROUTER_0=192.168.68.1
EnableDNS=0
EnableTFTP=0
ROOT=C:\Users\Osx\Desktop\DHCP\wwwroot
WritePermission=0
EnableHTTP=0
ROOT=C:\Users\Osx\Desktop\DHCP\wwwroot
[00-01-A9-00-EE-E9]
IPADDR=192.168.68.1
AutoConfig=06/26/2016 12:41:32
Hostname=ICOM1120134
LeaseEnd=1467070189
IP 192.168.68.99
Subnet mask 255.255.255.0
Posted by: jean at
01:44 AM
| No Comments
| Add Comment
Post contains 881 words, total size 11 kb.
September 04, 2017
bmw f series f30 coding tool: ENET cable or ICOM
bmw f series f30 coding software download: BMW E sys
bmw f series coding software install: on Windows or Mac OX
bmw f30 coding cheat sheet: VO coding and FDL coding
bmw f30 ECU coding list: all modules can be coded
bmw f30 ECU coding manual: step-by-step how-to guide
bmw f series coding tool:
For coding only:BMW ENET cableis okThere are basically two ways to get the ENET cable. You can buy a complete cable, or you can simply build one.
DIY an ENET cable BMW with the help of the how-to’s (Google "DIY enet cableâ€; it’s easy to find guides you wan)- it’s a piece of cake for you if you’re equipped with technique. You can have a try and then decide to whether buy a complete one.
Don’t spend too much on it- that is, just buy a cheap knock-off online:
http://www.obdii365.com/wholesale/bmw-enet-interface-cable-e-sys-icom-without-cd.html
I wouldn't recommend other sites, although they may work, problem is that they have not been confirmed working yet.
For coding & programming: you must have a BMW ICOM emulator (ICOM A2orICOM Next). Also, if you have a new BMW or wanna use the tool for future cars, you should have bmw icom.
bmw f series coding software:
bmw e-sys software download:
http://blog.obdii365.com/2016/07/06/download-bmw-e-sys-v3225-v3261-v3271/
bmw f30 coding software download: E sys 3.24.5 worked 100%
http://www.obdii365.com/wholesale/bmw-enet-interface-cable-e-sys-icom-coding-f-series.html
Note: E-sys software is used for bmw f series coding only; if you want to have ECU programming, please you should have Ista-p.
Bmw icom ista-p latest version 07.2017: bmw programming
http://www.obdii365.com/wholesale/v2017-7-bmw-icom-software.html
bmw f series coding software install:
Usually, Windows system is your first option. But now, Mac OX also be the one you can have a try. This is how to install BMW E sys on Macbook pro:
http://blog.obdii365.com/2016/08/25/install-bmw-enet-e-sys-on-macbook-pro-v10/
bmw f30 coding cheat sheet:
FA Codes (VO Coding)
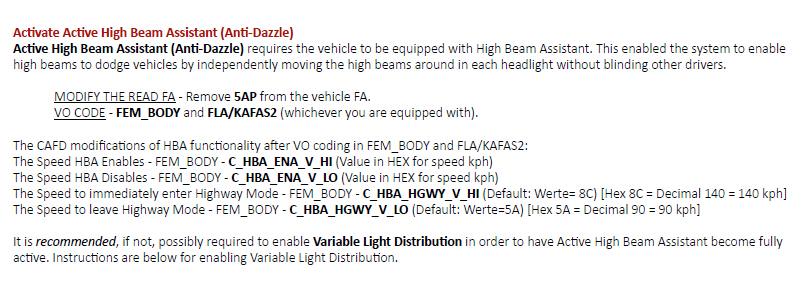
Activate Active High Beam Assistant (Anti-Dazzle)
Activate Variable Light Distribution
Activate Enhanced Bluetooth
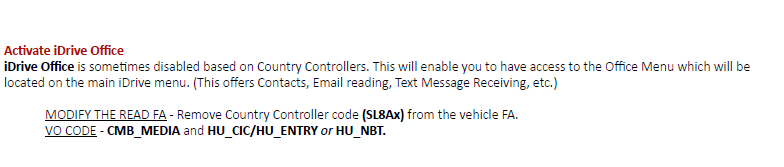
Activate iDrive Office
Activate Sport Automatic Transmission


Angel LED Brightness (Xenon Headlamps or LED Headlamps required)
Cornering Lights (Fog Lamps) & Fog Lamp Welcome Lights
Day-Running Lights & Activate Rear Fog Lamps
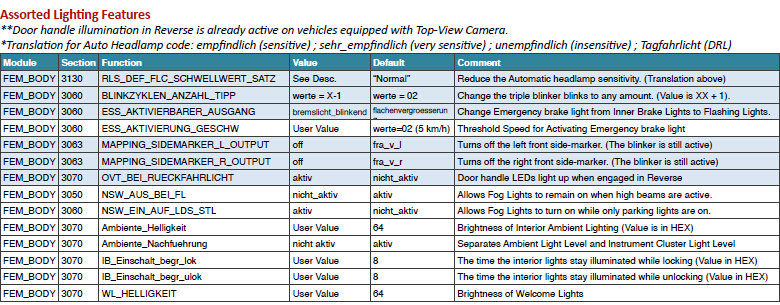
Assorted Lighting Features
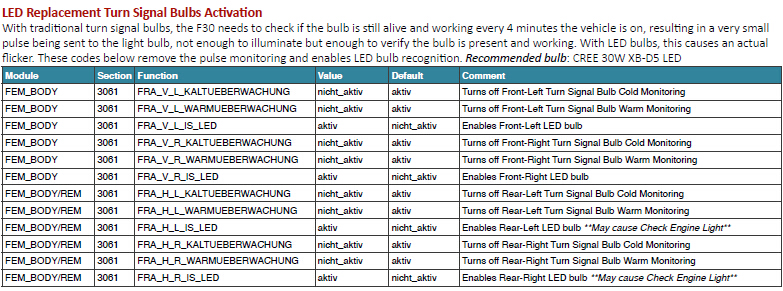
LED Replacement Turn Signal Bulbs Activation
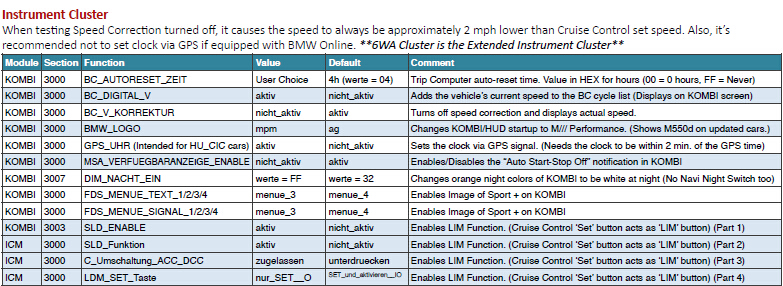
Instrument Cluster
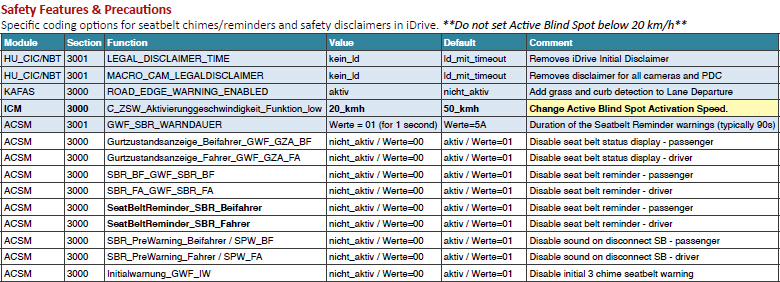
Safety Features & Precautions
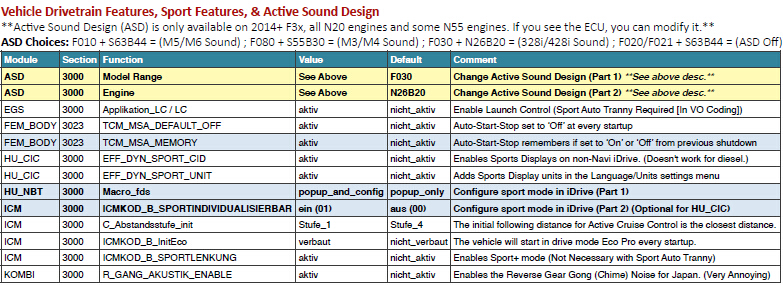
Vehicle Drivetrain Features, Sport Features, & Active Sound Design
General Locking/Window Features & Convenience Features
iDrive Features
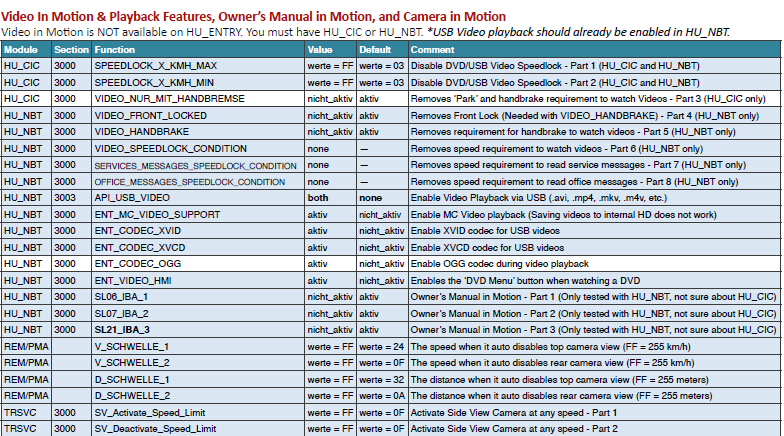
Video In Motion & Playback Features, Owner’s Manual in Motion, and Camera in Motion
Advanced Real-Time Traffic Information Activation
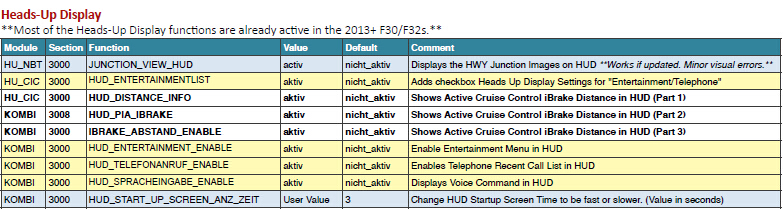
Heads-Up Display
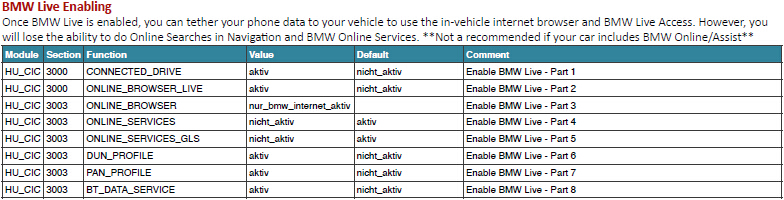
BMW Live Enabling
Active Spoiler (F34 3-Series GT only)
Seat Heating Temperature Levels/Memory Seats
Headlamp Washers Configuration
CODES THAT NEED TO BE TESTED OR CHECKED
INEFFECTIVE OR UNAVAILABLE CODES


https://mega.nz/#!wXQHhSgb!4nj6DeU7MefmjfcEvZpaGN1l2E8cEZnevMFHCtYnZ3U
bmw f30 ECU coding list:
AAG - Trailer Hitch Module
ACC - Active Cruise Control
ACSM - Advanced Crash and Safety Management
AHM - Trailer module
AMP - Amplifier
AMPH - HiFi Amplifier
AMP_TOPHB - Top HiFi Amplifier/System
AMP - Amplifier/System
AMP_TOPHB - Top HiFi Amplifier/System
ASA - Active steering
ASD - Active Sound
BDC - Body Domain Controller (ZGW, FEM, REM, SZL, IHKA, TCB, CAS, JBBF Combined)
CAS - Car Access System
CID - Central Information Display
CMB_ECALL - Combox Emergency Caller
CMB_MEDIA - Combox Media
CVM - Soft top module (Convertable Top)
DKOMBI - MFID Instrument cluster (6WB)
DDE - Digiatl Diesel Electronics
DME - Digital Motor Electronics
DSC - Dynamic Stability Control
DWA - Immobilizer (Alarm)
DVDC - DVD Changer
EGS - Electronic Transmission Control Unit
EHA - Electronic ride-height control
EHC - Electronic ride-height control
EKPM - Electronic fuel pump control
EMF - Electromechanical parking brake
EPS - Electronic power steering
FEM_BODY - Front electronics module (ZGW, FRM, CAS, and JBBF Combined)
FEM_GW - Front electronics module gateway
FKA - Rear-cabin automatic A/C
FLA - Automatic High Beam Camera Only
FRM - Footwell module (Lighting)
FRR - Active cruise control
FZD - Function unit roof
GWS - Gear selection switch
HKFM - Rear Lift-Lid (Trunk)
HKL - Rear Lift-Lid (Trunk)
HU_ENTRY - Head Unit Entry Level (no iDrive System)
HU_CHAMP (Head Unit CIC Mid) (iDrive system)
HU_CIC - Head Unit CIC High (iDrive system)
HU_NBT - Head Unit NBT (iDrive system)
HC2 - Lane Change Warning
HUD - Heads-Up Display
ICM_QL - Integrated Chassis Management
ICM_V - Integrated Chassis Management Vertical (Vertical dynamics management)
IHKA - Integrated automatic heating/air conditioning system
JBBF - Junction box electronics
JBE - Junction box electronics
KAFAS - Cameras System (LDW, AHB, SLI)
KOMBI - Instrument cluster
LHM - LED Headlights main light modules (fan and LEDs for the cornering light, low-beam and high-beam
headlights).
NIVI - Night Vision Camera
PDC - Park distance control
PMA2 - Parking Assist
RDC - Tyre pressure control
REM - Rear Electronics Module
RSE - Rear Seat Entertainment
SM - Seat module / Seat Memory
SME - Accumulator-management electronics
SMBF - Seat module / Seat Memory Passenger
SZL_LWS - Steering column control unit
SVT - Servotronic
TCB - Telematics Communications Box (BMW Assist)
TMS - LED Headlights (stepper motors for the Adaptive LED Headlights and LEDs for the side marker light,
the positioning light and the turn indicator)
TRSVC -All around view camera
TBX - iDrive Controller Touch Handwriting Module
VDM - Vertical dynamics Management
ZBE - iDrive Controller
ZGW - Central gateway module
f30 coding manual:
The steps of BMW F series ECU flash.... Just remember to identify the dependencies and select appropriately in step 15 in the below procedure.
When flashing involves ZGW it is widely said that the ZGW module should be updated BEFORE other
modules. The TAL (transaction list) generated by E-Sys should take care of this. But if you want, you could
flash the ZGW all by itself and then restart and do the rest. The steps remain the same.
Flashing all modules at once is also as easy as flashing individual modules. Just select all the modules in step
15 (still blFlash, swDeploy, cdDeploy, and ibaDeploy columns)
HU_CIC Depends (PreRequisites) on: 38 + 14 (BOTH ZGW)
KOMBI Depends on: 38 + 10 + 14 + 53 + 57 (ZGW + HU_CIC + ZGW + CMB_MEDIA + HU_CIC)
CMB_MEDIA Depends on: 57 (HU_CIC)
ZGW does not have dependencies.
How to identify dependencies inE-SYS interface:
Open TAL IN TAL Editor, and it will show you under ECU (TalLine_ID) if it has any PreRequisite ECU (TalLine_ID's).
As you can see here, TalLine_ID=13 (Kombi) has a PreRequisite of TalLine_ID=11 (HU_CHAMP):

HU_CIC:


ZGW:

Here are the basic steps:
Go to Comfort Mode => TAL-Calculating
- Read and Save FA
- Activate FA
- Read and Save SVT Actual as SVT_ist
- Create an SVT Target
Under KIS/SVT Target Calculation Strategy, select Complete Flash
Select I-Step (shipm.) to match your original I-Level as read and shown in VCM I-Step (Shipment)
I-Step (target.) will be unselectable as it is fixed based on current PSdZData I-Level
Do a KIS/SVT Target Calculation and Save as SVT_soll
- Do a TAL Calculation and Save as SVT_tal
Go to Expert Mode => TAL-Processing
Load TAL (SVT_tal)
Load SVT Target (SVT_soll)
Select "Read FA" button.
Check radio button for "read VIN out of FA"
On ECU Tab, uncheck let top box in column "All" (All checked boxes should toggle to unchecked)
On ID Base Row for Kombi, make check boxes in blFlash, swDeploy, cdDeploy, and ibaDeploy columns.
Press Check software availability
Press Start and it will proceed with processing TAL to flash Kombi with new firmware.
Please go on your reading for details.
1. Connect external charger (at least 50AMPs, preferably 70AMPs) to the car battery. Connect laptop to power supply. This step is essential!
2. Turn lamp switch to parking light – this will keep the ignition on beyond 20 minutes.
Turn light switch to Parking Lamp On - first position/stop to the right.
Please refer to Appendix B for further info regarding the light switch and the 20
minutes.
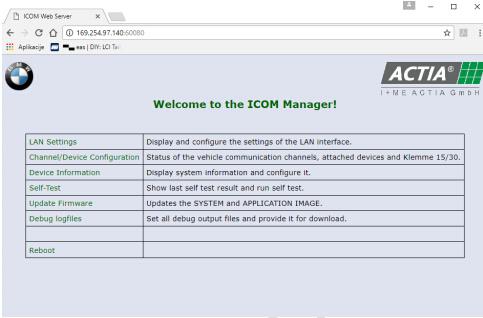
3. Connect via "Connection via Gateway URLâ€
In the Connection window, select the 'Connection via gateway URL' instead of via VIN, and use the car's IP address with the default port number 6801.
Passed with flying colors
(else flashing ZGW will fail)


5. Read and save FA

6. Activate FA
7. Read and save SVT Actual as "SVT_istâ€

8. Create an SVT Target:
a. Select Complete Flash

b. Select I-Step (shipm.) to match vehicles shipment I-Step level
i. Select Expert Mode VCM button


iii. In I-Steps box, click on "Read†button.

iv. Integration Steps boxes above will be populated with the data. Note down the IStep
(Shipment).

c. I-Step (target.) will be unselectable as it is fixed based on current PSdZData I-Level. Select
the appropriate level in I-Step (shipm.) as obtained in step above

d. Do a KIS/SVT Target Calculation and Save as "SVT_sollâ€

e. Do a TAL Calculation and Save as "SVT_talâ€

9. Go to Expert Mode ïƒ ï€ TAL-Processing

10. Load TAL [SVT_tal) created in step 8.e


12. Click the "Read FA†button


cdDeploy, and ibaDeploy (please see Appendix C) columns.

and the FULL version of them)

17. Press Start and it will proceed with processing TAL to flash Kombi with new firmware

18. Cross your fingers and watch it work
END. That’s all above BMW F30 coding withBMW ENET E-syssoftware.
Credits to all contributors, esp.http://www.obdii365.com/
Posted by: jean at
03:44 AM
| No Comments
| Add Comment
Post contains 1638 words, total size 40 kb.
32 queries taking 0.0663 seconds, 200 records returned.
Powered by Minx 1.1.6c-pink.

