


March 31, 2022
Here comes the common problem onVW Amarok Caddy etc 2018+ UDSprotocol vehicles:
.jpg)
Solution:
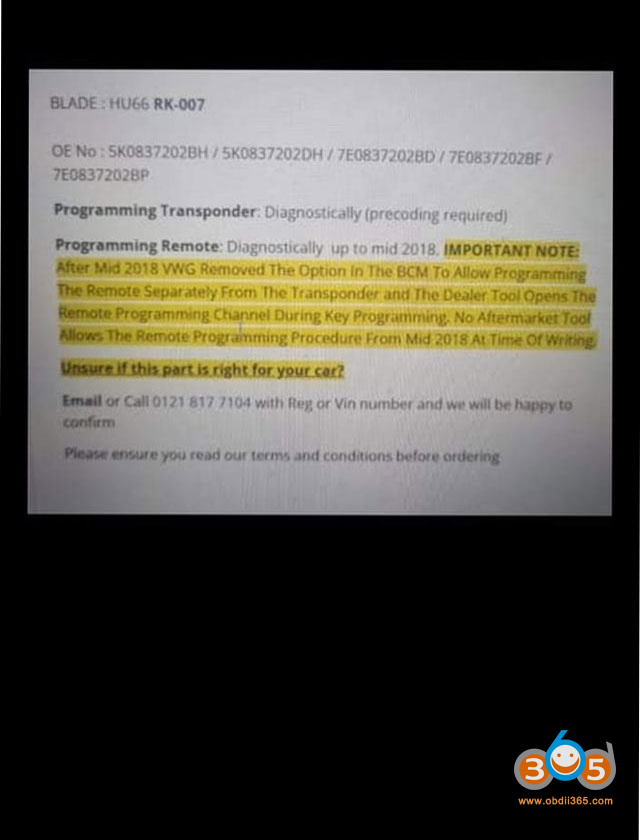
Only Odis opens it at that stage, you can’t even use an After market precoded key apparently has to be OEM.

Programming remote:
Diagnostically up to mid 2018.
Important Note:
After mid 2018 VWG Removed the option in the BCM to allow programming the remote separately from the transponder and the dealer tool opens the remote programming channel during key programming. No aftermarket tool allows the remote programming procedure from id 2018 at time of writing.
But some people had luck with these tools (with dealer key). Try if you have them in hand.
1). I usedlonsdor k518iselast time. Under remote section, just go through all of them till you get one that works. Smart Pro can do it as well.
2). In Brazil people do it withxtool x100 pad3. I’ve already managed to program a key of a Brazilian 2018 VW (Voyage) I programmed separate chip then remote successfully.
Posted by: jean at
07:32 AM
| No Comments
| Add Comment
Post contains 340 words, total size 5 kb.
March 30, 2022
[March 2022] Scania VCI 3 SDP3 2.51.1 has been tested by anobdii365.comengineer. We provide software download and 1 time activation service.
Type: Software application
Language: Multi Language
Title: Scania Diagnos & Programmer 3
Release: 2.51.1
Release date: 2022-03-28
Supported diagnostic interface:SCANIA VCI3


Win7 pro sp1 just 32 bit
Win10 pro
Free download Scania SDP3 2.51.1
https://mega.nz/file/fRUWGBYZ#ewe66SiRFGX5fE_8h0KgmcOrEx4_n8NKq2frf0Lj_7M
PM for password
Skype:OBDII365.com
Email:Sales@OBDII365.com
Whatsapp :+86 18150118226
Resource 2: stable, 100% working with 1 time free activation


Posted by: jean at
06:50 AM
| No Comments
| Add Comment
Post contains 119 words, total size 5 kb.
March 29, 2022
Is work with PSA Peugeot Citroen EDC17C60 by service mode? WillPCMTunerkill it by Service Mode?
It does not kill ecu.EDC17c60 works fine after manual change tprot.You need to disable Tport manually.
Our customers have made a few on bench and no problem. Only had to make tprot off with hex or OLS.
If don’t disable Tport manually, car doesn’t start after write flash.

Here is the reason:
This is a known problem of original pcmflash v1.20.PCMTuner 1.20does not know how to bypass PSA protection at the moment.
pcmflash 1.21 corrects the problem with patch. Apparently with the current version you have to manually edit the otp area before writing.
you need to manually edit tprot off,
This is fix for DTC to try
2CDB78 => 0000 => 2CDB7C
Patch for write protection

There is also third-party software for tprot off and immo off, i,e Multi Remover Tool

Posted by: jean at
06:45 AM
| No Comments
| Add Comment
Post contains 154 words, total size 4 kb.
March 28, 2022
A new version of the Mercedes Benz MB Star diagnostic programV2022.03 OpenShellversion is rolled out. The Mercedes-Benz Xentry Diagnostics program is designed to diagnose electronic control units and electrical equipment of any Mercedes-Benz cars. The program has a multilingual interface.
XENTRY Diagnosis OpenShell
Year/Release Date: 2022.3
Version: 22.3.3
All Xentry functions are available, including diagnostics, firmware/update of software modules and developer menus, as well as coding and programming modules in Mercedes, Maybach, Smart, Foton Daimler, BAIC, Bharat Benz and some others.
03/2022 Software List
- Xentry 03.2022
- DAS 03.2022
- EPC 11.2018
- WIS10.2020
- HHT-WIN
- SDmedia offline 2014
- Vediamo 5.01.01
- Vediamo Database 2019
- Star Finder 2016 & 2020
- PL76
- DTS Monaco 8.16.15 & 8.14, 2019
- DisassembyAssistant
- Support Languages:English, Croatian, Czech, Danish, Dutch, Finish, French, German, Greek, Hungarian, Italian, Japanese, Korean, Polish, Portuguese, Romanian, Russian; Spanish, Swedish, Turkish, Chinese.
Software inHDDorSSDformat in Windows 10 Pro 64bit system

Compatible device:
MB SD Connect C4,MB SD C5,Super MB Pro M6
2022.03 Software Images:


Posted by: jean at
08:00 AM
| No Comments
| Add Comment
Post contains 164 words, total size 10 kb.
March 25, 2022
Recommended by Scotty Kilmer Autofun and a few other mechanics, one of the customers from obdii365.com finally got the Godiag GT101 circuit tester and did a professional unbiased review here.
Part I: Device and Function Overview
Shipping was super fast and everything came packaged really well. I actually really like this Probe especially the price to features ratio is pretty good.
https://www.obdii365.com/wholesale/godiag-gt101-power-probe.html
This is actually quite compact when I compare this to my voltmeter, it is actually a little bit smaller.

It does have a 20-foot extension cord attached to it and that is because this probe ispowered by the battery of our vehiclewhich is what enables this probe to do a lot of the testing that a normal voltmeter cannot do that easily.

And this unit has anLED segment displaywhich is quite interesting because normally we’ve seen LCD displays on here but LCD displays are prone to breaking especially when you are using this in a shop environment.

Using the LED segment this is gonna be quite a bit resistant to abuse and towards the front of the unit.
So it’s like having aflashlight built-in onto this unitand we also have a little spot for the probe and the probe has a protective cover on here which is helpful so you don’t go around poking yourself just put that back on like so.
And the gt101 probe does not require any batteries in here, it is powered by the vehicles’ battery and that is done by connecting this plug right here to the set of alligator clips that they have included.

This is an advanced power circuit probe tester. This is more than your typical tester. You can do so much with this. I’m talking you can test for voltage, test for continuity, bad ground, and even test relays and fuel injectors.
There is a very inserting featuregodiag gt101that I have not seen in other power probes. It has theability to test and clean fuel injectorsand what they have done is pretty clever.
They have manufactured these fuel injector adapters so their fuel injector cleaner can be connected here and then a fuel injector can be inserted here.

Here they are made it easier for those with these adapters to activate the fuel injectors. They have included this little extension this gets connected here and then either one of these ends can go to the fuel injector which we can then activate and then we can trigger the cleaning process or the testing process.

But using the same accessory plug that has included another feature that I have not seen either before which is theability to test relaysand the same deal will apply here this gets connected and locked in place and now I can take this and connect each one of these leaves to the end on the bottom of a replay and begin to test my relay in that way and be able to see if it clicks and works correctly or not.

And finally, they include this instruction manual which covers the functionality of the probe and the different advanced tests that it can do on our vehicle or components.
Part II: On Car Test
Let’s test the probe on the vehicle.
Feature number 1
You can see it is already connected to the vehicle with the two alligator clamps.

And the display is on.The very first feature is gonna be simply the flashlightand is you can see there are the dual lights that can eliminate when we’re working on the car.
Feature number 2
Is the voltmeterand that is this red LED display. This is great because instead of having two probes in a voltmeter setup here we only have one probe so that frees up our hand and we can quickly check voltages. I want to check the voltage of the battery I can go ahead and connect that and as you can see we have 12.5 volts.

Now we also hear a beep and you saw a red light that indicates we have a positive voltage.
Feature number 3
That is going to be locating grounds. I am going to touch the negative now we have a been light instead of red light and the beep beep is different again.

As you can see this allows us to locate ground anywhere on the vehicle by just touching the surface very quickly.
Feature number 4
Is the ability to injector power into components.Why is this handy perhaps we have tail light that is out on our vehicle all the way to the back of our vehicle and we don’t know if its the light bulb or if it’s the wiring. Image this was till mounted and I am able to access from behind and pearl the light with this I can confirm if the light turns on that means that the issue is with the wiring of a fuse or if the light does not turn on it is possible that the light bulb is out.
We can know how much a device pulls in terms of amps can allow us to know if there is an issue with it.
Not only can we power light bulbs we can power anything else such as a motor, the windows regulator on our car allowing us to confirm if it is the wiring or the component that has failed.


Feature number 5
Is the ability to provide a ground connection.In feature number 4 you saw me turn on this bulb by providing a positive connection. But what if the light bulb was connected to the positive side. Let’s imagine that this was all the way to the back of the car and we suspected it was a ground problem
Here I can simulate the ground and confirm and yes by providing a ground the light bulb turns on, so that tells us that the wiring on the ground wiring to the light bulb all the way to the back of the car is what’s faulty.

Feature number 6
The next function is a continuity meter. If there a break inside of this wire.
This wire is relatively short but if this wire travels all the way to the back of our car there could potentially be a break in here somewhere and we are struggling to see if the wire is good or not.
so we are going to connect the alligator clips from the power probe and I am gonna touch the other end.
If this lights up green and you get the nice little beep that means there is continuity the wire is not broken.
As simple as this feature is it can be very helpful in locating opens.

Feature number 7
Is the ability to find shorts directly from the fuse or relay panel.You are going to be familiar with the schematic and wiring diagrams of a car before you can start to find shorts now the way that this will work is once you are familiar with the diagram and you have found the fuse for the cell where you suspect that there is a short the fuse can be pulled out. Now the fuse has two contacts I would inject power by pressing up into the first contact and there is a circle breaker in here, if the circuit breaker in here trips that means that side where I inject the power is the side that has a short and then I can now follow the wire and locate that correctly.
But if it doesn’t trip I still have one more side of the use which I can inject power from, and if that side of the fuse contact trips the circuit breaker internally we know that’s the side of the wire that I have to follow to locate the short. Once I have fixed the short I can reinstall the fuse and the circuit should work correctly at that point.

Feature number 8
Probably one of the coolest features of thegodiag gt101 circuit testeris the ability to test relays.
Relays, for the most part, you cannot really see visually if they are good or not so I have to remove it then I have to find a battery, find some cables to connect to the relay to test it out. The gt101 addresses that by creating this interface that allows us to test replays. Each of the wires in the gt101 power probe has been labeled with a number and a function. In the bottom of the relay they are the same numbers in there. So all I have to do is match each number to each wire and connect it to the relay.
I can grab the power probe and I can install the relay test and as you can see I can hear it clicking that’s first of all that’s a good indication because that tells me that the replay is functioning, also looking at the pc board in the bottom we have 3 lights that are on a blue, a green and a red. This is important because this can tell us something about what’s going on with the relay.

Part III: Pros and Cons
Pros:
- The manual covers the test procedure, the presentation was really professional.
- Great value ($79 only)
- Nice quality, well made
- This is more than your typical tester. You can do so much with this, i.e fuel injector and relay test
- with extension cable and flashlight
Cons:
- Only thing I didn’t like was it has no case and the box it comes in was also the shipping box.
- The only con, i wish it had a hard case, but it’s such a great tool otherwise, that I really don’t mind it one bit.
In sum:
Godiag GT101 power probesupportscircuit testing, fuel injector tester, cleaning, relay tester, current amp meter & more.
This is not a cheap tool by no means. It’s really well made and can do a full diagnosis on the power system and charging system of your vehicle. This is definitely a go-to tool and one that deserves a spot in any mechanics toolbox.It is a must-have for any car technician whether you are doing this as a hobby or as a business, this type of probe is going to save you a lot of time over a simple voltmeter and it can do a lot more than that.
Posted by: jean at
03:59 AM
| No Comments
| Add Comment
Post contains 1736 words, total size 24 kb.
March 24, 2022
In this article, we will explain how to get the right cloneTactrix Openport 2.0J2534 adapter and why Openport 2.0 is better thanMini VCI J2534interface.
Openport 2.0, like its colleagues MVCI 3 in 1 and Mini-VCI, is a J2534-1 compatible adapterand works with any software (VAG ODIS, Toyota Techstream, etc.) supporting PassThru library/driver.
Choosing the right clone
There are two clone versions available on the Internet.

Adapters differ not only in Golden Pin, best quality (Full Chip or New Version) and Black Pin, Poor Quality (standard version) and the type of sticker but alsothe board inside.
A bad OBD2 clone has a black connector and a green board inside:

The correct clone has atransparent OBD2connector anda black board:
https://www.obdii365.com/wholesale/new-tactrix-openport-2-0-ecuflash.html


Let’s figure out which chips the correct clone is built on:
1.LPC2364FBD100– microcontroller: Arm7TDMI-S™ processor, microcontroller for embedded applications featuring a high level of integration and low power consumption at frequencies of 72 MHz.Features 128 kB of flash memory, 34 kB of RAM, Ethernet MAC, USB Device/Host/OTG, DMA controller, 4 UARTs, 2 CAN channels, 3 SSP/SPI, 3 I2C, I2S, 8-channel 10-bit ADC, 10-bit DAC, 2 PWM, 4 general purpose timers, low power Real-Time Clock with separate battery supply, and up to 70 general purpose I/O pins.
2.NCV7708B– Six-channel signal switcher (Double Hex Driver)
3.6251DS– CAN bus transceiver (transceiver)
4.LM317L– voltage regulator 1.25-32 volts (adjustable, positive-voltage regulator capable of supplying 100 mA over an output-voltage range of 1.25 V to 32 V. It is exceptionally easy to use and requires only two external resistors to set the output voltage) .
Support for K / L-line, in this adapter, is made on transistors.
Since the microcontroller 2364 does not have a built-in SD card controller, work with a MicroSD card designed for recording logs is implemented here via the SPI bus.
Minijack connector (stereo connector) is used to connect an adapter for supplying programming voltage.For example, on Mitsubishi, 18 volts are supplied through it, on Honda 5 volts, etc.(set automatically by a diagnostic program such as Techstream, etc.
Supported protocols
CAN 2.0(CAN/ISO15765)
K-line (ISO9141/ISO14230(KWP2000)/dual K line)
Ability to supply voltage for programming and recording logs to a MicroSD card:
An adapter capable of switching GND or voltage (from 5 to 25 volts) to pins 1,3,9,11,12,13 of the OBD2 connector or an auxiliary 2.5mm stereo connector:

Also, the adapter’s firmware can record the log received from the 2.5 mm minijack (stereo) connector from Innovate Motorsports devices (lambda probes, etc.) via theMTS data busprotocol to an SD card.
Contact assignment:

The CANL and CANH pins are used for CAN and ISO15765 communication.
Contact ISO-9141 K and ISO-9141 L are used for ISO-9141 and KWP2000 communication.Often, only ISO-9141 K line is used.
The J1850+ and J1850- pins are used for SAE J1850 communication.For J1850PWM, both J1850+ and J1850- pins are used.For J1850VPW, only the J1850+ pin is used.Despite the presence of physical binding on the J1850+ and J1850- contacts, there is no protocol support in the firmware.
ContactsRingandSleeve2.5mm minijack are used to receive data from other devices via the RS-232 protocol.Typically, these are devices such as the Innovate Motorsports wideband oxygen sensor or other MTS bus compatible devices from other manufacturers.
The Tip2.5mm pin of the mini jack is software connected to the OEM12pin and can be used as an ADC output: a setpoint voltage or ground can be supplied here by software, for use with adapters for non-OBD2 connectors.When a 2.5mm mini jack is inserted into the connector, to protect the adapter and the vehicle, the microcontroller disables the 12th pin of the OBD2 connector.
Voltage from 5 to 25 volts can be applied to contacts: OEM1, OEM3, OEM9, OEM11, OEM12, OEM13.The J1850+ pin can also be driven from 5 to 8 volts.
GND can be applied to pins: OEM1, OEM3, ISO-9141 K, OEM9, J1850-, OEM11, OEM12, OEM13, ISO-9141 L
Voltage using the ADC (analog to digital converter) input of the 2364 chip and, accordingly, the firmware and software, can be read from the following pins: OEM8, OEM12, Vbat
Why you can’t buy a clone with a black OBD2 connector (green board inside):
- 1. Serial numbers of microcontrollers on these boards are blacklisted in Openport 2.0 drivers.
When the adapter is connected to the USB port of a PC / laptop, the op20pt32.dll driver (containing the firmware) or ECUFlasher (software bundled with the adapter) checks the firmware version in the microcontroller and, if it is younger, flashes a new version. The firmware first of all checks the serial number of the microcontroller and if it is on the black list, it erases the flash memory of the microcontroller and turns on write protection. Thus, the clone becomes inoperable. If, when checking, the firmware versions in the driver and in the microcontroller match, but there is an Internet connection and a new firmware is available, it is automatically downloaded, sewn, and if the check fails, the microcontroller is corrupted. - 2. In the circuitry of the green board, as many as20 differences from the original, without correcting which, after a short use (2 or 3 times), the adapter fails in terms of power supply.
Advantages ofOpenport 2.0adapters with a transparent connector and a black board:
- 1. They have unbanned serial numbers, you can sew with official firmware from the Internet.
- 2. For refinement, it is enough to replace6 resistors (if you need network connection).
In addition to replacing the resistors, you can do the following:
1). To capacitor C8, soldered a ceramic capacitor of 10 uF
2). On pins 1 and 3 of LD33, added an electrolytic capacitor of 100 uF, 25 V.
3). From plus C12 to pin 53 (P2[10] /EINT0) LPC2364, added a 10 kΩ resistor. This modification prevents the bootloader located in the LPC2364 from starting when the RESET command is given to the microcontroller. (An modification tutorial will be attached soon)
What are the benefits of an Openport 2.0 clone overMini VCIand HEX-CAN+USB clones?
1. Openport 2.0 has a USB interface for communication with a PC / laptop, connected directly to the microcontroller and capable of operating at high speed, unlike the outdated and slow FT232R chip used in Mini-VCI and HEX-CAN + USB.
2. Openport 2.0 can supply voltage to the minijack connector or OBD2 connector pins, which is mandatory for some Toyota, Honda, Mitsubishi, Subaru
3. The openport 2.0 is verified working no issue with Mercedes Xentry passthru program.
Disadvantages:
1. You cannot install the new official driver (the last update was released in 2016). Although the situation is the same today with Mini-VCI, MVCI 3in1, HEX-CAN + USB and VAS5054A adapters.
2. Just like Mini-VCI, MVCI 3in1 and VAS5054A – does not support J2534-2 standard protocols
3. Does not support legacy VPW and PWM protocols. An inscription hangs on the official website that work to add support for these protocols is in the process, but the openport clone says that this will never happen.
Posted by: jean at
06:04 AM
| No Comments
| Add Comment
Post contains 1151 words, total size 15 kb.
March 23, 2022
How to connectpcmtuner/pcmflash to Iveco Bosch EDC17C69/EDC17C49 ECUs?
There are 2 possibilities for canbus on these ECUs. You must use a capacitor on Iveco edc17c49 even with the original pcmflash and scanmatik (capacitor 10uf must be used for gpt1).

Always fix is a capacitor in serial with GPT1 10uF or 100uF and extra ground at pin 21.

Bosch EDC17C49 ecu pinout diagram

Bosch EDC17C49 ecu pinout diagram
How to read Iveco EDC17C49 with PCMTuner without opening ECU?

Set uppcmtuner usb dongle, hardware and ECU connection following the wiring diagram above

In PCMTuner software, select Iveco- Daily- EDC17C49- Bench mode


Check instructions and make bench connection
Then pressRead and Write
Use module [71] Bosch MEDC17 (TC1724/1728/1767/1782/1784/1797) FLASH


Read data until completed


Posted by: jean at
07:11 AM
| No Comments
| Add Comment
Post contains 127 words, total size 11 kb.
March 22, 2022
Several mistakes were made during this process but still can learn from it. 2016 Ford Explorer all smart keys lost done byAutel IM608. Belongs to car lot. Ordered 1 key for it. Fought active alarm and failed. Made 2 chirps then next step would set it off again. Seen a bcm read option so I pull it and getting ready to open it up I see the key code on sticker. I previously did not think it had the key pad but after looking again I see it in pillar very well hidden. Lol. Put it all back together and use keypad to deactivate and it works. So now onto programming key. Seen 4 keys and decide to do akl. (I know now) learned right in perfectly but now says it need 2 keys to finish. I looked through my truck and find a different ford smart key that reads same transponder but it’s locked. Throw it in slot and added a key. It went through the process but then said it failed. I backed out and looked and it said there was 2 keys. Sure enough. It closed out. Starts runs and drives with no issues.
BTW: Those keys are reusable. And they are the same keys just look different. They work from 2016 and up.


Fords if you do AKL procedures you will need to add 2 keys, you could have just chosen add key then would have only need 1 key. Also you said you heard the 2 chirps then started to add key and alarm sounded again next time just continue to add key, that is how it worked for me. I did the deactivate alarm, I heard 2 chirps then started to add key, alarm sounded but I just went through the process then the key was added and alarm stopped.
Posted by: jean at
09:05 AM
| No Comments
| Add Comment
Post contains 315 words, total size 6 kb.
March 18, 2022
Question:
I just got myAutel IM508software updated. I noticed there is a new ‘OEM Authorization’ function menu. What does it do?
Solution:
This is a new IM508/IM608APP to manage the vehicle security gateway authorization information. You know some new vehicles with safety gateway that the scanner can not access. So need to obtain the gateway authorization then be able to access it. If user paid the authorization in vehicle software, in this OEM software, it will show the payment, balance and etc.
Currently, Autel team is working on Renault, the instruction will be added soon due to some system configuration work from server side.
Just ignore this if no related issues occurred.
Posted by: jean at
07:33 AM
| No Comments
| Add Comment
Post contains 118 words, total size 2 kb.
March 17, 2022
Just did today a New Keless Remote for Volvo V40 Cross Country 2013.


Posted by: jean at
07:51 AM
| No Comments
| Add Comment
Post contains 73 words, total size 4 kb.
20 queries taking 0.0166 seconds, 47 records returned.
Powered by Minx 1.1.6c-pink.

