


October 31, 2022
Problem:Today i try to add a key to a Porsche Cayenne 2008 withAutel IM608.
Read data from ecu me7 -ok
7th bytes from working key – ok
Make dealer key – ok
Program key – no ok
Lost communication with car when i want to program.
The original key can always start the car. Any solution?
Possible solutions:
Solution 1)
Just went through this a couple days ago. I had to jump fuse 26 and 36 to wake up car gateway aka cluster and then usedVVDI2to do key learn with pin I got from Autel, because Autel kept losing communication, if you go under diagnostic and talk to Kessy you’ll see it talks just fine but some glitch in the learning process.
just put power to the car normally and then jump the power from a full time fuse like 36 to the one that needs to be powered up 26.

You might be able to do it through diagnostic mode using same instructions as vcds and a PIN code like you would with earlier Volkswagens.
Solution 2:
the solution was to pull kessy and eeprom it then make key on bench.. ended up being quicker than trying to add the key obd2.
Posted by: jean at
06:01 AM
| No Comments
| Add Comment
Post contains 211 words, total size 2 kb.
October 28, 2022
DTS Monaco is a controller for vehicle diagnosis and general engineering test terminals of the controller functions. The Monaco is derived from the name used for modular Analyzer traffic. In the Mersedec-Bensmaintenance tests it is the ultimate authority, perfect support forC4 (SDconnect) and (Ecom) hardware (currently Das-x-entry. Vediamo lower privileges)
Free Download DTS Monaco 8.16.015 Keygen and Patch


Resource 1:
https://mega.nz/file/f7IGAKSY#d0ircr6MRFaIo2l2OxEtcvJiIOHsMlfNr2ytSZrYdig
password: wiese@77$12%5

After installing DTS Monaco software, paste Hardware ID to both the Regsitration name and Hardware ID area to generate the activation key


Resource 2:
https://mega.nz/file/300BTBpL#6w2GmO7G7mijkFkbiksN4J9CnlI8FYD9ZEft42CIfTs
2 Ways to get license.bin if you want:
1.Directly purchase from Softing.
2.open start > RUN > write :CMD(Command Prompt) and enter
write > ipconfig /all
find >Ethernet adapter Ethernet: thenfind>Physical Address (example)XX-XX-XX-XX-XX-XX
Send mac address of your LAN adapter to DTS exports (MH, DK forums), they will give you a license file.
Resource 3:
Get MB SD C4 Xentry, WIS EPC, DTS Monaco, Vediamo software HDD or SSD
https://www.obdii365.com/wholesale/v202006-mb-star-sd-connect-c4-software.html
Send DTS Monaco hardware ID to sales@obdii365.com for the activation key.

If need DTS Monaco 8.14, check here
Free Download and Configure DTS Monaco 8.14 with Openport 2.0
Posted by: jean at
06:18 AM
| No Comments
| Add Comment
Post contains 192 words, total size 8 kb.
October 27, 2022
Here is the Mercedes diagnostic multiplexer test report from one of theobdii365.comcustomers.


So I bought a Super MB M6 for fun.
A report from all three.
The first two no longer need batteries or an ad hoc connection.
They have a built-in access point and always show a LAN connection (in SD Toolkit) even though they are connected to WiFi.
The first two can also doip, whether one is needed is an open question.
The firsthas a built-in fan for better cooling.It works like SD-C4 theconfiguration must be done in sd toolkit.
But it makes a very good impression and the workmanship is also good. It works very well for me. The connection is stable with the car and computer via wifi (not like in old c4… always on cable). Monaco, vediamo, das, Xentry, update via toolkit everything working. Super MB works with every version, nothing has to be done again. WIS EPC also runs on Win 11. I recommend.
Thesecond has a built-in heatsink at the pointwhere the WLAN card was, which no longer exists.
The first has been in continuous use for several months without any problems.
I tested it today on my S class, the Super MB Pro takes 51.68 sec to communicate and the SD C4 Plus takes 52.09 sec on computer Win 11, I5, 8 GB RAM and SSD.
But the old SD Connect still works.
Conclusion I will only buy the first two in the future, preferably the second, because it hasno fan and there is no batterywith either.
And here, too, there are only two types, it works or it doesn’t.
This is just information and not a discussion
Posted by: jean at
06:48 AM
| No Comments
| Add Comment
Post contains 301 words, total size 4 kb.
October 25, 2022
There is no 3rd revisionKT200 PCB. The picture with no green pcb board was an unprocessed pcb. All devices included green small pcb (decrypt module).
So the rework will be applied to version 2 with the green small PCB on the top of red.
*You are at your own risk.
1).
If device is recognized by pc, can be identified and reset by kt200-update app (reset kt200), but the main app does not see it.
The 16MHz resonator can be faulty so should be replaced to Murata 16 MHz (cstls16m).


2).
For problems related to blockage in writing (always modified files not same as ori example edc16cp31)
One ofKT200users have solved themby applying partial rework on PCB .
some hints:
with quartz instead of oscillator – the authorization is only with power plug; at final he used ZTT 16.00X – more stable than original yellows one
Is mandatory to revise 74HCT125D 2xpc ; HEF4011BT 1x pc ; 74HC14D 3x pc; 74HCT245D 2x pc
L9613 seems ok ;
scotty diodes "74†did not changed yet but are not inspiring any quality – to be analyzed;
Still to do: small relay change with Omron 5GV-1 ; identify on pcb MAX485 2x pcs ; L9613 2x pc.
Can controller A82c250 normally should be exchanged with A82c251 for 24v compatibility
Posted by: jean at
05:59 AM
| No Comments
| Add Comment
Post contains 249 words, total size 7 kb.
October 24, 2022
An Opel Astra H with all keys lost, have new key and pin code. Where to add that key? In PEPS, in CIM, in both? Tried to read key info with VVDI key tool, but it cant recognise it, I can check remote only and its working.
Finally done.
Procedure:
1. Read PIN usingFVDI2018
2.OPCOM:
a. Enter immobiliser -> programming -> enter security code -> press start button
b. with ignition lights on, enter with OPCOM to PEPS -> programming -> programming -> enter security key
c. enter transponder learn mode. It will clear all keys
d. hold key next to transponder reading coil and press learn transponder
e. it will ask to press unlock button once, while holding to the coil
f. after successful learning, press display transponder info
g. if all OK, press close transponder learn mode
all working perfectly
Amazing what Opcom can do on Vauxhall/Opel the cheapest tool.
Posted by: jean at
09:03 AM
| No Comments
| Add Comment
Post contains 162 words, total size 1 kb.
October 21, 2022
Nissan Qashqai 2017 spare remote key programming successfully done usingxtool x100 pad3.
Select Key programming- Nissan- Program Key- Select from Type- Immobilizer system- 20 digits pin code- Type 1
Turn the ignition off and turn on emergency indicator
Program key


All keys lost will be erased. You can program up to 4 smart keys withxtool pad3.
Insert the working key and turn on the ignition switch
Switch ignition off wait for 5s and press Yes to continue

Insert the working key and switch the ignition on again
Switch ignition off wait for 5s and press Yes to continue
Program 1st success

Insert a new key and switch the ignition on

Switch ignition off wait for 5s and press Yes to continue
Program complete

Test both keys, all working.

Done.
Posted by: jean at
07:58 AM
| No Comments
| Add Comment
Post contains 145 words, total size 12 kb.
October 20, 2022
Question:
How do you get your immo bin files in and out of yourXtool x100 Pad3?
Are there some kind of PC software that you connect to the Pad3?
X100 Pad3+ KC501.

Answer:
In case anyone need, here is how to.
you need to transfer the files from internal storage to external storage.
From xtool app go tofile managerand then copy your dump (it is saved in a map called "adapterâ€) to external storage. Download a file manager to sent the file or use usb cable to connect pc.
USB Xtool to USB PC E:\Diagnosis\traces\PS_ADAPTER-V19.05 Copy or paste here.
Posted by: jean at
06:06 AM
| No Comments
| Add Comment
Post contains 110 words, total size 2 kb.
October 19, 2022
The littleVXScan ENET WiFi/USB adapteris tested working with Mercedes Benz Xentry Passthru software on PC. Here’s the guide to set up ENET adapter for Xentry passthru.
This ENET cable can be used with BMW ISTA, VAG ODIS, DTS Monaco programs as well. You can test by your side.

The benefits of ENET adapter with Xentry passthru:
1. For users who got theold none-DoIPMB SD C4/C5 device, you don’t need a brand new DoIP VCI to diagnose DoIP models, just get this cheap dongle as an alternative (for DoIP Mercedes only).
2. If get the dongle, vxscan technician will activate w223 w213 w203 w167zenzefi licensefor free
3. If you get yourself Xentry passthru version, vxscan technician will help activate the software
4. It is a versatile adapter. It will also work on iOS, Android phone or tablets. It is compatible withE-SY-S, BimmerCode, Bootmod3, Ethernet, ISTA D, MHD, xHP Flashtool, xDelete, THOR-the M Flasher, BimmerGeeks Pro-Tool,etc. Apps.
5. The dongle is cheap$39.99.
How to Set up VXScan ENET Adapter with Xentry Passthru?
Search WiFi nameMHD-ENETand pair with password:123456789

Once connected, run Xentry ENET WiFi Cars (program to switch J2534 devices)

Select passthru interface asDoIP Only
It will launch Xentry software
Run Zenzef-UI program on the desktop

Xentry will ask you to login with user name and password
Contact sales@obdii365.com for user name and password


Select vehicle model, i.e C class W206 and pressXentry Diagnosis


Load ZenZefi license

Software is ready to use
Run a quick test and then perform the functions you desired.


Posted by: jean at
06:33 AM
| No Comments
| Add Comment
Post contains 260 words, total size 13 kb.
October 18, 2022
Which firmware version of Toyota Techstream cable is better?Mini VCI V1.4.1or V2.0.4?
More info about mini vci j2534 with firmware 1.4.1 & 2.0.4:
The clone cables used 1.4.1 or 1.4.6 (latest) firmware.

The "real†cables use 2.0.1 or 2.0.4 (latest).

They are all clone Techstream cables of course but the good fakes use the same firmware as the real Xhorse cable. The 2.0.4.
Back Story:
1) Original TechStream cable/machine costs $5000+.
2) Drew Technologies created the Mongoose MFC cable as an alternative to TechStream. It’s legit and supported for TechStream Lite but the cable costs $500.
3) XHorse is a clone of Mongoose. Costs about $100. This is "legitâ€. 100% works with all modern Toyotas.
4) Chinese clone mini vci of XHorse. This is what most people are buying. The good fakes use the same firmware as XHorse. These ones will work just like the XHorse except you get no L-line support for flashing ECUs. This is fine for most people.
Firmware 2.0.4 supports all the diagnostic communication protocols needed for Toyota (since 1996). Better performance and compability ( Activate Test , Customize function, ECU Reprogramming etc.) !
The latest 1.4.1 firmware interfaces have both CAN chip (xx1050) and K-Line chip (fake discontinued si9241a = LM393 in a different circuit), so they may full support these 2 protocols for Toyotas since 1996+. Only missing VPW chip (and si9241a for L-Line).
They will not work on the 2011 Prius as some on PriusChat have said.

Fake 9241A chip

Real 9421A chip
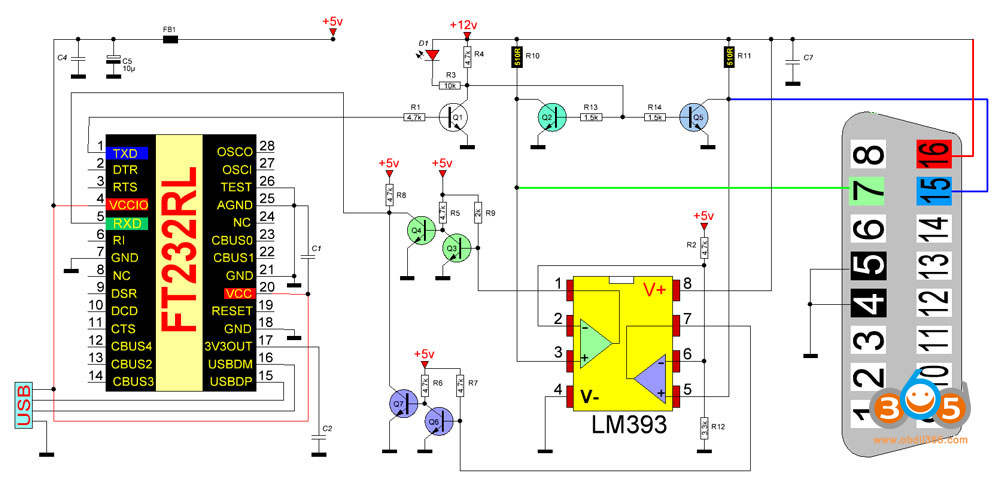
LM393 instead of 9241a in a circuit for vag com kkl 409.1
Mini vci 2.0.4 firmware PCB
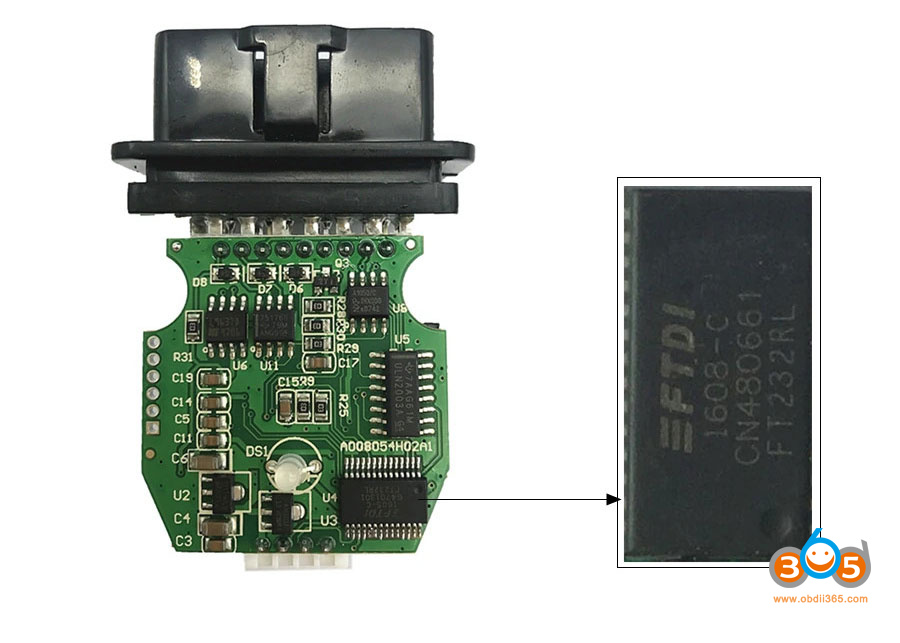

Mini VCI 1.4.1firmware PCB


2.0.4 cable is now only available in ali or ebay, twice as expensive than 1.4.1 cable. If you need to troubleshoot K-line Toyota/Lexus, 1.4.1 is fine. 1.4.1 is tested working with the latest Toyota.
MINI VCI Techstream V17 Tested Working on 2022 Tundra
There is no reason to try to update firmware. Interfaces with 1.41 will be bricked if you try to update firmware. There is not enough space inside the chip.
If bricked yourmini vci j2534cable, follow the DIY solution to fix it.
How to Fix Bricked Mini VCI J2534?
Read also:
http://blog.obdii365.com/2022/06/24/vxdiag-mini-vci-1-4-1-or-2-0-1-for-old-lexus-sc/
Posted by: jean at
02:59 AM
| No Comments
| Add Comment
Post contains 373 words, total size 10 kb.
October 17, 2022
DeadAutel km100solution. If the battery is fully discharged and cannot be charged and turned on anymore, open km100, disconnect battery and attach power 4.2-4.4v directly to battery terminals + and -. Keep it for 10-15 min. Then assemble all together, connect Charger to usb-c and it will work again. I use Dc power adapter with output 4.2v 500ma.


This must override the battery sense circuit.
Since, the battery is fully discharged, the sensor cannot detect battery presense.
Posted by: jean at
08:36 AM
| No Comments
| Add Comment
Post contains 84 words, total size 2 kb.
32 queries taking 0.1571 seconds, 210 records returned.
Powered by Minx 1.1.6c-pink.

