


September 29, 2016
You will need a cable:
Option 1:K+DCAN USB cable for coding:
This is similar to what I bought, it came with a green circuit board and worked well.
OPTION 2:BMW ICOM
****NOTE if you plan on updating modules in your car, buy an ICOM cable. It will have a faster and more reliable connection.
If continuing with K+DCAN...
Download BMW tools 2.12 this will give you updated NCS Expert @ v3.1, EDIABAS 7.2, and winkfp 5.1. Then, I used the BMW coding tool to update my daten files.
After this you will likely need to update your: SP-DATEN files. This is so you don't have strange errors and so you can code your car back to default using the "expert mode profile."
There is newer SP-DATEN than v54.
This is from 2014, I just done have time to keep searching. Feel free to post links to newer versions here guys!!!!
Link for: v54:https://mega.nz/#F!0N8A3LSb!kPyNeBaKoO1GaGoSokfuJA
This is a large file, about 16 GB and will take some time. It contains, what is know as SP-DATEN update files for all BMW models and MINI models. Just pick you chassis and follow the following procedure to update that to the car. After the download you will need to unzip it.
***Use "7zip" found here:http://www.7-zip.org/download.html***
*****Winzip is unable to handle such large files*****
**After it is unzipped it is a: ".rar" You must now "unrar: it, Here is a link to Unrar a file:http://www.rarlab.com/rar_add.htm**
After that you will have the folders, feel free to delete the ".zip" and all the ".rar" files. You can also delete all other chassis except what you need for your car. Now use the BMW coding tool to update the SP-DATEN files to NCS Expert and the EDIBAS.
Now once you have done the other steps and are thinking, how do I actually code something?
You can watch this video, it has a great explanation with some details on exactly what to do. This has to do with reactivating "Passive Go or Keyless Go," with respect to the CAS "Car Access System" and Comfort Access. Watch it here.
Posted by: jean at
06:59 AM
| No Comments
| Add Comment
Post contains 427 words, total size 4 kb.
September 28, 2016
E-Sys 3.26.0 is used for screen dumps. Other versions may differ slightly.
ï‚· CMB_MEDIA
ï‚· HU_CIC
ï‚· KOMBI
ï‚· ZGW
When flashing involves ZGW it is widely said that the ZGW module should be updated BEFORE othermodules. The TAL (transaction list) generated by E-Sys should take care of this. But if you want, you could
flash the ZGW all by itself and then restart and do the rest. The steps remain the same.
Flashing all modules at once is also as easy as flashing individual modules. Just select all the modules in step15 (still blFlash, swDeploy, cdDeploy, and ibaDeploy columns)
HU_CIC Depends (PreRequisites) on: 38 + 14 (BOTH ZGW)KOMBI Depends on: 38 + 10 + 14 + 53 + 57 (ZGW + HU_CIC + ZGW + CMB_MEDIA + HU_CIC)CMB_MEDIA Depends on: 57 (HU_CIC)ZGW does not have dependencies.
HU_CIC:
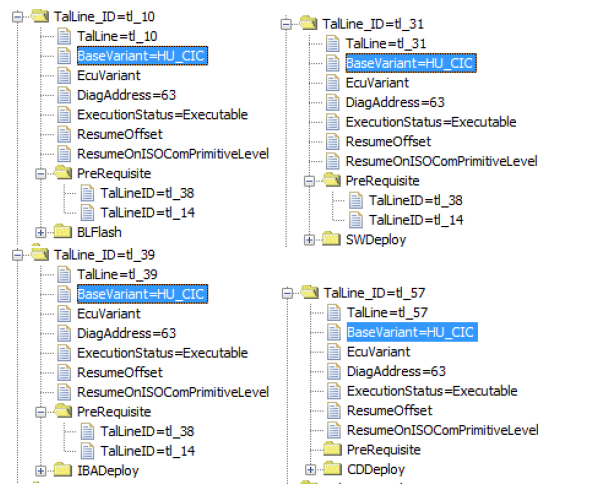
KOMBI:
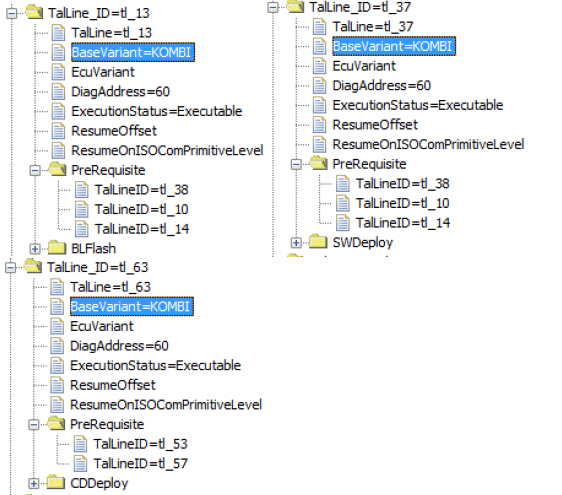

ZGW:

Basic steps:
1. Connect external charger (at least 50AMPs, preferably 70AMPs) to the car battery. Connect laptop to power supply. This step is essential!
2. Turn lamp switch to parking light – this will keep the ignition on beyond 20 minutes.
3. Connect via "Connection via Gateway URL†instead of via VIN, and use the car’s IP address with the default port number 6801.
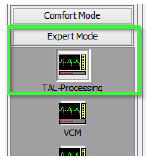
 4. Select Comfort Mode > TAL Calculating
5. Read and save FA

6. Activate FA

7. Read and save SVT Actual as "SVT_istâ€

8. Create an SVT Target:
a. Select Complete Flash

b. Select I-Step (shipm.) to match vehicles shipment I-Step level
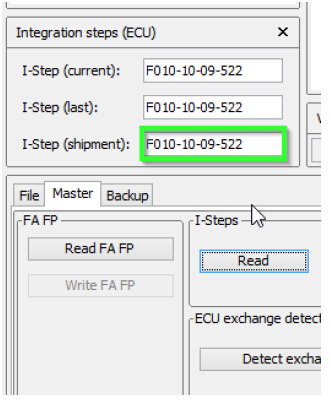
i. Select Expert Mode VCM button

ii. On the right bottom box, select "Master†tab

iii. In I-Steps box, click on "Read†button.

iv. Integration Steps boxes above will be populated with the data. Note down the IStep (Shipment).
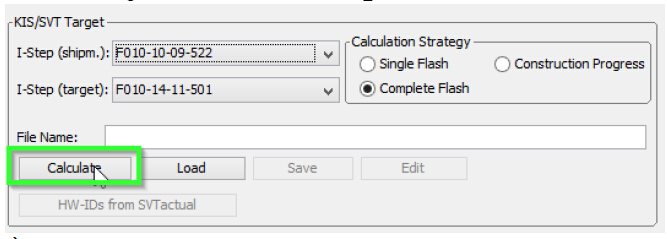
c. I-Step (target.) will be unselectable as it is fixed based on current PSdZData I-Level. Select the appropriate level in I-Step (shipm.) as obtained in step above

d. Do a KIS/SVT Target Calculation and Save as "SVT_sollâ€

e. Do a TAL Calculation and Save as "SVT_talâ€

9. Go to Expert Mode > TAL-Processing
10. Load TAL [SVT_tal) created in step 8.e

11. Load SVT Target ("SVT_sollâ€) created in step 8.d

12. Click the "Read FA†button
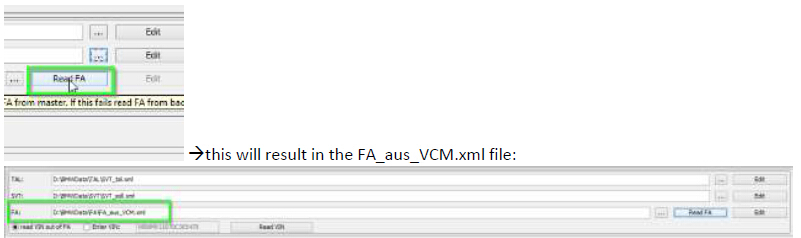
13. Check radio button for "read VIN out of FA†and click the "Read VIN†button

14. On ECU Tab, uncheck let top box in column "All†(All checked boxes should toggle to unchecked)

15. On ID Base Row for HU_CIC, CMB_MEDIA, KOMBI and ZGW check the boxes in blFlash, swDeploy,cdDeploy, and ibaDeploy (please see Appendix C) columns.

16. Press Check software availability (this, among other, ensures that you have the correct PSdZdata and the FULL version of them)

17. Press Start and it will proceed with processing TAL to flash Kombi with new firmware

18. Cross your fingers and watch it work.
1) Click "External Applications†in the left menu.
2) Click "External Applicationâ€
3) Double-click "Transmitterâ€
4) Double-click "ACSM verriegelung_schreibenâ€
ACC – Active Cruise Control
ACSM – Advanced Crash and Safety Management
AHM – Trailer module
AMP – Amplifier
AMPH – HiFi Amplifier
AMP_TOPHB – Top HiFi Amplifier/System
AMP – Amplifier/System
AMP_TOPHB – Top HiFi Amplifier/System
ASA – Active steering
ASD – Active Sound
BDC – Body Domain Controller (ZGW, FEM, REM, SZL, IHKA, TCB, CAS, JBBF Combined)
CAS – Car Access System
CID – Central Information Display
CMB_ECALL – Combox Emergency Caller
CMB_MEDIA – Combox Media
CVM – Soft top module (Convertable Top)
DKOMBI – MFID Instrument cluster (6WB)
DDE – Digiatl Diesel Electronics
DME – Digital Motor Electronics
DSC – Dynamic Stability Control
DWA – Immobilizer (Alarm)
DVDC – DVD Changer
EGS – Electronic Transmission Control Unit
EHA – Electronic ride-height control
EHC – Electronic ride-height control
EMF – Electromechanical parking brake
EPS – Electronic power steering
FEM_BODY – Front electronics module (ZGW, FRM, CAS, and JBBF Combined)
FEM_GW – Front electronics module gateway
FKA – Rear-cabin automatic A/C
FLA – Automatic High Beam Camera Only
FRM – Footwell module (Lighting)
FRR – Active cruise control
FZD – Function unit roof
GWS – Gear selection switch
HKFM – Rear Lift-Lid (Trunk)
HKL – Rear Lift-Lid (Trunk)
HU_ENTRY – Head Unit Entry Level (no iDrive System)
HU_CHAMP (Head Unit CIC Mid) (iDrive system)
HU_CIC – Head Unit CIC High (iDrive system)
HU_NBT – Head Unit NBT (iDrive system)
HC2 – Lane Change Warning
HUD – Heads-Up Display
ICM_QL – Integrated Chassis Management
ICM_V – Integrated Chassis Management Vertical (Vertical dynamics management)
IHKA – Integrated automatic heating/air conditioning system
JBBF – Junction box electronics
JBE – Junction box electronics
KAFAS – Cameras System (LDW, AHB, SLI)
KOMBI – Instrument cluster
LHM – LED Headlights main light modules (fan and LEDs for the cornering light, low-beam and high-beam
headlights).
NIVI – Night Vision Camera
PDC – Park distance control
RDC – Tyre pressure control
REM – Rear Electronics Module
RSE – Rear Seat Entertainment
SM – Seat module / Seat Memory
SME – Accumulator-management electronics
SMBF – Seat module / Seat Memory Passenger
SZL_LWS – Steering column control unit
SVT – Servotronic
TCB – Telematics Communications Box (BMW Assist)
TMS – LED Headlights (stepper motors for the Adaptive LED Headlights and LEDs for the side marker light,
the positioning light and the turn indicator)
TRSVC -All around view camera
TBX – iDrive Controller Touch Handwriting Module
VDM – Vertical dynamics Management
ZBE – iDrive Controller
ZGW – Central gateway module
On new cars (7/2014 F30) the ignition will not stay on even if you turn light switch. After 15 minutes or soignition will turn off. This is not a problem though, just remember to cycle ignition before svt sollcalculation and before starting TAL processing (actual flash). Ignition will stay on as long as the TAL isrunning.
Posted by: jean at
03:21 AM
| No Comments
| Add Comment
Post contains 1123 words, total size 19 kb.
September 26, 2016
Here’s the instruction help you check/know if his BMW car’s base control unit DME MEVD has been updated or not, especially for the new cars just bought. There is a way to tell it in BMW INPA software.
I have a 2011 135i but I got it recently and don’t know if it has been updated or not. Is there any way to tell? If it has been updated, do I just need a different number than what’s listed in the table?
NOTE from those with experience says in the forum:
"Experience has shown that MEVD1726 isn’t flashable.
That means all Cars Build after 03/2012 are not flashable.
That also means that the Green Numbers in Table are to ignore.
SoDon’t flash if your car is after 2013 or got Update by Dealer after 07/2012!â€
You need to check with INPA software. Just buy a Chinese INPA K+DCAN cable. INPA will be sent together.
Here’s what it looks like on my 2011 135i.
Your INPA may look a little different and you may need to press different ‘F’ buttons to get to the same place depending on version and scripts but the info below should hopefully get you to where you need to be.
First, connect to the car with INPA and you should see something like this – like I said above yours may look a little different

Here, its then shift + F7 to get this

Then double click ‘Functional jobs’ to get this

Then press F3. The next screen gives you details for each module and, as you can see below, I update my DME/DDE with Zsub 8639122 on 10.08.2015. This is the date you need to check.
This wasn’t actually to flash the PPK but to move me from BMW ROM 9780B which could not be flashed with a BEF to BMW ROM 98G0B which I could flash.

If you want more detailed information about each module, from the first INPA screen press shift + F7 to get this

Then select Engine and double click ‘MSV 80.0 for N52KP (NG6) to get this

The press F3. As you can see below, this will give you further information about your DME including Zsub, when it was updated and ROM version

Done!
Hope it helps.
https://eobd21.wordpress.com/2016/09/26/inpa-check-bmw-135i-dme-mevd-is-updated-or-not/
Posted by: jean at
02:46 AM
| No Comments
| Add Comment
Post contains 389 words, total size 5 kb.
September 21, 2016
There are three popular software options for BMW E series in the market,BMW INPA software, NCS Expert and Bavarian technic (BT); so which one is best for auto diagnosis, coding & programming on E series? Here are what the users think of, talked about in forums.
Part 1: NCS expert vs Bavarian technic software
I have the enthusiast version of the bav tool…it’s more user friendly. Can’t do coding….professional version may though
The type of "coding†the BT tool refers to in the Professional version is the ability to back up the coding of a module and to restore it into a new module for replacement.
It doesn’t do theadvanced coding like NCS Expert can. However, with all the information coming out now on coding and how to handle official retrofits with NCS Expert and such, I wouldn’t be suprised if BT started working on getting into more advanced coding before too long.
Part 2: INPA vs BT
INPAwill tell youwhat the code is and why, just like BT.
You can even google the error code and get a more in depth explanation.
BT Tool doesn’t work on 2011 cars.INPA does…
To do stuff likedigital speed and key fob coding, i use theinpa cableas I don’t think the Bav Technic cable is capable of stuff like coding besides programming your battery and minor other things….
Part 3: INPA/ NCS expert vs Bavarian technic
BT is simpler to use but I prefer INPA/NCS expert. I also use DIS and it is really easy to use as well. TheBT enthusiast tool (the cheaper one) can’t do coding. You can clear codes with it, though.
My preference isINPA/NCS expert/DIS. You cando everything and more with them over BT. And once you have them set up, you can do some pretty coolcodingas well. Good luck!
TheBT tool can’t really do any coding.
I tried to code my drl with the BT tool and always got an error.
once you are comfortable withNCS-Expert/Inpa you can do so much more cool stuff with it.
Conclusion:
INPA/ NCS Expert can do everything for BMW E series (INPA is a factory diagnostic program, NCS expert is factory coding), while BT cannot do coding but for basic diagnosis.
http://blog.obdii365.com/2016/09/20/bmw-inpa-vs-ncs-expert-vs-bavarian-technic-software/
Posted by: jean at
06:55 AM
| No Comments
| Add Comment
Post contains 378 words, total size 3 kb.
September 19, 2016
What can you do with a K+DCAN usb cable for BMW E series and ENET (Ethernet to OBD) cable for F series? Here are all BMW E series and F series coding options available.
First HQ cables!! It must be with GREEN board, not WHITE!
BMW INPA K+DCAN cable for BMW E series
http://www.obdii365.com/wholesale/bmw-inpa-k-can-with-ft232rq-chip.html
ENET cable with E-sys coding software for F series
http://www.obdii365.com/wholesale/bmw-enet-interface-cable-e-sys-icom-coding-f-series.html
(dcan cable works with INPA software; enet cable runs with E-sys program)
BMW models available:
*E60, E61 od 03/2007
*E83 od 09/2006
*E81, E87 od 03/2007
*E90, E91, E92, E93 od 03/2007
*E70 (new model X5)
*R56 (new model MINI)
*From 1995 to 1998 (don’t need K-line).
*From 1998 to 03/2008 (all models)
* BMW F series, the new 1 Series, 3 Series, 5 Series, 7 Series , GT, X3
Popular basic coding options available:
Navigation Coding
-DVD in Motion (CIC headunit only) Allows video to be playing while car is in motion
-Disable the Legal disclaimer on startup screen
-Navigation Map updates to 2014 North America maps
-Show Tire temp and pressure of each tire (F series)
Car Access System(CAS)
-Key fob to open/close mirrors( must have motorized mirrors)
-Set timeframe for mirrors to close with keyfob (2 seconds, 1 second or instant)
-enable the reverse mirror to tilt further down (see curb while parking)
-Key fob to open/close windows and sunroof
-Key fob to open/close trunk (must have motorized trunk lid)
-Enable cabin trunk button to open/close trunk lid (must have motorized trunk lid)
-Enable windows to close when door is open
-Komfort Eject (E series only)
-Enable doors to open automatically when car is turned off(no more double pull of handle)
-Disable seatbelt chime (Most models)
-Disable seatbelt butler
-Disable door Gong
-E93 coding of convertible top to allow open and close while moving
-Turn off TC-MSA ( f series only)
Heads-up Display (HUD)
-Enable Turn signal in HUD(some models work)
-Enable Entertainment and telephone list in HUD (some models work)
Lighting
-Euro double blinking hazards (E series only)
-Allow Fog lights to stay on while flashing high beams
-Allow Fog lights to stay on with high beams
-Angel Eyes as Daytime running lights (production date 3/07 till present)
-Enable Fogs light as welcome lights (production date 3/07 till present)
-Disable sidemarkers ( those ugly yellow lights)
-Euro blinkers also known as double blink hazards
-Remove all bulb errors for aftermarker replacement lights
-Remove adaptive headlight errors
-Increase the Voltage on AE rings (only with LED rings)
Gauge Cluster (Kombi)
-Digital Readout of speed
-Disable Speed correction and show true reading
-Instrument cluster always on (like the M-models)
-Enable Shift suggestion (6MT only)
Windshield Coding
-Disable headlight washers( for those that like to have a clean car!)
-Windshield washers complete cycle (wiper blades dont stay up when you forget to shut them off)
Retrofits/Flashes/Activation/Miscellaneous
-Retrofit Alarm coding
-Retrofit LCI tails coding
-Retrofit CIC coding
-Retrofit Bluetooth coding
-Retrofit side mirror coding
-Xenon retrofit coding
-Retrofit Aux coding
-Retrofit FRM module coding
-Sirius (SAT) activation
-BMW Apps activation
-Navigation map update with activation
-Clear error codes
-Injector coding
-Battery Registration coding
-Alpina B3 transmission Flash
Posted by: jean at
02:26 AM
| No Comments
| Add Comment
Post contains 530 words, total size 5 kb.
September 12, 2016
Here’s a user solution to change odometer from miles to km on BMW E-series byusing NCS Expert step-by-step.
Instruction:
Part 1 – NCS Expert read miles
1. Connect your cable (BMW INPA K+DCAN cable or BMW ICOM A2 emulator) to your vehicle’s OBD II port and to your computer. Your vehicle’s ignition should be in the ON position, but your engine does not need to be running.
2. Launch INPA and verify that it reads Battery: ON and Ignition: ON. You should also have a program called "EDIABAS Server†running in your task bar. If everything checks out, close INPA.
Leave the server running.
3. Open "C:\NCSEXPER\WORK†and create an empty text file named "FSW_PSW.MANâ€. I just use NOTEPAD for this.
4. Launch NCS Expert. Go to File -> Load profil and select "Revtor’s NCS Expert Profileâ€, click OK.
5. Select "VIN/ZCS/FA†then "ZCS/FA f. ECUâ€. This will tell NCS Expert to attempt to read your VIN from your vehicle’s ECU so you don’t have to type it in.
6. Select your chassis from the list and click OK. Then select which module you want NCS Expert to read your VIN from. Usually the first choice is fine. Click OK again to have NCS Expert read your VIN. You should see the CHASSIS, FG, and FA fields populated in the top part of the NCS Expert window.
7. Select "Backâ€, then "Process ECUâ€. You will be prompted to select a module. Select the module you want to read values from(in this case KOMBI OR AKMB) and click OK. Click OK again on the window that appears to return to the main NCS Expert window.
8. Select "Job†and choose "CODIERDATEN_LESSEN†from the menu. This will change the job from one that writes to one that only reads data. Many of the job names look very similar. Always read job names carefully to ensure you select the correct one.
9. At this point NCS Expert is relatively harmless, as all it can do is read from your car. Select "Execute job†to begin reading from your selected module. When you see "Coding ended†below the module name, the process has completed.
9. Once NCS Expert has read data from a module, it stores that data in a file called
"FSW_PSW.TRC†(called a "trace fileâ€) in the "C:\NCSEXPER\WORK†folder. This file contains some general information about your car, as well as all the values currently stored in the module you read from.
Part 2 – NCS Expert write odometer from miles to km
- Open "FSW_PSW.TRCâ€(you can use NOTEPAD) and find the field you wish to modify. Trace files are formatted as:
FIELD_NAME
field_value
2. Change the field value(s) to your desired settings(this is where you look for the WEG_EINHEIT field name, and change value to "kmâ€), then save this file as "FSW_PSW.MANâ€, overwriting the empty one you created earlier.
3. If you closed NCS Expert, follow steps 1-6 in the section above to get back to the correct screen. Otherwise, NCS Expert is ready to code your module as soon as the job is changed back to the default, "SG_CODIERENâ€. Do this by selecting "Job†and then "SG_CODIERENâ€, then click OK. Verify that the correct job appears in the "JOBNAME" field.
4. Click "Execute job†to have NCS Expert write the information from FSW_PSW.MAN to your vehicle. When you see "Coding ended†below the module name, the process has completed.
Depending on what you coded, you may need to turn your car off and back on again to verify the desired feature/behavior has taken effect.
5. Open "FSW_PSW.MAN†and delete its contents. Save and close the file.
That’s all about BMW E series odometer change, from miles to km, using NCS Expert coding software.
Hope it helps!
http://bmw-icom-a2-wifi.blogspot.com/2016/09/ncs-expert-change-odometer-from-miles-to-km.html
Posted by: jean at
02:06 AM
| No Comments
| Add Comment
Post contains 635 words, total size 5 kb.
September 09, 2016

Ps. Same software is working fine with my F3x -serie car (with K+DCAN and/or ENET cable).
10pin --> obd2
1 --> 7
4 --> 4 and 5
6 --> 16
10 --> 1
I have installed EDIABAS and tried to change com ports (in obd.ini) according to laptop’s usb port com etc. I have changed in laptop’s device manager latency of port to 1. Feeding additional electricity to battery with separate charger, tried engine running but not working.
When I try to read vechile info via Rheingold, K+DCAN cable’s little light flashes once briefly and then stops and gets the error in software.
SOLVED!!!
I can now connect to all of my bike’s ecus and read live data, reset service indicator after service etc. Although I cannot make for example ABS unit’s bleeding (in case of I would like to change all break lines and some other this kind of jobs).
I removed all old stuff and re-installed software. I also downgraded USB serial driver version. I found via Google that there might be problem with Chinese cables which not necessarily have genuine FTDI chip. The newest driver versions won’t necessarily work with fake FTDI chips.
http://www.obdii365.com/wholesale/bmw-inpa-k-can-with-ft232rq-chip.html
I cleaned com ports via Windows regedit and configured there serial port RxFIFO and TxFIFO values and put force_fifo_enable on. If I remember it correctly it was off at some point in my trials.
I also made own cable between bike’s 10-round pin adapter and k+dcan cable. Or actually it’s not real cable, just set of separate wires which I connect from motorcycle’s round adapter pins straight to K+DCAN cable’s pins. I haven’t tried to connect to motorcycle with icom-d cable since then so I don’t know whether it would work nowadays after other changes I made.
I was lazy and made many changes at the same time so root cause for my earlier problems is not totally clear.
I am not sure whether I should have BMW ICOM A2 entity in order to get rest of Rheingold functionalities to work. But at the moment I am happy with those functionalities I have now available.
Posted by: jean at
06:36 AM
| No Comments
| Add Comment
Post contains 518 words, total size 6 kb.
September 05, 2016
It’s an instruction on how to do ECU reflashing/programming/coding with Autel Maxisys Pro MS908P tablet and J2534 ECU programming device.
Note: so far, Autel MS908P is the only full diagnostic scanner supporting online ECU programming.
Model: BMW 750Li 2006
All operation (ready) for ecu programming:
Part 1 – connection issues
Step 1 – connection to voltage supply
Connect the car to a stable voltage supply
Make sure the battery clamps are properly fixed
Fully charge Autel MS908P tablet


Step 2 – connect to network
Connect Maxisys pro to the Internet
Make sure the network connection is stable to ensure a successful ECU programming
Both wired & wireless connection is ok, using ethernet cable
Check the connection status icon to confirm the internet connection is successful


Step 3 – connection to J2534 ecu programmer
Connect Maxiflash J2534 ECU programming device to MS908P using USB cable
Tighten the screws


Step 4 – connection to the car
Connect Maxisys pro ms908p to the vehicle with OBDii cable

Now, all connection complete

Part 2 – ECU programming
Here goes the ECU programming on BMW.
SelectDiagnosticsn the main menu of Maxisys pro MS908P
Select BMW
Turn ignition off…wait 10 seconds…turn ignition on

Tap OK and read out vehicle data


TapCIP (coding, individualizing and programming)for ecu programming

Vehicle configuration
Read data and tap ok to go on. Edit button is available to perform customized SA configuration

Make sure and delete vehicle data correctly

Tap ok
Upon completion, tap ESC to exit

Tap yes to save revised data
Maxisys is communicating with control units for a few minutes
Confirm whether any control unit has been replaced or not before programming
Tap yes or no accordingly to continue

SelectSIMforcoding/programming


TapSelective updateto reprogram a specific control module separately

Or performComplete updateby selecting all modules

Here, program SIM only
Tap OK for vehicle info

Tap Execute measures plan to continue
Turn off ignition
Switch on terminal 15 (ignition)
Again, make sure of the stable network connection, and other connections to start reflashing

Coded! Stored DTCs will be cleared

Turn off ignition and remove the key with remote control from key slot (if provided).
Wait 10 seconds.
Insert the key with remote control and turn on ignition
Then go on the next action. All action will be done one by one automatically
Do not perform other tasks at the same time


The system will generate a report after reflashing


Tap End session to finish ECU reflashing/ programming
http://blog.obdii365.com/2016/09/04/autel-maxisys-pro-ms908p-program-sim-on-bmw-750li/
Posted by: jean at
06:03 AM
| No Comments
| Add Comment
Post contains 416 words, total size 24 kb.
September 02, 2016
That is,
ICOM A2 requires valid firmware license.
If you have no license, just update firmware to latest version and use ista-p loader v4.9 (v5.x discontinued).

Free download
ISTA P Loader (for those with ista p but data is gone)
ISTA-P 3.59.0.600 (tested OK, with Loader v4.9)
http://www.obdii365.com/wholesale/v20167-bmw-icom-software-windows-7.html

User feedback on ISTA/P and loader
More info on ISTA P loader:
Tried running Rheingold ISTA/P 3.55.0.100 using v3.2 loaded.
Select K+Dcan emulator, which started fine. (network tool for kdcan is necessary)
Select BMW car and ista/p loaded up.
Start new session. Fine.
Select my machine.
Select interface. all good so far.
On the next page I had a progress bar on the bottom left.
First job finished, then it said "Determining Vehicle Identification numberâ€
Then things stopped and I got an error box come up saying:
"An error on execution of the measure.
94201 Technical service initialisation failed.
10007 (CIP)- Error during initialisation of EDIABAS.â€
All help appreciated as this is getting frustrating.
Then run the network config tool for k+dcan:
Error solved. And ISTA/P works like a charm.
Tip: What to do if programming data is missing?
"Programming data†in launcher is for ISTA 4 only (I, F & G series). Requires separate install to ISTA/P.
Posted by: jean at
03:39 AM
| No Comments
| Add Comment
Post contains 242 words, total size 4 kb.
32 queries taking 0.1282 seconds, 208 records returned.
Powered by Minx 1.1.6c-pink.

