


April 28, 2018
Car model:BMW F46 (F45/F4![]()
Purpose: Enable Cruise Control
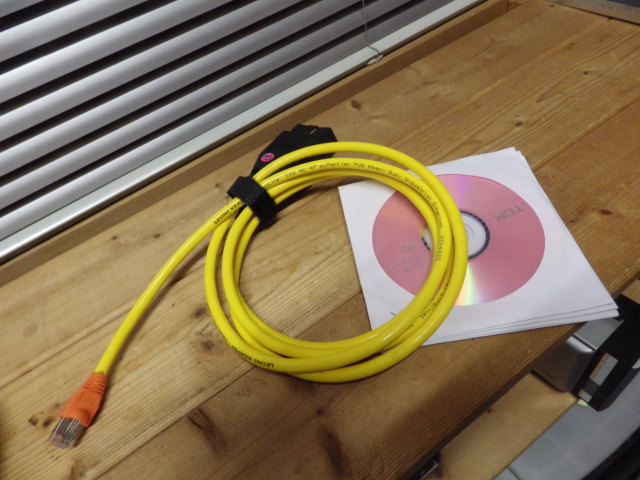
Coding device:BMW ENET cable and E-sys coding software
Why?
Once you have your car Cruise Control switch physically installed, you will need to activate your Cruise Control feature in your BMW through "VO codingâ€.
Note that the procedure is also applicable to enable "Enhanced Bluetooth†feature or other VO code procedure.
The modules that are required to be coded will be different though. For example, "Enhanced Bluetooth†will require HU_ENTRYNAV module only.
In order to avoid any VCM update errors (this does not affect your coding), go to the top ofE-SYSand click Options > Settings > Options tab.UNCHECKboth check boxes -> "Update VCM after TAL execution†and "Update MSM after TAL execution.â€
How to: VO Code 544 to enable Cruise Control
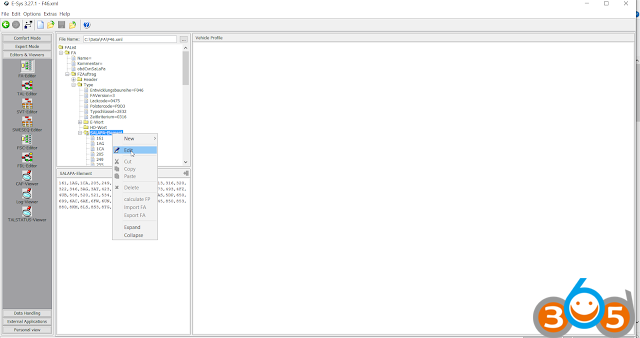
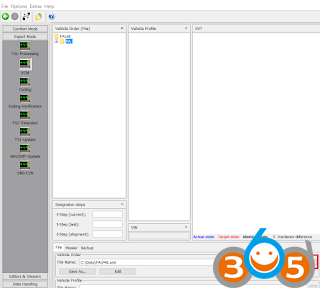
1) Run E-Sys coding sofware, Click "Read†button and then "Active FAâ€:

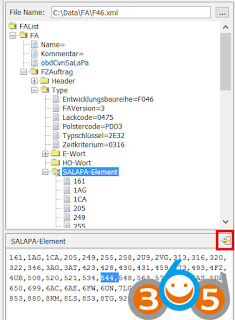
2) Go to"SALAPA-Elementâ€and right click and select "Editâ€:
3) Add the value "544,†into the SALAPA-Element and click the "Save†button on the right as highlighted.
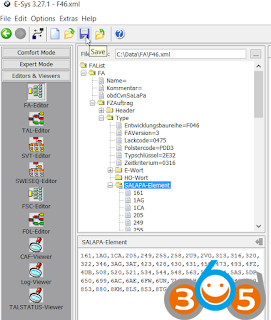
4) Click the "save†button to save the file into a XML file with your desired file name.
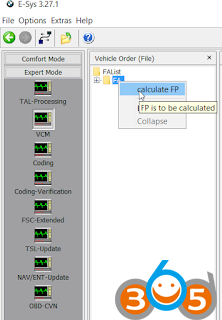
5) Go to "VCM†section and load the same XML file that you had saved.
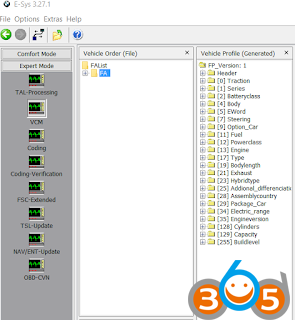
6) Right click "calculate FP†and you will see the Vehicle Profile generated.
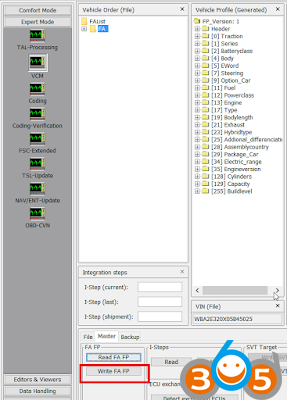
7) Click the "Write FA FP†button which will writes into your ECU memory.
![]() To enable Cruise Control for BMW F45/F46/F48, you will need toE-SysVO code these 4 modules:
To enable Cruise Control for BMW F45/F46/F48, you will need toE-SysVO code these 4 modules:
1) BDC_BODY
2) HU_ENTRYNAV
3) KOMBI (or BKOMBI)
4) DSC2
9) Go to "Coding†section, click "Read ECU†button on the right and then right click on the above-mentioned modules and select "Codeâ€. This will enable the settings required for your Cruise Control. Note that the engine need not be switched off for this operation to work successfully.
10) Test your Cruise Control switch to ensure that it has been enabled successfully.
11) It is recommended to remove the VO Code after the coding has been performed.
If VO code is something that you don’t prefer to modify, you can perform FDL codings only as such to enable Dynamic Cruise Control:
BDC_BODY
PfLinSteeringWheel -> 3140 > LIN_VARIANTE_MFL = DCC_Sports_SLD
HU_NBT
EXBOX 3001 > DCC = aktiv
FZG_Ausstattung -> 3003 > LDM_VERBAUT = dcc
DSC2
DSC_FAS_CODIERDATEN 3009 > C_Fahrfunktion = DCC
Posted by: jean at
02:55 AM
| No Comments
| Add Comment
Post contains 395 words, total size 7 kb.
April 24, 2018
You can find lots of information on the internet. Here describes everything in one place.
Disclaimer: The document is translated from Russian. Everything you do, you do at your own risk! You and only you are responsible for your actions.
There are many different interfaces and software for BMW diagnosis. What to choose?
BMW scanner- a convenient and intuitive interface, displays the runs from different modules, all coding is reduced to ticking.
BMWINPA K + DCANOBD (USB) - can do everything, works with dealer software.
1.ELM327 WiFi. The most budgetary option. If enough to read the engine and then not all, only for OBDII - it's enough ELM327. I know about a dozen versions of the adapter. The most successful in a small case with a power-off button - its height is about 2 cm from the diagnostic connector.
1a.iOBD2 from XTools(it is important not to be confused with a fake on it - iOBD). Slightly more expensive than option 1. Functionality is similar, but the performance of the devices is better and there is a native free modified very good program for it in the AppStore iOBD2.
2.BMW iOBD2from XTools. Externally, the adapter is similar to the version 1a, for the functional it is also + diagnostics according to the factory protocols of other BMW systems. Statistics on it a little. The product is very fresh, but interesting. Actually, it became possible to activate it only from August. Today I checked on e39 - most systems took, reads and resets errors, shows real data on the car.
3. iDiag/Easydiagfrom Launch (there is an option for both iOS and Android). Scans all systems.
Since it is manufactured by a well-known and large manufacturer of diagnostic equipment and, in fact, analogue Launch X431 Diagun or Master for simple users.
As an added bonus, you can buy AppStore software for several brands of cars (for example, if the family has BMW Mersedes and Rover, then you can buy software for these brands)
All these adapters have the right to live - it depends what the person wants to get from the device and how much money he like to spend.
Why do we need it simply and quickly? It takes a lot and it is interesting). The choice fell on theBMW INPA K + DCAN OBD (USB) with Pin7 & PIN8 switch
We take a laptop and start to put everything according to the instructions. Surprisingly, everything was in accordance with the instructions and ended without problems. We go to the car and then start working.
It was necessary to close 7-8 pins.To connect X3 from 2007, you do not need to connect.
Before work, read all warnings on the disk. You can not start and stop the machine with the cable connected, do not remove the cable with the ignition on and at the time of data transfer.
Coding.
You must correctly configure the profile.
There is also a ready-made profile. But the MANUAL profile needs to be edited. In the profile, put the data from the CVT, and not from the file. Otherwise, it will swear when writing data. In the .NCSEXPER \ WORK directory there must be a file FSW_PSW.MAN otherwise when you press F6 the program will swear on this file. To do this, create an empty TXT file and rename it to FSW_PSW.MAN.
The ECU has a configuration that NCS Expert reads and writes to the file FSW_PSW.TRC It opens with a notepad and is a list of parameters and a value on / off (in German).
The number of parameters depends on the FA code. The FA code is an encoded car kit containing all information about what is in the car. The FA is located in the AKMB device and the ALSZ light unit. This is a file with a line, which lists all option numbers, separated by the symbol "$". With the FA, you can code the computer or all units with the default settings for your options list. To do this, you must perform the encoding process with the empty FSW_PSW.MAN file.
The general encoding process for any module is described below. In the example, we get the data from the module, rename it, and save it in a safe place. Then we correct the configuration and write back to the computer.
The coding process.
1. Start the NCS-Expert
2. Select the profile manual
3. Press F1 then F3 in the opened window select the body and click OK
in the opened window select from where we will read FA Press OK
in the machines with FA it is in the AKMB device and the light block ALSZ
4. Press F6 Back
5. Press the F4 "Computer selection" button. A list of available computers will appear
(you need to read the data from the GM5 main unit and the blocks you are going to encode.)
6. Select the GM5 block in the list and click OK.
7. We see that GM5 is selected for the encoding, Further 2 ways you can simply press the F4 button "Read the computer", or 8. press F5 "Basic functions" and select coapiReadSgGetFswPsw from the list. After that, the file .NCSEXPER \ WORK creates a file FSW_PSW.TRC, copy it to another folder for safekeeping and rename FSW_PSW_GM5.TRC. You can at home, slowly, look at the settings, and prepare the files to write to the block.
9. Press the button F4 "Computer selection". and repeat the read operation for the other blocks that we are going to encode. After that, the file .NCSEXPER \ WORK creates a file FSW_PSW.TRC with the data from the new block, copy and rename it.
10. In the .NCSEXPER \ WORK folder, open the FSW_PSW.TRC file with a notepad, look for the parameter we need, change its value, and save the file with the extension .MAN (FSW_PSW.MAN)
11. Return to the NCS
and check that JOBNAME = SG_CODIEREN, if not, then change the button F2 "Change operation" by pressing F3 "Encode the computer". The coding process of the computer will begin. If everything went successfully, "Coding OK" will appear.
All coding is complete.
Coding Memory key:
On the supplied disk, the instructions have a file CARKEYMEMORY.pdf with a description of the parameters for a large number of bodies.
1. Download our CAR KEY MEMORY ("File" - "Load Profil")
2. Read the data on the machine. To do this, press the button F1 "VIN / ZCS / FA"
3. Press the F3 "ZCS / FA from the computer" button. We select the body and from where we read the coding data, choose EWS counted
4. press the F6 button "Back"
5. the F5 "CKM" button appeared, we click on the auto and key memory menu, see the list of keys, available functions and parameters
6. Press the "Read" button F1, the I symbol appears in the parameters, it indicates the active parameter. The S symbol indicates the factory default setting. Let's look at the example of the option of smooth light attenuation in the cabin. The active parameter is in aktiv and by default in the same position.
7. If you want to disable the soft fading, select nicht_aktiv and press F2 "Edit". And to save the changes F4 "Transfer."
Only parameters and values ​​will be listed below. You need to read the required module, change the parameters in the file FSW_PSW.TRC, rename it to FSW_PSW.MAN and write it back to the side.
Adding options.
By the instructions above, we save the files with the original configuration for the AKMB and ALSZ blocks.
Start theNCS Expert
Select the profile manual
Press F1 then F3 in the opened window select the body and click OK
in the opened window choose from where we will read FA press OK
at the machines with FA it is in AKMB device and light block ALSZ
cipher was considered push F2
choose the body
In the input window VIN click OK
The window for entering options appears.
In this window we see a list of already existing options in the car.
1 To add a new option, enter it in the top line so $ 861
2 click the Add
3 button. The option is added to the general list.
To delete options, select it and press the Del key on the keyboard.
4 Press OK
Press F6 Back
Press F4 select the ECU of the light unit to which we write FA
Press F2 Change the operation. Select FA_WRITE (write FA) press OK Press
F3 write FA to the computer.
Press F1 to select the ACMW unit and repeat the FA recording operation for the control unit.
after changing FA you can encode the whole machine and the program will display the required parameter values ​​in accordance with the added option in the FA
to make the changed parameters after the encoding you need to turn off the ignition for a few seconds.
Software deactivation of the passenger presence mat.
It is better not to do this and replace the mat.
In addition to software shutdown, you must also disable physically using the blende. If the wrong actions can trigger the airbag!
Block ABG
two mats
OS3_1 -mat presence (america)
OC3_2 -mat presence (
america ) nicht_aktiv
SBE1_1 -mat presence
nicht_aktiv
SBE1_2 -mat presence
nicht_aktiv
SBE1_STATUS_VERZ_1
nicht_aktiv
ERKENNUNG_SITZBELEGUNG_1 Check presence mat
nicht_aktiv
ERKENNUNG_SITZBELEGUNG_2 Check presence mat
nicht_aktiv
Message on the non-seat belt.
Device unit AKMB GURTWARNUNG
Warning
mit_gurtschlosskontakt data from the belt lock (glows on the gadgets of the pregnant man)
ohne_gurtschlosskontakt detects without the steering lock (will not glow)
AKUSTIK_GURT_WARN Sound warning
nicht_aktiv
The central lock
The module GM5
Comfortable is closing of all glasses and a hatch.
aktiv
KOMFORTOEFFNUNG -komfortnoe opening
aktiv
KOMFORTOEFFNUNG_FB -Remote convenient opening on Hold CL button on the key
aktiv
KOMFORTSCHLIESSUNG -komfortnoe closing
aktiv
KOMFORTSCHLIESSUNG_FB -komfortnoe closing on Hold CL key button
aktiv
BEIKLAPP_B_KOMFORTSCHL_GM Folding mirrors with remote
aktiv
BEIKLAPPEN_GM Folding mirrors with key
aktiv
following parameters do better key memory. Since it will be necessary to activate the speed readings for each key
VERRIEGELN_AUT_AB_X_KMH - automatic locking of the CP after X km / h
KMH
VERRIEGELN_AUT_MACH_2_MIN -automatic locking after 2 minutes. If the door did not open.
aktiv
VERRIEGELUNGSSCHWELLE - support for the speed at the speed (parameter X)
aktiv
VERRIEGELN_XKMH_SENDER_1 Digit - key number, activates the speed reading for the CP after X km / h
aktiv
HECKKLAPPE_ENTSICHERN - trunk opening remotely
aktiv
ZUENDSCHLUESSEL_WARNUNG - inserts the gong and text on the instrument if, with the ignition switched off and the door open the ignition key is left in the lock
aktiv
ZV_SELEKTIV - selective opening of the central locking system, when the central locking is opened, only the driver's door is opened.
aktiv
ENTSICHERN_CENTERLOCK - the button CZ works when the doors are locked and the key is not in ignition.
You can also encode audio and visual confirmation of the closure of the TZ. Coded in the memory of the key and the machine and in the instructions Activation of the standard signaling.
Activate the standard signaling S302A
Module GM5
It will be more correct to add the option $ 302 to the FA, then encode the GM5 module.
If you encode a block with an empty file FSW_PSW.MAN, it is encoded by default with the alarm enabled, but other parameters will be encoded into the factory settings.
Transfer of units from USA to European.
In CARKEYMEMORY - Coding Memory key and machine
Possible parameter values ​​will be specified, you only need to select.
ZEIT_EINHEIT - time format 12 or 24 hours
VERBRAUCH D1 - fuel consumption unit
L / 100km
TEMPERATUR_EINHEIT - temperature in C or F
grad_C
WEG_EINHEIT readings bk
km
WEG_DURCHSCHNITT readings bk
km / h
WEG_REICHWEITE readings bk
km
WEG_LIMIT readings bk
km
Radiotransmissioncan be done in two ways.
Without coding.
If immediately after switching on, press the "m" button located above the radio button and hold it for about 8-10 seconds. then on the screen of the radio, some parameters will appear, you can switch from one to another using one of the softkeys above which the "+" and "-" icons will appear. I have the following parameters:
1. SN ******** (apparently the serial number)
2. SV ** - ** ** (apparently the software version)
3. RI ** (?)
4. GAL * (adjustable parameter, I have from 1 to 6) - as an option the sensitivity level of automatic volume control depending on the speed)
5. Radio frequency for example: 105.2 and ** ** - continuously changing digits - as an option the signal level at a given frequency
6. DSP * V * - as an option the presence of DSP and its version, although I have every time the parameter V is different.
7. TP-V * (adjustable parameter, I have -9 to +9 - as an option the volume level which will be automatically switched to the station selected for the traffic situation notification.)
8. AREA EUROPE (adjustable parameter, I have the values: ECE US, JPN, OCE, CAN.) Allows you to change the step and frequency of the adjustment depending on the selected region.I think that many owners of cars destined for the American, Canadian and Japanese markets will independently and free of charge solve the problem of radio reception
9. AF AUTO (adjustable parameter , I have the available values I: RDS OFF; OFF; MAN; AUTO. - AF adjustment)
Since the values ​​are specific, it is better to use the first method. The only thing that will have to encode this is PTY_TABELLE
With coding
RAD block
LAENDERVARIANTE_RADIO
ece
TP_FUNKTION
tp
RDS-AF_SWITCHING
rds_on / af_off
PTY_TABELLE
ece
Service interval
limit
AKMBblockSIA_KM_SERVICE_INTERVAL
25.000_km
http://www.obdii365.com/
Posted by: jean at
06:45 AM
| No Comments
| Add Comment
Post contains 2290 words, total size 16 kb.
April 21, 2018
Tools:
1.BMW Enet cable
2. Laptop with E-Sys and E-Sys Launcher installed
3. Attach the FSCGen file (unzip it to C: \)
Extraction method
1. RunningE-Sys
2. After cable connection (â‘ ), go to next screen by FSC_Extend â‘¡

3. Enter 0x63 (③), click Identity (④), confirm that HU_NBT is coming up (⑤)

4. Enter 0xDE (⑥) and 0x1 (⑦) as shown below, then press StoreFSC (FSC Save, ⑧)

5 Click Read button (â‘©) and press SAVE button to save as DE, fsc

6. Copy the attached file to 'C: \' and copy the above saved DE.fsc to C: \ FSCgen, then run the window command window and type 'cd \' to move to the root directory Then, enter 'cd FSCGEN' to go to FCSGen, which is the directory saved above.

7. Enter 'nbt, exe DE.fsc 0xA6 0x28 *******' (where ******* is the chassis number of your car)
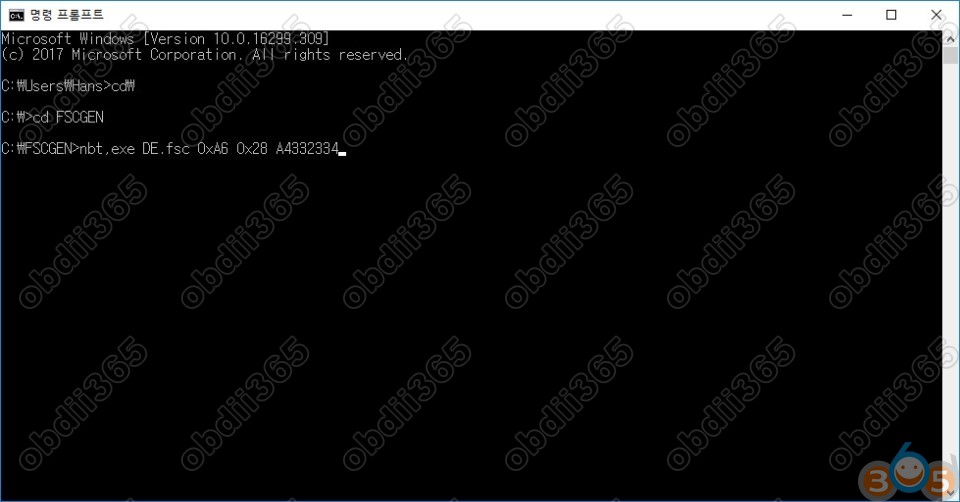
8. This will launch the program in the command window and generate the system code.
Remember this code and use it in your navigation updates to update your navigation on your own.
The vehicles that can be updated in this way are only available for vehicles with the H-NBT and later F series. The E Series can not be updated this way, and the navigation is actually annoying, but using WoW navigation or teeming is good for mental health.
Related post:
Download E-sys 3.26.1 to generate BMW FSC code
http://www.obdii365.com/
Posted by: jean at
02:30 AM
| No Comments
| Add Comment
Post contains 264 words, total size 5 kb.
April 20, 2018


Posted by: jean at
06:26 AM
| No Comments
| Add Comment
Post contains 78 words, total size 5 kb.
April 13, 2018
Purpose:write/code VIN after FRM2 update
Car:330d 2006
Tool:BMW ICOMemulator
Software:NCS expert, Tool32, WinKFP
Tutorial:Upgraded to FRM2 – how do i code it?
The basic steps are:
1. Install FRM2
2. Change FRM2 VIN to yours. Flash FRM2 withWinKFPcomfort mode with your VIN. Or use Tool32 to change VIN as above.
2.5. Verify VIN change with Tool32.
3. Copy CAS VO (FA) to FRM with NCSexpert.
4. Change date with NCSexpert.
5. Code to default with NCSexpert.
Exact instructions for each step are discussed and available in the following parts.
It’s very simple.
1. Open Tool32
2. Plug in cable
3. Press F3 and choose the FRM87.prg or whatever FRM you have (see from INPA uif)
4.Select job c_fg_schrieben
5. Enter your FULL VIN (including checksum) into arguments field
6. Execute job
You can check the VIN using job ‘c_fg_lesen’
Once done use NCS EXPERT to copy your CAS FA string to FRM / change date then code to default with expertmode.
Btw, when you enter your VIN you must use FULL VIN. Which is VIN number with a checksum at the end. You can see you full VIN inNCS expertwhen you do any coding.
Note: Step 2 means you won’t need to use Tool32 at WinKFP can set VIN also…
The basic steps:
1) Remove FRM, install FRM2.
2) Use WinKFP to program the module, make sure to enter your VIN-number before programming.
3) Switch to NCS-EXPERT. Get your Vehicle Order from the CAS module (as we are unsure of what the FRM2 module contains.
4) Write the Vehicle Order to module "FRM†using job "FA_WRITEâ€
5) Go back to the main menu (or restart ncs-expert) and get the vehicle order from the "NFRM†module. Make sure NFRM returns YOUR VIN and YOUR VO. We want the VIN (FG) and VO (FA) to be the same in both CAS and NFRM.
6) You now need to do the trick described by 4711 a couple of posts back, i.e. change the production date in the VO to at least #0307. If you don’t do this, ncs-expert will not list NFRM (=FRM2) in the "Process ECUâ€-list and you won’t be able to code it. Change the VO using the "Enter FA†option – remove your production date and enter #0307 (meaning march 2007).
7) Now click "Process ECU†and select "NFRMâ€
Then just code to default with expert mode.
Reference: Youtube video – E90 VIN change with NCS Expert
Posted by: jean at
08:33 AM
| No Comments
| Add Comment
Post contains 415 words, total size 3 kb.
Here lists possible solutions from users to help those with error "Programming is not possibleâ€when using BMW ISTA+.
Sw version:Ista+4.10.30
Hw:Enet cable
Error message:I get message after reading all ECU’s
"Programming is not possibleâ€
If I click this message away I can just continue.
I have:bin, binx64, host, hostx64
But which files/maps must be located in map PSdZ?
Solution 1:
Try it with the BLP data so the folder "dataâ€under C / Rheingold / PSdZ / data ..
Of course, in the Reg also specify that the data is available but still as you have made everything on "false†..
you unpack the BLP under C / Rheingold / PSdZ / and you get the folder "data†..
So C / Rheingold / PSdZ / data ..
Reg:
"Product Version†= "4.10.30.15635â€
"Main Product Version†= "4.10â€
"Data version†= "10/04/31â€
"DataVersion_en-GB†"04/10/31â€
"Logistic Base Version†"10/04/30â€
"SWIData†= "04/10/30â€
"BMW.Rheingold.Programming.ExpertMode†"Trueâ€
"BMW.Rheingold.Programming.Enabled†= "Trueâ€
"BMW.Rheingold.Programming.PsdzDataPath†= ".. \\ .. \\ .. \\ \\ PSdZ data_swiâ€
If it doesn’t work, try the following solution. It works for someone in earlier version.
Solution 2:
In earlier versions this worked:
"BMW.Rheingold.Programming.ExpertModeâ€=â€Falseâ€
"BMW.Rheingold.Programming.Enabledâ€=â€Falseâ€
"BMW.Rheingold.Programming.PsdzDataPathâ€=â€..\\..\\PSdZ\\dataâ€
Have not tried on latest.
P.S. BLP must be installed normally into data folder. No need to create any empty folders.
Still had psdz path set to data_swi. You must adjust it to be data instead of data_swi when no sdp installed. Then it should not complain and work. BLP data MUST be installed in all cases.
Solution 3:
Create empty folders
С:\Rheingold\PSdZ\data
С:\Rheingold\PSdZ\data_swi
Working registry
Windows Registry Editor Version 5.00
[HKEY_LOCAL_MACHINE\SOFTWARE\WOW6432Node\BMWGroup]
[HKEY_LOCAL_MACHINE\SOFTWARE\WOW6432Node\BMWGroup\ISPI]
[HKEY_LOCAL_MACHINE\SOFTWARE\WOW6432Node\BMWGroup\ISPI\ISTA]
"DataVersionâ€=â€4.10.31â€
"DataVersion_en-GBâ€=â€4.10.31â€
"ProductVersionâ€=â€4.10.30.15635â€
"MainProductVersionâ€=â€4.10â€
"InstallLocationâ€=â€C:\\Rheingoldâ€
"LogisticBaseVersionâ€=â€4.10.30â€
"SWIDataâ€=â€4.10.30â€
[HKEY_LOCAL_MACHINE\SOFTWARE\WOW6432Node\BMWGroup\ISPI\Rheingold]
"BMW.Rheingold.Programming.Enabledâ€=â€Trueâ€
"BMW.Rheingold.Programming.PsdzDataPathâ€=â€..\\..\\..\\PSdZ\\data_swiâ€
"BMW.Rheingold.Programming.ExpertModeâ€=â€Trueâ€
Rheingoldlocation
Directory of c:\Rheingold\PSdZ
06-Apr-18 22:13 <DIR> .
06-Apr-18 22:13 <DIR> ..
29-Mar-18 19:35 <DIR> bin
29-Mar-18 19:35 <DIR> binx64
06-Apr-18 22:13 <DIR> data
16-Mar-18 09:25 <DIR> data_swi
29-Mar-18 19:35 <DIR> host
29-Mar-18 19:35 <DIR> hostx64
FULL SW
Directory of c:\Rheingold\PSdZ\data_swi
16-Mar-18 09:25 <DIR> .
16-Mar-18 09:25 <DIR> ..
16-Mar-18 09:52 <DIR> psdzdata
Lite SW
Directory of c:\Rheingold\PSdZ\data
06-Apr-18 22:13 <DIR> .
06-Apr-18 22:13 <DIR> ..
06-Apr-18 22:13 <DIR> psdzdata
Posted by: jean at
01:15 AM
| No Comments
| Add Comment
Post contains 350 words, total size 5 kb.
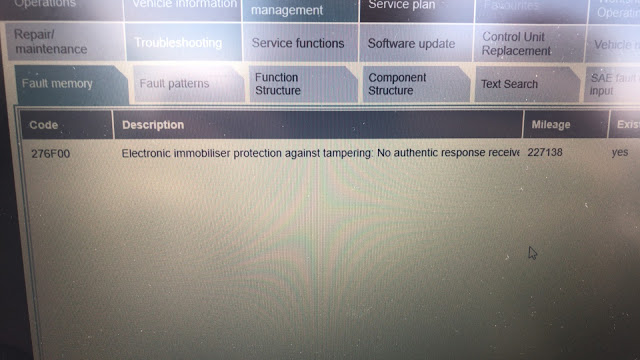
April 10, 2018
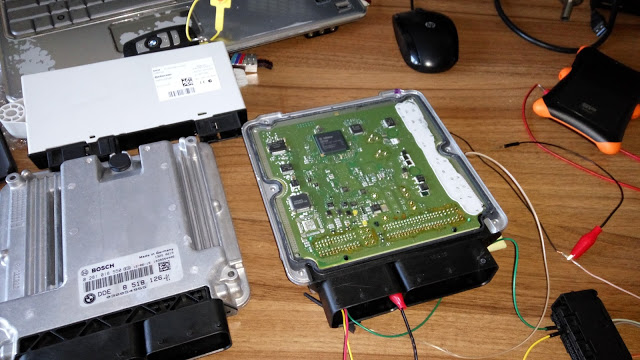
- replace the used engine module to F11 2012, because the original was totally dead after incorrect power connection during chip-tuning and remained forever in the parking lot.as a consequence of the lack of communication on the table with the processor in the boot mode.
Tool:
BMW ICOM A2/ICOM Nextemulator withISTA-D ISTA-Pprogramming software
How to:
1. Readout of the immo CAS4 data
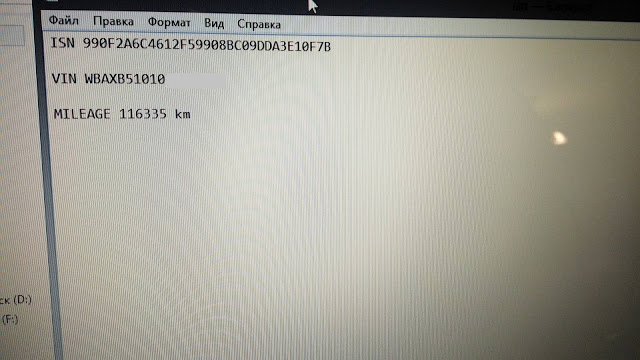
2. After reading the data, it became clear that CAS4 EWS5 crypto.
3. Next decode CAS4 memory to obtain the synchronization code.
4. Entry of received synchronization code into the new-used DDE741 engine ecu.
5. Change of three VIN codes in the new-used engine control unit.
6. Zeroing the mileage in the new-used engine controller because the mileage in it was 116335km, and in the car 227140km.


Posted by: jean at
02:18 AM
| No Comments
| Add Comment
Post contains 153 words, total size 5 kb.
32 queries taking 0.1194 seconds, 204 records returned.
Powered by Minx 1.1.6c-pink.

