


September 30, 2021
Question:
Can we clone the original (my car is an Aston Martin 2007) Smarttire system sensors with Autel? And the whole system is about $1500?. That's favorable to getting this done a couple times at a dealer, right?
Solution:
TheAutel MaxiTPMS TS401has the ability to program Autel MX universal sensors, which are around $20-$25. I've used the TS401 and the MX universal sensors on other cars and they worked without any problems.
I've not tried to program the MX universal sensors with the DB9 Smartire system yet; however, all indications seem that it's doable. Indications meaning -- I was able to pull the codes of the Smartire and the Autel site link I provided above seems to indicate that Smartire codes can be copied to the MX sensors. I've not done it yet -- mainly because my sensors are fine, but I'll likely experiment in the spring out of curiosity. I will, however, pull all the codes off the sensors and store them -- in case the sensor batteries die before i have a chance of testing it.
Related, the $1K+MaxiSys MS906TSdoes an excellent job on reading the codes, resetting the service light,program TPMS sensors like the TS401 etc. for a number of the higher end vehicles.
Below are instructions for programming a 433 MHzAutel MX sensorto support a Smartire system.
Relearn Procedure:
Please note:
If new ID is created for the this sensor, OE tool is needed to perform relearn.
With Autel tools, the only solution is to copy the OE Sensors' IDs, and no relearn needed.
There are two methods to copy the OE sensors' IDs.
Method 1:
1. Please perform a rapid tire deflation while pressing the trigger button on Autel tool to receive sensor data.
2. Then use the 'Copy By Activation' function to program Autel sensor.
3. Install the duplicated Autel sensor to the location corresponding to the OE sensor.
Method 2:
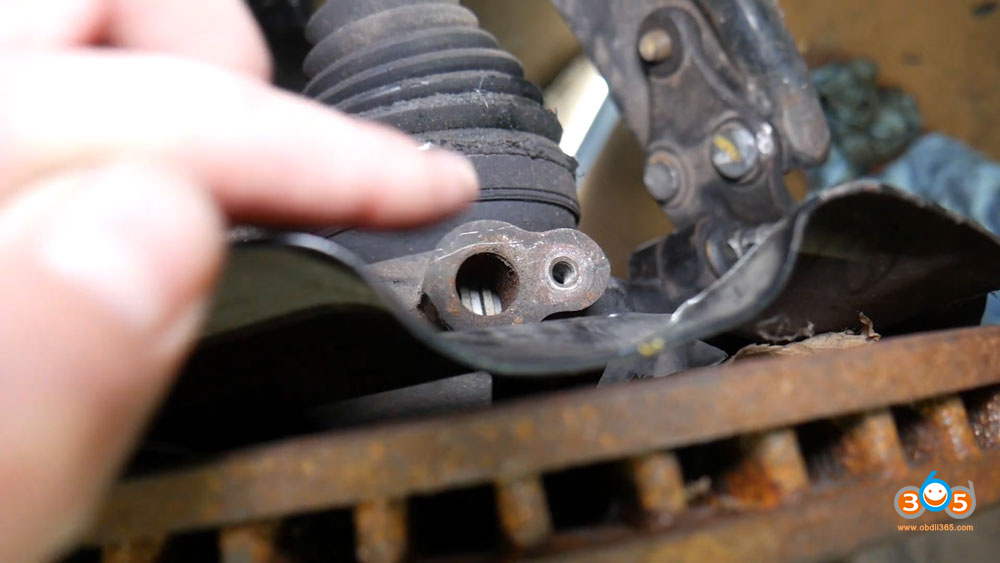
1. Uninstall the OE sensor, a series of numbers (173-1-1-XXXXXXX) are printed on its surface, among which XXXXXXX is the OE sensor's decimal ID.
2. Use the 'Manual Create' function to program Autel sensor.
3. Install the duplicated Autel sensor to the location corresponding to the OE sensor.
Note:
If necessary, please pay special attention to the sensor ID format conversion when using the 'Manual Create'.
I used method 2 and it worked perfectly. Went ahead and replaced all 4 SmarTire sensors. Saved a fortune.
Posted by: jean at
06:02 AM
| No Comments
| Add Comment
Post contains 410 words, total size 3 kb.
September 29, 2021
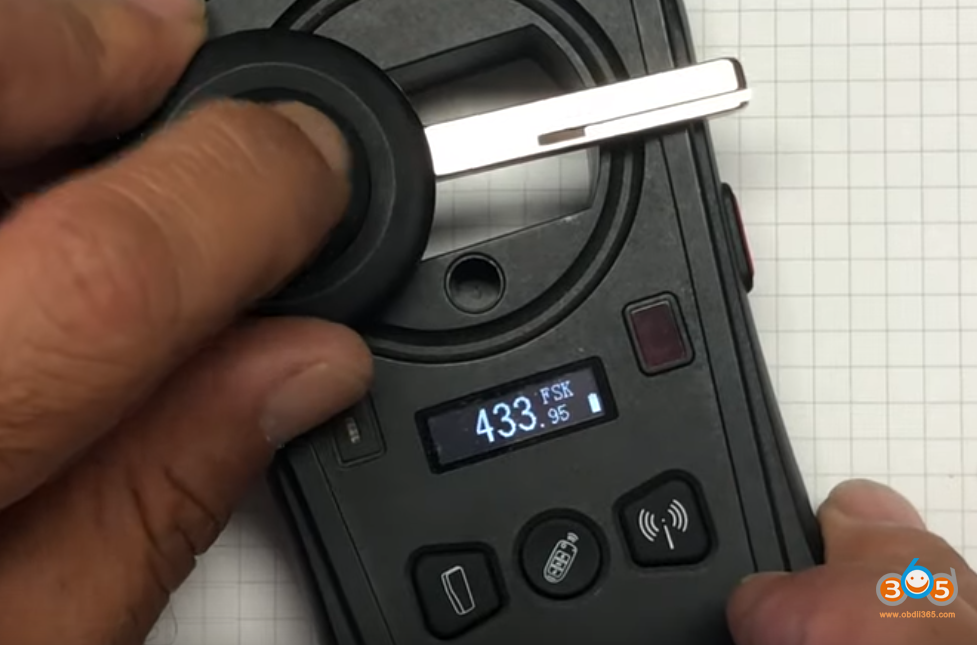
Keydiy KD-X2 remote makercan unlock and renew the used Smart 454 / Mitsubishi Colt PCF7941 remote key so that it can be programmed to another vehicle.


Smart 454 / Mitsubishi Colt remote is the same, Hitag ID46 PCF7941, locked.
Go to Keydiy App- Chip function- Remote Renew -Mitsubishi- V3 PCF7941


Keydiy App will show you wiring diagram, the circuit board is the same as in the app

Connect circuit board withkd-x2remote maker


Press UNLOCK

If failed to unlock, check connection and try again


Renew remote success

The remote is unlocked.

Install circuit board and battery to key shell
Test key frequency: 433MHz
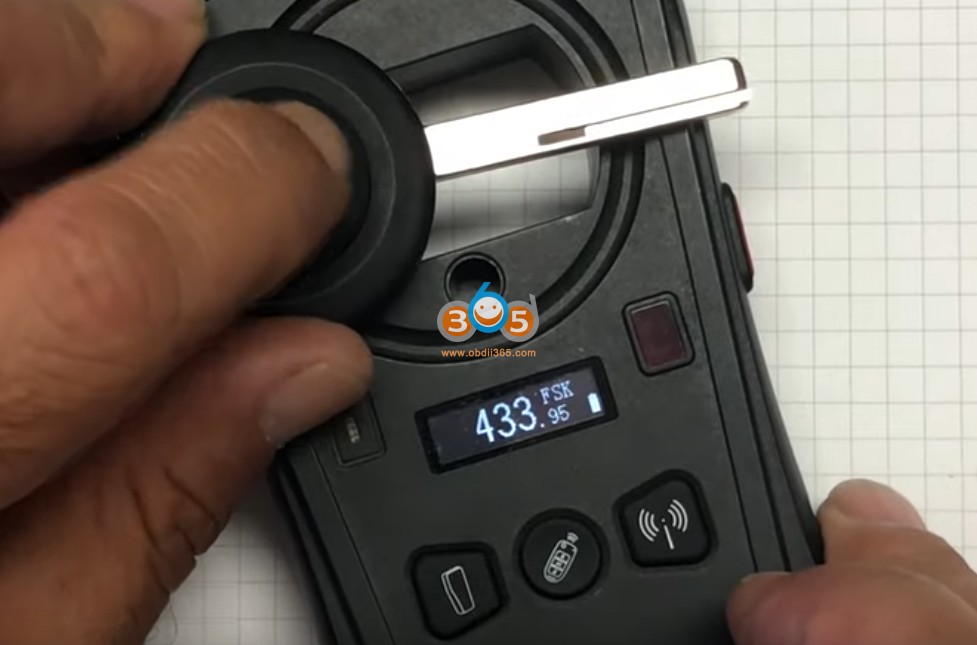
now the new key is ready to be programmed to another vehicle.
Done.
Posted by: jean at
10:07 AM
| No Comments
| Add Comment
Post contains 127 words, total size 9 kb.
September 28, 2021
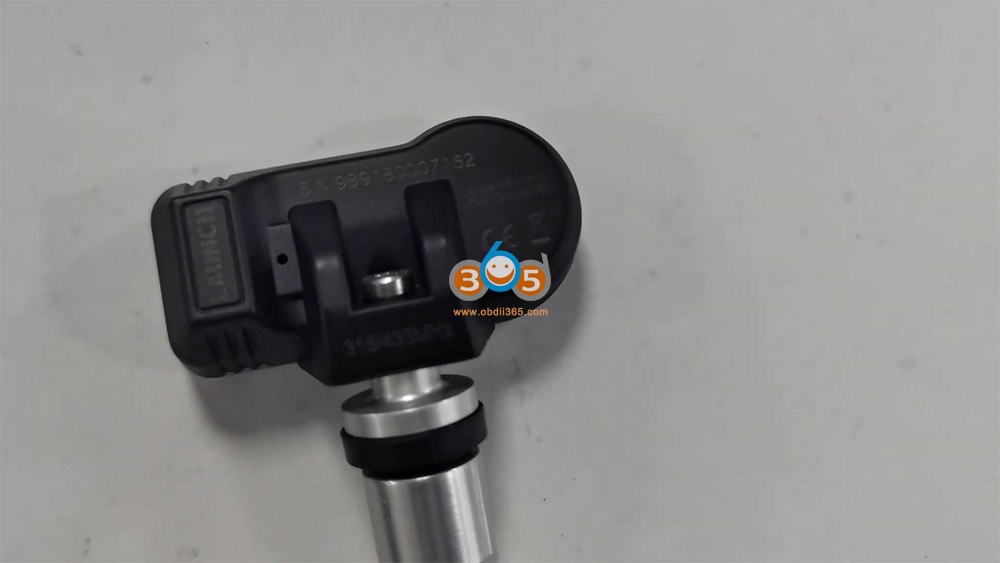
Intelligently Reprogram LAUNCH TPMS Sensor using X431 TSGUN and X431 PAD V.
Good to know:Before doing the programming, please make sure that your TPMS software has been updated to the latest version. LAUNCH sensors can be reprogrammed with unlimited times.
Prepare:
- A car (Cadilac for example)
- X431 TSGUN
- LAUNCH LTR-01 RF TPMS Sensor
- X431 PAD V
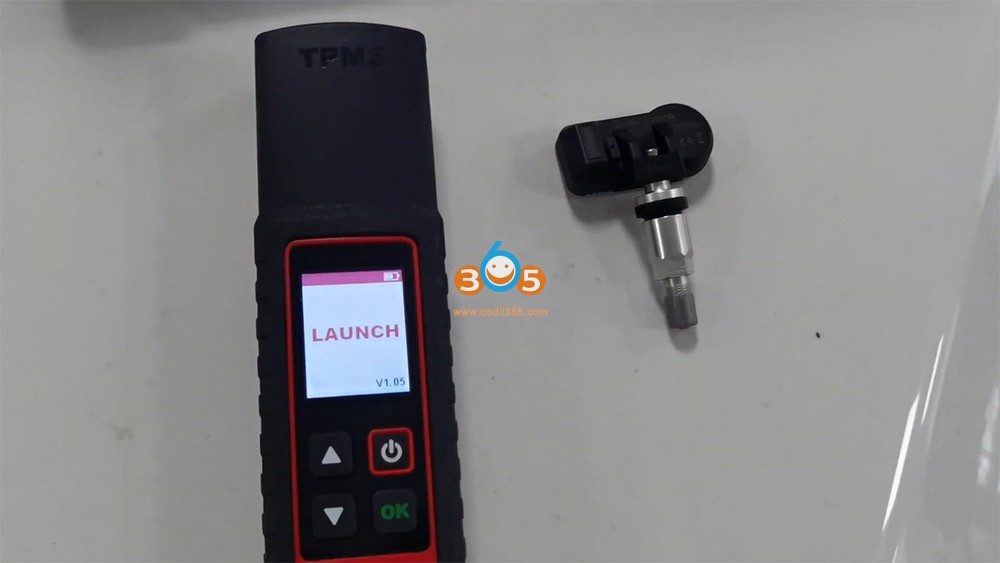
- Bind TSGUN with Launch X431
Guide:https://youtu.be/3FKFATglSBg
Guide:
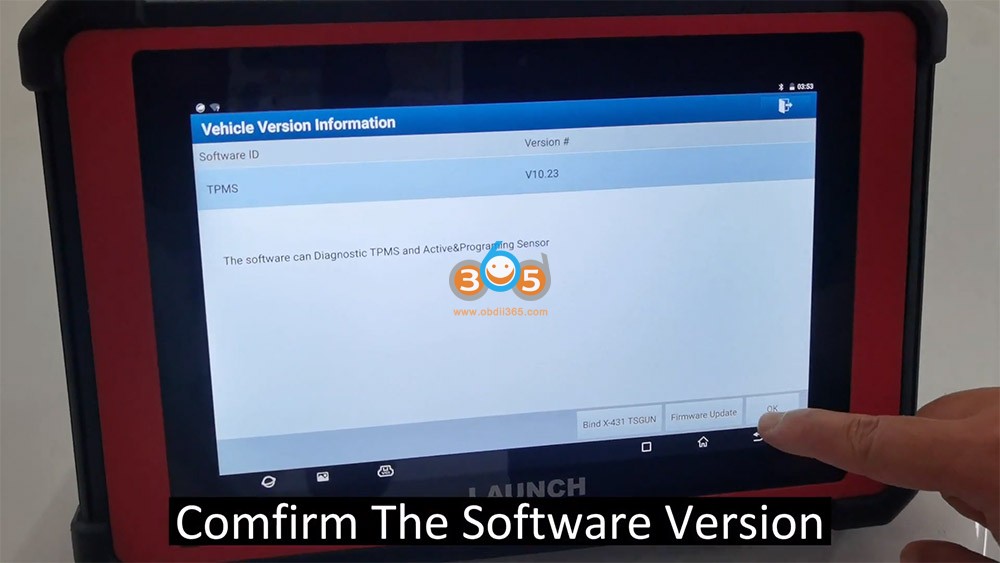
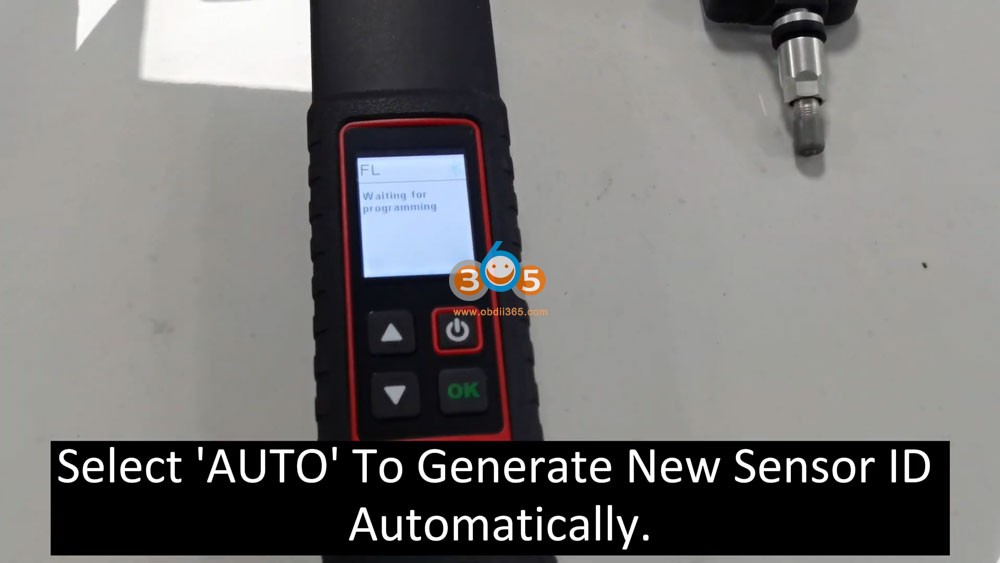
Tap "TPMSâ€.
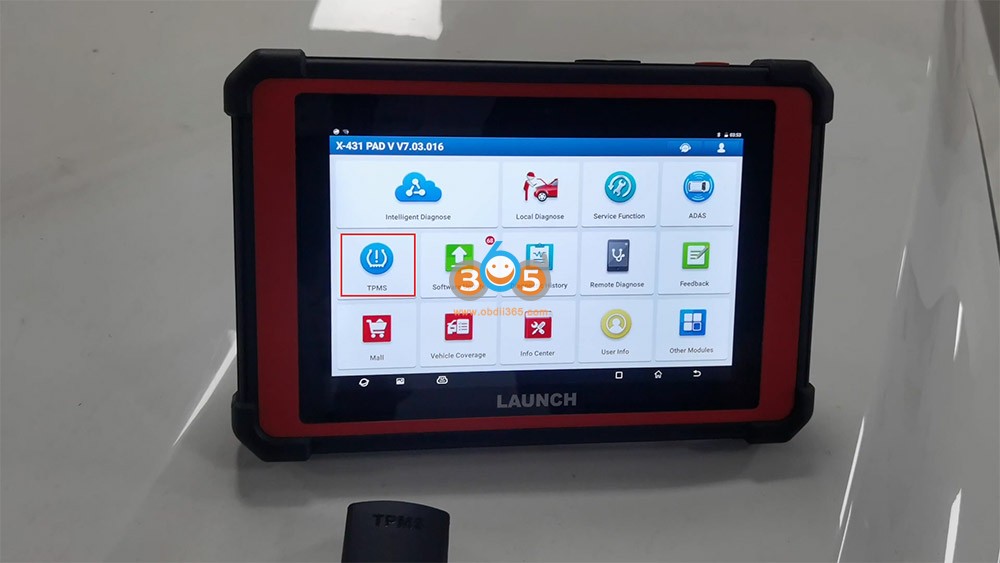
The software can diagnose TPMS and Active & programming sensor.
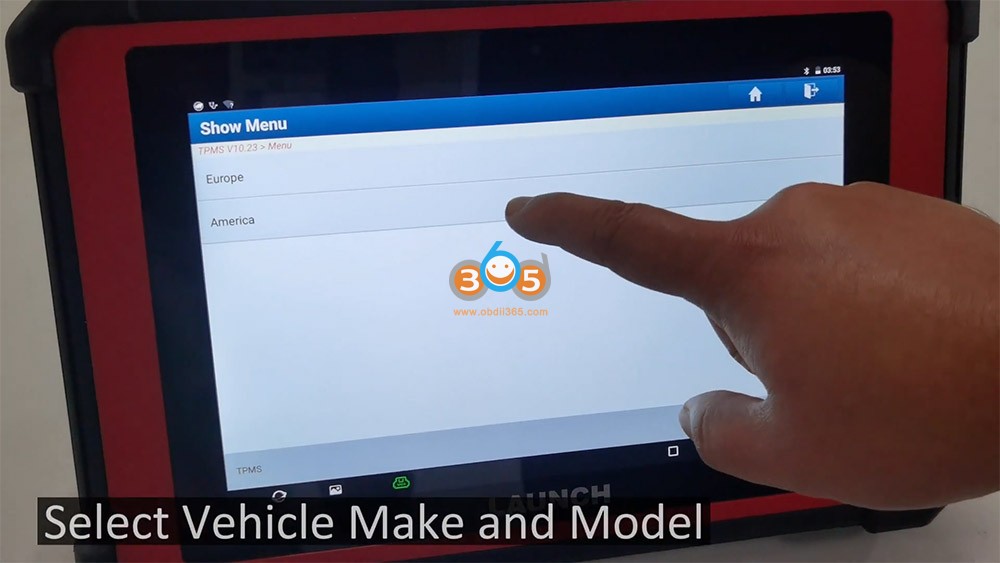
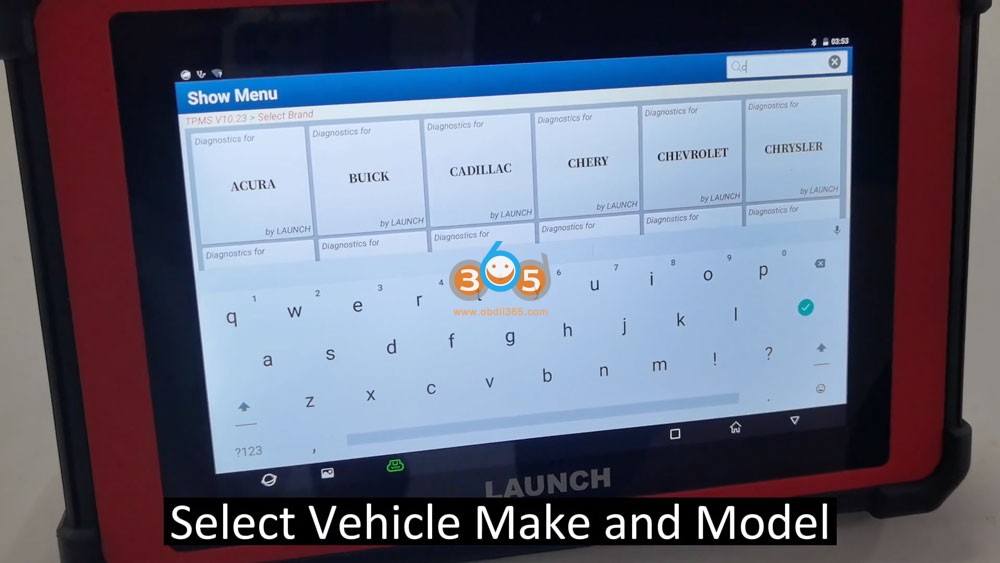
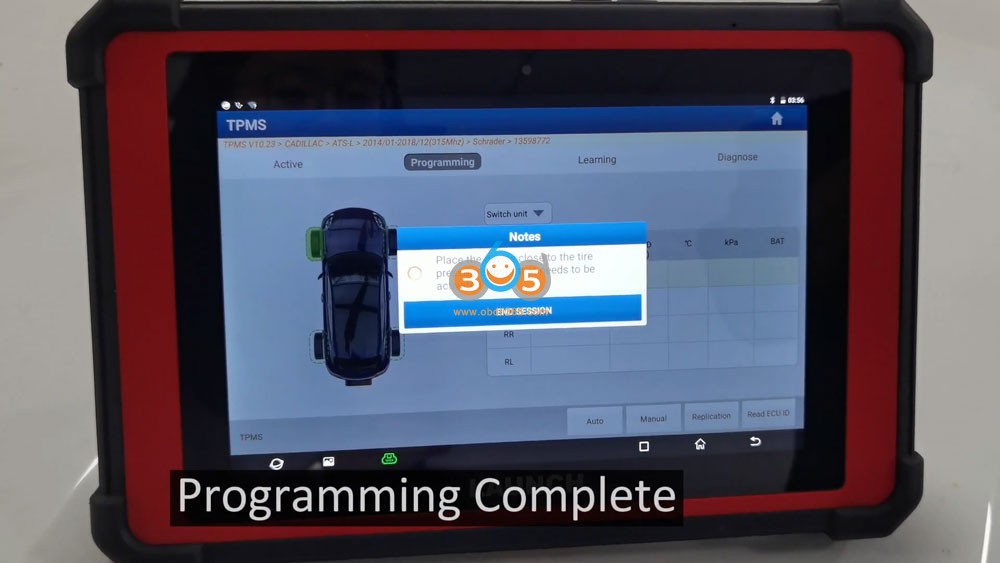
Select vehicle make and model ( for example: Cadillac ATSL 2014/01-2018/12 (315Mhz).
Select "Auto†to generate new sensor ID automatically.
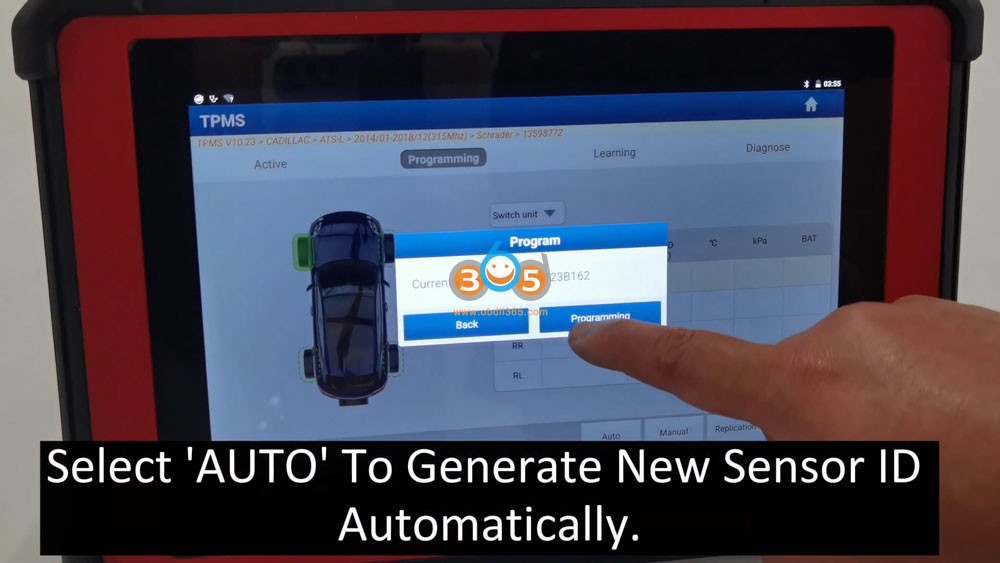
Programming complete.
Place the device close to the tire pressure sensor that needs to be activated.

Related article: Launch X431 TSGUN Write Tire Position for Toyota Land Cruiser 2015
http://blog.obdii365.com/2021/05/03/launch-x431-tsgun-write-tire-position-for-land-cruiser-2015/
Posted by: jean at
08:22 AM
| No Comments
| Add Comment
Post contains 132 words, total size 7 kb.
September 27, 2021
Car model and year:Mercedes Benz 221.176 (2007 S600)
Purpose:update the Navigation
Problem:
My NAVI was out of date, so I bought the NAVI V15 (2016 version) DVD, the last available for the USA and it didn’t work right.
How to fix it?
To update Telematics and requiresDAS Softwarerunning withmb sdconnect c4hardware.
The Telematics update must be done to make the last NAVI version work correctly.if you don’t have "Bird’s-eye View†or "Video†on the Comand screen, you don’t have the Telematics update… But, you’ll know when you try to install the last NAVI update version.
How to do next?
- You need or will need to get, Star/Xentry/Das. I got mine almost six years ago… Version 09/2014 running on Windows XP with a Dell D630 laptop– don’t ask me why but, the DIY version of DAS seems to work best on that old Dell… As many have said, having DAS is a "Must†to do most work on the W221 and will pay for itself the first time you need it…
Once you get familiar with Xentry, you’ll find that SCN coding (updating software programming, as opposed to just "codingâ€, which DAS will do…) is not normally available in DAS– it requires access to MB’s online database.
E.g.,when trying to program, or ‘update’, Telematics/COMAND (control units> communications>telematics> adaptions> programming– or, something like that path), you’ll get to this screen:

FYI, For Telematics, I ordered the CD from a dealer, part # A221-827-06-65-26. I was thinking I might could use Developer Data to load it. Dealer emailed me back that the CD-ROM has to come from Germany. I cancelled the order and looked to see if I could just download the .iso file and burn my own CD. It’s not an iso file, BTW, it’s just a CD data disc, as we will see…
- If you start searching for stuff like that, Telematics CD, you are probably going to find yourself in the weird world of *******.com. 25USD to join and, like me, you’ll probably find the download you are looking for is no longer available…
Now, at this point, like me, you’ll find out you have to "start all over againâ€:
A. You need to figure out how to change your DAS to do "off-line programmingâ€â€¦ See the screen shot above.
Tip, get another hard drive of the same type as the one your Xentry/Das software came on and clone your working hard drive, test the clone and set it aside, in case you FUBAR the good, working drive… I didn’t need the back-up hard drive, but it’s good insurance. Also, I don’t know exactly which Xentry systems are in favor today but, from the discussions on the forum, it seems many owners have the old Dell/XP setup… IMHO, XP is a stable and reliable OS, so, if it ain’t broke don’t fix it….
- Without going into too much detail, you need to modify the files that your Xentry hard drive came with. Specifically: (DAS) F:\programme\das\trees\pkw\Flashen. (Your hard drive may have a different drive letter. And, you need to know how to use Windows ‘File’ Explorer, cut and paste, etc., etc.) The "Flashen†folder holds the files that allow offline programming.
- The "Flashen†folder is just programming so, one would assume, you can modify it. I tried that without success… Anyway, the "Flashen†folder is out there on the net, so I’ll leave it to you to find a copy of "Flashen†or reprogram it yourself???
- If you install "Flashen†(i.e. replace the folder you have with one that allows offine programming), instead of "Xentry Flash access required†on the screen above, you’ll get to a screen that allows "off-line programmingâ€â€¦ Hooray… you’ll think… Well… maybe you are half-way there…. more like a quarter of the way….
(If you’re still reading, this may be good time to stop and come back to "5†when you are able to get to this DAS screen after changing your Flashen folder.):

- Next, when you get to the decision screen of offline vs online and choose offline, unless you’re damned lucky, you’ll probably get errors about VeDok or other mysterious missing "stuffâ€. Here’s where it gets fuzzy for me… I tried a bunch of "stuff†and don’t know exactly what made a difference… But, here are some more tips…
- First, you need a SDflash folder that DAS can read… This may be located in a drive partition. In my case, there were two: (WIS) E:\programme\SDflash and a virtual drive, K:\SDflash. The virtual drive, Alcohol 120% software, was already on my Dell. I think you need the Alcohol 120% or something similar to "mount†the SDflash.iso in a virtual drive in XP. Windows 10 has the "mount†ability built in, just right-click. "Mount†changes the iso file to folders you can read, copy and manipulate.
- There are a few dozen SDflash files (.iso) out there on the net. I tried about six… I used ImgBurn (free) software to modify the iso files. I settled on SDflash 2012-11 (Nov 2012), even though my Xentry is 2014-09 ( Newer versions didn’t work for me or, at least, I couldn’t make them work. Also, I don’t think the SDflash folders work in ‘Simulation’ mode because Xentry Simulation uses a fake VIN #, so you should test them on the car when Xentry Simulation gives you an error message that the VIN # and model # don’t match.)…. These, SDflash.iso’s, are large files– 5 to 17 Gb–, so downloading and sharing isn’t a simple task!!!
I know what you are thinking. Why use 2012-11 SDflash— that stuff is 8 years old??? Well, that’s still about 6 years newer than the software the car was born with. DAS will tell you if you have programming that is any newer before updating… One would also think those 6 years were enough for MB to sort out the bugs and they probably didn’t do much, updating, thereafter…
- So, you have the SDflash folders and still it doesn’t work??? For me, at least, it came down to something very strange… It seems my DAS version is 2014-09 and the file in SDflash\Release\PKW named "profi_cd.ini†MUST match the 2014-09 version. That is, copy whatever profi_cd.ini file was originally in your SDflash file and replace the file in the 2012-11 SDflash\Release\PKW folder…. here’s what the complete profi_cd.ini for 2014-09 looks like:
[DEFAULT]
DAS-CD-NR=09/2014 (2014-08-13)
FlashData=2014.09.000
CAESAR-NR=03.01.99
MVCI-NR=08.02.026
Aktionierung_PATH=
CD_TYP=5
… just a few lines of code… And, here’s 2012-11… not much difference:
[DEFAULT]
DAS-CD-NR=11/2012 (2013-02-01)
FlashData=2012.11.014
CAESAR-NR=03.01.99
MVCI-NR=08.02.042
Aktionierung_PATH=
CD_TYP=5
See why I said to clone your working hard drive??? If you totally lose track of the mod’s to your hard-drive, you can always start over with your ‘good’ drive… You’ll also find "Search†in Windows File Explorer is your friend… I also pulled out of the closet a USB 2.5†HDD reader that I haven’t used in years, to use my Windows 10 desktop for changes to the Dell HDD files…After a while, you can create your own Frankenstein’s monster with all the SDflash iso’s.
- Also, you are likely to get "Insert CD labeled ‘Star Diagnostic Software'â€. I think that means you are missing the correct #FDOK file in SDflash\Release\PKW\#FDOK. The one that worked for me with SDflash 2012-11 is:
221_2012101014573400000000.fsam
I have no idea what this file is (note, the date of Oct-10-2012) but, it’s about 64 Mb and is needed to get SDflash 2012-11 to work. It’s also the newest 221_ ".fsam†file in folder "#FDOK†I could find!!! (Location is: SDflash\Release\PKW\#FDOK).
Next, if all is working, you’ll get to this screen for a Comand update:

and, this:

- So, you need ‘2218270665_0001’. That CD, I think, is the one I ordered from MB and it had to come from Germany. After MUCH looking, I found a downloadable .nrg version. Unzipped, it’s less than 500 Mb.
Now, you have to burn 2218270665_0001, but as what??? .iso, ngr, etc. Here’s my burned CD Hall of Shame:

Fifth time’s a charm!!!
9. It’s a DATA file, i.e. just copy the file and folders to a blank CD-R, like you are making a backup of your data on a permanently burned CD-R. (Just guessing here, but DAS has to read the file, exactly one file, and the five folders off the disc you put in the CD changer in the car and just wants the file and folders on the CD… Why it can’t read those from your laptop is a mystery to me…)
Here’s what my burned disc ‘2218270665_0001’ looks like when viewed in Windows 10 File Explorer:

Note, I named it "2218270665_0001â€. I don’t know if that is needed, however, who knows… Also, I burned it on the Dell D630 DVD RW. I just put the file and folders shown in the pic above on a USB, plugged that into the Dell and burned them to a blank CD on the Dell. Again, I don’t know what difference that made, but it worked… Also, you may very well have all those folders, and one file, in the pic above, on your SDFlash already and, you can just copy and burn them to a CD. I checked and had the folder named "HU221″ in my Dell laptop in drive E:\– although I screwed around with that drive so much, I’m not sure where it came from??? However, in some of my SDflash ISO’s, HU221 was empty!!! So, you may or may not have all the folders and the one .cdi file in your laptop already.
I tried, for quite some time, to decode the CD_INFO.cdi a/k/a 2218270665_0001.cdi — which is from some old technology called "DiscJuggler†and it was a waste of time… no matter what the Google searches for decoding a CDI file say…. I’m not sure what this CDI file is all about but, I surmise it is telling the computer in the car and in your laptop where to go for the updates?
Here’s a sample of what the beginning of the CDI file looks like:
.
.
.
[CD-Info];
CD-Name 2218270665-0001;
# UpdateCD V1.0.0
#
# Automatic generated CD_INFO.CDI-File
# Software from:
# Daimler AG, Sabrina Meier
#
# Generiert am: 21.12.2010 09:35:56
################################################## ##########
# HU221
[2168200726-XXX];
################################################## ##########
# BOOTLOADER_HEADUNIT_ECE_USA
2214424360-001 \HU221\001001\A221442\4360_001\__EMERG_\;
# HU221
[2168200826-XXX];
################################################## ##########
.
.
.
(and so on…)
- If you are still here, now your hard work pays off… When you get to: "New control unit software versions are available†you’ll, of course, press F2 and I think you’ll get this, again:

- Instead of pressing F2, I inserted the disc I named ‘2218270665_0001’ in the CD changer in the car and got an ‘Unknown Format’ on the screen in the car. Ignore that, and then hit F2… I think it asks for the reason for the change, you answer and, then…Voila… you have it!!!

In the car, you’ll have the progress shown:


As others here have said, the process takes about 50 min. So, a battery charger is needed but, forget that BS about 30-40 amps… I held 12.8V with 8 amps indicated on the charger’s LED readout….
- When done, you get a screen indicating what has changed:

Pretty cool… You get Bird’s eye view, audio in wma format, expanded PCMCIA capability and more… But, most importantly to me, new map capability, albeit, 2016 data…

- All done, Right??? You just FU’d your cold air conditioning and it will never work again unless you get back in DAS… You’ll get this advice at the end of your Comand update:

- Like a good German, I did as ordered and went to AAC and reprogrammed the control unit. It did update the software and it didn’t ask for a CD, like Comand does… (Weird, when programming the AC control unit, the brake lights were activated… I guess no weirder than having to reprogram the AC control unit after programming Comand.)
I also looked at the German language website referred to in the pic above, but it was mostly about the virtues of MB and was of no help….
One might not even notice this SNAFU in December, but I’m in the tropics and, AC is a year-round necessity. I tested a running car and, no cold air from the AC…
Somewhere in the hidden maze of my regularly-lubricated-with-ETOH-brain, I recalled ‘something’ about ‘magnetic clutch.’
Sure enough, in DAS, air conditioning>AAC>control unit adaptions is: ‘Read Coding and Change, if necessary’. There’s a tab for ‘magnetic clutch’ and you can set it ‘off’ or ‘on’. Counter-intuitively, the Comand update sets it to ‘ON’… WTF!!! The W221 doesn’t have a magnetic clutch!!! WHO KNEW?… Certainly not the people who made the damn car!!!
THIS IS IMPORTANT: Magnetic Clutch has to be reset to ‘OFF’.
So, there you have it… Sort of…
I don’t know if this helps but thought I’d share with the W221 community, who have helped me out a lot… Also, I tried to document my steps– mostly with pics for my own memory– but, I may have missed a couple or, included something that’s not needed. However, I think it’s all there.
But, I’m not being entirely altruistic– I noticed the AAC needed an update, not that it needed it…
Now that I know how to ‘program’, I’m up for trying to screw something else up, like I did with my previously, perfectly-working Navi!!! (Note: the screw up of Navi occurred with the MB APPROVED DIY SOFTWARE and NOT with the DIY cloned DAS software, so I’m not taken the blame for the mistake… only for the ‘fix’… )
Alright, credit to @mcypert
Maybe you are interested in the best mb sdconnect c4 plus with DAS, xentry, free DTS Monaco,Vediamo:
https://www.obdii365.com/wholesale/mb-sd-connect-c4-benz-scanner.html
http://blog.obdii365.com/2021/09/27/diy-update-mercedes-w221-s600-navi-telematics-with-das/
Posted by: jean at
09:21 AM
| No Comments
| Add Comment
Post contains 2280 words, total size 24 kb.
September 26, 2021
Problem:
A friend has Alhambra 2007 chip 44, he has 2 keys, one of them starts the car but the other does not start even though when I read chip id, they have the same id. We have tried to read pin code withxhorse key tool maxto be able to program a new key but eventually all keys stopped starting the car. Which tool can program key for this car?

Solution:
The cheapest option would beSBB. Sbb read pin add key no problem. Tested working 100%.


Posted by: jean at
03:20 AM
| No Comments
| Add Comment
Post contains 112 words, total size 4 kb.
September 24, 2021
Today will be super helpful article guys to any of you having a Hyundai vehicle. It could be practically any Hyundai vehicle if you have a Hyundai and you want to find out why your ABS and traction control lights are on, we will explain the top 3 reasons that can cause that. Pretty simple guys stay with us,we’ll explain also what computer (LikeAutel MaxiCOM MK808 obd2 scanner) are used for diagnostic all that and we’ll show you how to test everything to find out what’s wrong with it, you should work on multiple Hyundai models such as Sonata, Sucson, Sanadam Veloster and Accent as well,so let’s go ahead and start on it now if you guys need to buy any parts to use anything from your hand.
So the number one thing that we see for ABS and traction control light having them at the same time on some models, it can be known as EPS, slide no distraction control light it’s bad ABS sensor also known as wheel speed sensor, you have one of those sensors on every way, it will be attached right here, it will detect guys how fast each wheel is going because the traction control and ABS okay both systems need that.
This is the number one thing that we see that can go bad and sometimes people just damage them when they replace suspension parts such as sway burnings or they they replace.
Let’s say struts bushings anything like that guys even brakes they will damage them sometimes, and they will break the cable internally which which can cause that problem.
Now we have the diagnostic toolAutel MK808connected to the OBD port on that Hyundai and I want to show you specifically here now guys okay, let me just exit here, so I can get everything ready, I’m trying to get in the car, one second okay perfect, I mean so I’ll turn the ignition on that Hyundai guys okay.
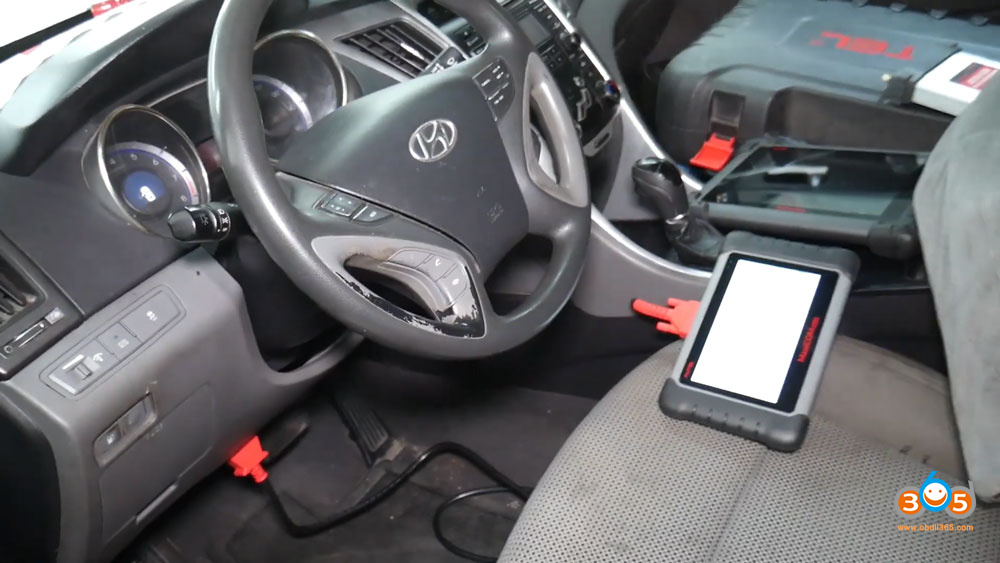
This is the MK808 that we use it on many vehicles, they asked me to recommend a good diagnostic tablet, he is right here, yes it works on almost any car, you can think of it.
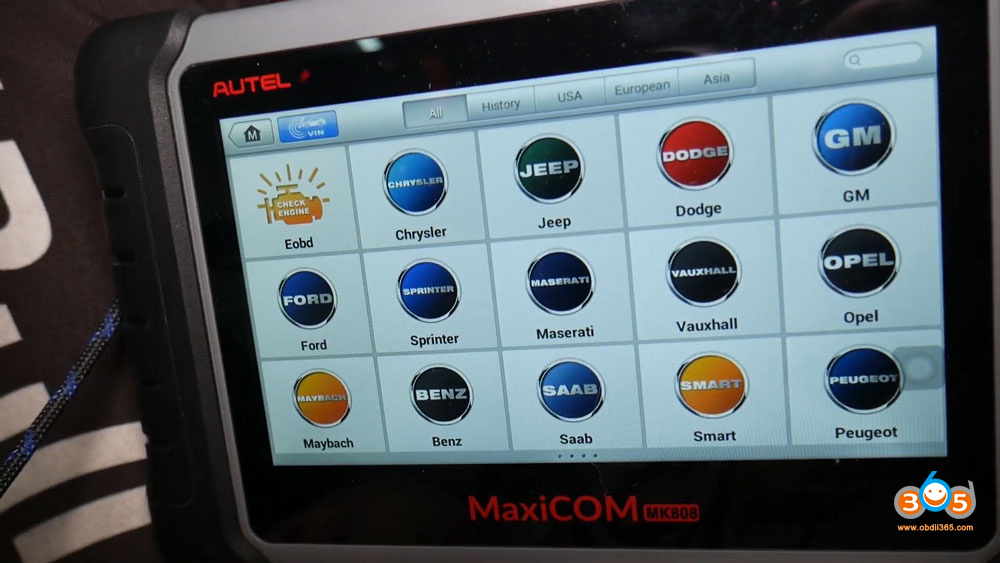
You can just click "VIN detection†it’s going to read your vin number, you have to confirm that this is the correct one, it will decode it and tell you even which car you have which is pretty amazing because it’s a very convenient for you.
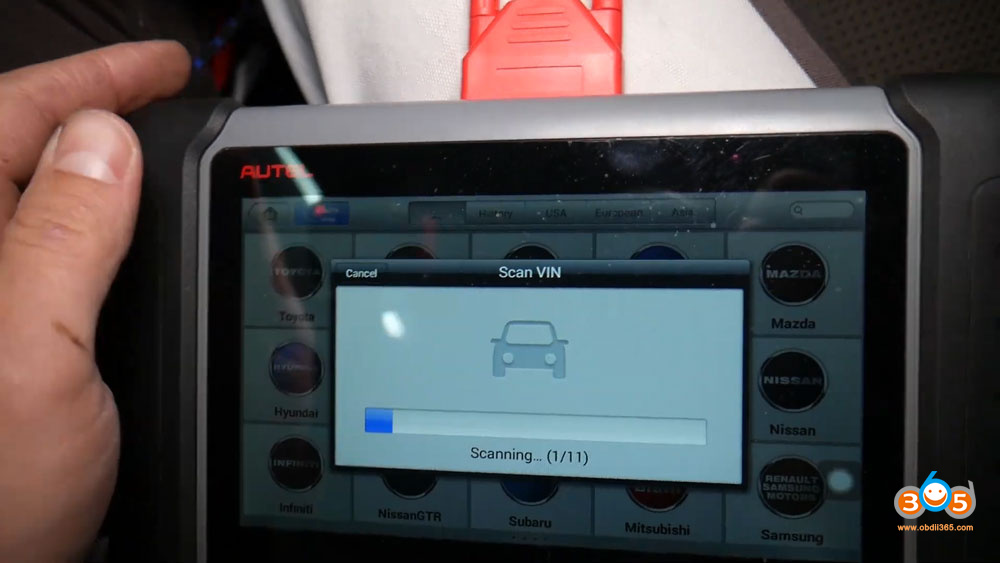

What we like about Autel MK808, you can access every computer system in your car and this Hyundai it’s a 2013 model which has 17 systems but imagine how many even the newer ones have more.
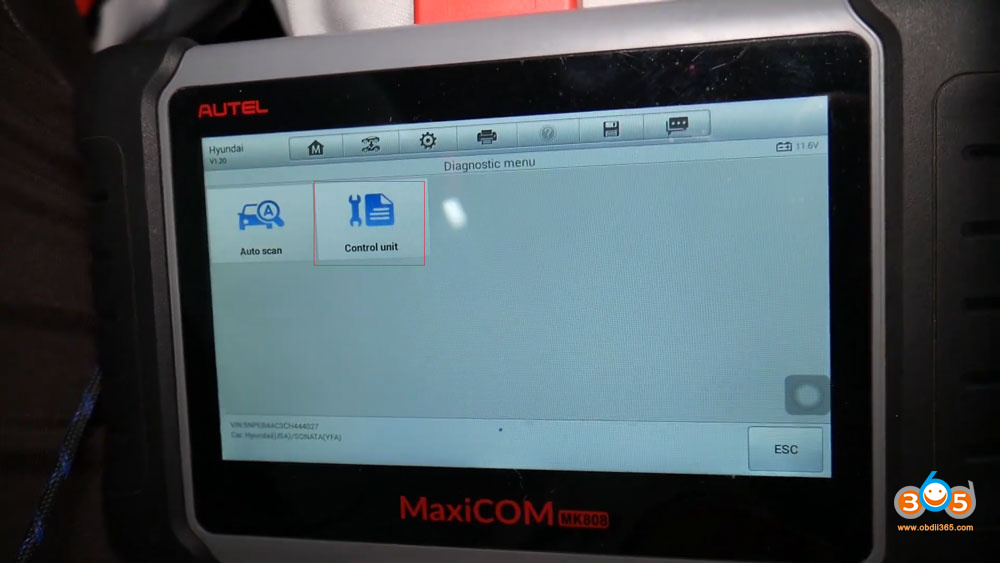
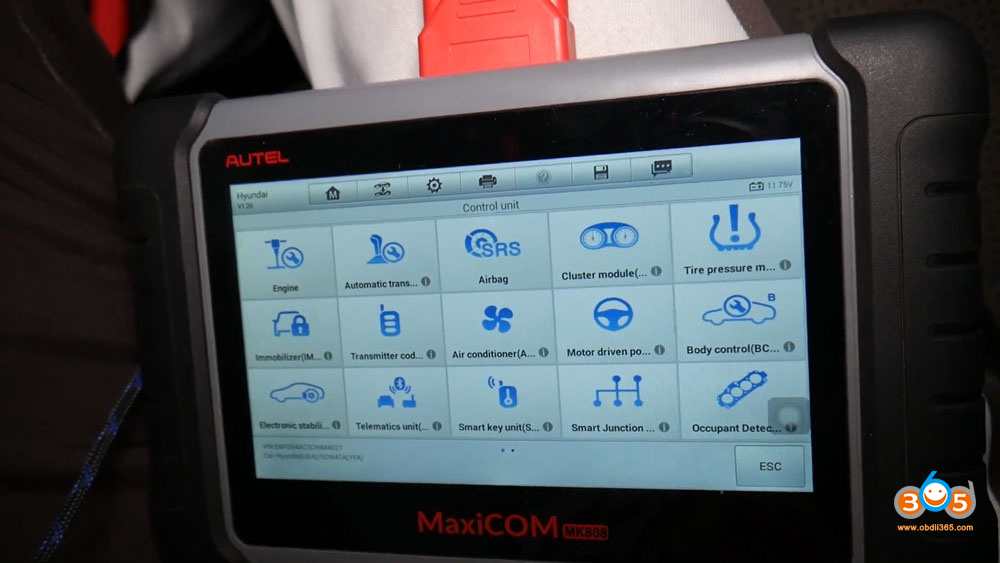
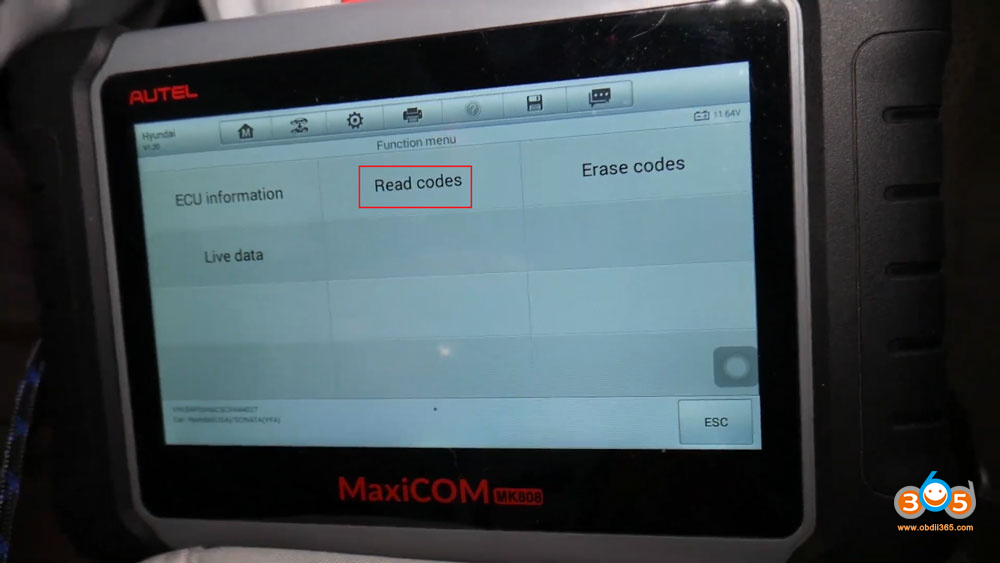
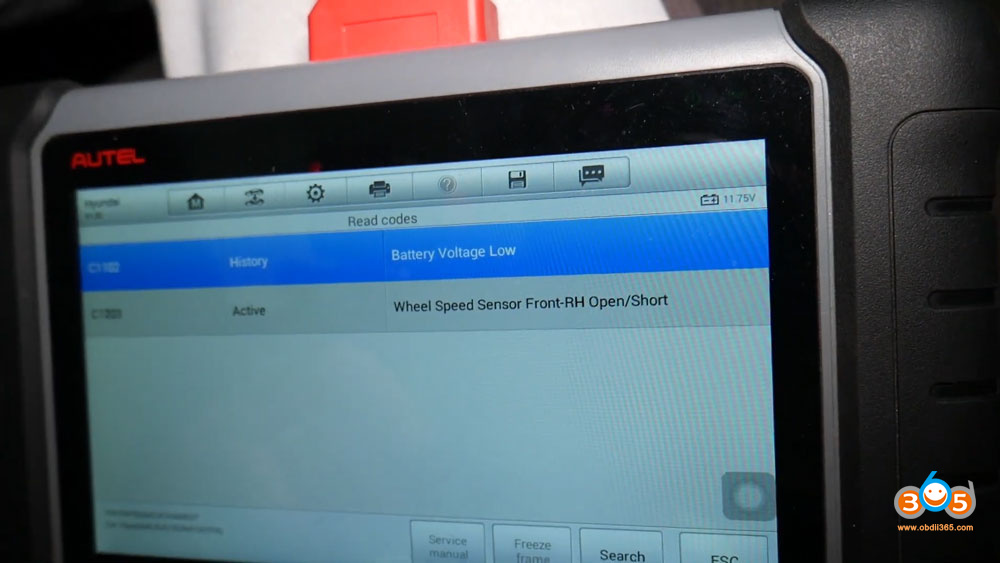
Next you need to find the electronic stability program, and from there you need to select OK, you can click"Read codesâ€so find out exactly why the traction control and ABS light is on, in most cases it will tell you directly what is, low voltage means that the battery was low at some point but that’s in the history so it doesn’t activate the lights now, but even low battery can cause down and the next one says active means that we still have a problem, the wheel speed sensor on the front right side is broken, the one that we have removed, that’s why we have ABS interaction light.
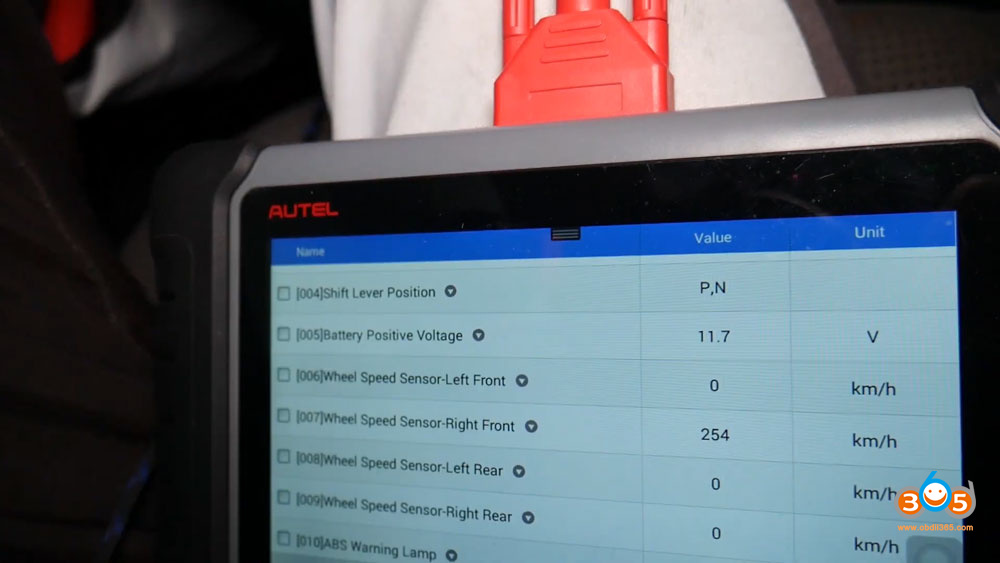
But what else can cause that?if you go to "live data†here, okay, it’s super powerful too, you can check the speed sensors for every wheel and one that’s broken says 254 kilometres per hour, what are we going to do now, we have a person spin the left wheel.
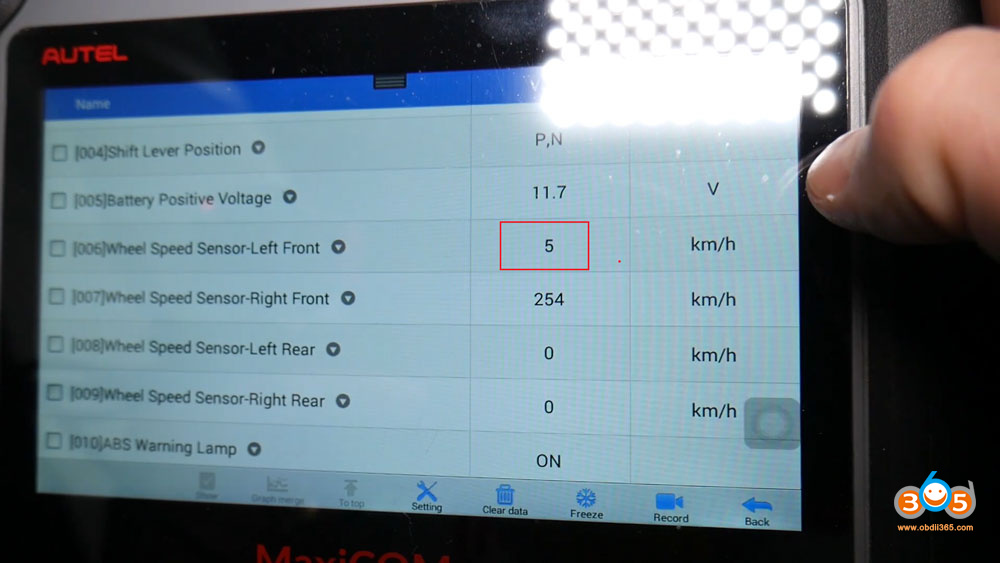
And I’m gonna check the speed here and it says front left 5 kilometers, okay perfect, so that’s a working sensor, you can check each one of them when you have. In the cabin here or you just drive the car you can check them that way and see which one is working, which one is not.

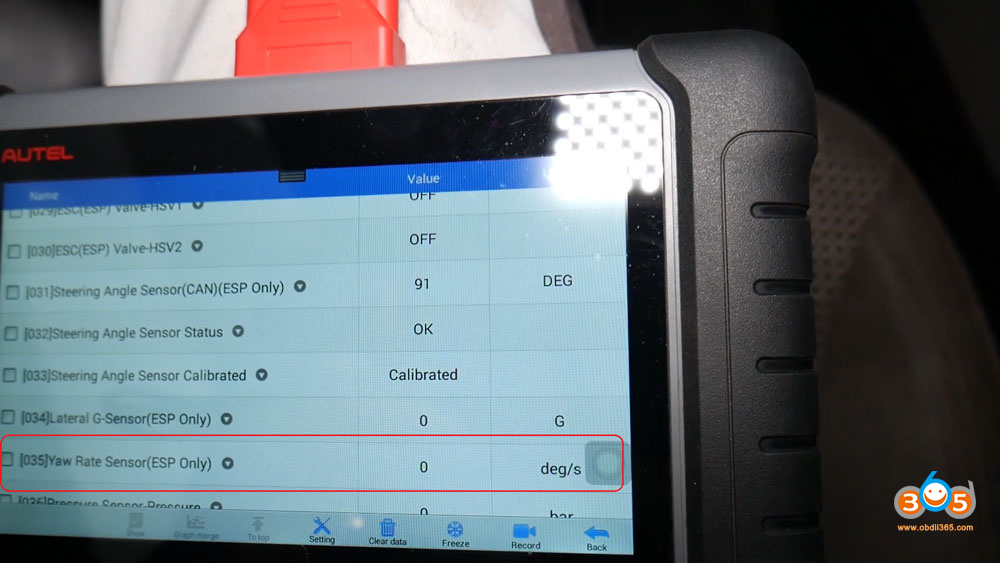
Another thing: you can scroll down to "steering angle sensor†status, sometimes you may have a problem, let’s say you had something replaced on the suspension, you hit a pothole, or you put a new steering angle sensor, it’s not calibrated or that, or let’s say the alignment is off it means that the steering wheel will not be aligned correctly that can trigger guys traction control and ABS light on it as well, then the sensor displayed on Autel MK808 will say calibrated it, if it’s not calibrated you will need to calibrate its super simple, there is Youtube video that explains how to do that, it’s very simple, you need to do that every time you replace a suspension pockets take it to the shop for alignment, all that stuff you will need to calibrate.
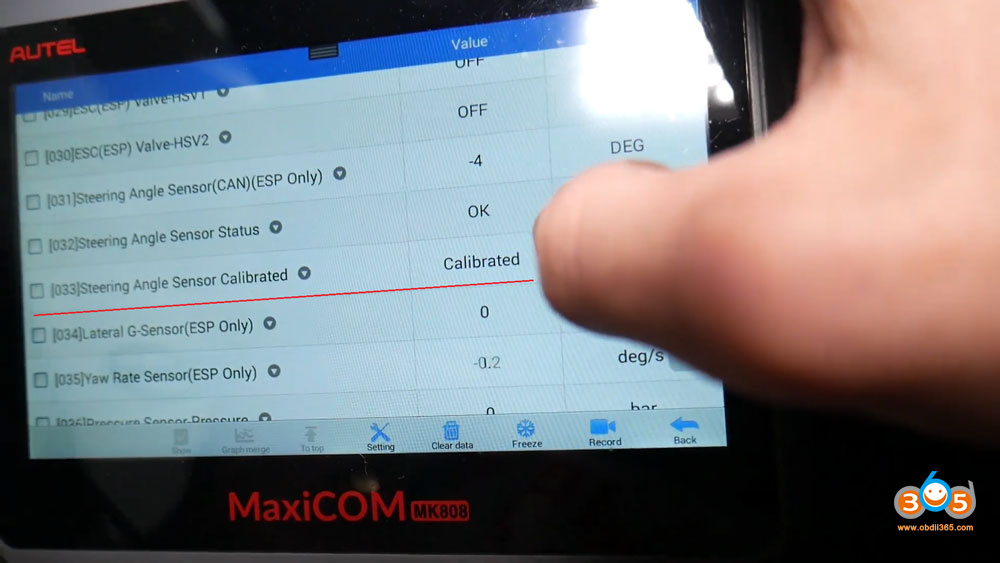
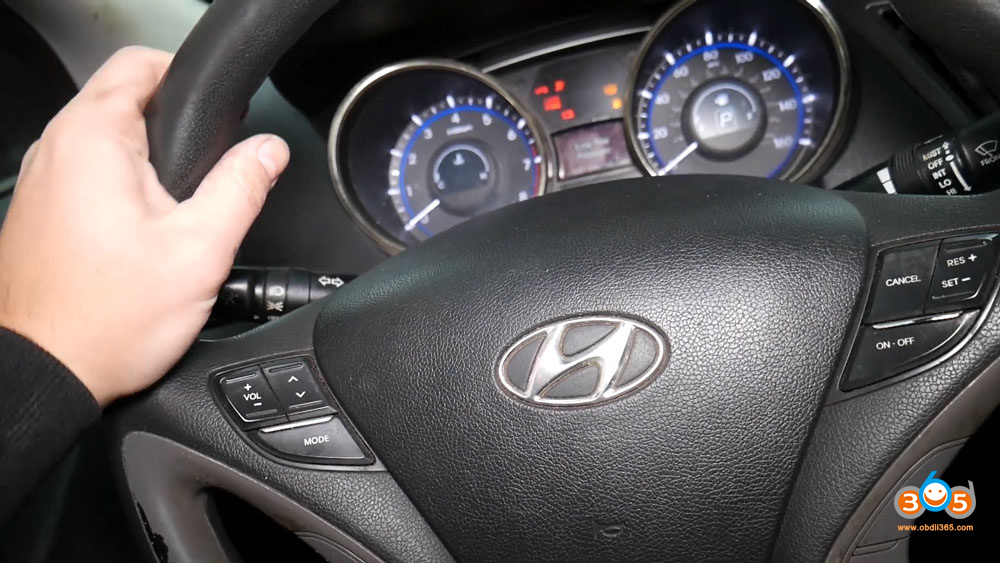
You can actually test if it’s working, you can see right now it says 0 degrees.
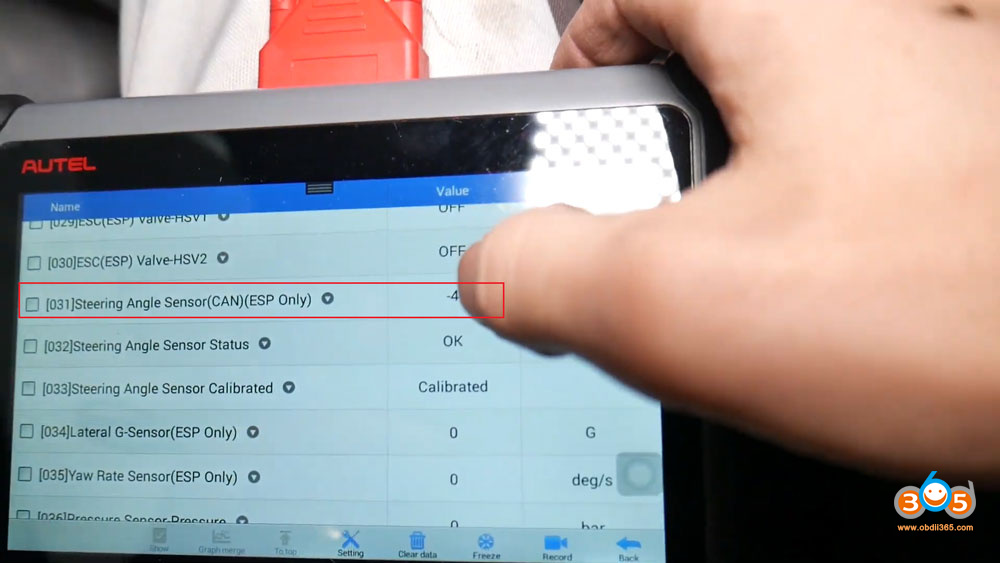
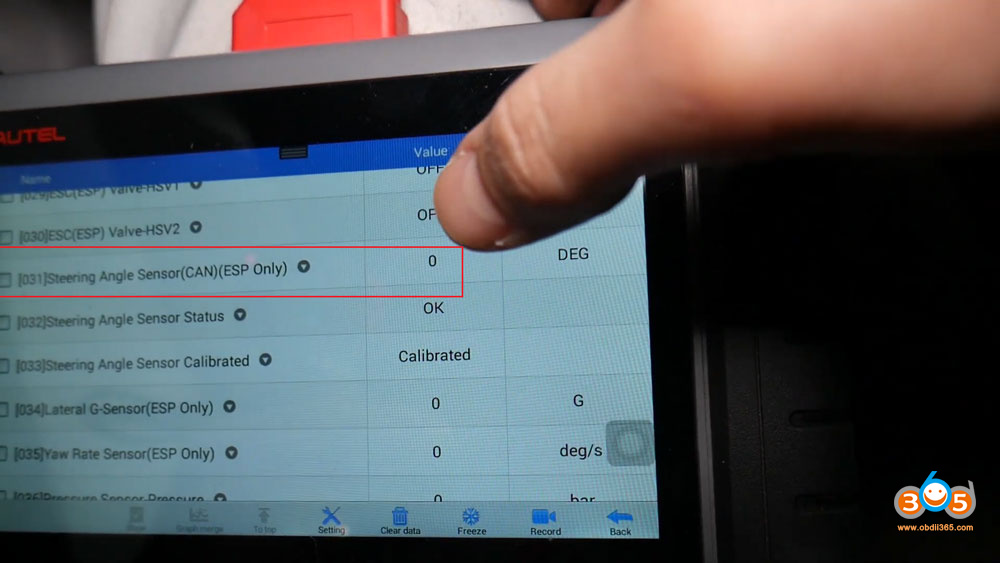
For the steering angle sensor and the steering wheel is straight if I go left about 90 degrees, you can see 90 degrees right there.
I can go to right, it should be negative 90 because I’m going the other way and you can test it that way and see.
But top 3 things that we see bad speed sensor not calibrated steering wheel sensoror bad steering wheel sensor.
Alright, hopefully the article will be helpful, thank you for reading, thanks toAutel MaxiCOM MK808and see you guys next time.
Posted by: jean at
06:52 AM
| No Comments
| Add Comment
Post contains 915 words, total size 20 kb.
September 23, 2021
How-to: disable Mercedes 2005 to present Start/Stop ECO feature via coding using both Vedamo and DTS Monaco engineering software program.
Preparation:
1.Benz J2534 passthru or Xentry Passthru.MB Star diagnostic system is recommended because it is Mercedes benz’s official diagnostic software for Mechanics.MB SD Connect C4is still an excellent adapter but it can do a few more things, such as flashing on a dead ECU over DoIP.
2.Vediamo 4.2.2 or version 5.x.It comes with SDConnect C4 hard drive (HDD). It’s more advanced software thanXentry. Vediamo 4.2.2 was released in 2012. There is Vediamo 5.x but you need SD C4/C5 to use 5.x Vediamo.
3. DTS Monaco 8.16.Another engineer program comes with MB SD C4 hard drive. It’s more advanced software than Vediamo.
4. Seed key calculator.You can find free software online.
There is an open source application, MBSeedKey,https://github.com/Xplatforms/mbseedkey/releases/This application doesn’t include DLL files though. So, you need to find DLLs. Do google, and you will find them with easy. Put the DLLs in the lib sub-folder (Example: C:\MBSeedKey\lib\*.dll or C:\MBSeedKey\dlls\*.dll or C:\Program Files (x86)\MBSeedKey\lib\*.dll …).
5. A laptop.They have got aC4+HDD+laptoppackage. software is pre-installed and ready to use. The downside is that the old laptop is slow. You can use any latest laptop you have.
Recommanded PC: (Windows 10, 64bit Intel/AMD CPU, 8GB RAM, 100GB free space SSD)
Installation
Install Xentry XDOS, Vediamo, DTS Monaco and Seed Key Calculator
If you using J2534 passthru (Openport etc), you also need to install J2534 driver, Pass Thru library, activate Vediamo and DTS (do Google).
MB C4/C5 adapter kit can make work easier.
If use J2534 adapter, to make Vediamo 4.2.2 work with a J2534 pass thru adapter,
6. Edit "C:\Program Files (x86)\Vediamo\Caesar\driver\slave.iniâ€.
7. Find section "[PartJ]†and replace "DeviceName†with your Pass Thru adapter’s name. For example, DeviceName = "Softing – VAS5054A#XXXXXXXXâ€.
8. I don’t know my adapter’s name? It’s in the windows registry. Or, runXentry, thenxentrywill pop up a dialog to let you select a pass thru driver. Type the name in the slave.ini
9. Run Vediamo 4.2.2, and click on "Update†button. Select "Part J†only (unselect all others), click on "Updateâ€.
Disclaimer:Credit to realeric from MB forum. The tutorial here is for sharing purpose. You are at your risk.
Let’s get started.
Connect C4 with laptop and vehicle via OBD port
Run Xentry software
Do a quick test. Does it run? Yes ==> go to next step. No ==> you are doing something wrong, go back.
Turn on ignition switch (don’t run the engine) when you are doing the coding. Don’t press brake pedal and press the start button two times, or turn the key two click.
Always connect an AC-12V charger to the battery in case of battery drain. To save battery, turn off headlight, room lights, HVAC fan.
Let’s Find the Control Unit Name
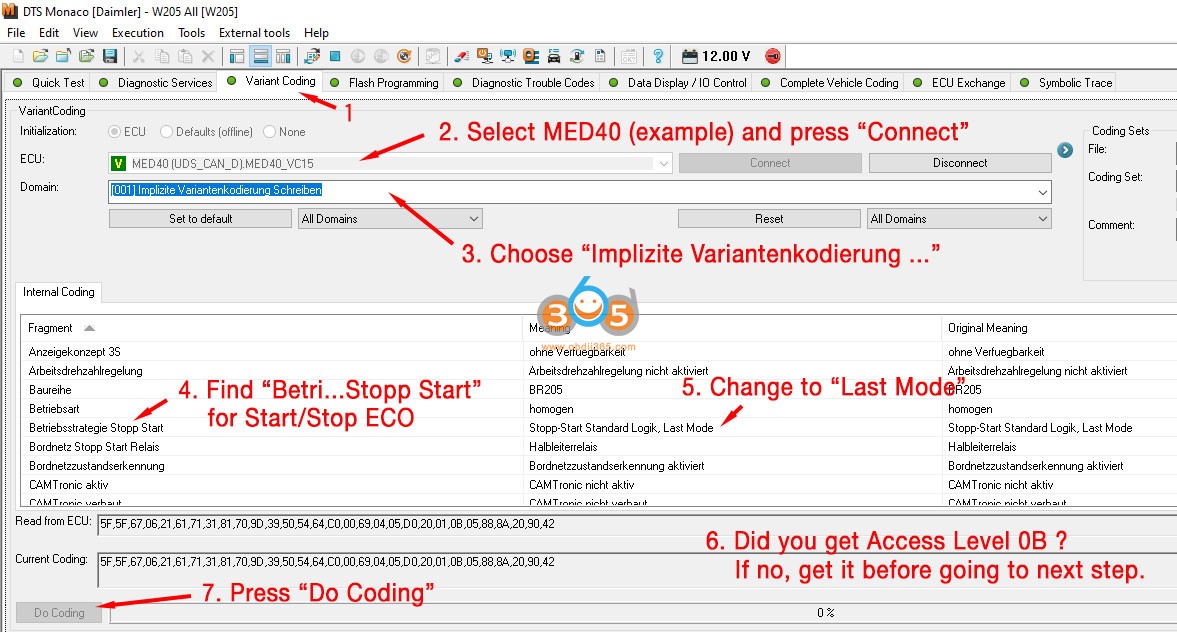
You are going to disable Start/Stop ECO. Main Engine ECU/Controller controls "Last Mode / Default On / Default Offâ€, and front SAM controls "Default On / Default Offâ€. "Last Mode†will be better than "Default Onâ€. So, let find thecontrol unit name (ID)of the Main Engine ECU controller. The control unit name varies depending the vehicle model.
1. RunXentry. Select Diagnosis.
2. Search "Motor electronics … for combustion engine … †(or similar items).
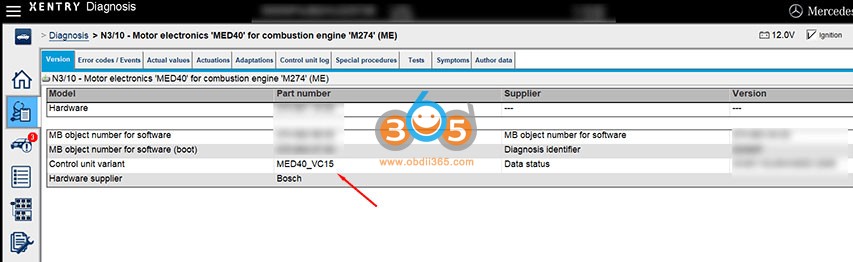
3. Search "Control unit variantâ€.
4. It’s MED40 in this vehicle (example). So, let’s do "variant coding†of MED40.
Let’s Do It.
How to Disable Start/Stop ECO with Vediamo?
1. Run Vediamo. Click on "Ecoute†application.
2. Click on "Select…†(1st icon on the top menu)

3. On the dialog, check *.cbf and click on "Change folderâ€
4. Where are *.cbf files? It’s inXentry. (Vediamo and DTS Monaco use *.cbf, *.smr-d files inXentry).
5. Select "C:\Program Files (x86)\Mercedes-Benz\Xentry\MB_PKW\Caesar\cbfâ€
6. Choose "MED40†on the dialog and click on "OKâ€
7. Now the window shows "MED40â€, "System:MED40†/ "ECUs†/ "MED40 – xxxxxxâ€
8. Right click on "MED40 – xxxxx..†and select "Propertiesâ€
9. Change the connection to "xxxxxxx…… HSCAN_UDS_500â€. Always choose "500â€. Click on "OKâ€
10. Click on "Initiate ECU Contact†(3rd icon on the top menu)
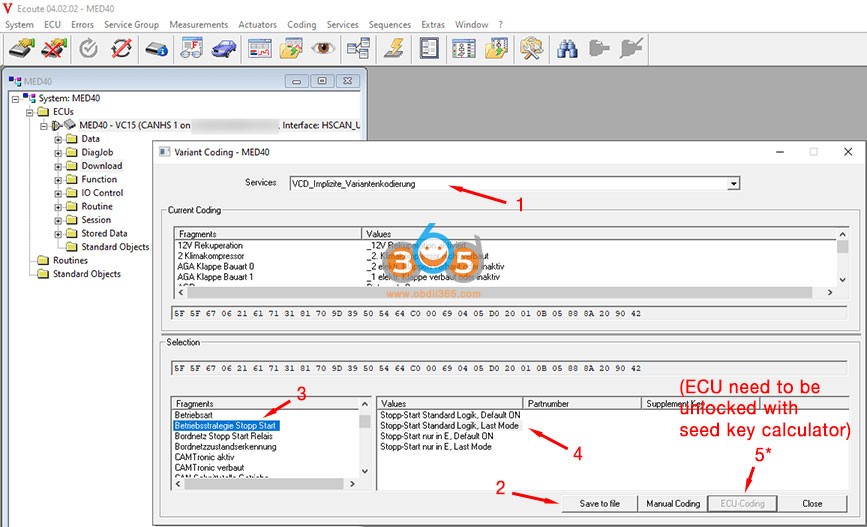
11. Select "Code the variant of an ECU†(11th icon on the top menu)
12. You will see the "Variant Coding – MED40†dialog.
13. Select "VCD_Implizite_Variantenkodierung†on the dialog. It’s German, not English. Don’t panic.
14. Find "Betriebsstrategie Stopp Startâ€. Click on it with mouse.
15. You will see "Stopp Start Standard Logik, Default ON†on the right panel.
16. Select "Stopp Start Standard Logik,Last Mode†with mouse.
17.WARNING. STOP HERE, Take a break.
18. Click on "Save to Filesâ€. This saves current parameters in a sub-folder, "MED40â€, i.e., "C:\Program Files (x86)\Mercedes-Benz\Xentry\MB_PKW\Caesar\cbf\MED40\YYYY-MM-DD.htmlâ€. If something goes wrong, you can recover current states with this file.
19. Go to the folder, verify if it’s saved well. Double click on the file (*.html) and you can see the the content coding (parameters).
20. Click on "ECU-Codingâ€
21. It will show "warning: SCN number can be erased……â€. Ignore it.
22. Click on "OK†(or go or proceed… anyway).
23. It will fail. Don’t worry. It’s normal. It happened because you didn’t have enough "access level to the ECU†for the variant coding.
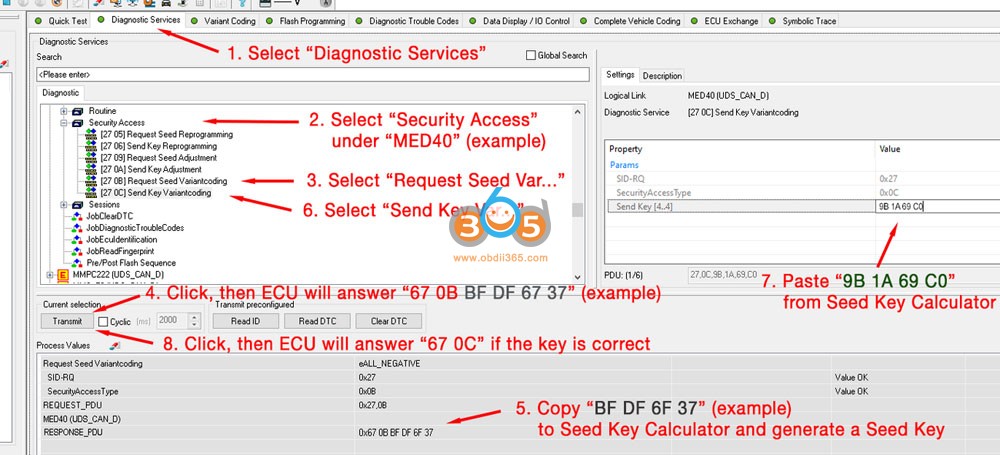
24. Select a menu on the top menu, "ECU†/ "Manual Command Input …â€
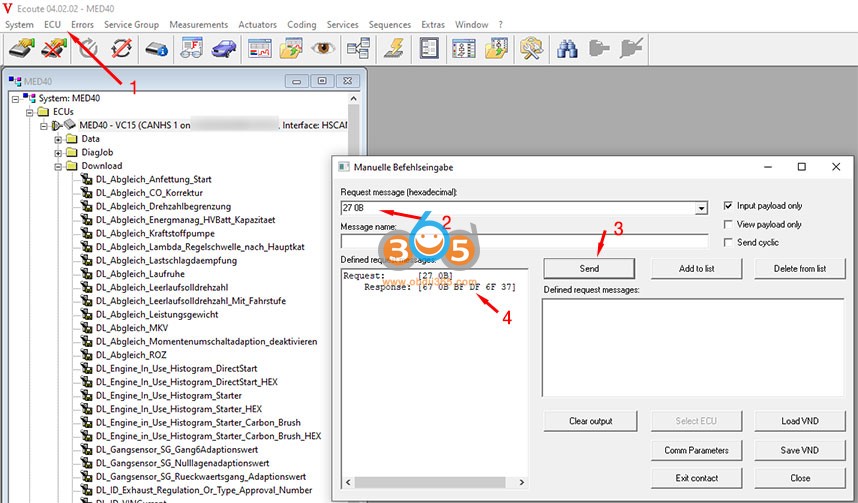
25. Type "27 0B†and click on "Send†button. Why 27??? What is 0B??? It means "Hello ECU, would you let me know a temporary PIN to generate a seed key for access level 0B?â€
26. ECU will answer back "67 0BBF DF 6F 37". It means "Hi, the temporary PIN is BF DF 6F 37"for access level 0B (= required level for sensitive variant codings).
27. Run "MBSeedKeyâ€. Change DLL folder if the DLLs are not in dlls sub-folder.
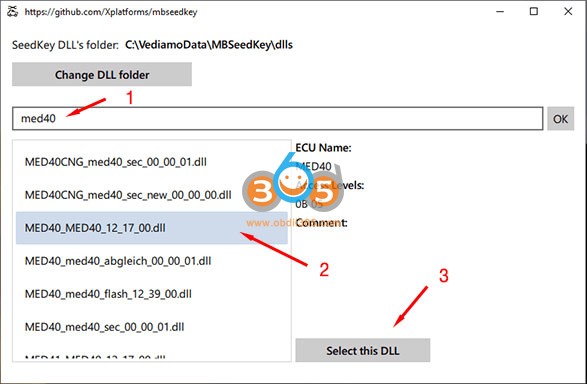
28. Select "MED40_MED40_…….dllâ€. Why should I need to select a dll file? Mercedes hided a different seed key algorithm in each DLL. The key calculator simply use the algorithm. So, it needs to know which dll is going to be used. If you choose a wrong dll, the key generator will answer a wrong key, and the ECU don’t allow you to pass. Therefore, you can’t make mistake. Don’t worry.
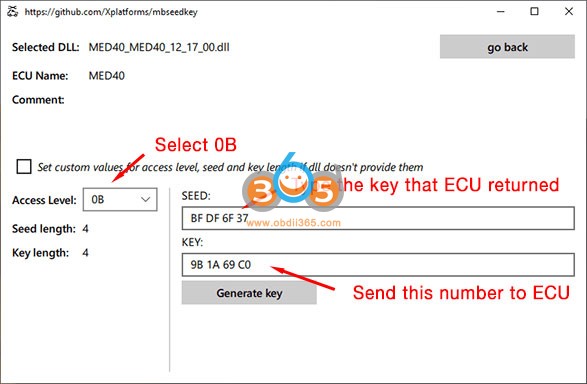
29. Select 0B on Access Level. (There are access levels, such as 1, 3, 5, 9, B. To do EURO6 emission related variant codings(parameter change), 0B access level is required)
30. Type "BF DF 6F 37†(for example) on SEED:, and press "Generate Keyâ€.
31. Key will be displayed "9B 1A 69 C0†(for example).
32. Go back to the vediamo.
33. Type "27 0C9B 1A 69 C0†on the Vediamo / Manual Command Input… / Request Message and click "Sendâ€
34. ECU must answer back "67 0C". It means "Ok, you are allowed to 0B levelâ€. If the ECU answer other than 06 0C (for example, 0x7F ….), you did somethingwrong– go back to step 28.
35. Close the "Manual Command Input…†dialog
36. Open the previous "Code the variant of the ECU†again.
37. Do the STEP 11 ~ 16 again.
38. Click on "ECU-Codingâ€
39. It will go through. If not, you did something wrong.
40. Click on "Save to Filesâ€. It will save parameters "after†coding. You can compare before/after data to see which parameters were changed.
41. On left tree window, click "System: MED40 / ECUs / MED40 – xxxxx / Functionâ€. You can see "FN_HardResetâ€
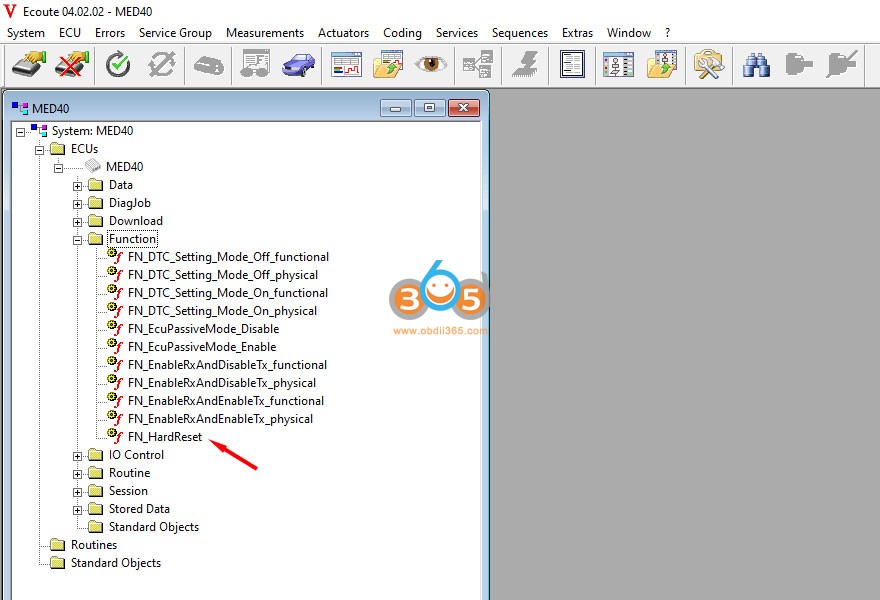
42. Double click on "FN_HardResetâ€. It will make the MED40 reload the parameters you modified.
43. Click on "Exit ECU Contact†(4th icon on the top menu).
44. Close Vediamo program.
You done. Be careful, don’t change any parameters until you know 100% what it is and 100% sure if you are correct.
How to Disable Start/Stop ECO withDTS Monaco8.x?
DTS Monaco 8.x is more advanced software than Vediamo 4.x or 5.x, and good news is DTS Monaco 8.x works with J2534 Pass Thru adapters.
It’s almost the same with Vediamo 4.2.2. Vediamo 4.2.2 use *.cbf files included inXentrybut DTS Monaco 8.x use *.smr-d files included inXentry. *.smr-d is newer version of *.cbf, i.e., *.smr-d = *.cbf + *.dll. You can extract the *.dll from the *.smr-d. The DLLs used for the seed key calculator was extracted from the *.smr-d. You can extract it yourself… but someone already did it for you. DTS Monaco 8.x also support *.cbf but only with SD C4 or DoIP adapters. Since you have a J2534 adapter, you can’t use *.cbf in DTS Monaco 8.x. That’s fine as *.smr-d is newer version of *.cbf. You don’t lose anything.
Where is *.smr-d files? It’s in "C:\Program Files (x86)\Mercedes-Benz\Xentry\Kontexte\ODXProjekte\PKW_COMMON\dbrâ€. You don’t need to beg the files. You already have them.
(1) Install DTS Monaco, activate it, (2) run system configuration, (3) add J2534 adapter, (4) create a project, (5) add control unit modules to the project, (6) close system configuration, (7) create a new workspace from the project : do google or watch youtube. There are many videos.
Here is what others don’t say to you:
8. When you open the workspace, you will see the below screen.
9. Select "MED40†on the quick test tap, and click "Start†to do the quick test. Does it work? It should work. If not, you are doing something wrong. Go back…
10. Do the things on the below image.
11.WARNING. Before doing the coding, save current parameters to a file ("Coding Set†/ "Saveâ€)
12. You need to get access level 0B to do the Euro6 emission related variant coding. Do the following things on the below image.
12. Click on "Do Codingâ€. It will go through.
13. Reset the control unit (Select, Diagnostic Service -> MED40(example) -> Ecu Reset -> [11 01] HardReset Reset, and click on "Transmitâ€)
14. Done.
Don’t pull the trigger until you sure 100% what you are doing.
http://blog.obdii365.com/2021/09/22/disable-mercedes-start-stop-eco-with-vediamo-and-dts-monaco/
Posted by: jean at
06:53 AM
| No Comments
| Add Comment
Post contains 1631 words, total size 18 kb.
September 14, 2021
Question:
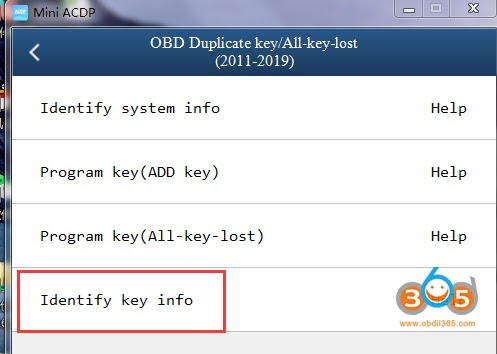
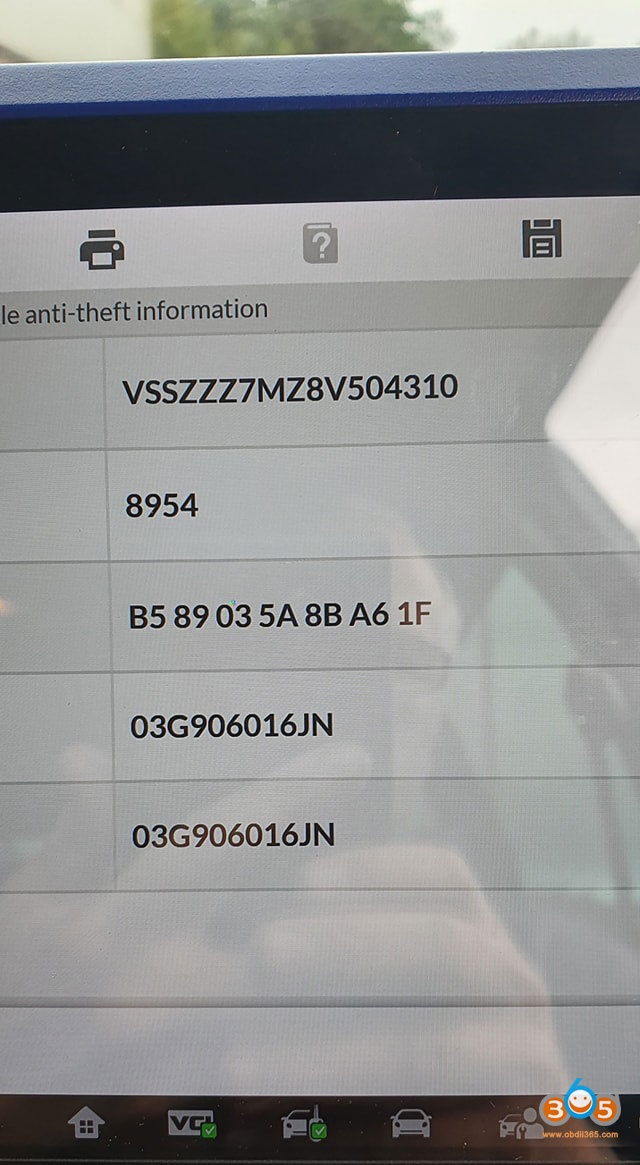
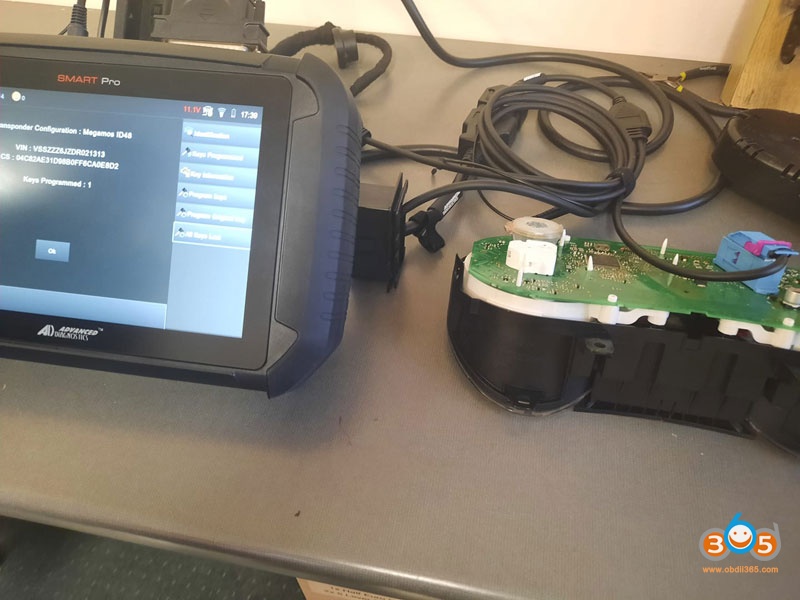
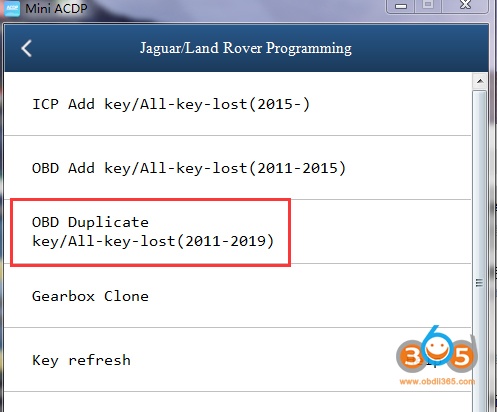
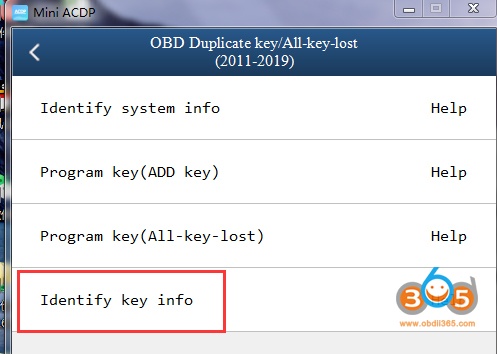
I need to duplicate a new key to a Land rover sport 2015 withYanhua Mini ACDP and module 9. It asks for a special key that can change ID correctly on the BAV key adapter.
Where can I find the aftermarket Landrover/ Jaguar keys that allow the ID to be changed/modified?

Solution:

Posted by: jean at
09:10 AM
| No Comments
| Add Comment
Post contains 146 words, total size 4 kb.
September 13, 2021
Confirmed: Launch X431 scan tool (i.eX431 V,X431 V+etc) allow the user to expand the storage capacity from 32GB to 128GB.
Next part is about how to use TF card to extend memory in X431 V:
Prepare:
- Launch X431 V (for example)
- One TF card: Over 8 gigabyte (GB), with the speed of Class 10 (which is over 10 megabyte per second).
- One screwdriver

Simple procedure:
- take off the plastic protection sleeve from its backside.
- Remove all the screws.

- Set aside the back cover and take out the tablet.
- There is a TF card socket at the right side of the tablet where we insert the TF card.

- Start up the tablet.
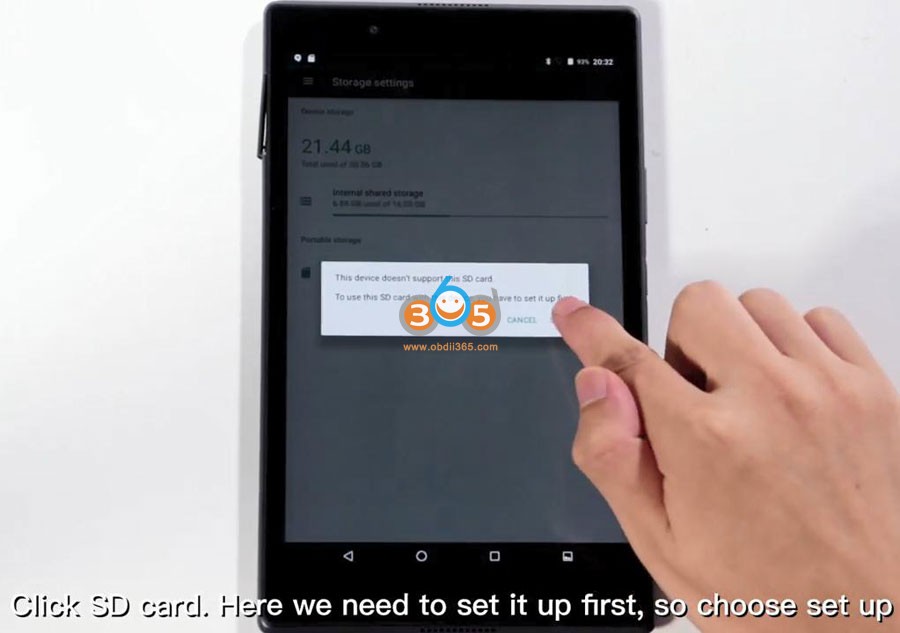
Open "Setting†and choose "Storageâ€.
Click on "SD cardâ€, here we need to set it up first, so choose "Set upâ€.
Choose "Used as internal storageâ€;
Next is "Erase and formatâ€, it takes a few minutes in this step;
Next is to choose "Move nowâ€, it takes a few minutes according to the data size.

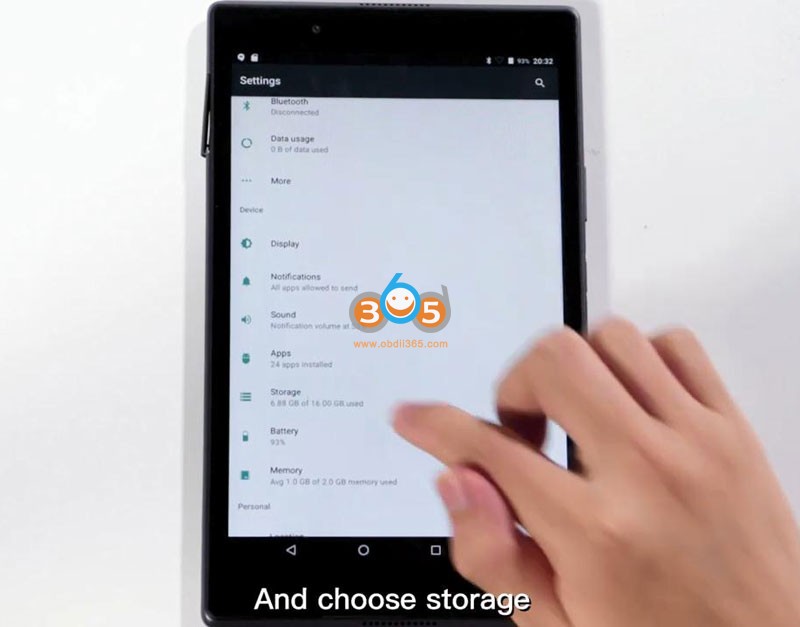
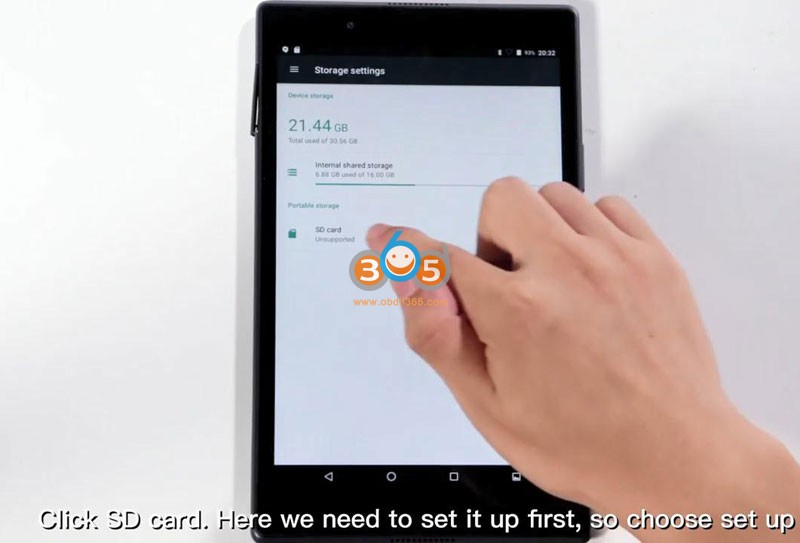


- Job is done.Launch X431 Vsuccessfully used TF card to extend the internal storage, and the procedure is applied toX431 V+and any other X431 tools.
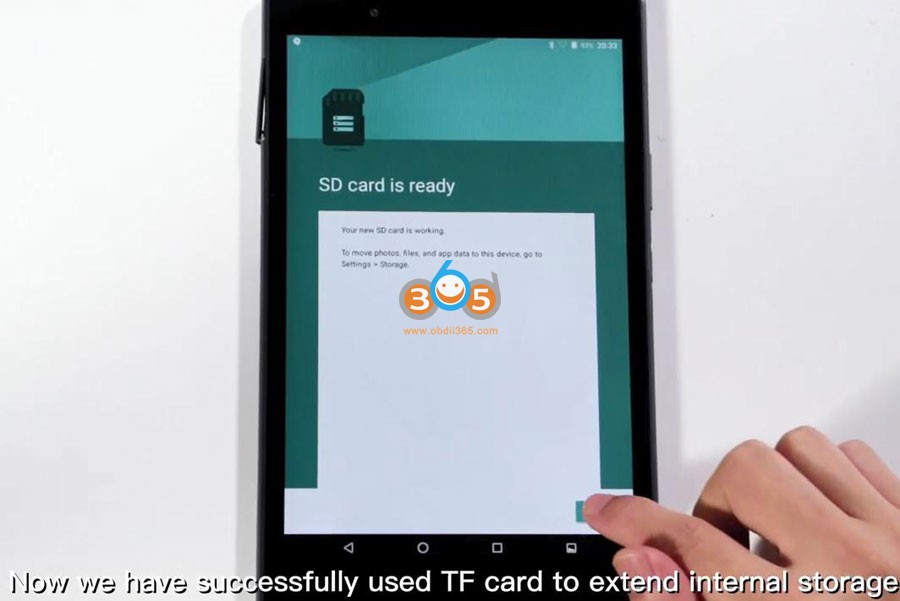
Good luck!
Launch X431 scan tool tech support:www.obdii365.com
Posted by: jean at
07:03 AM
| No Comments
| Add Comment
Post contains 208 words, total size 8 kb.
September 10, 2021
Newer version IDS V123.01 has been tested ok byobdii365.comengineer. Download software and patch here for free.
Software:
Ford IDS V123.01
Mazda IDS V123
Multi-languages: English, German, French, Italian, Dutch, Spanish, Swedish, Finnish, Danish, Norwegian, Portuguese (European) , Portuguese (Brazil)
Operating system: Windows 7, Windows 8, Windows 10
For VXDIAG & VCM2
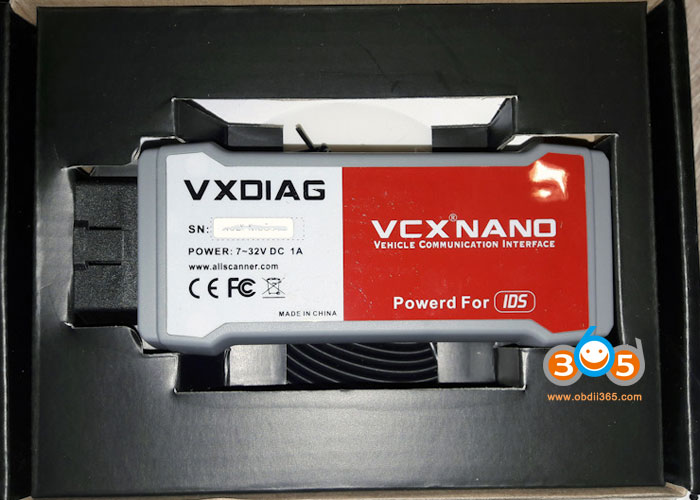
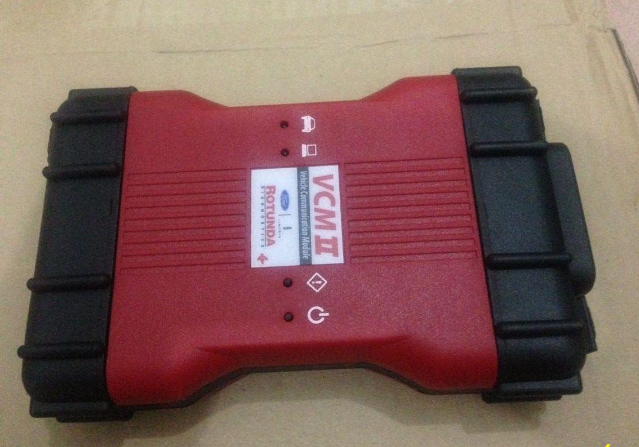
Compatible scanners:
Ford VCM2 cloneusing vxdiag solution
VXDIAG full brands incl. Ford
Free Download VXDIAG Ford IDS V123
https://mega.nz/folder/6dwzgaJR#XW2q1xPdbgKV4XtZQqkB0w
Including
FordIDS-123.01_full.exe
VCI_Software_1.0.0.10.exe
VCI Manager (Ford) 20.11.24.exe
Free Download VXDIAG Mazda IDS V123
https://mega.nz/folder/iQp1UACZ#d4ey2cWHmaEMf9n2dTcTAQ
Including
MazdaIDS-123.00.exe
VCI Manager (Mazda) 20.11.24.exe
Free download IDS patch
https://mega.nz/folder/OV4RRC6B#seCWP6UCzOPWEDYlQxZ1iQ
Install Ford IDS V123
1. Install IDS Software
2. Install VCI_Software_1.0.0.10
3. Install VCI Manager(Ford) 20.11.24
4. Connect VCX device and install idspatch
5. Use idspatch to open IDs and start diagnosis.
Install Mazda IDS V123
- Install mazdaids-123
2. Install VX manager and Ford IDS driver
3. Connect VCX device and install idspatch
4. Use idspatch to open IDs and start diagnosis.
Note:
1. Ford IDS requires VCI Manager driver, Mazda IDS does not.
2. Ford IDS and Mazda IDS need to be installed on separate systems.
3. Don’t install IDS on Home version windows system.

Ford IDS V123
=> Setup:IDS-123.01_full
=> Driver:SVCI_J2534_Ford_Setup_v1.2.3.1
=> VCI:VCI_Software_1.0.1.16
=> Update:
=>Java 32 bit:Download
SVCI Mazda software has not been updated to V123 yet. Contact us if you need V122 version.
SVCI J2534 is a specialized diagnostic device for Ford/Mazda. Support in-depth diagnostics and installation of vehicle control boxes. In addition, SVCI can also support Ford models until 2020 when using FDRS software.
Posted by: jean at
07:46 AM
| No Comments
| Add Comment
Post contains 270 words, total size 6 kb.
32 queries taking 0.1386 seconds, 210 records returned.
Powered by Minx 1.1.6c-pink.

