


October 31, 2023
Here is another easier way to read Ford or JLR SID208 ECU using J2534 devices, pcmflash software and godiag adapters.
Device used here:
PCMTuner dongle(pcmflash software)
Scanmatik pro 2 (or other J2534 devices, openport etc)
Godiag GT100+ breakout box(will work with or without this breakout box, but it is good to check communication)
Procedure:
Video reference:
Step 1: Read Password (via OBD on bench)
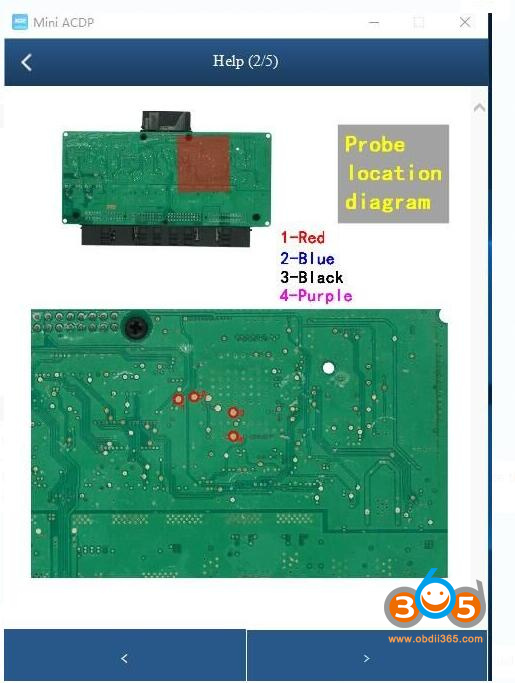
Connect j2534 with gt100 and godiag ecu adapter

Connect SID208 with godiag adapter via jumper cable follow the wiring diagram attached below


Power gt100 with 12v adapter
Connect pcmtuner dongle with PC
NOTE: Must press the switch on Godiag ECU adapter to read ECU.
Run pcmflash software
Select 07 module JLR or Ford SID208 model
Read and Save password.

Step 2: Read and write ECU
Open ECU

Connect ECU withgodiag ecu adapteraccording to the previous wiring diagram


Then solder the chip to the PCB board according to the wiring diagram


Directly connect the red wire to CNF1 on the PCB board


When complete connection, run pcmflash software
Select module 32 Infineon TC1797 EEPROM
Read and upload password read in step 1
Read and save eeprom


Select module 32 Infineon TC1797 MICRO flash
upload password again
Read and save flash data


Done.
Posted by: jean at
06:42 AM
| No Comments
| Add Comment
Post contains 220 words, total size 19 kb.
October 30, 2023
Here is the tutorial on Range Rover Sport 2021 (full LCD cluster) mileage correction with one of the cheapest but very effective device-Godiag GD801 Odomaster(same software as OBDSTAR Odomaster)。
*GD801 Odomaster has the same mileage software asOBDSTAR Odomaster. GD801 software update is one or two months leg behind obdstar. But it is much cheaper.
Procedure:

Record original mileage: 85,210 km
Connect GD801 Odometer with vehicle via OBD socket.
Select DiagProgram->Landrover Jaguar->Land rover Jaguar V31.13->Auto Detect System


This function is available by connecting the server, ensure the internet connection is normal.
Check ECU information
It is JPLA type.


Select Odometer Recalibration

Read current mileage and confirm
Input new mileage, i.e 21,076km and confirm

ifgodiag odomastergives you error request time out 1002, press Retry and try again

The dashboard will turn black then turn on again.

Change mileage succeeds.

Change the new mileage on the instrument dashboard.
Done.
GD801 Odomaster supports the following Jaguar Land rover odometer correction models:

Posted by: jean at
06:18 AM
| No Comments
| Add Comment
Post contains 166 words, total size 12 kb.
October 27, 2023
Problem:
Someone here in the shop hook up myyanhua mini acdpwith an old yanhua cable for FEM and hook up the power to the cable instead to the yanhua and the FEM starts to blink, I assume the fem was damaged and I purchase another fem but when i try to ready it normally with power to the yanhua with the adapter, not with that cable and read fine but after a few minutes that module give me the same problem, can you guys tell me what part of the equipment is damage or damaging fem or what is going on?
You can do a self-test by yourself.
Go to Special Function->ACDP Check->Device IO/DDR Self Check


Check the self test result and report to your dealer.
Posted by: jean at
06:59 AM
| No Comments
| Add Comment
Post contains 131 words, total size 3 kb.
October 26, 2023
The Renault Security Gateway is like a firewall for the ECU’s, you don’t have a full diagnostic functions without unlocking. You only can read out the datastream, the live data from ECUs, you can read out fault codes, but you cannot do special functions or calibrate and ADAS system or other things.
It’s now possible to unlock the security Gateway with Launch X431 diagnostic scanners (forLaunchX431 PAD VIIand PAD V and some advanced European tablets ONLY).
In original Launch X431 you have an option to activate the gateway after purchasing a card with tokens.
This feature allows you to unlock Renault vehicles equipped with Gateway (Clio 5, Zoe 2, Kangoo 3, Captur 2, etc.)
We will show you how to proceed.
First stepyou need to buy a security gateway card from Renault(https://asos.renault.com/) or purchase token card from online stores. And you have to implement it into the diagnostic tool.
A car isavailable with 20 tokens or 50 tokens.
1 token is 3 unlocks within 24 hours per vehicle with one online block. You can do three times. (Unlocking is valid for the same VIN for 24 hours and can be used a maximum of 3 times.)


How to Activate Renault Gateway on Launch X431 PAD V/PAD VII?
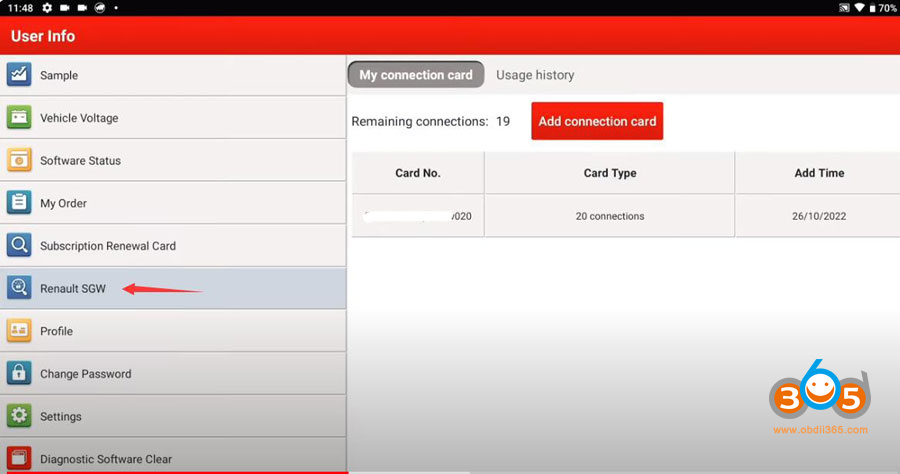
Click on More, then User Info.

and here you can find the Renault SGW (security Gateway).
Tap onAdd connection card.

You can add a new connection card with 20 or 50 unlocks.
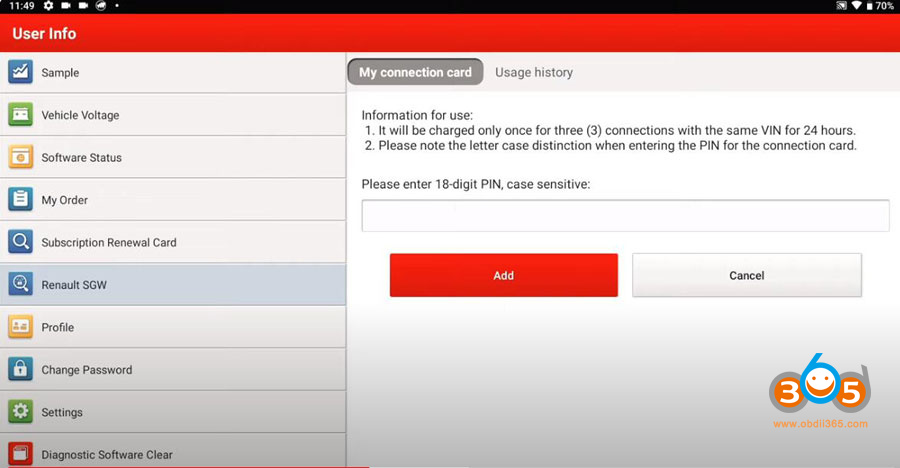
Therefore you have to enter the 18-digit pin and then click onADDwhen you have done.

How to Unlock the Renault Security Gateway?
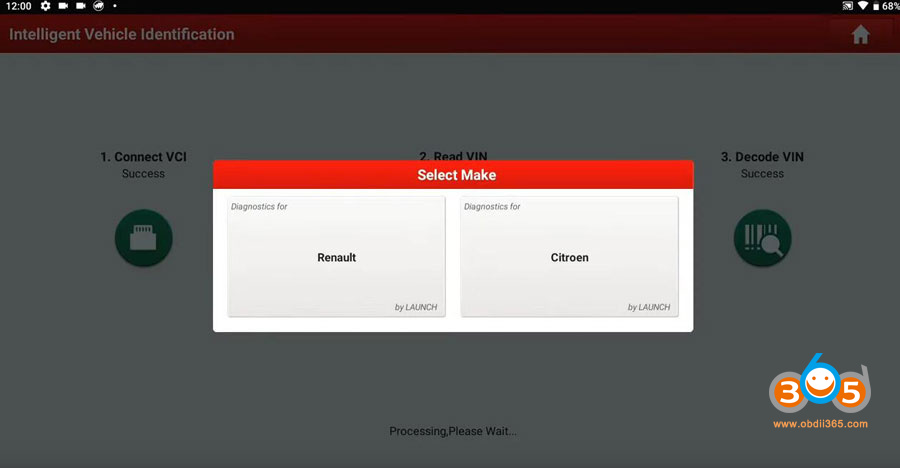
Tap on Intelligent Diagnose.
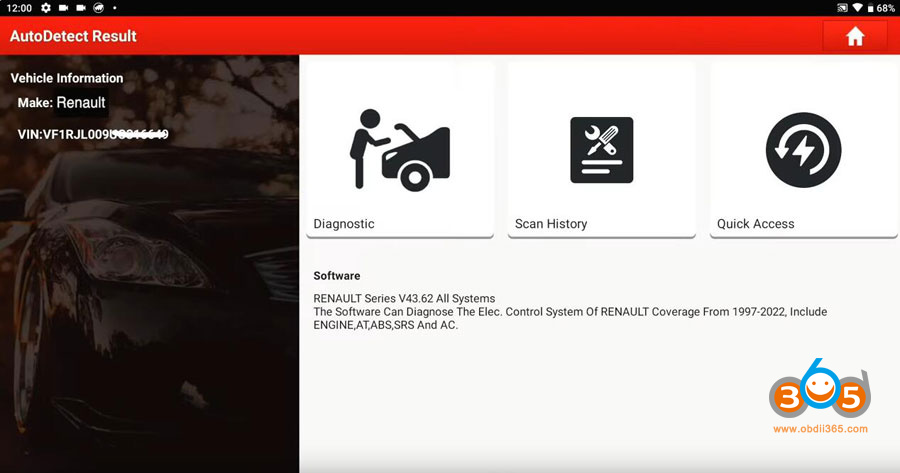
Now the VCI will connect with the car and reads out the vehicle identification number and then he knows which car and brand it is.


Here we tap under the North and then we tap on Diagnostics.
Then tap on Automatic research.
Now the Launch X431 tablet automatically knows that there’s a security Gateway and that it’s locked.


and it says to perform special functions activation configuration tests or other Advanced Diagnostic functions it is necessary to unlock the security Gateway ECU.
So if we not do that we have only the functions for read version information, read dtcs, clear dtcs and read datastreams.
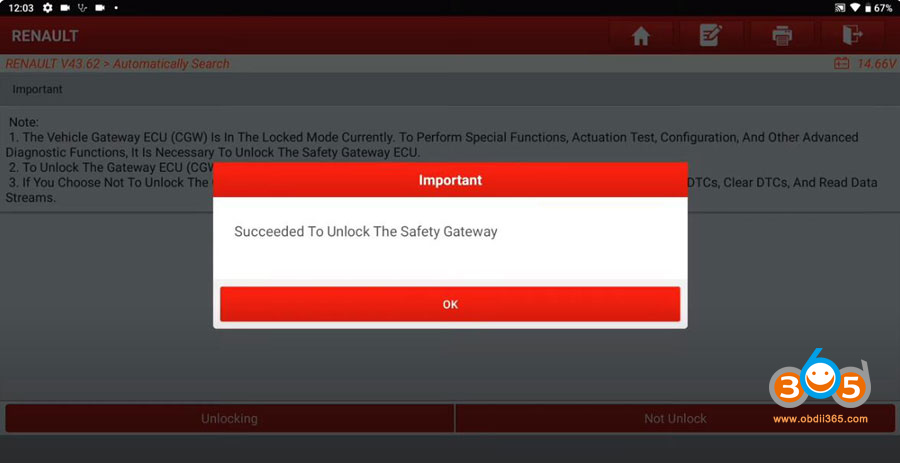
We will unlock it. Tap onUnlocking.We see that thesecurity Gateway is successfully unlocked.
We tap on okay.

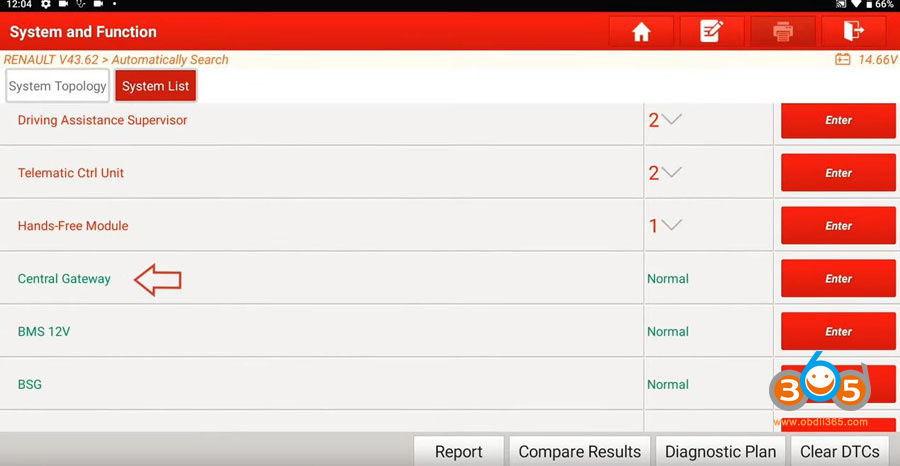
Now we will do a smart detection to read out every ECU and to show our fault codes so the see red ones are with a fault code and the green ones are without fault codes.

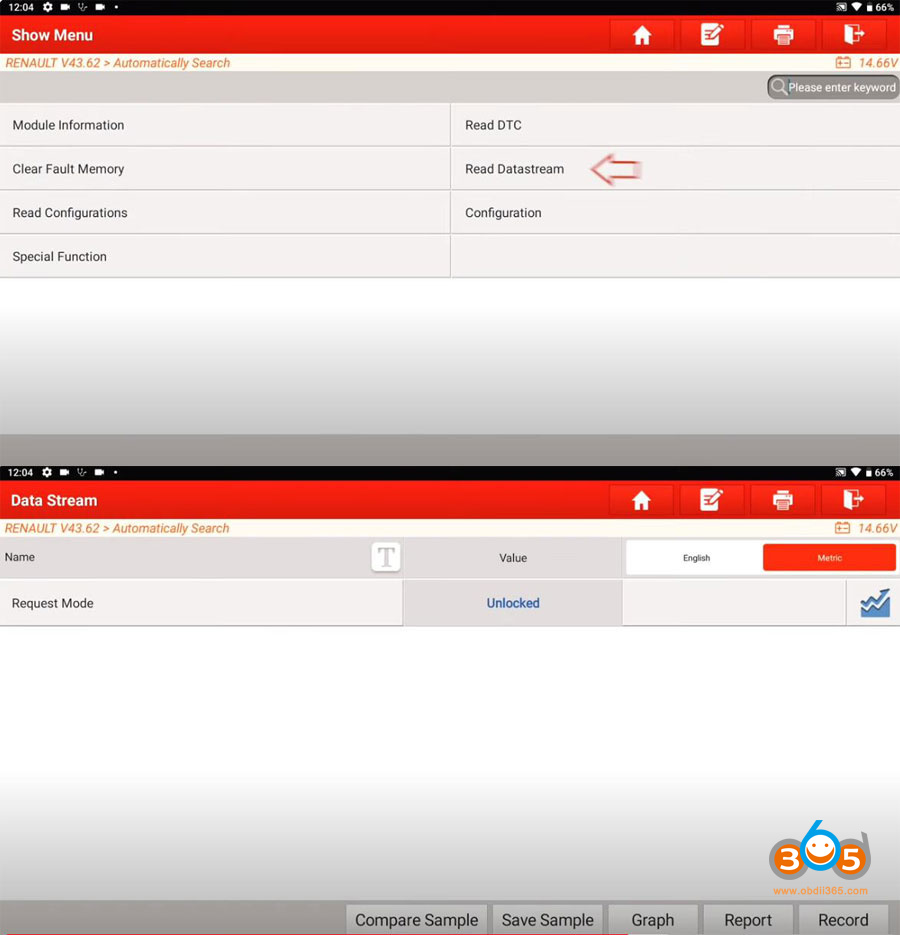
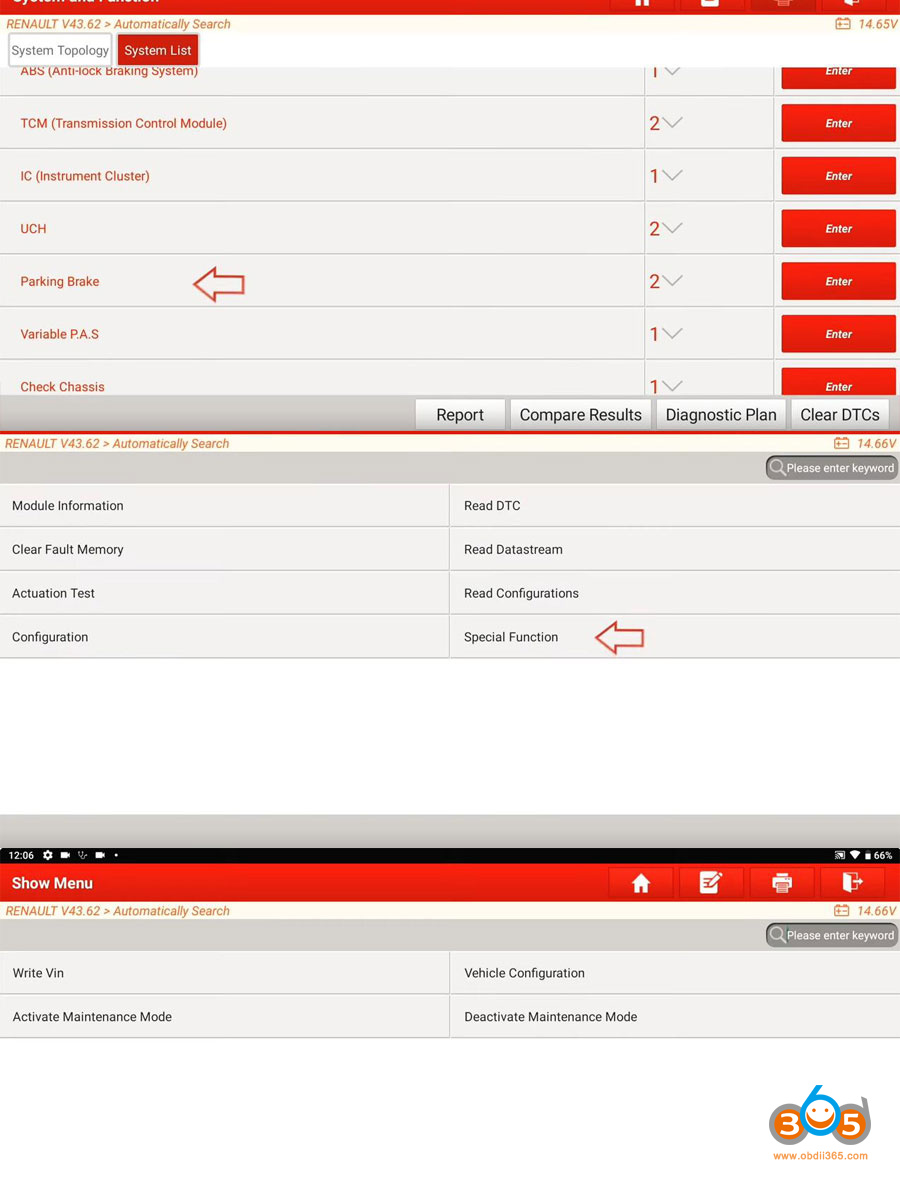
No we go to System list and we’ll choose the Central Gateway ECU and there we can see that the security Gateway is unlocked.
We see it in the data stream and a request mode and we see that it’s unlocked.


A typical process in the car workshop is to set the pack break in the maintenance mode and we will do that now.
So therefore we have to go in the parking brake and we choose the special functions.
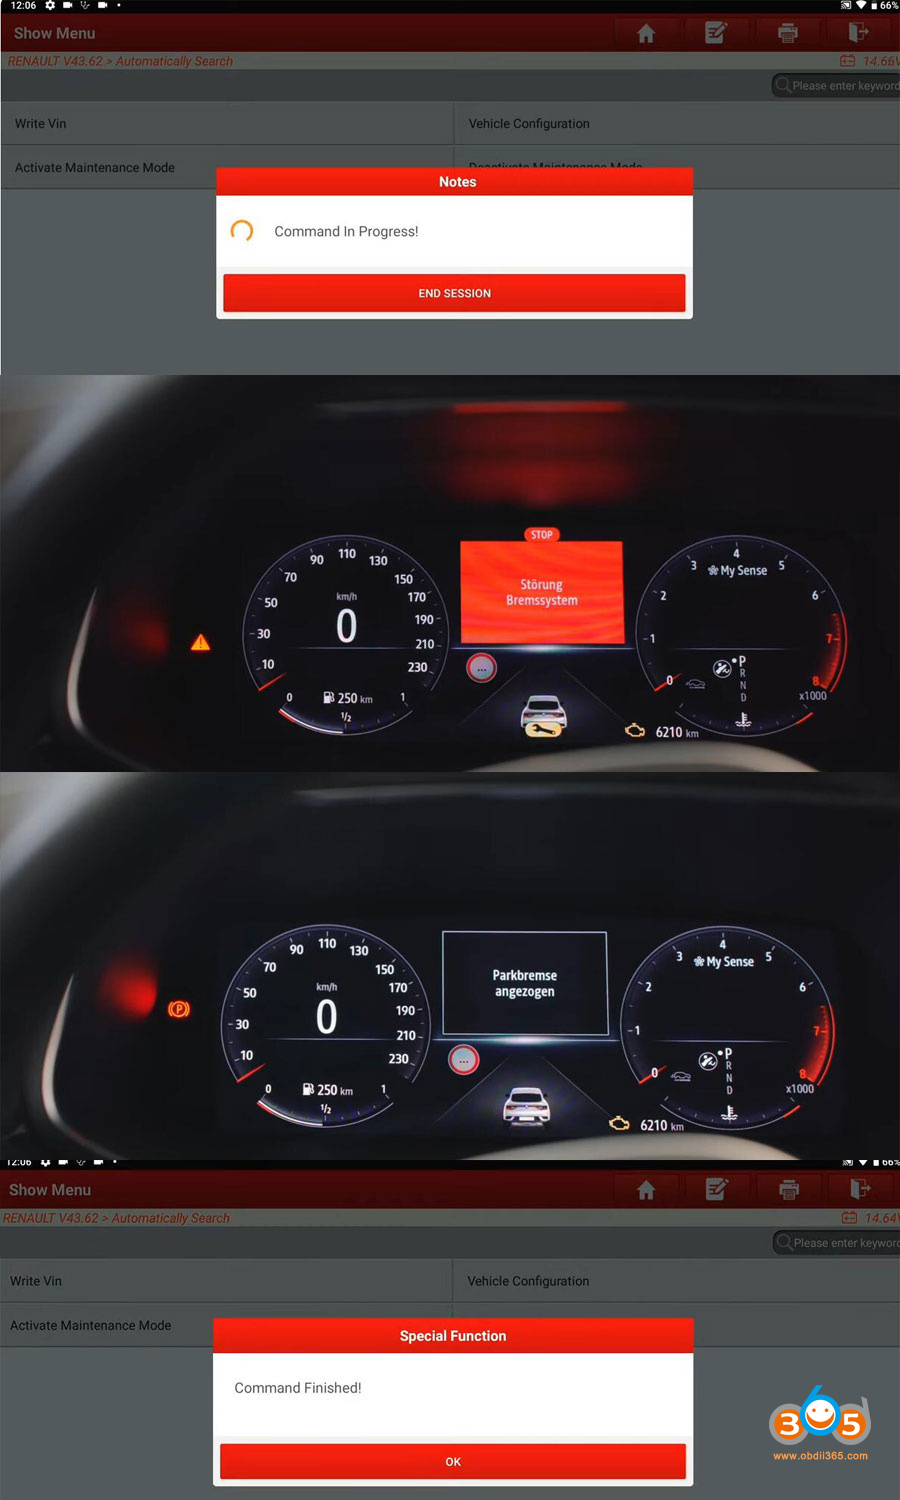
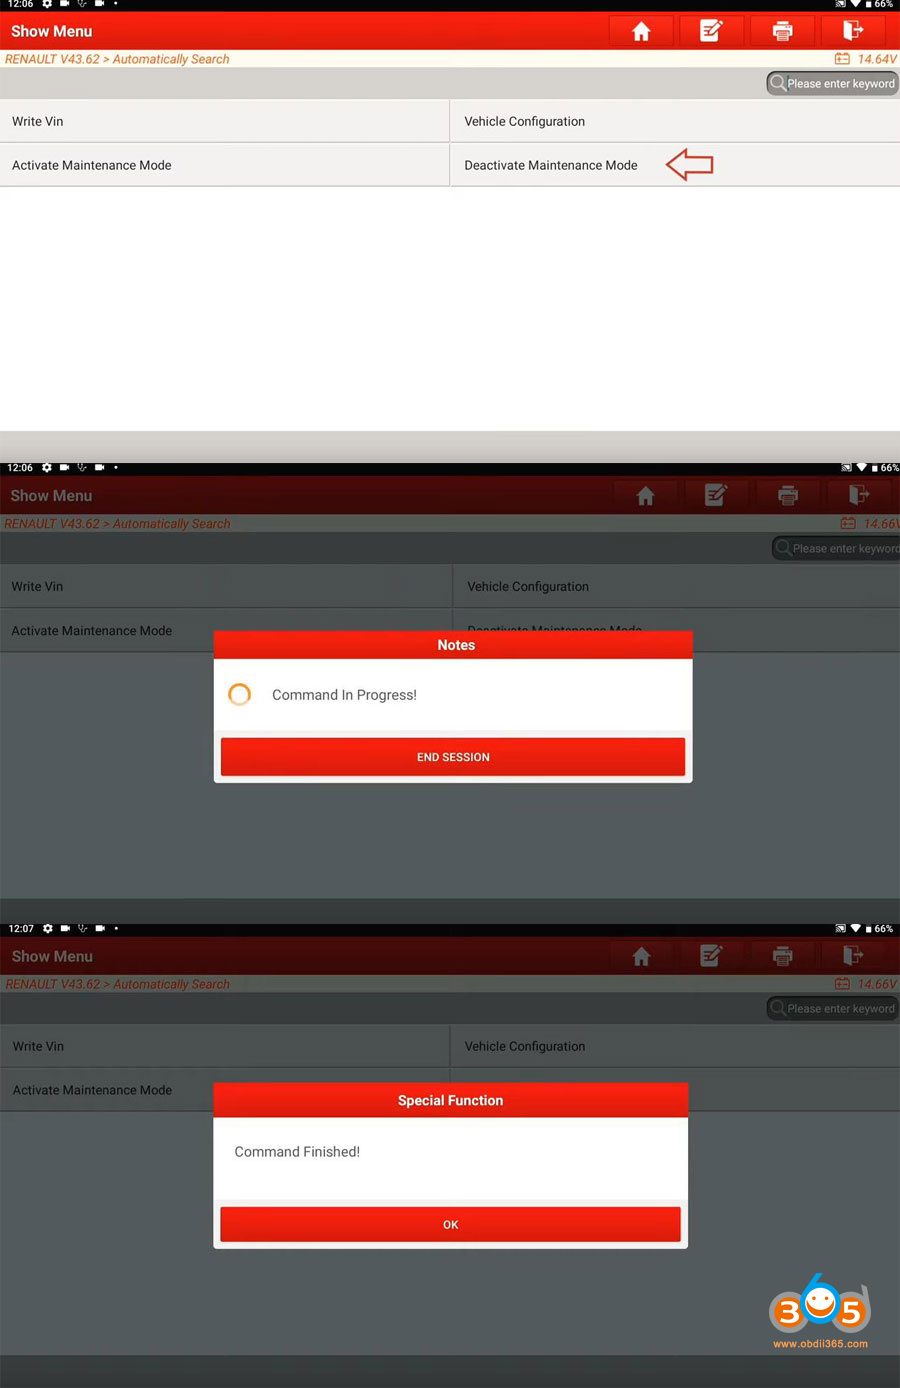
There we have the activate maintenance mode and deactivate maintenance mode.
so and we will activate it.
Now it activates the maintenance mode at the parking brake.


So the next step we will deactivate the maintenance mode after we’ve finished the maintenance at the or the service at the parking brake.
so if we click on OK and now it’s finished.

That’s a function that you cannot do if the security Gateway is locked.
You can’t also do an ADAS calibration or other special functions or calibration or coding in the ecu’s.
To use the full performance ofLaunch x431devices it’s very useful to unlock this security Gateway function.
Posted by: jean at
07:37 AM
| No Comments
| Add Comment
Post contains 619 words, total size 20 kb.
October 25, 2023
How to solveYanhua Mini ACDP2no device found problem when connecting via USB on PC?
Problem:
Connect ACDP2 to PC via USB cable.
Open the PC-ACDP2 software and wait for dozens of seconds but the device is still not connected.


Click onSettings->PC Bound to ACDP-II device
Still cannot see device information


Solution:
The problem can be solved by modifying the device IP.
OpenNetwork & Internet Settings

Select Change adapter options

If don’t know which network is device network, unplug the USB interface of ACDP2, when inserting USB interface you can see the device network


Right-click device network and click on Properties
ClickInternet TCP/IPv4


Enter device IP address and DNS (your local network IP and DNS)


Press OK to save the setting
Wait for a few seconds, thenYanhua ACDP2will automatically connect.

Posted by: jean at
09:53 AM
| No Comments
| Add Comment
Post contains 140 words, total size 13 kb.
October 24, 2023
Problem:
Trying to program an Autel ikey universal key to a 2018 ford edge withAutel KM100, anyone see this message before?
Error "The Universal Key Frequency is Not Supported”

Solution:
There are high frequency and low frequency keys when trying to generate Ford’s.
Need the 900mhz high frequency Ford style universal ikeys. You’ve got the low frequency one in there; replace with a high frequency one (with H or A as the 6th digit).
OnlyIKEYFD005AHandIKEYFD004AHikey remotes can be used to generate 868Mhz-915Mhz remote.


Posted by: jean at
06:28 AM
| No Comments
| Add Comment
Post contains 91 words, total size 3 kb.
October 23, 2023
Problem:
I got this yesterday withYanhua mini acdp 2, and fem died.
I’ve tried to reprogram fem, no luck. Internet connection was okay also. Any solution?

Solution:
ACDP2 gives you option to restore eeprom and coding data.
Menu path: BMW->FEM/BDC-> Mode 1: Add key- >FEM/BDC initial programming process- Method 2-> Recover EEPROM/Coding data


Perform Step 6: Recover EEPROM Data and Step 7: Recover Coding data.
Posted by: jean at
07:11 AM
| No Comments
| Add Comment
Post contains 74 words, total size 6 kb.
October 20, 2023
Obdii365.comhere provides Volvo Premium Tech Tool PTT 2.8.21 Version for all people who need it and completely free.
Volvo PTT 2.8.1 Software Free Download
No keygen. Does not need activation.
Version: 2.8.21
Database: Development
Last updated:
APCI (-M) 9/7/2021
APCI+ (-A):0.5.1.0
APCI+ (-M):0.5.1.0
VCADS Pro 2.8.0.38
Compatible device:Volvo VOCOM, VOCOM II
Operating system: Windows 10 or later

How to Install Volvo PTT 2.8.21 on Windows 10?
Turn off anti-virus program before installing software.
Enable network connection during installation.
Don’t need User ID. Don’t need activation.
Posted by: jean at
07:24 AM
| No Comments
| Add Comment
Post contains 93 words, total size 2 kb.
October 19, 2023
How-to: program 2021 Toyota Highlander All Smart Keys Lost usingAutel MaxiIM KM100by OBD.
The procedure is the same as 2021 RAV4.
Select Immobilizer->Toyota->Manual Selection->USA->Highlander->2020-2023->Smarrt Key->Control Unit->Keyless System (CAN)


Back up IMMO Data->Bakcup immo data via OBD
This function is used to back up EEPROM data of the smart box ECU which can be used to perform IMMO related functions without PIN. This function supports models with 8A-AA smart keys as of 2018 equipped with TMLF15 smart ECU.

Ensure network connection is good.
Turn the ignition off and turn the hazard warning lamps on and off once.
Turn off the bluetooth function of the device and connect VCI to the diagnose tool with USB cable otherwise the function may fail
Backup immo data successfully and save data

Select Generate analog key
KM100 has built-in emulator, so you don’t need APB112.
select the EEPROM Data just backed up
Generate analog key completed


use the analog key as the registered key to perform Add key function.
Select Add smart key function
Press Start button
Confirm VIN
Turn the ignition off and turn on emergency indicators
Upload eeprom data
KeepAutel KM100close to the start button, the buzzer will beep once.
Keep the new key close to the start button, buzzer will beep twice
Turn on ignition
Put a learned smart key close to the START button. When learning is completed, you will hear buzzer beep once.
Learning completed, test the new key.


Posted by: jean at
08:31 AM
| No Comments
| Add Comment
Post contains 248 words, total size 11 kb.
October 18, 2023
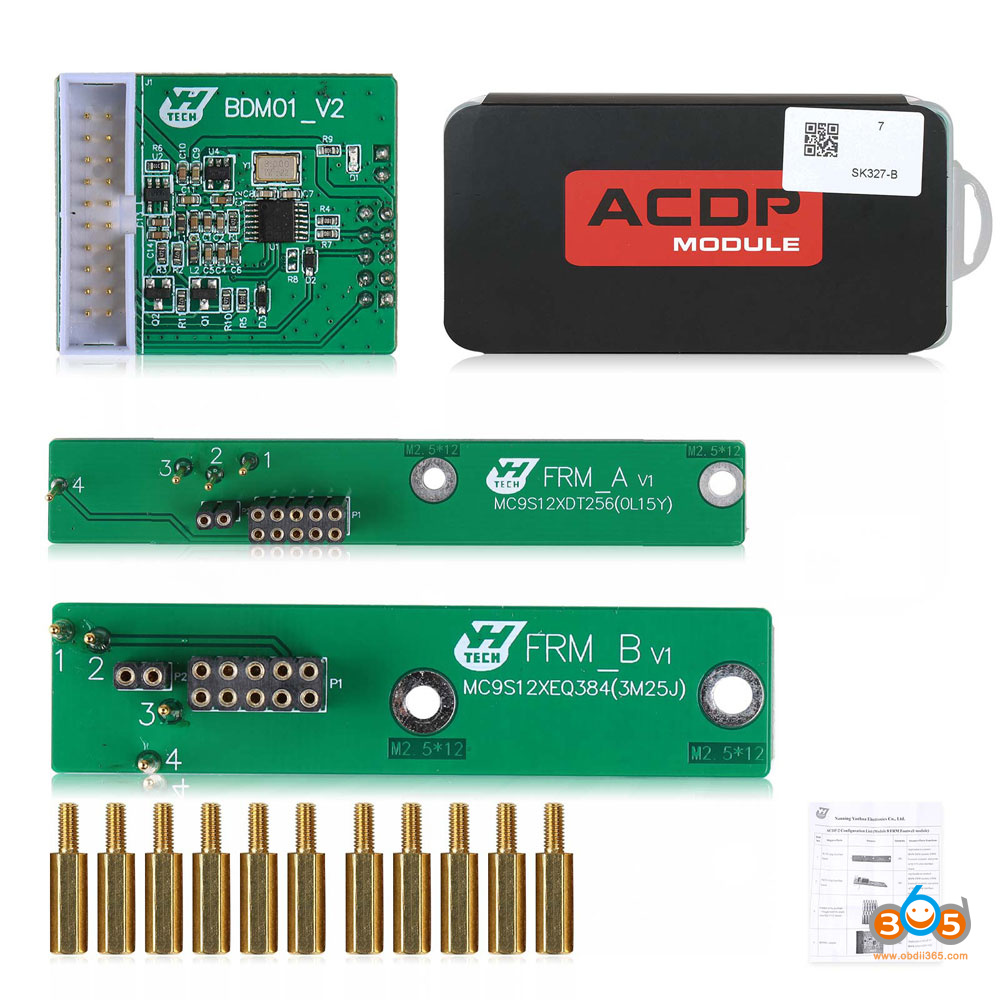
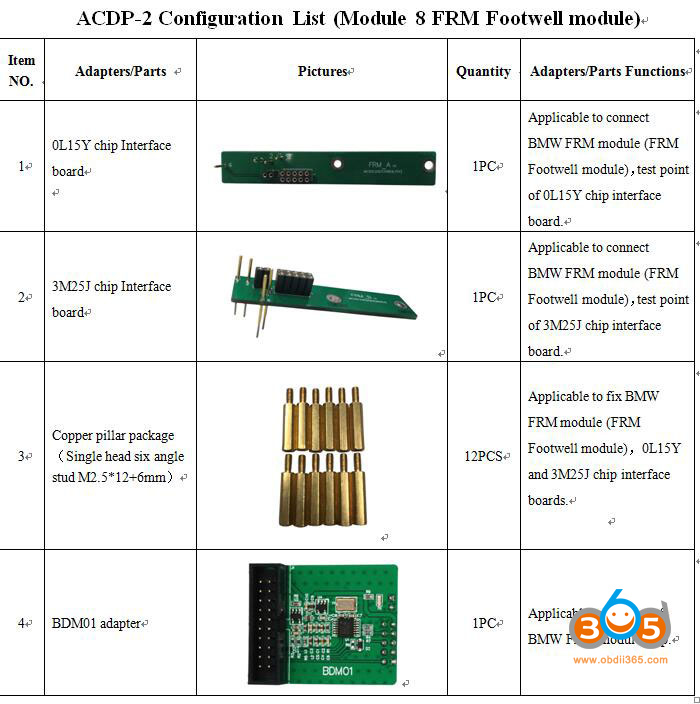
Yanhua Mini ACDP2BMW FRM Footwell Module 8 is different from that of ACDP1.
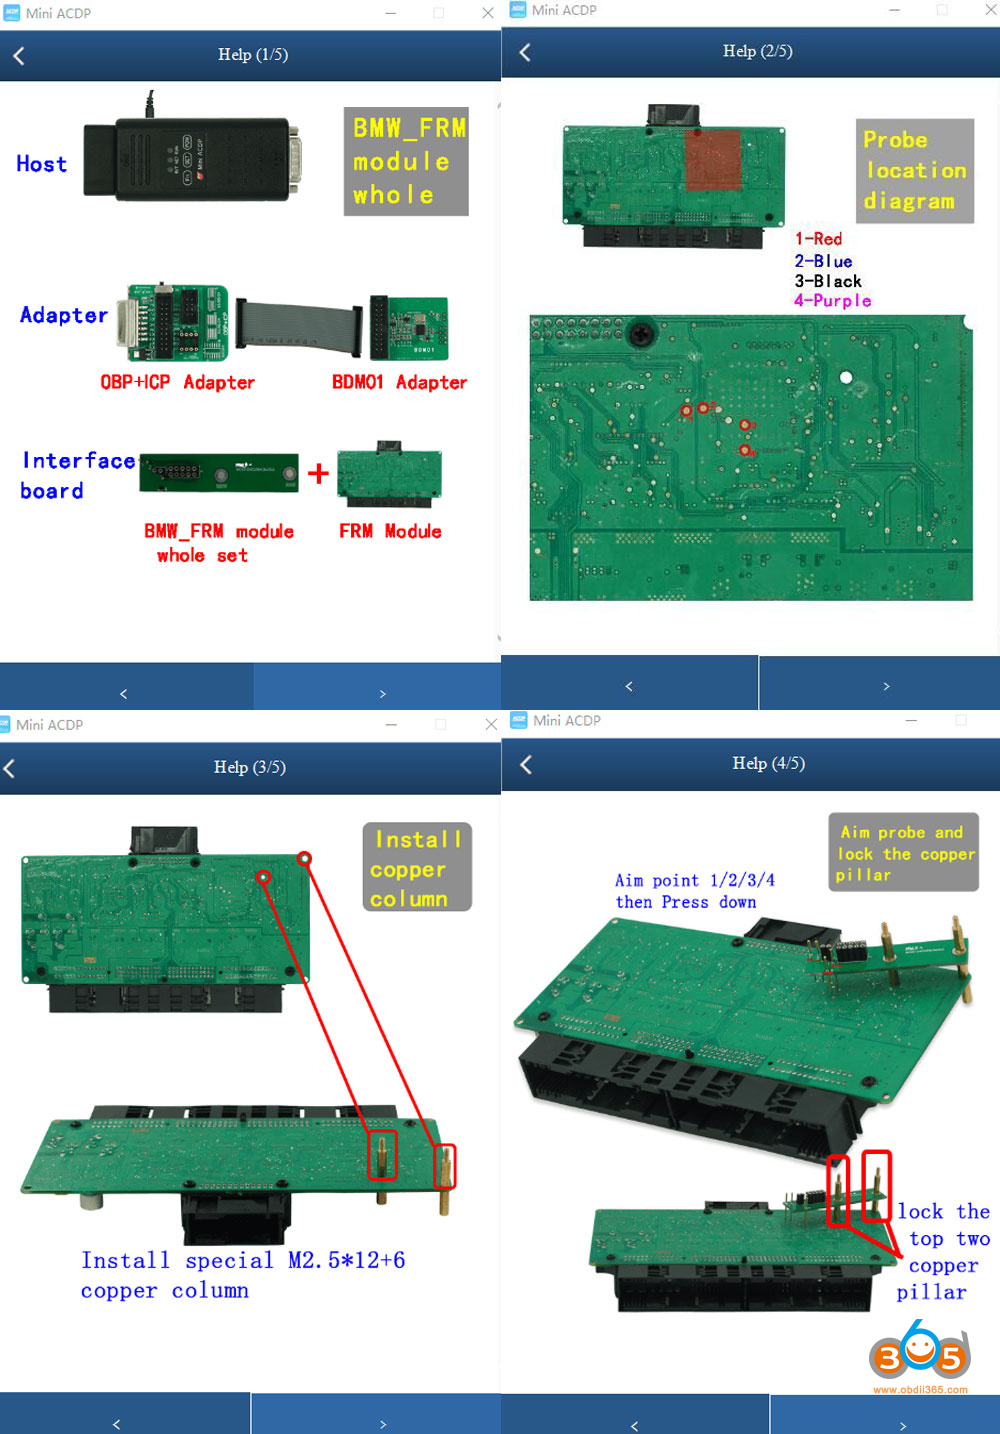
ACDP2 Module 8Package List
ACDP 1 Module 8Package List
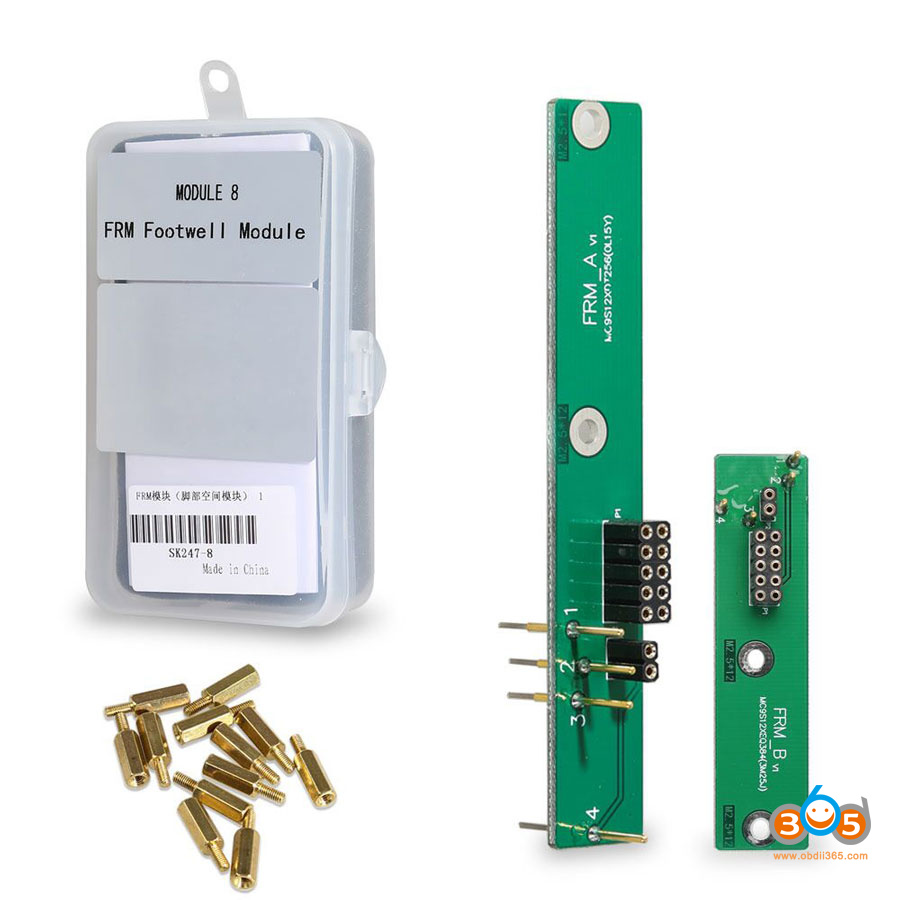
ACDP2 Module 8 is a standalone module, to read and write FRM module, you will need ACDP2 Host+ Module 8.
But if use ACDP1, you will need ACDP1 host+ Module 1 + Module 8 for FRM repair.
Their wiring diagrams are different.
ACDP 2 FRM wiring diagram
1L15Y MC9S12XDT256
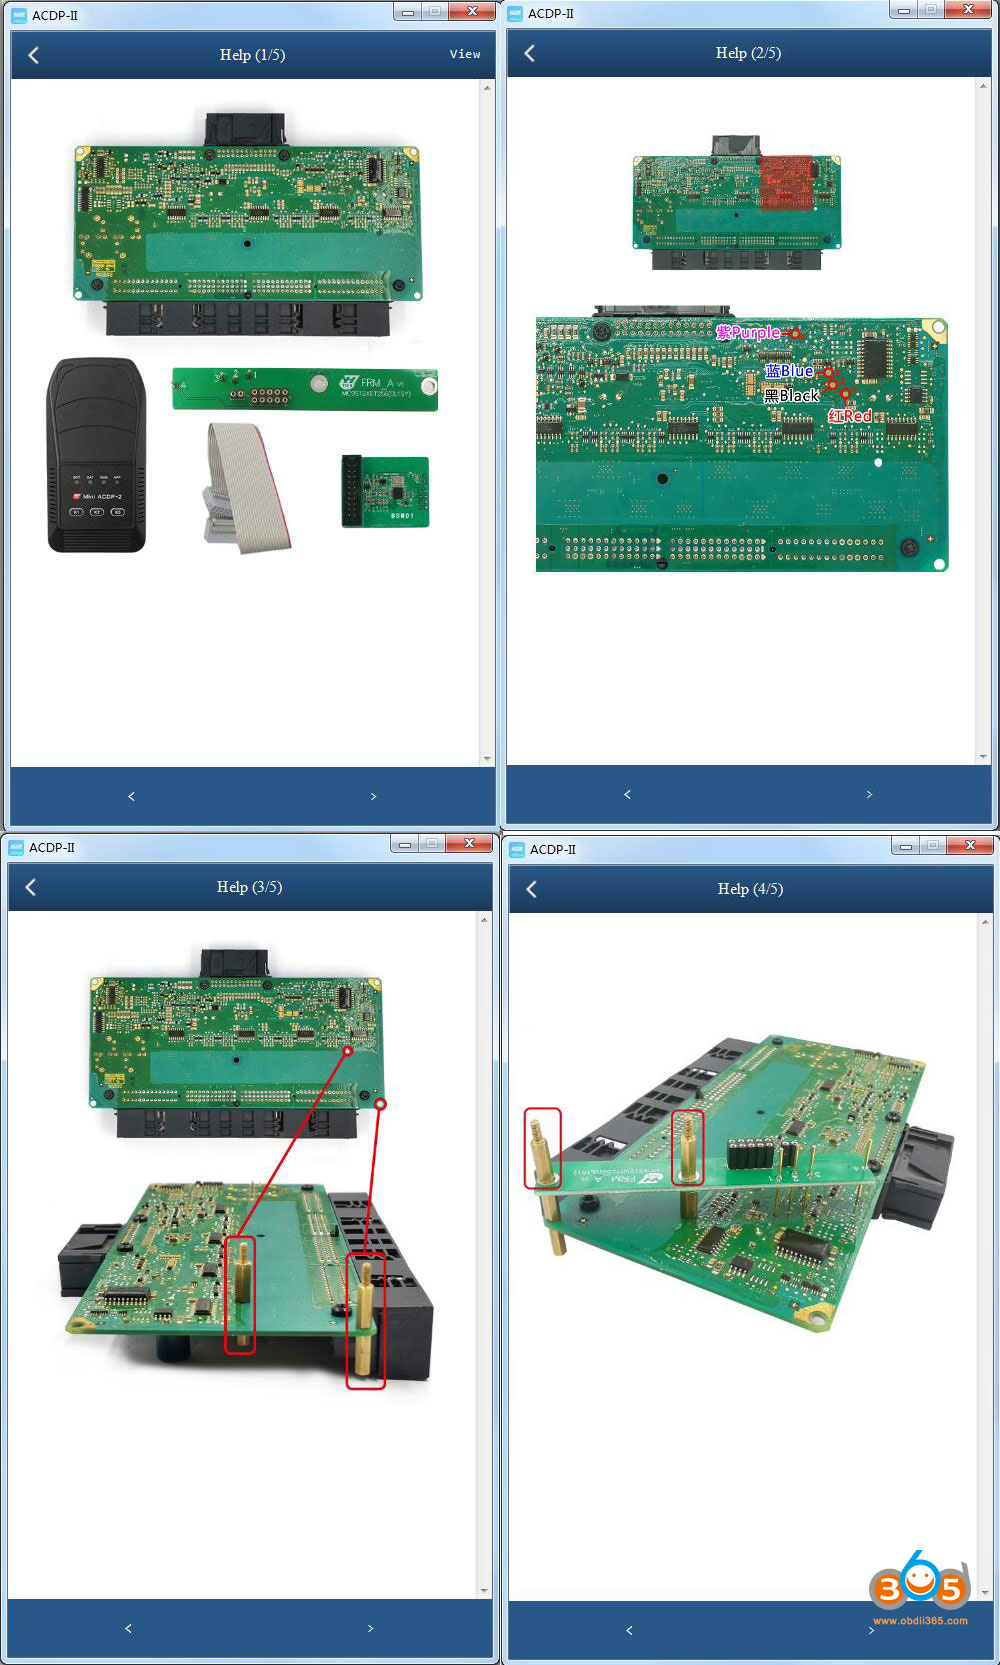
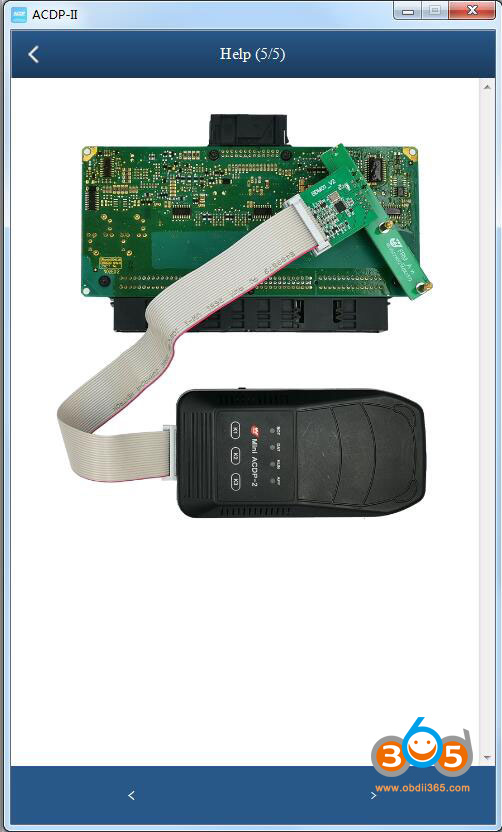
ACDP2 3M25J MC9S12XEQ384 Wiring Diagram
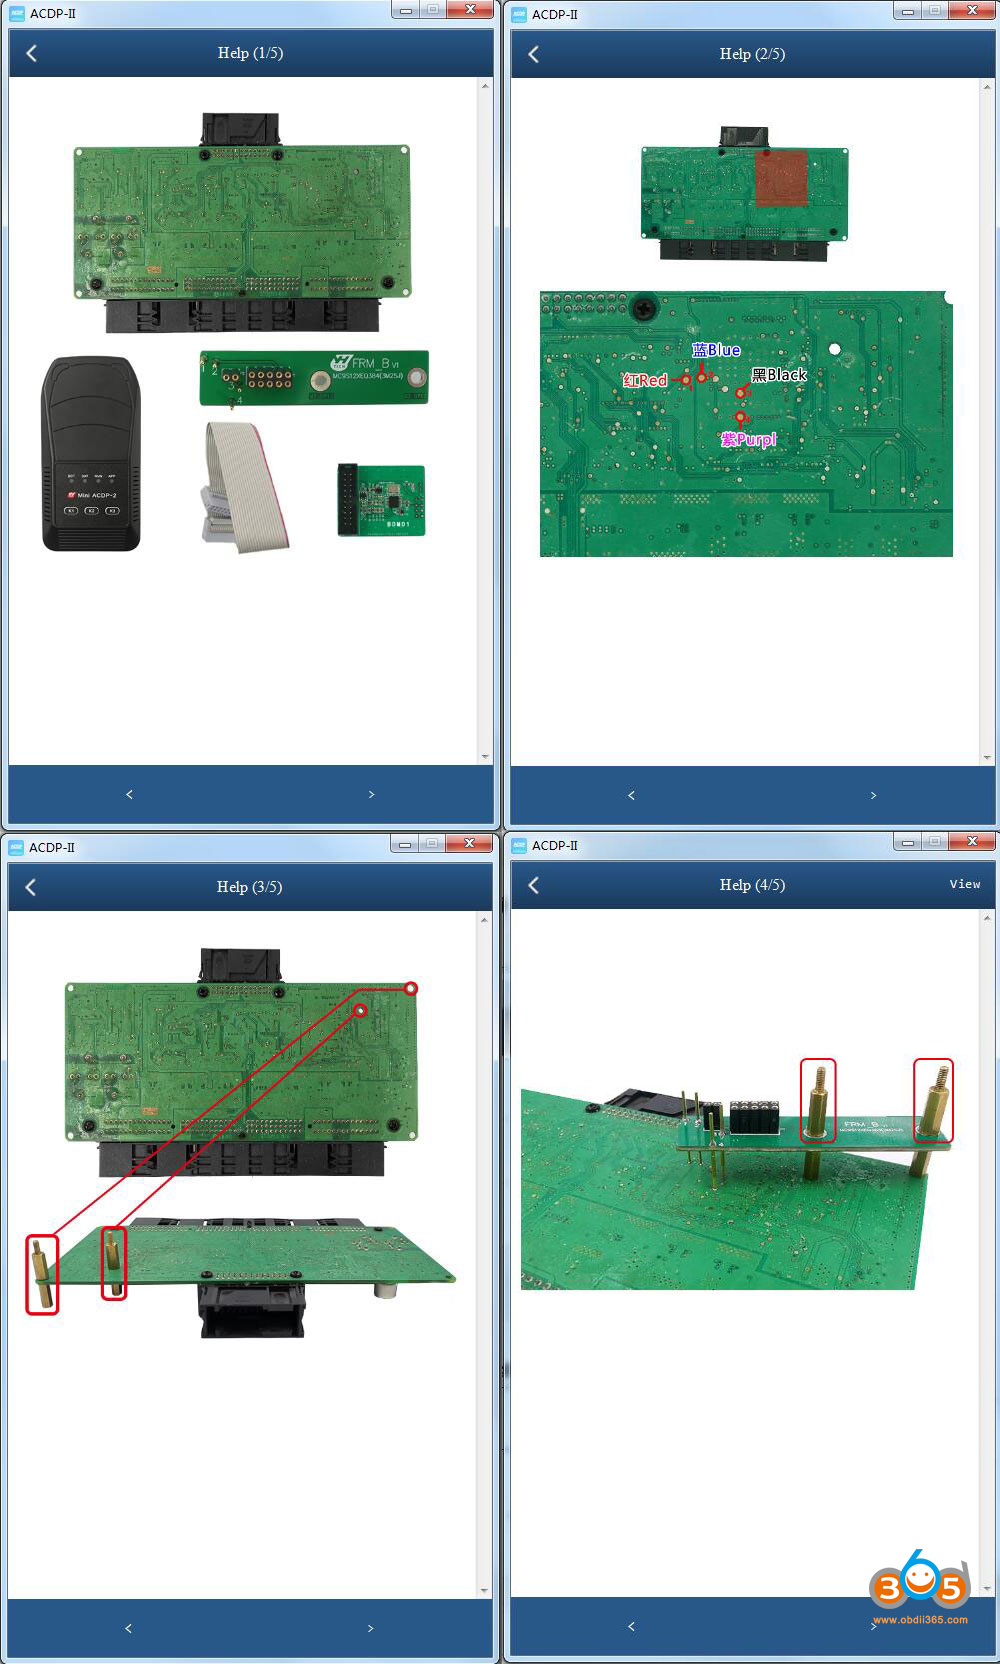
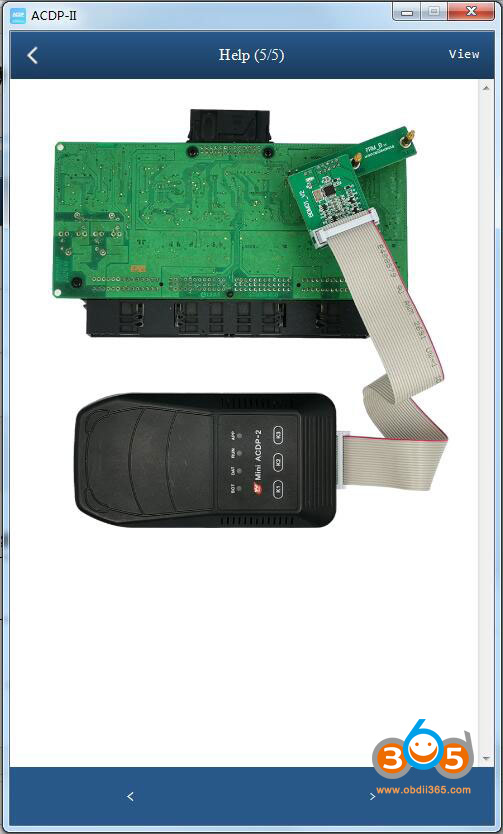
ACDP1 Wiring Diagram
1L15Y and 3M25J are the same.
Need OBP+ICP adapter and BDM01 Adapter from module 1. That’s why you need to bind module 1 with module 8.

As for read and write procedure, ACDP1 and ACDP2 are the same. Check
FYI:
You can do FRM function without module 8 for either ACDP1 or ACDP2, just do the welding way.
This way you need to have A500 license frommodule 1.
soldering wiring diagram
Posted by: jean at
07:13 AM
| No Comments
| Add Comment
Post contains 169 words, total size 8 kb.
32 queries taking 0.147 seconds, 210 records returned.
Powered by Minx 1.1.6c-pink.

