


October 17, 2023
CG FC200ecu programmer released new software update on October 16th, 2023. Adding GPEC3 GPEC2 GPEC2A GPEC4 E98 and more other ECUs.
V1.1.6.0 NEW
(2023.10.16)
1.Added CONTINENTAL TC17 type engine computers (BOOT mode):SID310, SID807EVO, EMS3110;
2.Added CONTINENTAL SPC5xx type engine computers (BOOT mode):GPEC3, GPEC2A, GPEC4, GPEC4LM, GPEC2;
3.Added CONTINENTAL TC17 type engine computer (BOOT mode):SIMOS8.2x, EMS2511, EMS24xx, EMS2205, SDI9, SDI3, SDI4, SDI10.x, SDI21.x;
4. Added new GM type engine computer: GMAcDelco E98;
5. Added the Flash verification function of the gearbox computer: DQ380, 8HP, 7DCT300, 9GT-VGS-NAG3;
6. Added PFlash verification function for CONTINENTAL TC17 engine computer;
7. Added the function ofindependently reading and writing DFlash/PFlash/ExtEEPROM/ExtFlash: MSD80/MSD81/MSD85/MSD87/MSV90/SIM271KE;
8. Fix some BUGs and optimize software performance.
Free download CGFC200new software

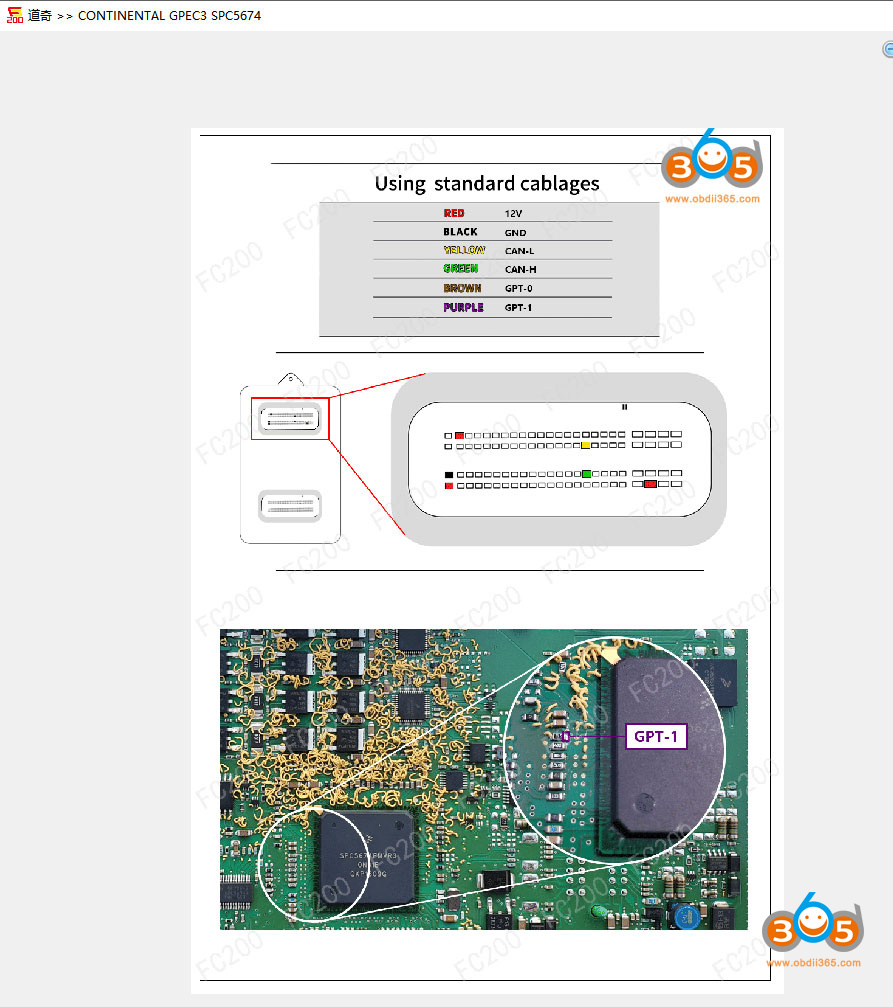
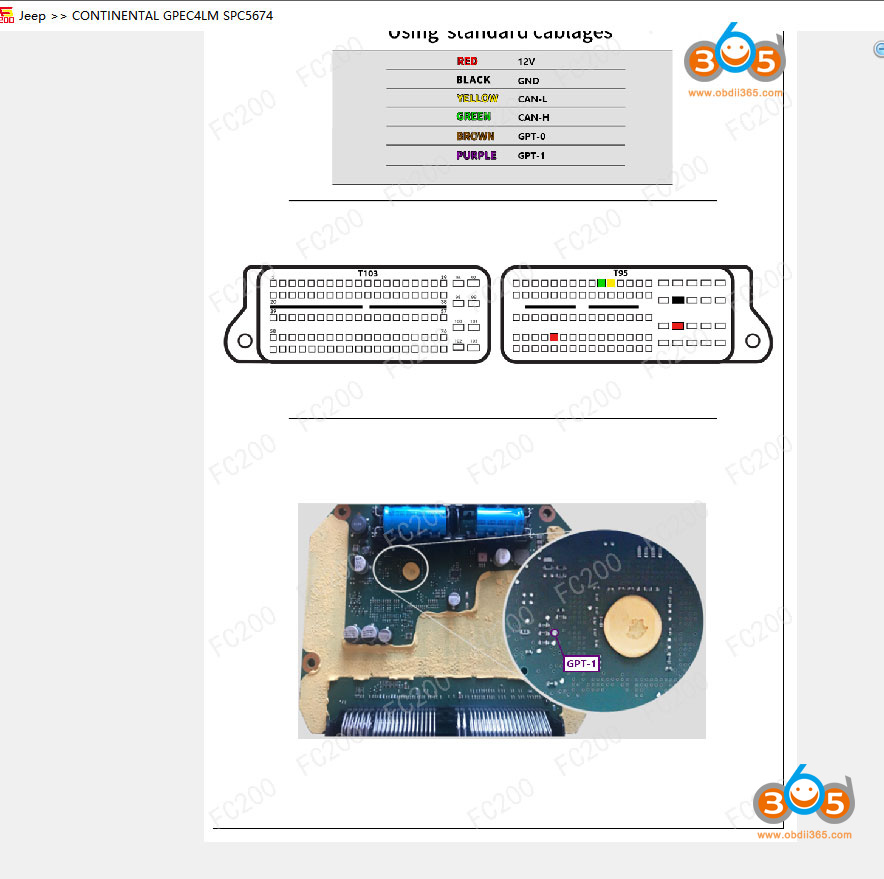
Some wiring diagrams of this update

ACDelco E98

Continental GPEC2 MPC5566

Continental GPEC2A MPC5674

Continental GPEC3 MPC5674

Continental GPEC4 MPC5674

Continental GPEC4LM MPC5674
Posted by: jean at
07:31 AM
| No Comments
| Add Comment
Post contains 149 words, total size 8 kb.
October 16, 2023
How to: install and activate VAG VW Audi Skoda Seat ODIS Engineering software V17.01?
Where to get ODIS-E V17.01?
ODIS E V17.01 can be downloaded freehere.
You can also get a U disk containing both ODIS-E V17 and ODIS-S V23:
https://www.obdii365.com/wholesale/vw-audi-v11-software-u-disk.html
Does it require activation?
Yes, we provide1 time free activationby keygen.
What device does it work with?
• VAS6154 genuine devices
• Multi J2534 Passthru (SVCI 6154, Openport 2.0,Godiag J2534,Xhorse MVCI Pro,VNCI 6154A,VXDIAG VCX SE 6154,Autel MaxiFlash JVCI,JVCI+,MaxiFlash Elite,MaxiVCI V200etc)
What’s the operating system requirement?
Win10 (ODIS-E V17 works only on Windows 10 or more)
RAM>4GB
How to Install ODIS E V17?
Step 1: Install ODIS-E V17 Setup
OpenODIS-E 17.0.1folder
OpenODIS-Engineering_17_0_1folder
RunOffboardDiagSetup-Engineering-17_0_1
Select Setup language

Press Next
Select diagnostic interface as VAS 6154 and press Next

Then software will ask license for activation
Open license.dat fromODIS-E 17.0.1/Patch & Licensefolder


Select Create a folder in the start menu and create shortcuts for all users
Installing Setup until finished

Step 2: Activate ODIS-E
RunPatch & Licensefolder, open 17.0.1 patch folder
Copyall three files from 17.0.1 patchfolder and paste toWin11ProW X64/Program Files/OEfolder


SendOffboardDiagLauncher_protectedfrom Win11ProW X64/Program Files/OEto desktop

RenameOffboardDiagLauncher_protecteddesktop shortcut asODIS E 17.01and run it

ODIS-E will ask for an activation key
Send the hardware ID toobdii365.comengineer and we will send you back the activation key
Input activation key and press Register

Step 3: Install PostSetup
OpenPostSetup_202300619.isoon ODIS-E 17.0.1 folder as Winrar file
Extract PostSetup 202300619 file to Disk E

In ODIS-E 17.01 if we select file location to E:/ODIS_Engineering, it says no valid software configuration.

We do this.
Create a new ODIS Engineer 17.01 folder on disk E, copy ODIS Engineering folder to this new folder.
Select local directory as file:E:/ODIS_Engineering 17.01/, it should be fine.


Select PostSetup language
Wait until postsetup installation finished

Step 4: Exyatct VWMCD
UnzipVWMCDfile in4.VWMCDfolder
and extract toC:/ProgramData/OE/MCD-projects-E/VWMCDfolder

Step 5: Install Driver.
The U disk contains both ODIS-S and ODIS-E software. Drivers are in the ODIS-S 23.0.1 folder.

Install the corresponding driver like Step5 here.
How to Install and Activate ODIS-S V23?
If already installed driver for ODIS-S, don’t need to install same driver for ODIS-E again.
Step 6: RunODIS-E 17
Run ODIS-E 17.01 on desktop
Software is ready to use.

Posted by: jean at
07:45 AM
| No Comments
| Add Comment
Post contains 370 words, total size 19 kb.
October 13, 2023
BothAutel AP200andThinkdiagcannot do odometer correction function.Xtool Anyscan A30MBluetooth obd2 scanner does change mileage for many cars by OBD.

Here is an example of Hyundai Tuscon 2020 mileage correction using A30M scanner.

Original mileage: 26,000 km
Procedure:
Download and install Anyscan App on your mobile phone or tablet.
Connect A30M adapter with vehicle via OBD socket
Go to Special function->Instrument Cluster->Hyundai->Tucson-> D70F3536 (2016)->Mileage adjustment


*It will correct mileage for many Hyundai models and also MB91 processor.
Turn on ignition but not start engine

Save original mileage data
Xtool A30Mwill show original mileage in both KM and Mile.

Check and confirm original mileage
Press Modify mileage (KM)

Input mileage you desired and confirm, i.e 28,938km.

Mileage correction completed.

Check mileage on dashboard. KM has been changed successfully.
You can keep AP200 for simple immobilizer, thinkdiag for diagnostic and A30M for odometer (A30M won’t do keys). They are all cheap bi-directional obd2 scan tools for DIYers.
Posted by: jean at
07:47 AM
| No Comments
| Add Comment
Post contains 161 words, total size 12 kb.
October 12, 2023
Here comes the OTOFIX D1 series universal diagnostic scanners comparison.
OTOFIX D1 LitevsD1vs D1 Pro vs D1 Plus vs D1 Max vs EvoScan Ultra


Click on images to enlarge or download PDFhere.
Posted by: jean at
06:42 AM
| No Comments
| Add Comment
Post contains 36 words, total size 4 kb.
October 11, 2023
The solution here is intended to solve the Launch X431 Bluetooth VCI connection problems.
1. Bluetooth connection failed

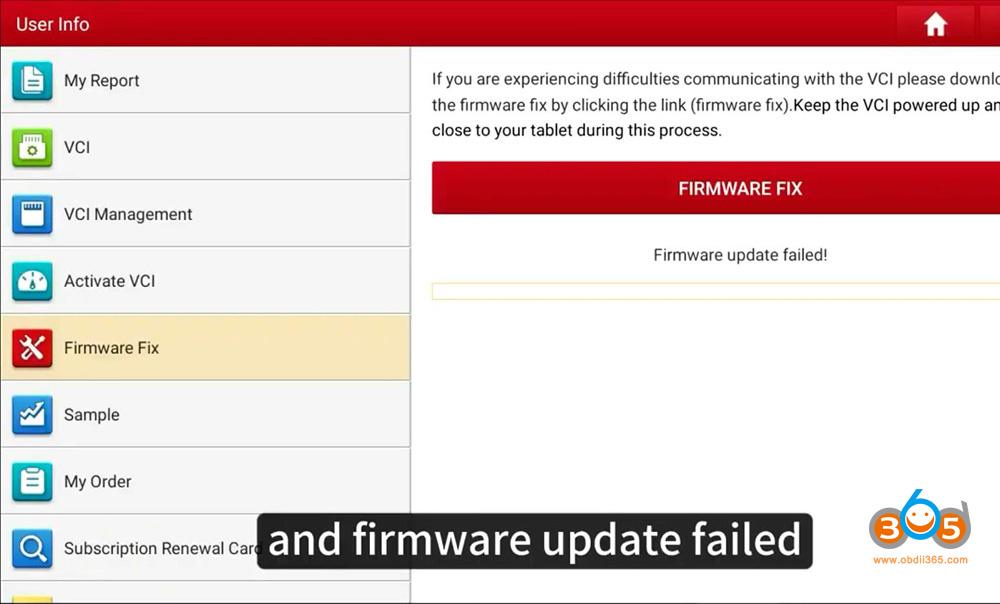
2. Firmware update failed

The solution can be applied to all Launch X431 tablets with DBScar (V, VII) VCI connector, includingX431 V,X431 V+,X431 ProS,X431 Pro3S+etc

First plug the VCI into the vehicle and make sure the ignition is on and the indicator turns on.
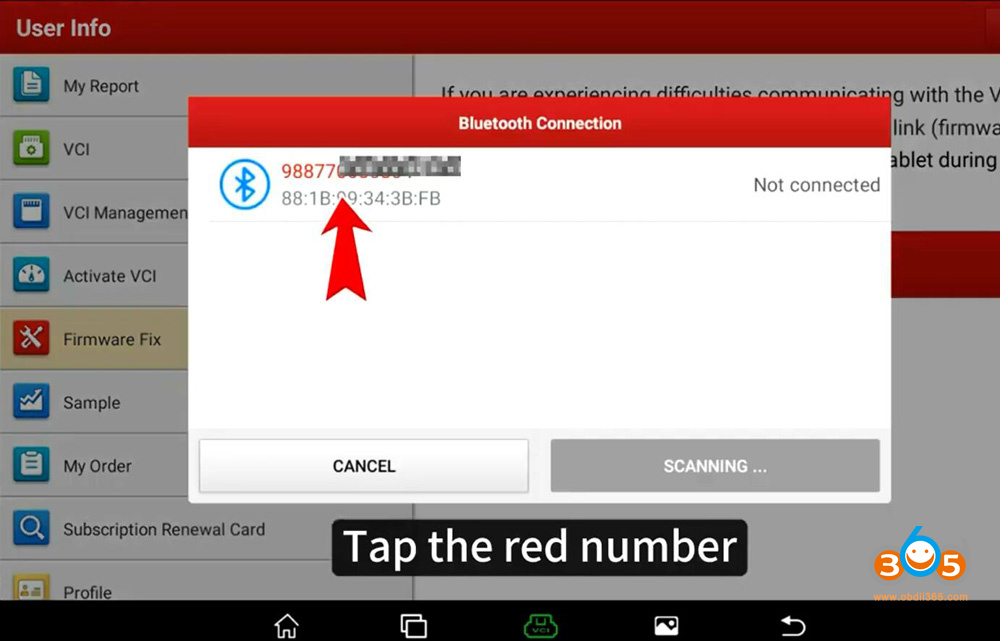
Select Setting, the Bluetooth is named after serial number


Select Connected device select previously connected device tap, Pess Setting-> Forget->Forget Device.


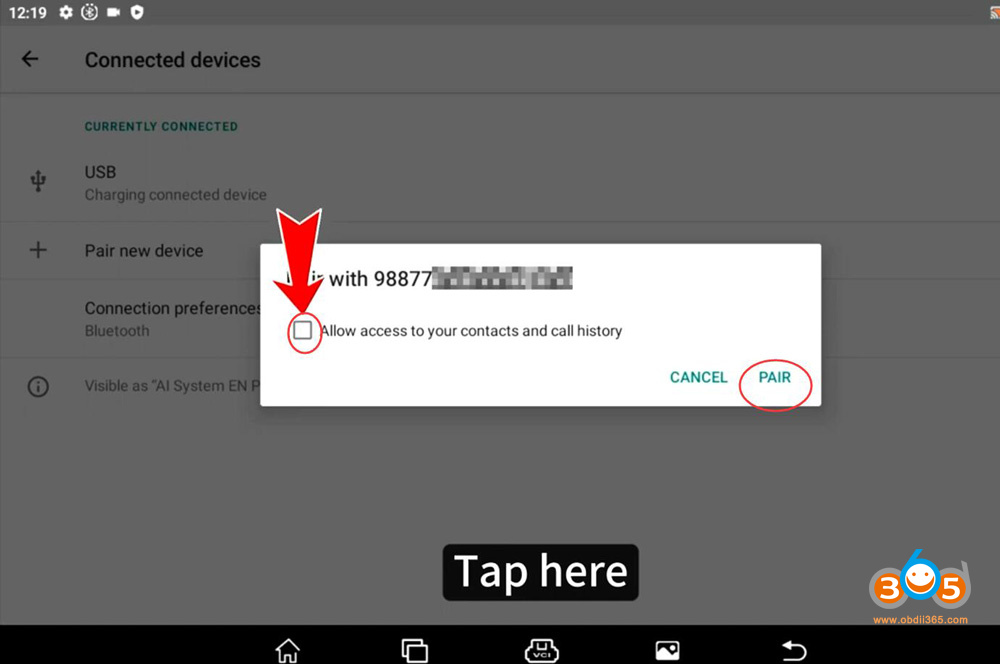
Unplug the VCI and wait for 20 seconds, plug in the VCI again and X431 will pop up a prompt in Bluetooth searching page


Select Pair
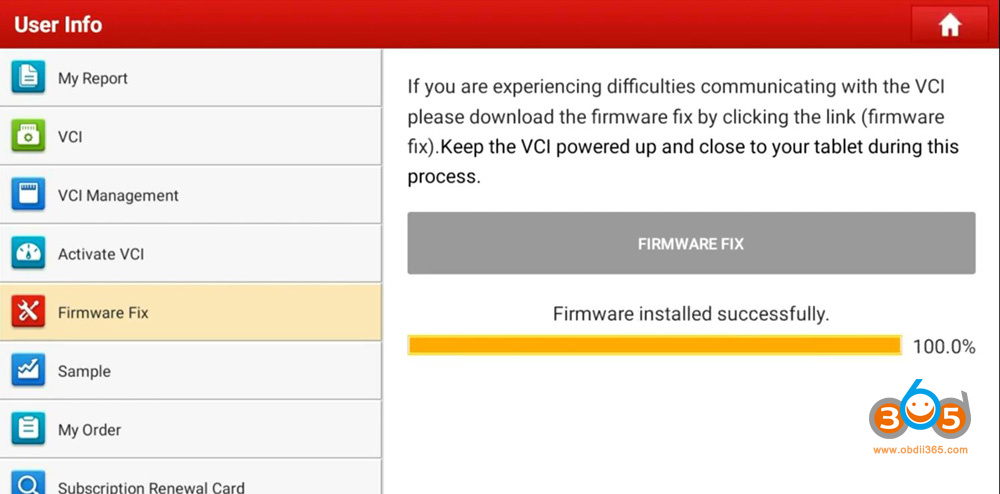
Run X431 software, select User Info->Firmware Fix->Firmware Fix

Select the serial number and wait until firmware installed (updated) successfully.
https://www.obdii365.com/service/launch-x431-bluetooth-and-firmware-update-failed-solution.html

Posted by: jean at
06:44 AM
| No Comments
| Add Comment
Post contains 136 words, total size 15 kb.
October 10, 2023
What’s the Difference between Autel MaxiIM IM608 II (IM608 Pro II) and OTOFIX IM2 universal key programmers?
Check a table comparison below:
| Item | Autel IM608 II/IM608 Pro II
|
OTOFIX IM2
|
| Brand | Autel | OtoFix |
| IP limitation | No | No |
| Operating system | Android 10.0 | Android 10.0 |
| Memory | 4 GBRAM+128GB | Storage 4GB+128GB |
| Processor | Qualcomm SDM660 Octa-core Processor (2.2GHz ) | Qualcomm SDM660 Octa-core Processor (2.2GHz ) |
| Screen | 10.1 inch | 10.1 inch |
| Resolution | 1920*1200 | 1920*1200 |
| Connectivity | BT V5.0 + BR/EDR, USB | BT5.0/USB |
| Battery | 15000mAh | 15000mAh |
| Camera | 16 Megapixel | 16 Megapixel |
| VCI | MaxiFlash JVCI+ | V1 Flash |
| Programmer
|
XP400 Pro | XP1 Pro |
| Smart Mode & Expert Mode | Yes | Yes |
| Diagnostic | Full system comprehensive diagnostics | Full system comprehensive diagnostics |
| Bi-directional (active test) | Yes | Yes |
| Online Coding | Yes (Mercedes-Benz not included) | Yes (Mercedes-Benz not included) |
| Offline Coding | Yes | Yes |
| Service Functions | 40+ | 40+ |
| Hidden Function | Yes. (Mercedes-Benz not included) | Yes. (Mercedes-Benz not included) |
| Guided Function | Yes. (Mercedes, BMW, JLR are not included) | Yes. (Mercedes, BMW, JLR are not included) |
| Offline Programming | Yes | Yes |
| Programmer function | EEPROM reading and writing, MCU reading and writing | EEPROM reading and writing, MCU reading and writing |
| Immobilizer function | Full immobilizer function | Full immobilizer function |
| Key tool
|
Yes | Yes |
| Key Unlocking | Yes | Yes |
| Frequency Detection | Yes | Yes |
| Universal key generation | Yes | Yes |
| Chip Simulation (Need APB112) | Yes | Yes |
| CAN FD | Yes, no need converter | Yes (Adapters required) |
| DoIP | Yes, no need converter | Yes (Adapters required) |
| Compatible with Gbox2/Gbox3 | Yes | Yes |
| Compatible withAPB112 | Yes | Yes |
| Compatible withIMKPA | Yes | Yes |
| Cloud Service | Report Management | Report Management |
| Remote Expert | Yes | Yes |
| Multi-Language | Yes | Yes |
| AutoVIN/ScanVIN/
Scan License |
Yes | Yes |
| Endoscope | Yes, optional | Yes, optional |
| Battery tester | Yes, optionalBT506 | Yes, optionalOTOFIX BT1 Lite battery tester |
| Free Update | 1 year free update/2 years free update | 2 years free update |
| Software subscription | $795 per year | $715 per year |
| Price | $2,788(1 year update)
$3,299(2 years update) |
$2,459 (2 years free update) |


In sum:
OTOFIX is a sub-line product of Autel.Otofix IM2is a cheaper alternative to IM608 Pro II.They have the same function.
The major difference will be
1.IM2 has 2 years of free update in default. IM608 II just 1 year.
2. IM608 II has built-in CAN FD and DoIP protocol. IM2 need an optional adapter.
3. Software subscription for IM2 is cheaper than IM608 II.
Posted by: jean at
08:26 AM
| No Comments
| Add Comment
Post contains 382 words, total size 9 kb.
October 09, 2023
Here comes a similar problem:
One of our customers failed to reset oil on a Jeep Renegade 2020 withAutel MaxiCOM MK908 IIdiagnostic scanner.
Error message "Unlock failed. The tool did not allow.”


Solution:
For 2018+ FCA Chrysler Jeep Dodge you need to unlock or bypass gateway to access functions.
2 Ways:
1. useChrysler 12+8 gateway adapter, Start Connector to unlock gateway
Chrysler 12+8 Bypass Cable, Star Connector?
2. purchase AutoAuth license
How to Purchase, Activate and Use FCA AutoAuth for Autel Scanners?
This can be applied to allAutel MaxiSysand MaxiCOM scanners.
Posted by: jean at
07:07 AM
| No Comments
| Add Comment
Post contains 100 words, total size 3 kb.
Here comes a similar problem:
One of our customers failed to reset oil on a Jeep Renegade 2020 withAutel MaxiCOM MK908 IIdiagnostic scanner.
Error message "Unlock failed. The tool did not allow.”
Solution:
For 2018+ FCA Chrysler Jeep Dodge you need to unlock or bypass gateway to access functions.
2 Ways:
1. useChrysler 12+8 gateway adapter, Start Connector to unlock gateway
Chrysler 12+8 Bypass Cable, Star Connector?
2. purchase AutoAuth license
How to Purchase, Activate and Use FCA AutoAuth for Autel Scanners?
This can be applied to allAutel MaxiSysand MaxiCOM scanners.
Posted by: jean at
06:58 AM
| No Comments
| Add Comment
Post contains 100 words, total size 3 kb.
October 08, 2023
How-to: add Maserati Ghibli key with Autel MaxiIM AP200 obd2 code scanner.
Technical difficulty:Medium
Potential to screw it up:Low
Impact if you do screw it up:Potentially catastrophic but youprobablywill just need to get a local auto locksmith to come and bail you out.
You will need:
iPhone (Had this already)
Autel AP200(would recommend that anyone has it, and gets the free brand for their Maserati. Great piece of kit)
Autel Chrysler software pack (assuming you’ve used your free one for the Maserati) £19.99
Android phone (Borrowed from work)
ELM327 compatible OBDII (had one of these already, but if you need one £8.99
Chrysler Pin Puller software for your Android phone (Free, but I have heard some people needed to buy 15 tokens for $19
A key (dur) Ebay if you want a second hand genuine one, or Aliexpress: (Must be 433MHz and full key with boot opening, not remote start): £22.08
Total cost to me: £42 plus some postage (actually less than that as my key turned up damaged and I got a £13 refund….)
First things first. Itmaybe possible to copy / clone an existing key to another key (not the type I’ve linked below). Never felt this was a good idea, as if you lose one key, anyone that finds it can use your car. You can’t delete one key from the car since they are the same and the car can’t tell the difference. Also, if you do pair your personal settings with the key fob, it’s not going to work as (again) the car will see the keys as the same.
From the above, it may be clear that they key is NOT programmed to the car, but, just like the 4200 and GT, the CAR is programmed to accept the key.
1) Plug your ELM OBD device into your OBD port.
2) Using your Android pone, pair the bluetooth to the ELM327 and connect to it (mine was always flaky but managed in the end)
3) Install the Chrysler Pin Puller software.
4) Make sure you have a good internet connection for your Android phone
5) Open the Pin Puller and connect it to your ELM327. (There is a big button for this purpose)
6) Press ‘Select Type’ in the Pin Puller software and select RHF_1 2012-2014
7) Buy tokens if needed
![]() Press start.
Press start.
9) Wait (in my case about 2 seconds) and you’ll be rewarded with your VIN, a part number, and critically a PIN. Make acarefulnote of this.
10) Disconnect the ELM and put your Android phone away
11) Plug yourAutel AP200 scannerinto your OBD port
12) Connect to your iPhone
13) Open the MaxiAP200 program that you installed when you set up your AP200 with your iPhone
14) Hit ‘Service’
15) Hit ‘Immo keys’
16) Select ‘Chrysler’
17) Select ‘Manual Selection’ (There will be a delay as data is loaded)
1![]() Select 2014 from the year
Select 2014 from the year
1![]() Select Hot Function
Select Hot Function
19) Program Ignition fobiks (RFH)
20) Press OK
21) Ignition off
22) Enter you pin from step 9
23) Select ‘Yes’
24) Press OK on the message
25) When the next message comes up, hold the key near the start button (not the central console, though I doubt it makes much difference) and press the unlock button
26) Press OK
27) Wait for the progress bar to complete
2![]() Youshouldget a message that the FOBIK was successfully programmed. If not it will suggest you try again. You can test success by pressing the lock button, and LO! the doors will lock.
Youshouldget a message that the FOBIK was successfully programmed. If not it will suggest you try again. You can test success by pressing the lock button, and LO! the doors will lock.
29) Enjoy.
Posted by: jean at
07:31 AM
| No Comments
| Add Comment
Post contains 602 words, total size 4 kb.
October 07, 2023
Problem:
Foxflashfailed to read Audi A1 1.4tfsi ECU MED17.5.5 on bench. error bench not not supported.


Possible reason:
It read fails due to security tprot hence this ECU has dealer security update so cannot be read on bench.
Solution:
It literally says what to do. Use boot mode tricore.
No bench possible, make in boot mode, you have to open the ECU and read password.
How to read VAG MED17.5.5 withfoxflash toolin Boot mode?
BOSCH MED17.5.5 [ TC1766 INT.F.] – VW, Audi, Seat, Skoda
Step 1: Read and Write ECU
Connect with the multifunction cable the following pinout and the boot shown below.
Use the driver:
→ TOOLS BOOT MODE
→ INFINEON TRICORE Boot
→ SAK TC1766

ATTENTION:
If the password error message appears at the beginning of the reading, proceed as follows:
Step 2: Password Search
Disable the boot mode by unsoldering the resistances. Connect the pinout below.
Use the driver:
→ TOOLS BOOT MODE
→ INFINEON TRICORE Tool Password
→ OBD PASSWORD TPROT V08 VAG
→ Click on "Find Password” and follow the software messages.

If the password was found with this system, go directly to the boot step to read and write the control unit.
Otherwise, see next step ..
Step 3: Password Search
Connect the pinout below and the two links on the pcb.
Use the driver:
→ TOOLS BOOT MODE
→ INFINEON TRICORE Tool Password
→ PASSWORD BFT
→ Click on "Find Password” and follow the software messages.

Now that the password has been found it’s possible to read and write the control unit as described in STEP 1.
Posted by: jean at
07:08 AM
| No Comments
| Add Comment
Post contains 270 words, total size 6 kb.
32 queries taking 0.1433 seconds, 208 records returned.
Powered by Minx 1.1.6c-pink.

