


May 31, 2024
VNCI RNM is a Nissan, Renault and Mitsubishi 3 in 1 diagnostic scanner. The RNM device can do diagnostic, module programming and immo funcitons. Here is an example of 2020 Nissan TEANA module programming with the RNM device & Nissan Consult III Plus software without subscription.
Get the Nissan conult3 plus software installed.
ConnectVNCI RNMwith vehicle via USB.
Run VNCI Device Manager, check if device is well connected and also keep firmware up-to-date.

Run VCI Manager and connect VCI

Run Nissan C3P+ software
Go to Vehicle Selection
Sleect Altima/Tenana L34 2020
Confirm vehicle information


Select Other operation
Select ABS system
Select Program black ECU after ECU Replacement


Manual selection


Read programming instructions and conform, press Next to continue

Select ECU part number
Confirm vehicle info again


Remove the terminal caps of battery and connect battery charger to battery.
Adjust the battery charger output between 12V and 13.5V.
Press Start to start programming


Program ABS module in progress


Programming is completed.

Turn ignition switch to OFF position
Then turn ignition switch to ON position, all DTCs are automatically erased.


Posted by: jean at
07:01 AM
| No Comments
| Add Comment
Post contains 186 words, total size 18 kb.
May 30, 2024
Xhorse VVDI MLB ToolMLB key programming device software download, install, update guide and wiring diagram.
1.Software Download
Current software version 1.0.3.0
Language: English, Chinese

2. Install Software
Operating system:Windows 10, Windows 11
Disable anti-virus program before installing.
One click software installation.
Run VVDI-MLB.exe setup until finish.
3. Bind device
Users must combine device with Xhorse app. Otherwise may fail to calculate immo data online.
Go to Special Function->Bind device, scan QR code and bind tool with Xhorse App via mobile phone.

4. Update Software
Update is done online for free.
Simple click ‘Update online’ tab.
5. How to use VVDI MLB Tool?
There are 3 steps to calculate MLB immo data with theVVDI MLB:
1.Identify key
Place the key in the device identification area for identification.
2.Collect key data
Open the original MLB key, connect the original car key PCB as shown in the diagram, click Collect Key data button after connection. The server takes approximately 10 seconds to calculate.
Save the calculation data when it completed.
3.Make dealer key
Load the saved data above and generate dealer keys.
Then useVVDI2andVVDI Key Tool Plusto learn key.

6.VVDI MLB ToolMLB Wiring Diagram
VVDI MLB Tool MLB Wiring Diagram Type 1 to Type 6
No need to remove chip. But need toremove two capacitors (100nF) and solder cable to original keyaccording to different color as diagram.
Type 1 Audi/Lamborghini

Type 2: Audi Lamborghini

Type 3: Audi Bentley

Type 4 Porsche

Type 5 Porsche

Type 6 VW

Posted by: jean at
07:52 AM
| No Comments
| Add Comment
Post contains 252 words, total size 10 kb.
May 29, 2024
Step-by-step tutorial: GM DCT Hydraulic Flush Procedure using GM Scanner GDS2 software and Techline Connect SPS2 subscription.
What’s needed:
A GM MDI hardware (MDI2 clone,VNCI MDI2,VXDIAG VCX NANO GMetc)
Techline Connect SPS2 subscription
Bosch MDI2 hardware is not cheap, if you buy it from ACDelco $850-$1100.
Additionally, the GM GDS2 (Techline Connect) needed to run the hydraulic flush is subscription-based. A three-day subscription was $64. Once you purchase the subscription, you’ll receive the link for the software.
Completing the fluid flush and subsequent filter change isan easy change that requires some patience.
NOTE:
– The DCT holds ~11.7 quarts of fluid when dry. The DCT is NEVER dry—the flush forces all the fluid through the filter. Once drained, about 1.5 quarts are remaining in the DCT. So, the fill will accommodate about 10 quarts.
– Once you complete the initial fill, it’s crucial to start the car and cycle between reverse, drive, and neutral for 30-45 seconds multiple times. Turn the car off, and add more fluid (about .5-.75 quarts) until you have a slow drip coming from the fill line.
Procedure:
Let’s get into GDS2 (Techline Connect)
We’ll start by plugging in our MDI2 and getting GDS2 fired up.
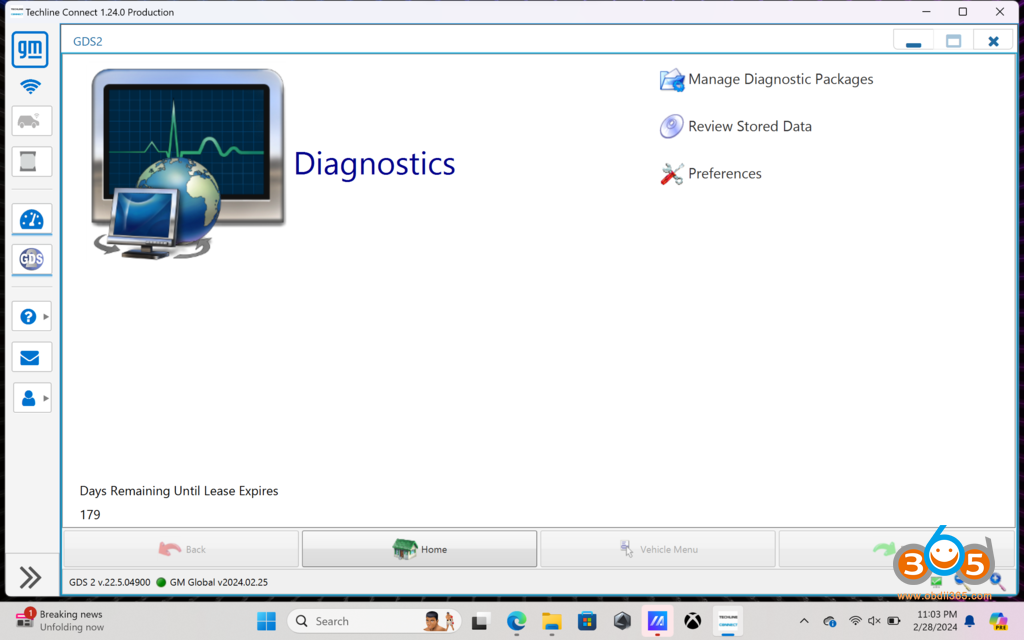
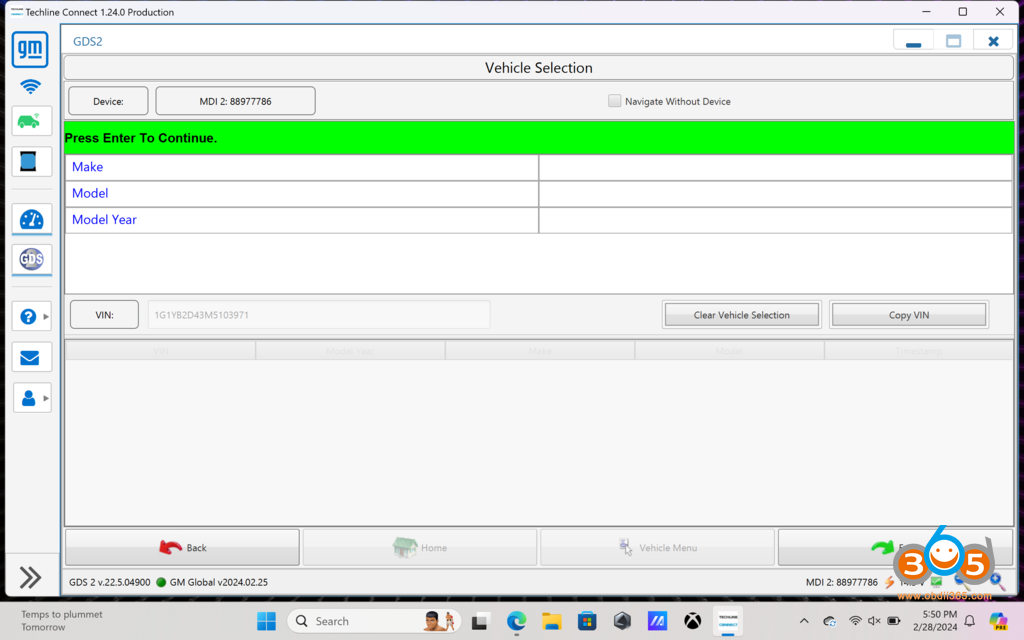
Next, we’ll get logged in and connected to the car using the MDI2.
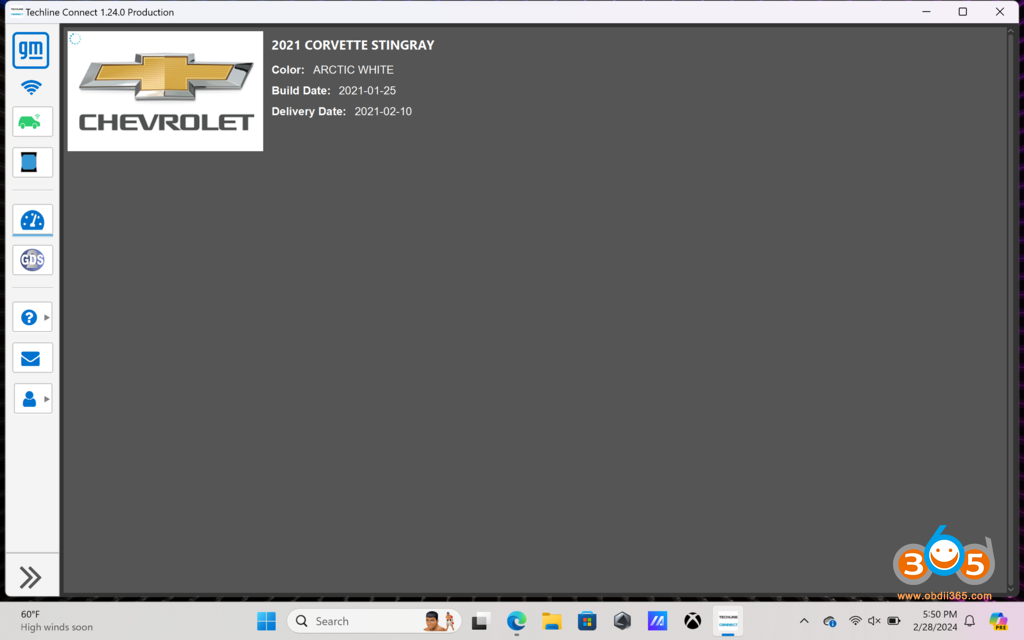
We’ll get the car read in and ready to browse for the transmission control module.

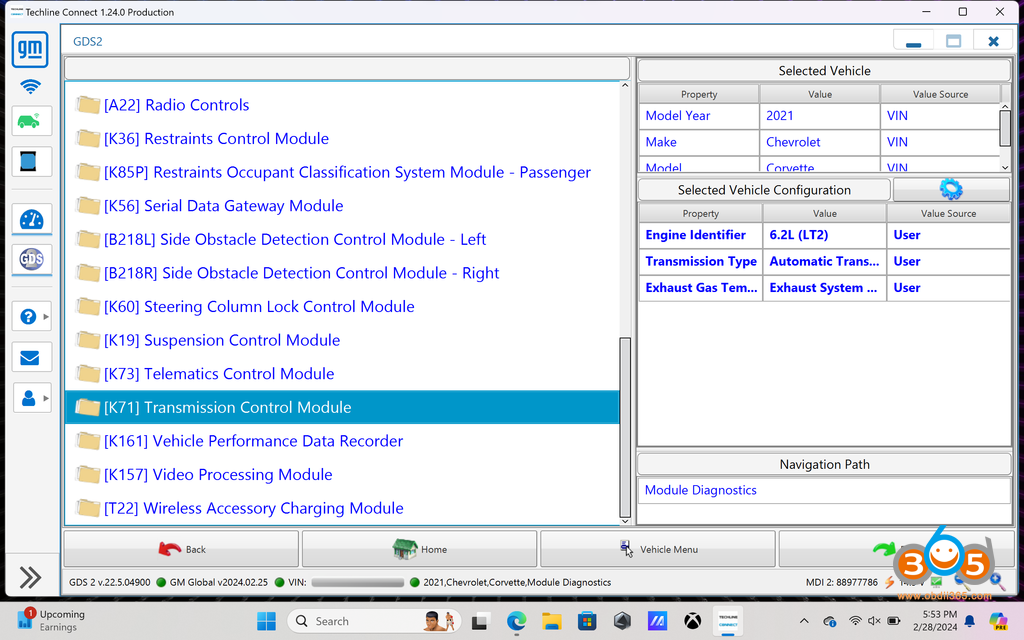
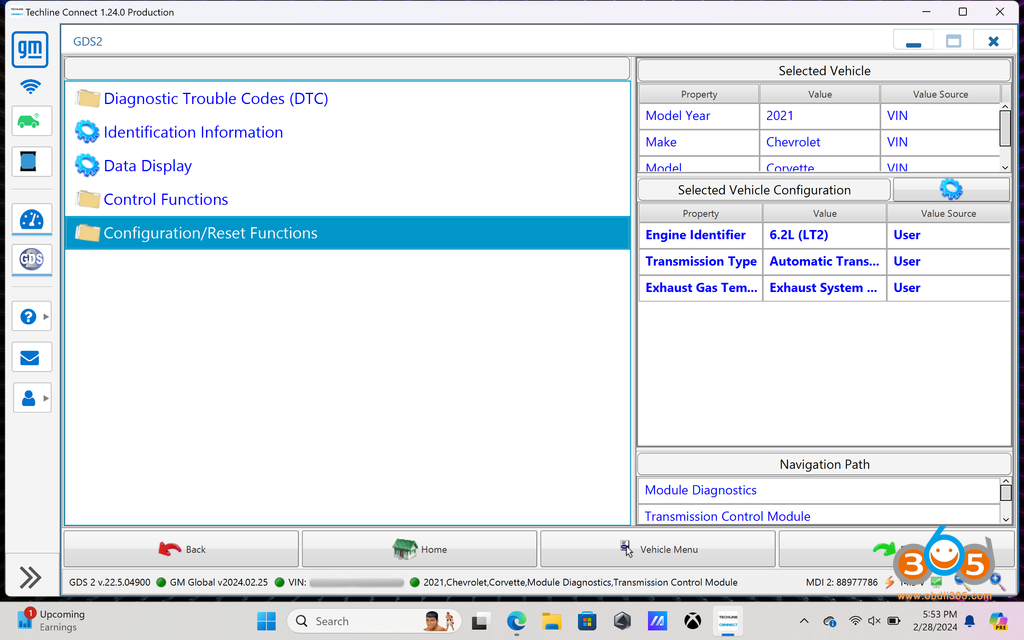
Now that we’re read in let’s navigate to the transmission control module.
Select ‘Module Diagnostics’
Go down to K71, which is the Transmission Control Module
Select Control/Reset Functions
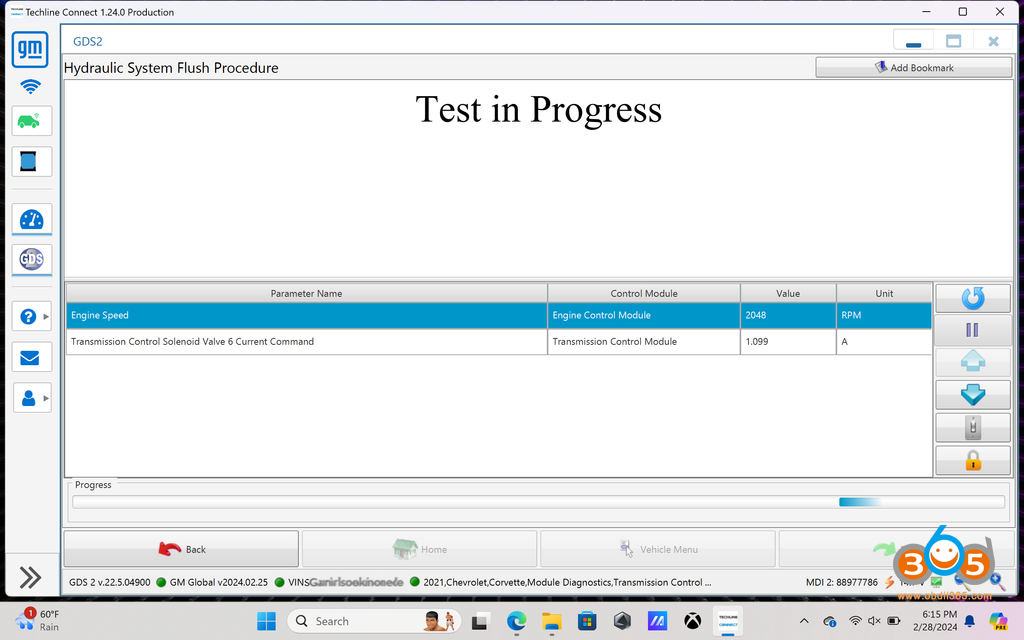
Select Hydraulic System Flush Procedure
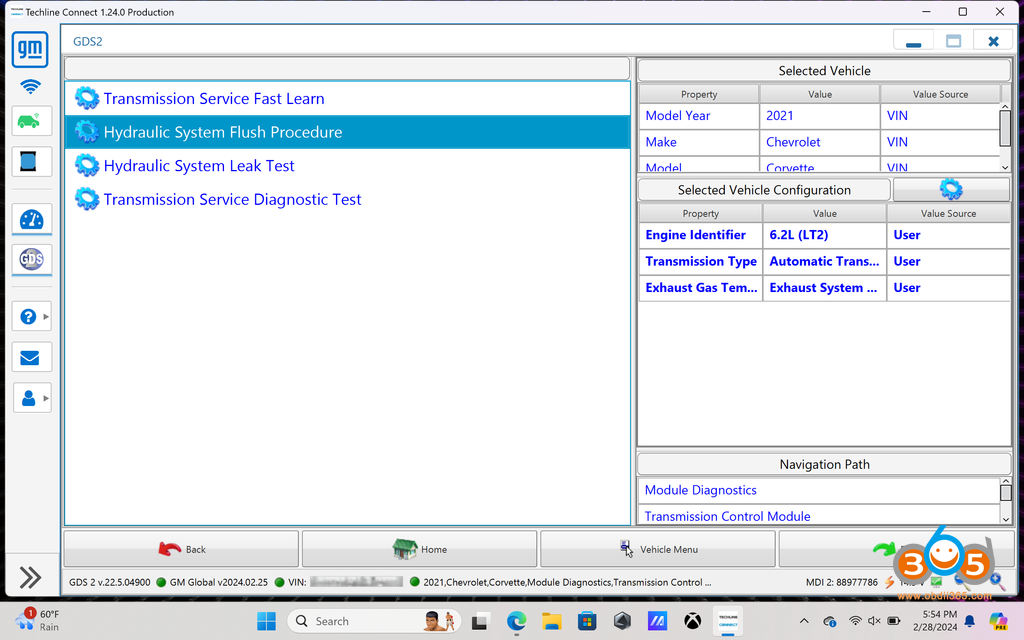
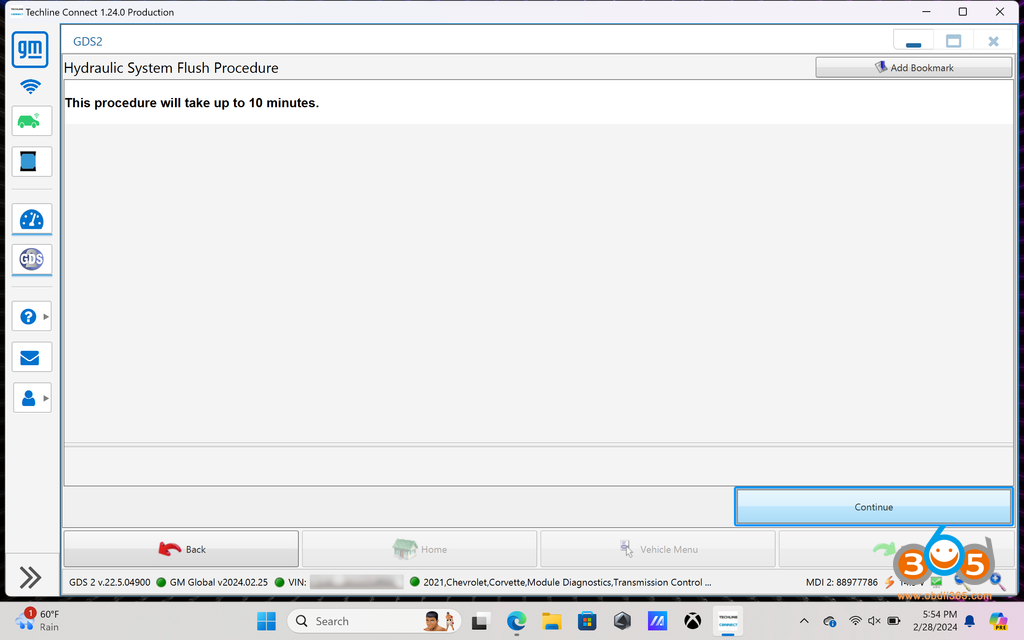
Get ready to start the procedure. It is not exaggerating. It will take up to 10 minutes to complete the flush procedure. You won’t begin the procedure yet, this is just an alert that it can take up to long.
There are conditions that must be met to begin the flush procedure.
1) The transmission fluid must be at least 50c (122f)
2) The car must be running (while it is not stated in the screenshot, the engine’s RPMs will fluctuate between 500-2100 RPM during the cycle, which obviously can’t happen with the vehicle off). 2022+ updates the procedure to state that the engine must be running.
3) Don’t skip leg day, you’ll need to depress the brake for the entire duration to prevent the car from rolling.
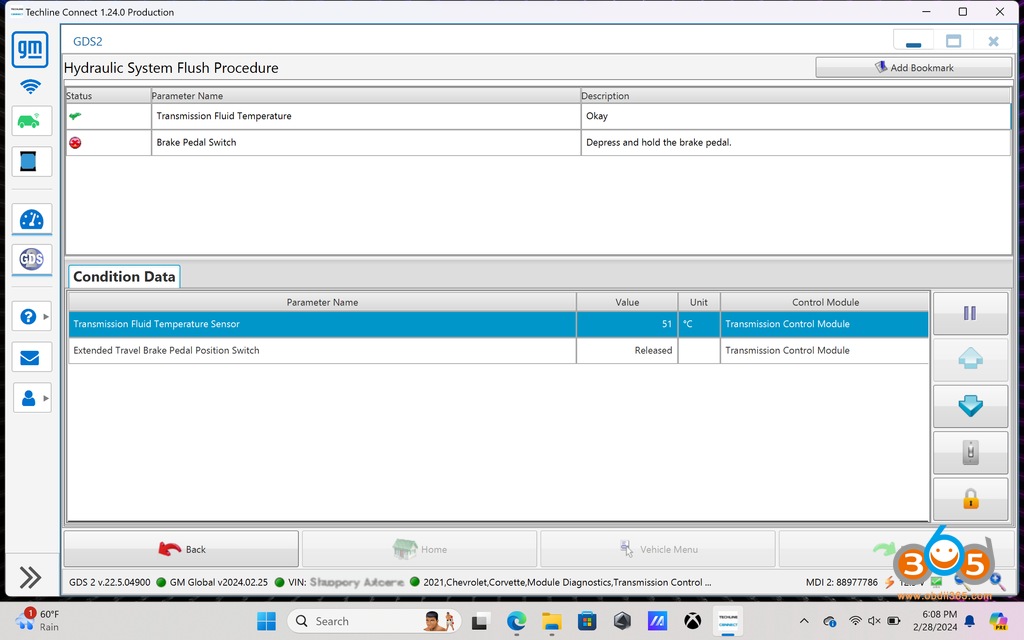
Once the conditions have been met (50c and brake pressed), you’ll be directed to shift into neutral

Once shifted into neutral, click continue to begin the hydraulic flush procedure. You’ll hear the engine RPM fluctuate between 500-2100 RPM. Throughout the procedure, you will hear several clicks from the solenoids and modules inside the transmission as the fluid is system is pressurized and fluid passes through the filter. Hang tight, it will take nearly 10 minutes.
Once done, you’ll receive a completed message.
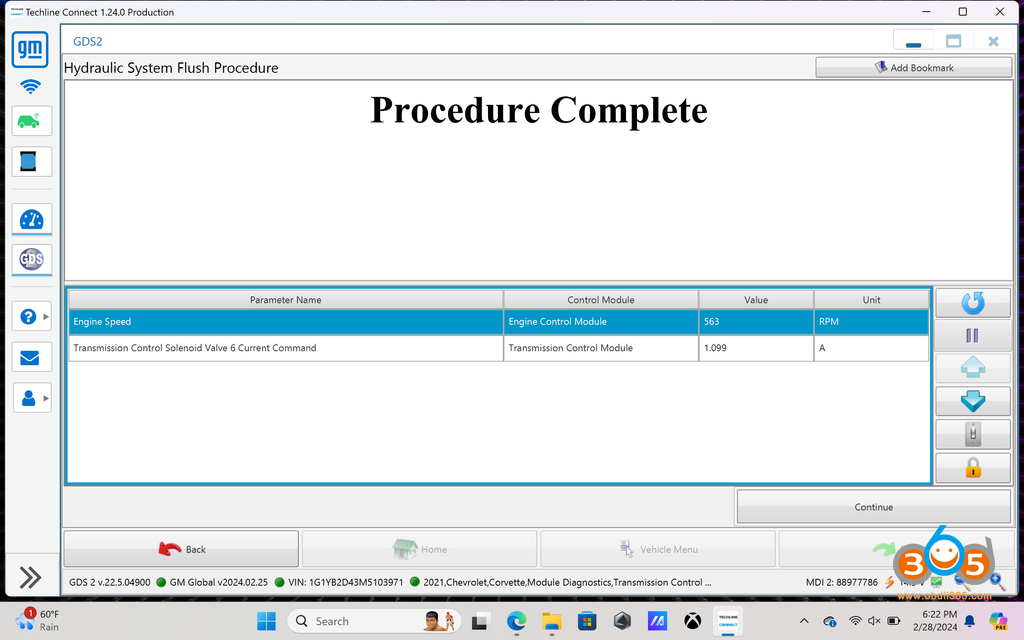
Click Continue to exit the procedure.
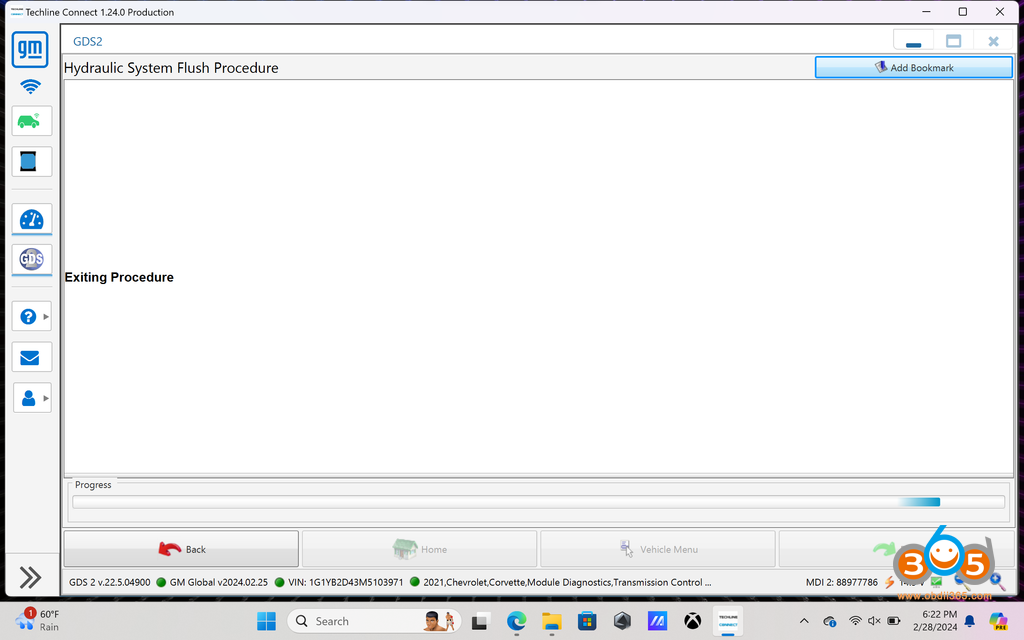
Close out of GDS2 and disconnect theVNCI MDI2from the OBDII and laptop. You don’t need them until you’re done with draining and refilling.
Lift your car. Remove the rear shear shield. Remove the FILL PLUG FIRST! You can use a ratcheting wrench, which worked flawlessly. Make sure you have at least a 11 quart drain pan. Give it some time to allow the fluid to cool, after all you did just warm it to 122+ degrees. The DCT fluid is low viscosity, meaning it will drain quickly. Remove the drain plug to drain. Remove and replace the DCT external canister filter (careful, it will be messy).
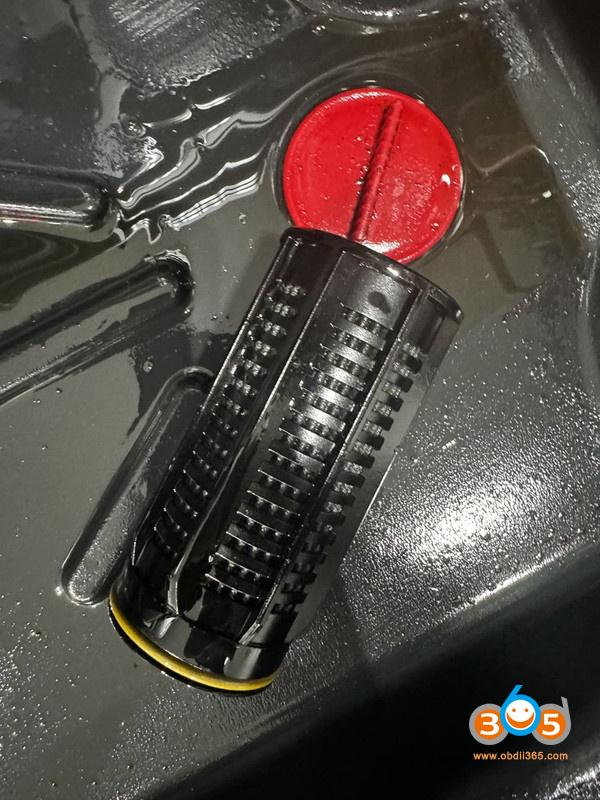
Insert the new canister filter. The filter comes with o-rings for the seat of the external aluminum housing and fill plug (set aside the old fill plug o-ring you’ll use it later if you read below). Reinstall the drain plug. Take your time to replace the o-rings and get everything sealed up.
I’d suggest picking up a:
Metric M20 M20X1.5 Male to Barb Hose ID 1/2” Brass Fitting
Brass Pipe Fitting Metric M20 x 1.5 Male To 1/2″ NPT Female Adapter
1/2 Inch ID (5/8 Inch OD) PVC Clear Vinyl Tubing (4-5’ is sufficient)
Small/Medium Funnel
Plumbers/Teflon tape
Put it all together and it’ll look something like this:
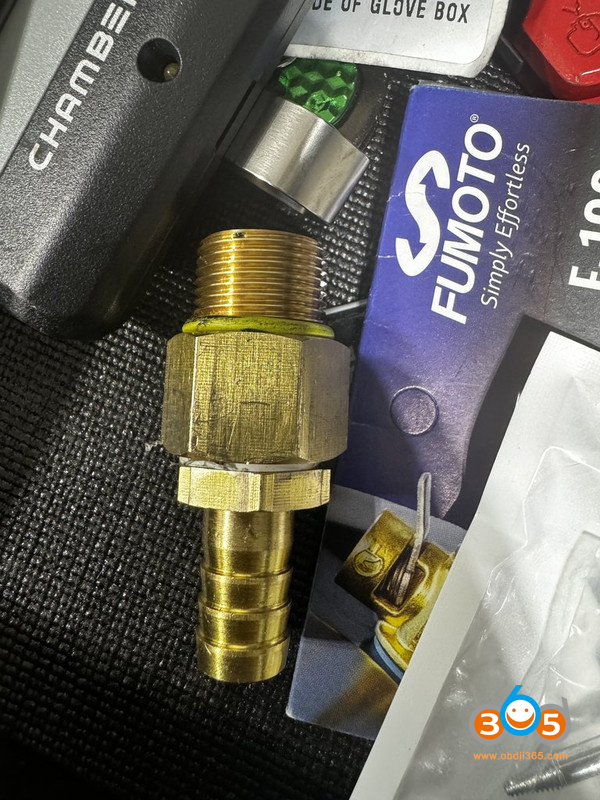
Install the fitting using the old o-ring from the fill plug. Now pass the vinyl tube through one of the top spokes on the wheel and press it onto the fitting.
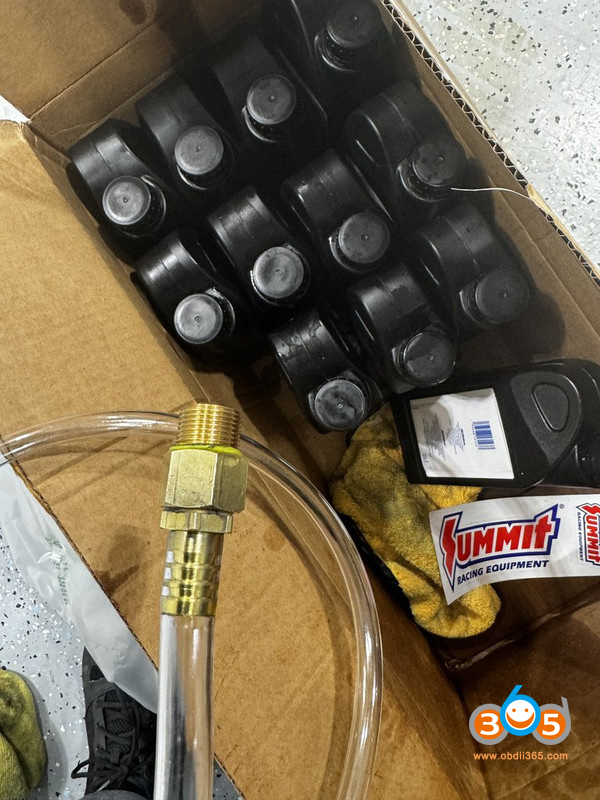
Now fill the transmission. You’ll easily fill 9 quarts with no issue. Stop periodically to ensure the hose is still attached to the fitting, which is would be if you tug too hard on it. Once you’ve finished 9 quarts, you’ll need to slow down because the transmission will fill before you see it backing up in the tube. Pour slowly and check the tube to see if it’s backing up. If you don’t hear gurgling from the tube, you’re reaching the full point and your tube is likely backing up — get ready to clean the mess.
Once you have it filled, remove the fitting and vinyl tube, install the fill plug, and start the car. Cycle through drive, reverse, and neutral waiting 30-45 seconds each. Stop the car, remove the fill plug and top off (using your DCT fill contraption). Once you have a very slow leak from the fill plug, you’re done. Replace the fill plug and remove the tubing.
Start the car so the fluid can warm and check for leaks.
Put away the tools that you don’t need again, e.g., your fluid contraption, empty bottles, fluid containers, ratcheting wrenches, etc.
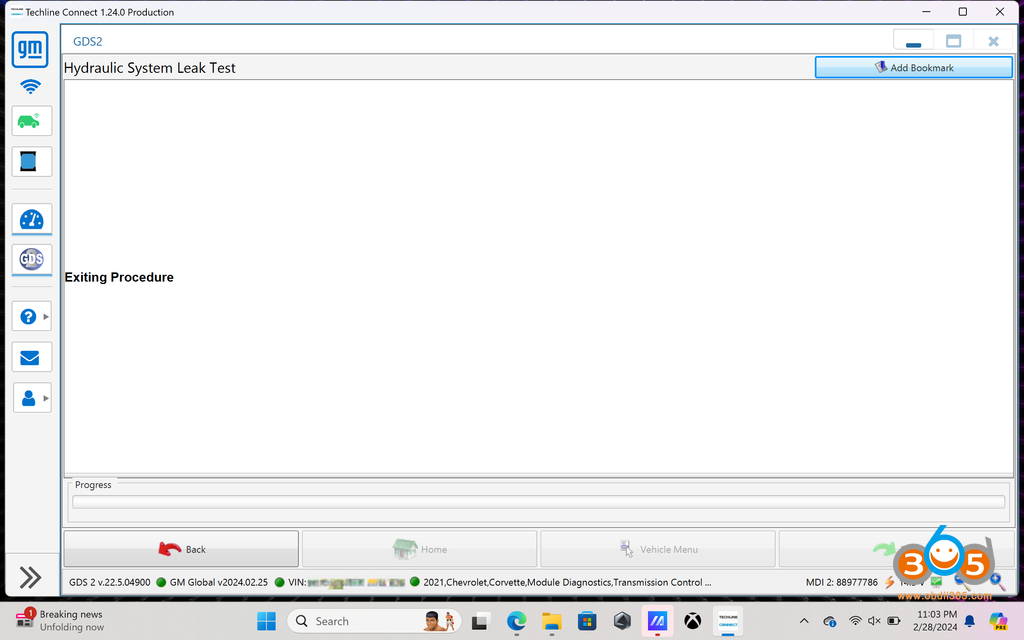
Get into the car and load back into GDS2 (Techline Connect). Follow the aforementioned steps to get back into the K71 Transmission Control Module menu and select Control/Reset Functions.
This time we went to select Hydraulic System Leak Test
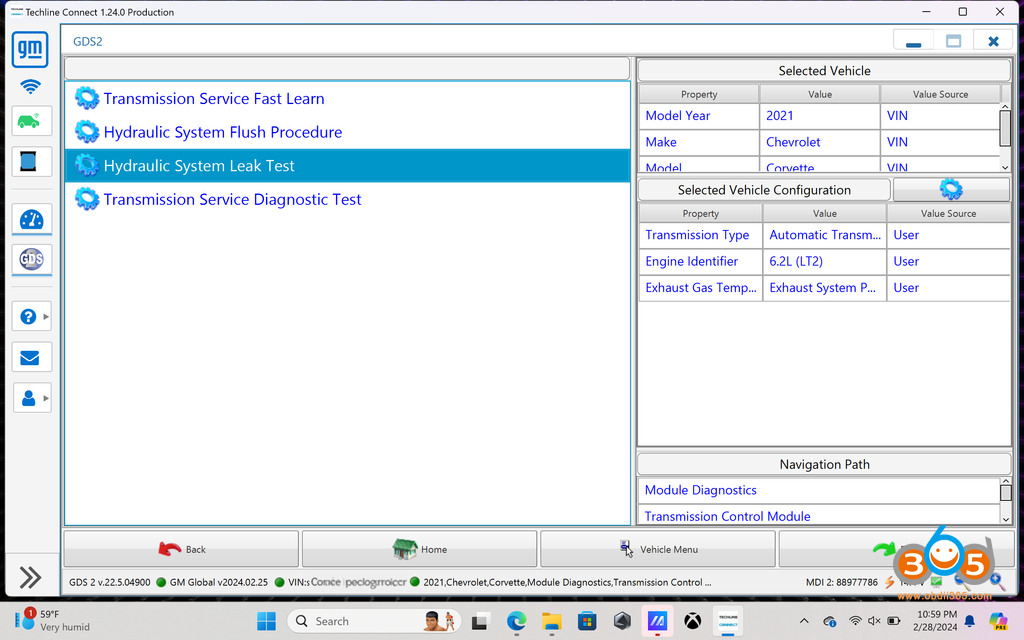
This will take you 30 seconds and we’ll click continue
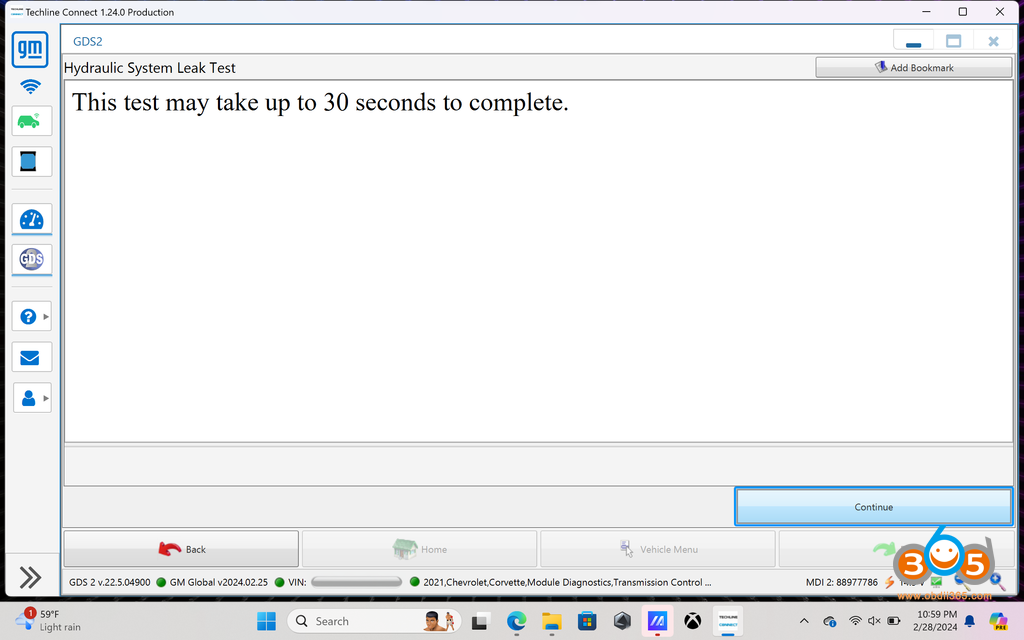
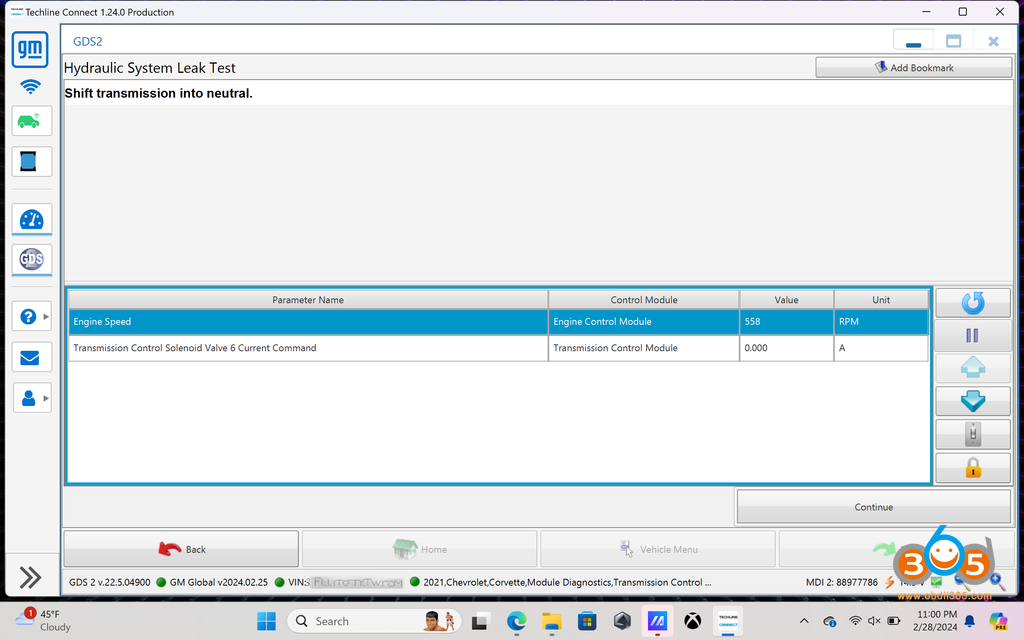
You need to be at least 50c (122f) and depress the brake, then hit continue

You’ll be prompted to shift into neutral and hit continue
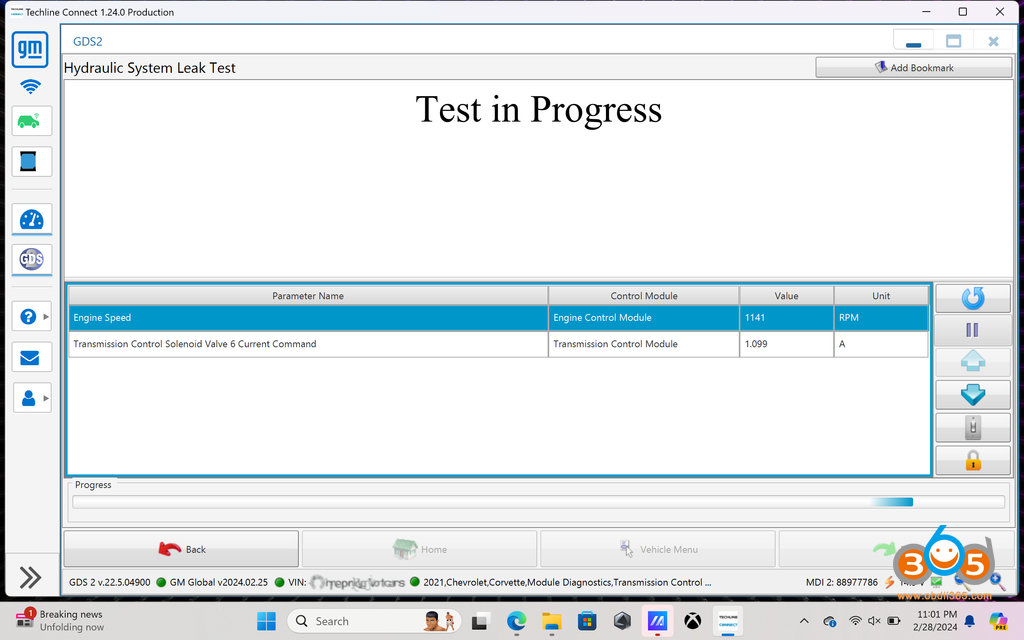
Allow the procedure to run
You’ll receive a prompt when finished
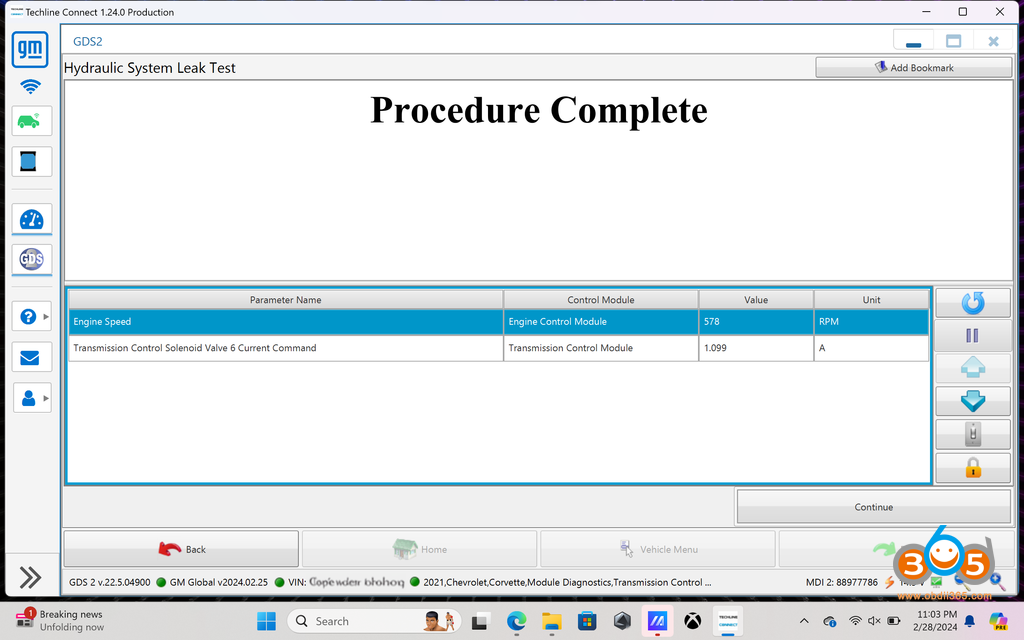
Click continue to exit the procedure
If you have a 2023+, use GDS2 (Techline Connect) to navigate to the menu option to reset the DCT external canister and fluid service interval. For 2020-2022, you can reset the DCT fluid service reminder from inside the car.
Close out of GDS2 (Techline Connect) and disconnect theMDI2from the OBDII and laptop. You’re done.

Posted by: jean at
08:37 AM
| No Comments
| Add Comment
Post contains 1072 words, total size 22 kb.
May 28, 2024
What is the difference betweenXhorse VVDI MLB Tooland KYDZ MLB Tool MLB key programmer?

Function:
Both can add key to VW, Audi, Porsche, Lamborghini, Bentley MLB platform
Both cannot do all keys lost.
Both devices support rewrite key IDs.
Both do not need to remove mcu chip.
KYDZ already sells the adapter, which does not require removing the processor.


Price:
VVDI MLB: price unknown, around $200
KYDZ: $439 with 5C OBD and solder free adapters
Compatibility:
VVDI MLB Tool is compatible withVVDI2andVVDI Key Tool Plus. VVDI2 requires VV02 VAG IMMO5 and VV05 MQB license activated.
KYDZ: after calculating immo data with KYDZ tool, you can program key with the 5C OBD tool or import data to Lonsdor K518 programmer to program key.
Tokens/Points:
VVDI MLB Tool:
No points are required when using VVDI MLB specialized key.
It takes 200 points when using the OEM key.
KYDZ MLB Tool:
The existing customers have 4 free tokens to generate OEM key.
The new customers have 3 free tokens to generate OEM key
After that you have to buy tokens, 1 token takes$50.
MLB Keys:
Both devices are compatible with original keys and their own MLB keys.
Key info. will be updated.
Software menu:
VVDI MLB Tool softwarecan be updated online. It will also modify key ID. Software will also show you welding instructions.

KYDZ MLB Tool software menu

Package:
VVDI MLB TOOL
Contains a MLB Tool, MLB cable, USB (OTG) cable and USB A to C cable

KYDZ MLB Tool
with MLB Tool, 5C OBD, power adapter, 3 solder free adapters, power cable

When dealing with MLB you should be professional in removing chips and re-soldering them back!
Both devices work fine. Both add key without removing mcu chip. Xhorse MLB Tool is more user friendly.
VVDI MLB Tool is good in both price and points in the long run. Xhorse also gets better technical support.
Posted by: jean at
09:24 AM
| No Comments
| Add Comment
Post contains 322 words, total size 9 kb.
May 27, 2024
Reset Flex Fuel Alcohol/Ethanol Percentage Level with Dealer, Toyota Techstream software or a cheap Bidirectional OBD2 Scan Tool (Autel, Launch, Xtool etc)?
Here is the user working experience:
"I have a 2013 5.7 Flex Fuel Crewmax (67,500 miles). I searched for a solution and found the TSB to fix it. Went to the dealer to have them fix per the TSB, but they wanted $1200 and the fuel pump is on long back order. This past winter, I started having the hard starting problems due to the high alcohol percentage level issue (the motor incorrectly thinks I’m running E85 ethanol gas but I never have, which causes extended starter motor cranking, an overly rich stumble, and strong fuel smells when it does start). I also had reduced gas mileage overall.
I’ve also read that some Flex Fuel owners who have had the dealer fix per this TSB have had the same problem return down the road. I needed a solution now and read that resetting the Alcohol Fuel Density level to zero will be a temporary fix (and some report it’s a longer-term fix). It seems that some have purchased a Techstream cable with what appears to be unlicensed software and tried to reset their Alcohol level using that tool (some with success and others report many headaches/problems with getting that software to work properly – much posts about it). Not wanting to spend my precious time trying to get that Techstream software to work, and instead of purchasing a 2 day license from Toyota Techstream (the real version), I decided to find a reasonably priced (to me) bidirectional scan tool that would reset my truck’s Alcohol Fuel Density level.
Scan tool was less expensive than a trip to the dealer. I searched and searched, and the only tool I found that said it could do this that wasn’t big bucks was theLaunch CRP919E(or many prefer theCRP919E BTBluetooth version).
I purchased the Launch CRP919E obd2 scanner ($389 free shipping). Once I received the tool, proceeded to run the updates and that took around 30 minutes.
Took my scan tool out to my truck and started my truck and plugged the scan tool in. You need to do that to get the Special Functions updates you need for Toyota and then checked my Alcohol Fuel Density Level which read 85%. I was able toboth read my alcohol percentage level (which was at 85%) and also reset that alcohol percentage level back to zero.
I have always had cheap scan tools, that could read codes and clear codes, but, for the money, this tool is very powerful. I will spend a great deal of time learning how to use the live data, and use all the special functions.
Seeing it was crazy high and the likely culprit for my problems, I then went intoDiagnostic > Automatically Search >System Sclection > Selcet "ECMECT(Engine and ECT)” System > Special Functions > Fuel Density Learning Value Reset(that will reset your alcohol level to zero – it takes like 3 seconds). My truck now starts right up no problems whatsoever, I get better gas mileage, and it runs smoother (it’s noticeably better). I’ve rechecked my alcohol percentage level since that reset and it remains at zero for now.
When the fuel alcohol percentage is reset ("Fuel Density Learning Value Reset” in the scan tool), that also resets the fuel trims.
If I ever have the problem return (I realize it may), I’ll just pull out the scan tool and reset the alcohol level (it takes about 2 minutes once you figure out how to find the function in the tool). Anyway, wanted to let you know in case you ever have this problem and you want to get a tool to fix it yourself (and also have a scanner in your garage that can do many other things (e.g., for my wife’s BMW (reset this and that)).”
Autel and Xtool bi-directional scanners also reset alcohol fuel density.
Autel’s advanced scannersUltra, MS909,MS908CVetc, go to Special Function->Fuel Density Learning Value Reset

Some users also used theXTOOL D7andD8etc scanners to reset alcohol levels on Tundra. They did add that to the latest firmware.
D7S also did it with no problem. Performed the "Fuel Density Learning Value Reset” using the D7S scan tool just now and truck started up great on cold start. Fuel trim values were reset also. The long term fuel trim was -23. After the reset it’s 0.

Hope this helps.
Posted by: jean at
06:30 AM
| No Comments
| Add Comment
Post contains 754 words, total size 7 kb.
May 24, 2024
Problem:
Working on a 2007 3 series E90.
Trying to read ISN on Siemens N54 MSD81 DME withYanhua Mini ACDPand module 3. When I try to identify or read I keep getting this message. How do I get my ACDP authorized or activated to read the ISN?
Error "This device does not obtain authorization of A51E module”

I’m not trying to clone. I’m just trying to read ISN. I’ve screen shotted the steps I’m taking to get to read ISN.


Solution:
A51E is the authorization fromModule 27for BMW MSV80 MSD8X MSV90 DME Read/Write ISN and Cloning.
If need to clone these DMEs, you need to activate module 27.
In this case, he just want to read ISN code, don’t do bench mode.Do OBD/CAN mode to read/write ISN.
Before you choose which DME it is, it should be a help button on the right, click on it and it will show you all steps as well as the slave pin.
Posted by: jean at
08:36 AM
| No Comments
| Add Comment
Post contains 167 words, total size 7 kb.
Problem:
Working on a 2007 3 series E90.
Trying to read ISN on Siemens N54 MSD81 DME withYanhua Mini ACDPand module 3. When I try to identify or read I keep getting this message. How do I get my ACDP authorized or activated to read the ISN?
Error "This device does not obtain authorization of A51E module”
I’m not trying to clone. I’m just trying to read ISN. I’ve screen shotted the steps I’m taking to get to read ISN.
Solution:
A51E is the authorization fromModule 27for BMW MSV80 MSD8X MSV90 DME Read/Write ISN and Cloning.
If need to clone these DMEs, you need to activate module 27.
In this case, he just want to read ISN code, don’t do bench mode.Do OBD/CAN mode to read/write ISN.
Before you choose which DME it is, it should be a help button on the right, click on it and it will show you all steps as well as the slave pin.
Posted by: jean at
08:36 AM
| No Comments
| Add Comment
Post contains 167 words, total size 7 kb.
May 23, 2024
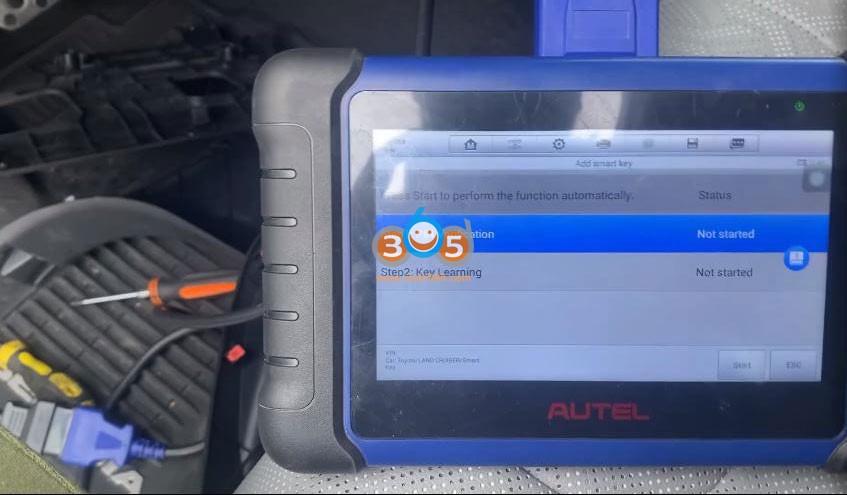
Autel IM508adds a spare 8A BA smart key to Toyota Sequoia 2023 using the 30-pin cable.
Find smartbox and connect 30 pin cable with smartbox and IM508.
We have shown many instructions on how to connect thisToyota 30 pin cable. Search our official blog.


Select Control Unit->Keyless System CAN
Then Backup immo data.
Make sure the device has a good network connection.


Reading eeprom data


The IMMO data has backed up.
Select Add smart key
Step 1: PIN Verification
Step 2: Key Learning
Confirm VIN
Select the eeprom data we have backed up in the previous step
Reading PIN


Then learn key

Add a smart key successfully.

Test the new key.
Posted by: jean at
07:26 AM
| No Comments
| Add Comment
Post contains 123 words, total size 17 kb.
May 22, 2024
Free hand key added on 2016 Citroen C4
Id46 key.
Blade VA2
Frequency: 433 MHz
PIN code recovery without any problem.
Attention, on this model, when adding the second key, the free hand and centralization function does not work on this second key.
Now you can fix this problem you need to program a 3rd key (Xhorse freehand) as a bug.
From here on, the first 2 keys will work properly (freehand and remote centralizing) and only the 3 keys will not work freehand.
For your information, this problem is the same as using theAutel Im608. (same issue).

I only had this problem with Citroen C4 and C4 Picasso freehand.
Read pin and add key withOBDSTAR X300 DP Plus.
GenerateXhorse PSA keyunder this option first.

Posted by: jean at
08:40 AM
| No Comments
| Add Comment
Post contains 135 words, total size 3 kb.
May 21, 2024
LatestGM GDS2 2024.05.08software was tested working with VXDIAG GM scanners (VCX NANO GM,VCX SE,VCX DoIPandVCX FD GMseries.)
Free to try the software with other tools.
Software version:
GDS2 V22.6.01200
GM Global V2024.05.08
GM Global V2024.05.08
GM China V2023.10.12
Opel/Vauxhall V2023.4.0
Supports some Buick Cadillac Chevrolet models till year2025.
Where to download GDS2 2024.05 software?
How to Install GDS2 2024.05.08 and Tech2win?
on Windows 10 64bit.
Main steps
Install GDS2
Install DPS patch
Install Tech2win
Install VX Manager
Run Software
Procedure:
Procedure:
1.
Download and unzip software folder
Open GDS2 folder
InstallGDS2AutoInstall.exeuntil completed


2.
Install2.gm_installer.exeto install DPS patch
Then delete DPS shortcut on desktop.


NOTE: The gm_installer.exe here is used as DPS patch for GDS2.
If not installed the DPS patch, the system will report PC Software Installation Error when running GDS2 (image below).
You can also install regular DPS 4.52 software but it will ask for license. Need to purchase license from official. If don’t want to purchase license, use this dps patch solution.

3.
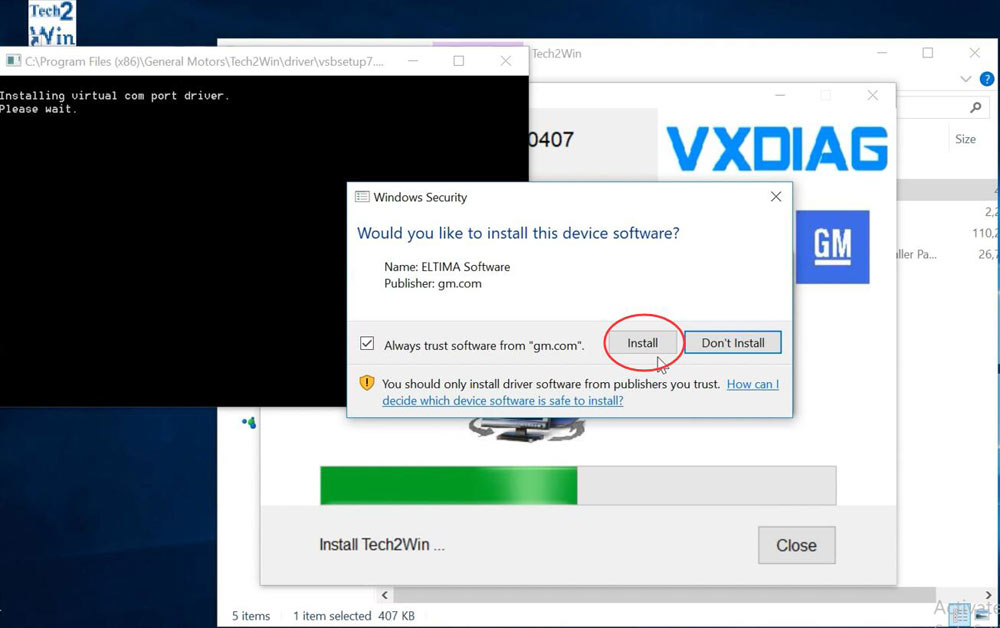
Run Tech2win folder
InstallAutoInstall.exe
If Windows asks to install virual com port driver
Press Install
Tech2win Install OK


4.
Install VX Manager 1.8.9
Connectvxdiag vcx nano gm scannerand check device is well-connected
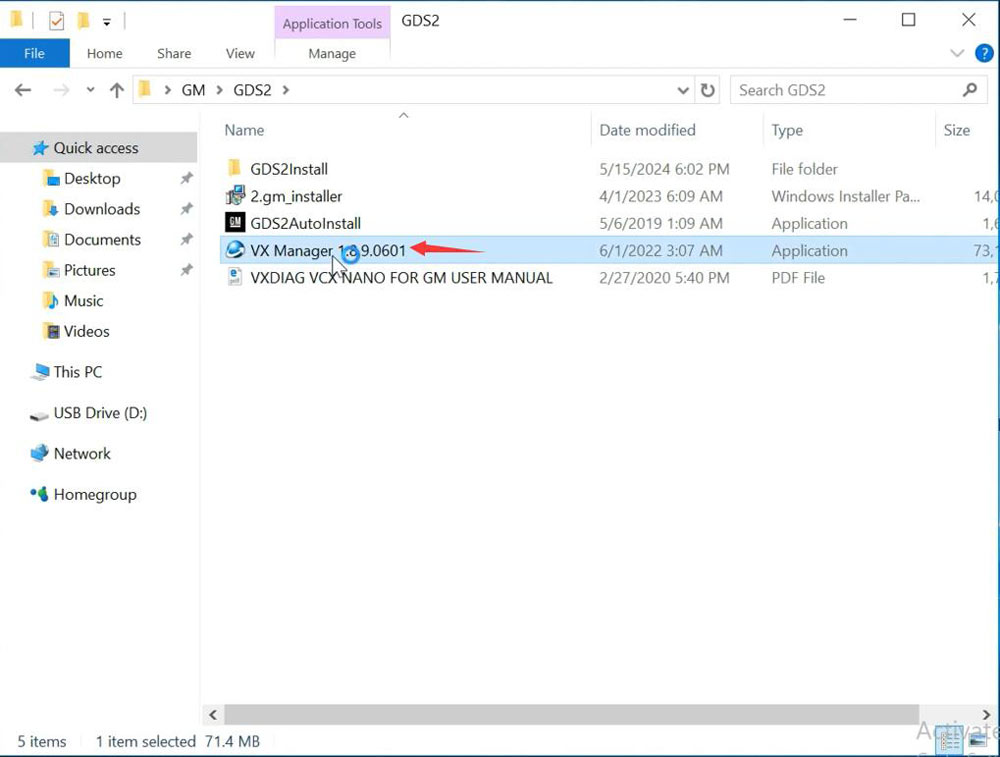

Go to Diagnostic, Install GM GDS2/T2W driver

Update firmware and license to latest version.
5.
Run GDS2 from patch on desktop

Start diagnosis


Video reference:
Posted by: jean at
07:10 AM
| No Comments
| Add Comment
Post contains 231 words, total size 17 kb.
32 queries taking 0.1571 seconds, 210 records returned.
Powered by Minx 1.1.6c-pink.

