


September 26, 2024
Great Wall Wingle 7 2022, programming on ID 47 blank chip key withAutel IM508successfully.
Chip type: ID47 PCF7938X transponder

You should have pin code from dealer or read by immobilizer.
Set up bench connection between MT62 Delphi ECU and Autel IM508
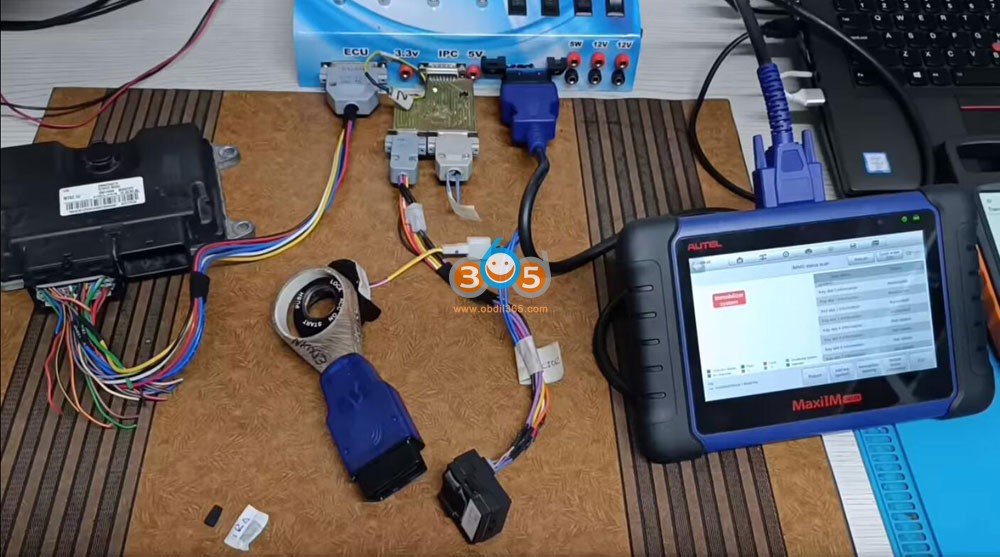


Do a Immo Status scan

Select Immobilizer learning-> Add keys

Insert a new blank tranponsder into ignition lock


IM508will ask pin code to access.

Add key successfully.

Posted by: jean at
08:37 AM
| No Comments
| Add Comment
Post contains 82 words, total size 10 kb.
September 25, 2024
Problem:
When sign up a hotmail forAutel MP808diagnostic scanner, it fails to set up this email and prompts error "Problem with account setup”.

Autel technician solution:
Use Gmail and complete settings below.
Part 1.Generate App Password
1.Open website https://myaccount.google.com/apppasswords , and sign in with google account


2.Complete the 2-Step Verification

3.Create a specific name for App passwords, for example Autel Email

4.The App password is generated, please copy it or write it down

Part 2.Enable Gmail IMAP
1.Open website https://mail.google.com, sign in with Google account

2.Click the Settings icon in the upper right corner, select Forwarding and POP/IMAP

3.Enable IMAP and click Save Changes

Part 3.Configure onAutel Tablet
1.Open Email app on tablet

2.Enter Gmail address and click Manual Setup

3.Select IMAP

4.Enter the App passwords generated in I, then click Next

5.Incoming server settings, click Next

6.Outgoing server settings, click Next

7.Configure Account options, and click Next

8.The Gmail is available now.

Done! That’s how to set up Email on Autel Tablet.
If you fail to log in gmail and cannot send diagnostic report, you can useCloud reportfunction. Just use Cloud reporting and your don’t need an email on it.
Use cloud by selecting ‘get report’ save and view report- share it to recipient email and it works.
Or use the chrome browser, login to Gmail, create an email and attach the pdf file to it.
Posted by: jean at
08:45 AM
| No Comments
| Add Comment
Post contains 236 words, total size 11 kb.
September 24, 2024
Many people use the regular version JLR SDD 165, it will display a red icon offline status and fail to download calibration files. Some others reported the VMware version works no issue.
Here comes the VMware SDD 165
Download Link
VMWare (Use VM V17 to run)
Windows 10 x64 IE fixes
SDD 165
Mongoose Drivers
Seed Generator

Admin
Pa55word
SDD – works with many J2534 devices. IncludingVXDIAG VCX SE JLR,VNCI JLR, Mongoose Pro JLR, OpenPort 2.0. Problems can only arise with clones of poor quality.
NOTE:
If you run into this VM the trouble of logging into an account for which the data was stored in a file. You can shut down image and restart it then it works.

Posted by: jean at
07:26 AM
| No Comments
| Add Comment
Post contains 131 words, total size 3 kb.
September 23, 2024
Some users had problems with theirJLR SDD V164/V159 software. Software is not working and says ‘software status file out of date.’
Error images attached:
The software status file is out of date. It is essential that the software status is updated to the latest version prior to performing a vehicle module software download”

Here are 2 possible solutions.
Solution 1:
JLR official released a manual patch, the patch will work with all versions.
The manual patch is available from within SDD or on the app launcher page.
In SDD interface, hit Continue.

Go to Parameter tab->Manual patch file update.

Click on manual patch, enterGCM_SDD_PCAwhich should automatically install.


If cannot see this manual patch in SDD, make sure your WIFI connection is activated in SDD settings. You need to go into the SDD settings in the Utility tab. Then the networking tab. Should be the top options in the Utility tab. There you can activate your wifi connection that allows SDD to access the WIFI.
Solution 2:
Here is the customer solution.
Set the computer date and to2020after that there was no pop up for "The software status file is out of date”. Modules software files download as usual worked on 2 cars today so far it is working with setting the data and time to few years back.


Many users have spent some time doing multiple troubleshooting, the issue appears to be isolated to windows 7, they suspect JLR has hardened their webservers to not support the legacy encryption algorythms supported in windows 7.
clean win 7 , install sdd 165 – no connectivity
clean win 10 , install sdd 165 , patch with v164 patch – downloads working.Red Wi-Fi Icon but Downloads working 100%
Posted by: jean at
07:24 AM
| No Comments
| Add Comment
Post contains 327 words, total size 8 kb.
September 20, 2024
Recently Toyota Motor North America requested that Autel remove all keys lost security capabilities for Toyota vehicles sold in their country asserting that such functionality goes beyond what is permitted in the license agreement for the software. Now there is no Immo smart box function menu onAutel IM608/IM508/KM100devices.
Here’s an update straight from Autel, regarding the Toyota situation. This is for North America, doesn’t effect in Australia or for those in Europe etc.
Its a legal issue with Toyota that forced Autel to take off the function.

Can’t generate analog key and can’t reset smart box either. No immo reset menu (see image below)

For all keys lost on proxy keys you need server access you need the seed code to be able to reset it. It’s only on the older non smart keys that you can do offline and those option are still on the tool.
It’s not Autel that did this it’s Toyota all tools lost Toyota server access but you can still do it like we did before autel had server access by backing up eeprom data and then using that to bypass pin or if you really must do it by OBD and not unplug the smart box then you can buy access to seed codes and still do it that way but you need to have NASTF for the seed key access again.
We think its to start forcing Autel to do the NASTF integration on the tool.

It affects any vehicles that require using the Toyota server. So even if you don’t update most will models will not work. Regardless of if you update or not, anything that will need internet won’t have server access. If you don’t update will still remove items the moment any wifi source is located without your permission.
You may be able to still AKL on older models. For example at least Ford/Mazda until 2017-ish did not need server access.
It’s still a great value for its cost. We still use them, keep subscriptions updated, also have factory tools including the newer jlr factory tools and factory access. Every tool has it pros and cons but all of our Autel still work great but they’re legit business tools.
Add a key is still available. It can help add keys, but not force new keys without at least one known key available. That’s pretty much it. The rest of its features are there.
Any alternatives for Toyota, since Autel doesn’t do it anymore ? What all other tools is everyone using? Or switching too?
Some programmers are still capable. We still have Lonsdor, OBDSTAR, Smart Pro and Xhorse vvdi key tool plus. Or autopropad from xtool.
Lonsdor K518has good Toyota coverage. It’s a good all rounder and excellent value for money. Using the emulators, you can do many Toyota all keys lost via OBD (need to activate Toyota AKL license). Lonsdor has ADP25 adapter and Toyota BA cable to bypass pin code. Lonsdor also haveLT20series smart keys.

OBDSTAR– OBDSTAR also has good Toyota coverage. You can back up immo data with the simulator for all keys lost via OBD for many models. They just added Toyota Corolla 2023- smart key function.
Xhorse- key tool max pro, key tool plus also do Toyota all key lost. They even launched a specialMini FD OBD tool$80 for Toyota. With the cheap OBD tool you can do both new and old Toyotas.
TheXM38 Toyotaremote is of great value. You can generate lots of Toyota remote and customize frequency/buttons. Xhorse also has Toyota 8A blade key and BA AKL adapter for Toyota.
Autopropad or SmartPro-much more reliable and has one of the best user interfaces of any of the devices mentioned.
It is a good tool for a beginner, but still quite expensive for what it is actually capable of.
Posted by: jean at
07:42 AM
| No Comments
| Add Comment
Post contains 641 words, total size 8 kb.
September 19, 2024
It’s a Toyota Yaris GR year 2022 with 8A blade key. The customer lost all keys on this vehicle in the United Kingdom.
Try to read the immo box on bench withAutel IM608, the connections in the box are not the same.
This is the immo box.


This is the wiring diagram in Autel IM608.

The connection is different but if you find the right pinout will be possible to read it.
Here is the wiring diagram for this immo box.
4 Positive
5 T3
6 ignition
9 k7
12 ground
Read IMMO data in direct mode.

Connect the immo box withAutel 8A non-smart AKL cableandGbox3


Do a immo status scan.


Erase fault codes.

Then add key withIM608.

After key programming is completed, reinstall the immo box back to vehicle.

Install programmed immobilizer unit in thsi vehicle and start vehicle.

If this wiring diagram not working for EU 2023/2024 Yaris Cross, they should be 3rd generation H Key, many tools cannot connect to this immo box and read a key/reset it. You must replace with a new unit and register new key(s) with a TIS challenge code then register immo-ecu by diagnostics. This is the same immobox as in MZEA1 Corolla or 300 series Hiace. There are currently no aftermarket options for these vehicles, you must replace and register as per the factory manual.
To finish the work, remove the immobilizer box from under the dashboard. a new immobilizer box, an 8A chip and an original remote control from the Toyota dealership are needed. And finally, you need to bring in a technician to do an online synchronization for the immobilizer and ecu.
Posted by: jean at
08:44 AM
| No Comments
| Add Comment
Post contains 284 words, total size 14 kb.
September 18, 2024
OBDSTAR OdomasterandG3with mileage license released new mileage software in Sep. 2024.
Subaru V41.31
Add Mileage Calibration function for SUBARU LEGACY 2015- NEC
D70F3529.
Nissan V40.96
Add Mileage Calibration function for NISSAN LAFESTA 2011 93C66
Toyota V40.40
Add Mileage Calibration function for TOYOTA SCION IA
Ford V41.49
Add Mileage Calibration function for below models:
• FORD BANTAM NEC+24C16
• FORD BRONCO 2021 TYPE3(7 INCHES R7F701441)
• FORD C-MAX HYBRID 2015- DENSO SPC5606S+93C86+2XLCD
• FORD ECOSPORT 2013- TYPE3(MC9S12XEQ384)
• FORD ESCAPE 2006-2008 93C56
• FORD EXPEDITION 2015- CONTINENTAL(SPC5606S)
• FORD EXPLORER 2015- TYPE2(V1 DENSO SPC5606S+93C86+2XLCD)
• FORD EXPLORER 2015- TYPE3(V2 DENSO SPC5606S+93C86+2XLCD)
• FORD EXPLORER 2011- TYPE2(NEC+93C86+2XLCD)
• FORD F150 2015- TYPE3(MPC5606S+24C32)
• FORD F150 2013- MPC5604S+24C32
• FORD F250 2011- TYPE2(MB91F037+93C86)
• FORD FIESTA 2013- TYPE3(MC9S12XEQ384)
• FORD FIESTA 2008- MC9S12HZ256
• FORD FIESTA 2006- MC9S12H256
• FORD FIGO/ASPIRE 2017- R5F10DPJJ
• FORD FIGO/ASPIRE 2015- R5F10DPJJ V1
• FORD FIGO/ASPIRE 2015- R5F10DPJJ V2
• FORD FOCUS 2 2008- HI (MC9S12XHZ512)
• FORD FOCUS 2 2008- LO (MC9S12XHZ512)
• FORD FOCUS 2 2005-2008 MC9S12H256
• FORD FOCUS 3 2011- NEC+95320
• FORD FOCUS EV 2013- DENSO SPC5606S+93C86+2XLCD
• FORD GALAXY 2010- HI (MC9S12XHZ512)
• FORD GALAXY 2010- LO (MC9S12XHZ512)
• FORD GALAXY 2006- LO (MC9S12H256)
• FORD GALAXY CONVERS+ MAC7116+24C16
• FORD FUSION 2015- CONTINEN7AL(SPC5606S)
• FORD FUSION HYBRID 2015- DENSO SPC5606S+93C86+2XLCD
• FORD FUSION USA 2011- NEC3423+93C86+2XLCD
• FORD KA 2017- R5F10DPJJ
• FORD KA 2015- TYPE1 (R5F1ODPJJ V1)
• FORD KA 2015- TYPE2(R5F1 ODPJJ V2)
• FORD KUGA 2008- HI (MC9S12XHZ512)
• FORD KUGA 2008- LO (MC9S12XHZ512)
• FORD KUGA 2 2013- MPC5604S+24C32
• FORD KUGA 2 2013- MPC5645S+24C32
• FORD MONDEO 2015- CONTINEN1AL(SPC5606S)
• FORD MONDEO 2010- HI (MC9S12XHZ512)
• FORD MONDEO 2010- LO (MC9S12XHZ512)
• FORD MONDEO 2007- LO (MC9S12H256)
• FORD MONDEO CONVERS+ MAC7116+24C16
• FORD MONDEO HYBRID 2015- DENSO SPC5606S+93C86+2XLCD
• FORD MONDEO VISTEON 2015- SPC5606S+24C32
• FORD MUSTANG 2013- SPC5606S+24C32
• FORD RANGER 2015- DENSO SPC5645S+93C86+2XLCD
• FORD RANGER 2015- CONTINEN1AL(SPC5606S)
• FORD TRANSIT 2011- NEC+95320
• FORD TRANSIT MK8 2016- NEC70F3525
• LINCOLN MKZ 2015- DENSO SPC5606S+93C86+2XLCD
• LINCOLN MKZ 2011- NEC3423+93C86+2XLCD

Posted by: jean at
07:14 AM
| No Comments
| Add Comment
Post contains 356 words, total size 4 kb.
September 14, 2024
What is the difference betweenGodiag GT327 ELM327Super OBDII ENET adapter and regular OBDII Bluetooth adapters (Vgate, ELM327 etc)?

Similarities
All these adapters supportBluetooth 4.0wireless connection.
All these adapters are compatible with multiple OBDII diagnostic applications foriOS and Androidsystem.
Android app incl. Torque, inCarDoc, CarScanner, MotorData OBD, DashCommand, OBD Car Doctor, Auto Doctor, MiniOBDI, EOBD Facile etc/
iOS app incl. OBDocker, MultiECUScan, inCarDoc, Dr.Prius, OBD Jscan, OBD Fusion, Carista, Car Scanner etc.
Connect GT327 to Apps on iOS

Connect GT327 to Apps on Android

Differences:
GT327 is a full-version ELM327 device with high quality inside board. GT327 will display voltage and give low voltage alarm.
Display voltage function:
If the voltage is lower than 11V, the device will sound an alarm and the user needs to charge the car battery with a dedicated car battery charger. After hearing the alarm, users should quit diagnose or program the vehicle, let alone try to start the vehicle to avoid damaging the battery due to excessive discharge.

The burst point of theGodiag GT327is that it comes with 3m copperENET Ethernet Cable.It is not only an ELM327 adapter but also an ENET cable.

With this ENET cable, you can usemany ENET softwares in the market.
Softwares:E-SYS, INPA, ISTA+, ISIS, ICOM, ECOM, Rheingold, BMWAiCoder, ODIS-E, Pathfinder, Xentry, DTS Monacomany more on Windows PC.
Connect GT327 ENET cable with PC programs

With this ENET cable you can also use Apps on mobile phone.
Application:Also compatible withBimmercode, Bootmod3, Bimmerlink OBDetc Apps.
You also need an OTG converter which is not included in the package.
Connect GT327 ENET cable with Apps on mobile phone

The GT327 ELM ENET cable is very cheap, it only takes$29.99in obdii365.com.
Posted by: jean at
06:48 AM
| No Comments
| Add Comment
Post contains 285 words, total size 8 kb.
September 13, 2024
Question:
Have tried the newThinkdiag2vci with diagzone on a Volvo in menu it cam up with use CAN OR DOIP tried doip did not work. Ok on CAN. Is there anyway to use the Thinkdiag2 DOIP protocol?
.jpg)
Here is the clue.
The Thinkdiag2 is similar to Launch DBScar VII (not exactly the same, check thecomparisonhere).
The DBscar VII supports CAN FD and DoIP protocol, so does the Thinkdiag 2.
The Thinkdiag2 scanner has its own software for iOS and Android called Thinkdiag +, Bluetooth connection. There is a rumor that it does not have new DOIP protocol for fast reading of Volvo SPA. It is not true.
You should use a special adapter (DoIP Connect cable). You use the same cable for DBscar VII.

Same connection as DBscar 7 and DoIP cable.

Posted by: jean at
08:00 AM
| No Comments
| Add Comment
Post contains 139 words, total size 3 kb.
September 12, 2024
Step1:
Open your phone's Bluetooth Settings, search for and tap "Android-Vlink".

Step2:
A request pairing prompt will be generated when pairing, enter the pairing code "1234" and click "OK".

Step3:
Successfully paired to the Bluetooth device "Android-Vlink".

Step 4:
Open OBDocker APP, click ‘Connect’.

Step 5:
Select the adapter ‘Vgate iCar BLE+Bluetooth’.

Step 6:
Click "Connect"

Step 7:
Waiting for the app to establish a connection with the car

Step8:
Connected successfully

2. How to Connect iCar Pro 2S with Bimmer-tool on Android
Step1:
Open your phone's Bluetooth Settings, search for and tap "Android-Vlink".
Step2:
A request pairing prompt will be generated when pairing, enter the pairing code "1234" and click "OK".
Step3:
Successfully paired to the Bluetooth device "Android-Vlink".
Step4:
Opentheappandclickonthebuttoninthetoprightcorner.
Step5:
ChoosetheConnectiontype"Bluetooth".
Step6:
Select the paired Bluetooth device "Android-Vlink".
Step7:
Click on "CONNECT".
Step8:
Waiting for the app to connect to the vehicle's ECU.
Step9:
Connected successfully.
3. How to Connect iCar Pro 2S with AlfaOBD on Android
Step1:
Open your phone's Bluetooth Settings, search for and tap "Android-Vlink".
Step2:
A request pairing prompt will be generated when pairing, enter the pairing code "1234" and click "OK".
Step3:
Successfully paired to the Bluetooth device "Android-Vlink".
Step4:
Open the app and click on Bluetooth.

Step5:
SelectthepairedBluetoothdevice"Android-Vlink".

Step6:
Connected successfully.

4. How to Connect iCar Pro 2S with Torque Proon Android
Step1:
Open your phone's Bluetooth Settings, search for and tap "Android-Vlink".
Step2:
A request pairing prompt will be generated when pairing, enter the pairing code "1234" and click "OK".
Step3:
SuccessfullypairedtotheBluetoothdevice"Android-Vlink".
Step4:
Open the app and click on the settings icon in the bottom left corner.

Step5:
Clickon"Settings".

Step6:
Clickon"OBD2AdapterSettings".

Step7:
Click on 'Connection Type' to select the connection method.

Step8:
Click on "Bluetooth"

Step9:
Click on "Choose Bluetooth Device".

Step10:
Select the paired Bluetooth device "Android-Vlink".

Step11:
Afterselectingthecorrectdevice,returntothehomepageandwaitfortheapptoconnect.

Step12:
Connected successfully.

5. How to Connect iCar Pro 2S with inCarDocon Android
Step1:
Open your phone's Bluetooth Settings, search for and tap "Android-Vlink".
Step2:
A request pairing prompt will be generated when pairing, enter the pairing code "1234" and click "OK".
Step3:
Successfully paired to the Bluetooth device "Android-Vlink".
Step4:
Open the app and click on "Settings".

Step5:
Click on "Connection".

Step6:
Click on "Connection mode".

Step7:
Select "Bluetooth" as the connection mode.

Step8:
Click on "BT connection".

Step9:
Select the paired Bluetooth device "Android-Vlink".

Step10:
Return to the home page when the settings are complete.
Step11:
Click on "Connect <BT"Android-Vlink">

Step12:
Connected successfully.

6. How to Connect iCar Pro 2S with EOBD-Facile-caron Android
Step1:
Open your phone's Bluetooth Settings, search for and tap "Android-Vlink".
Step2:
A request pairing prompt will be generated when pairing, enter the pairing code "1234" and click "OK".
Step3:
Successfully paired to the Bluetooth device "Android-Vlink".
Step4:
Open the app and click on "Settings".

Step5:
Click on:"Interface".

Step6:
Select: "ELM327 Bluetooth".

Step7:
Aftersettinguptheinterface,returntothehomepage.Clickon"Connection".

Step8:
Selectthepaireddevice"Android-Vlink".

Step9:
Wait for the app to connect to the iCar Pro 2S.

Step10:
Select your car model.

Step11:
Wait for the app to connect to the car ECU.

Step12:
Connected successfully.

7. How to Connect iCar Pro 2S with DashCommandon Android
Step1:
Open your phone's Bluetooth Settings, search for and tap "Android-Vlink".
Step2:
A request pairing prompt will be generated when pairing, enter the pairing code "1234" and click "OK".
Step3:
Successfully paired to the Bluetooth device "Android-Vlink".
Step4:
Open the app and click on:"SETTINGS".

Step5:
Click on:"OBD-II interface type".

Step6:
SelecttheOBD-IIInputType"ELM".

Step7:
Click on:"OBD-II dataport".

Step8:
Click on:"Bluetooth Device".

Step9:
ChoosetheBluetoothdevice"Android-Vlink".

Step10:
Return to the home page after setting the correct connection method.

Step11:
Click on:"NOT CONNECTED".

Step12:
Connected successfully.

8. How to Connect iCar Pro 2S with ActiveOBDon Android
Step1:
Open your phone's Bluetooth Settings, search for and tap "Android-Vlink".
Step2:
A request pairing prompt will be generated when pairing, enter the pairing code "1234" and click "OK".
Step3:
Successfully paired to the Bluetooth device "Android-Vlink".
Step4:
Open the app and click: "Connect".
Step5:
SelecttheOBDadapterconnectionmethod"Bluetooth3.0".
Step6:
Click on "OK".
Step7:
Clickon"OK"andthenselectthepaireddevice.
Step8:
SelecttheOBDdevice"Android-Vlink".
Step9:
Setupfinishedandclickon"OK".
Step10:
WaitingfortheapptoconnecttoOBD.
Step11:
Connected successfully.
9. How to Connect iCar Pro 2S with Shift OBDon Android
Step1:
Open your phone's Bluetooth Settings, search for and tap "Android-Vlink".
Step2:
A request pairing prompt will be generated when pairing, enter the pairing code "1234" and click "OK".
Step3:
Successfully paired to the Bluetooth device "Android-Vlink".
Step4:
Open Shift OBD Complete, click on "Settings".

Step5:
Select "Bluetooth" as the connection type.

Step6:
Exit and then reopen the app and wait for the app to connect automatically.

10. How to Connect iCar Pro 2S with Dr.Pruison Android
Step1:
Open your phone's Bluetooth Settings, search for and tap "Android-Vlink".
Step2:
A request pairing prompt will be generated when pairing, enter the pairing code "1234" and click "OK".
Step3:
Successfully paired to the Bluetooth device "Android-Vlink".
Step4:
Click "BLUETOOTH OBD2" and select "Android-Vlink".
Step5:
Waiting for the app to connect to OBD2 device.
Step6:
Connected successfully.
11. How to Connect iCar Pro 2S with ABRPon Android
NOTE:
APPcanonlybeconnectedtoBLE.
JustenableBluetoothsettingsonyourAndroiddevice.
DONOTNeedtoconnectBluetoothNameonAndroiddevice.
ThenconnecttheBluetoothdevicenameintheOBDappsetting
Step1:
Open the APP and click the button in the upper left corner.

Step2:
Click on "Plan sttings".

Step3:
Click on "Edit settings".

Step4:
Click on "+ OBD".

Step5:
Click on "Understood".

Step6:
Select "IOS-Vlink".

Step7:
Connected successfully.

12. How to Connect iCar Pro 2S with BimmerLinkon Android
Step1
Open your phone's Bluetooth Settings, search for and tap "Android-Vlink".
Step2:
A request pairing prompt will be generated when pairing, enter the pairing code "1234" and click "OK".
Step3:
Successfully paired to the Bluetooth device "Android-Vlink".
Step4:
Open the "BimmerLink" application and click on "CONNECT".
Step5:
SelectOBDadapter"Vagte iCarBluetooth".
Step6:
Click on "CONNECT".
Step7:
Waitingfortheapptoconnecttothevehicle'sECU.
Step8:
Connected successfully.
13. How to Connect iCar Pro 2S with BimmerCodeon Android
Step1:
Open your phone's Bluetooth Settings, search for and tap "Android-Vlink".
Step2:
A request pairing prompt will be generated when pairing, enter the pairing code "1234" and click "OK".
Step3:
Successfully paired to the Bluetooth device "Android-Vlink".
Step4:
Open the app and click on "CONNECT".
Step5:
SelecttheOBDAdapter"Vgate iCarBluetooth".
Step6:
Click on "CONNECT".
Step7:
Waiting for the APP to connect to the adapter.
Step8:
Choose your Car model.
Step9:
Waiting for the APP to connect to the car ECU.
Step10:
Connected successfully.
14. How to Connect iCar Pro 2S with OBD JScanon Android
Step1:
Open your phone's Bluetooth Settings, search for and tap "Android-Vlink".
Step2:
A request pairing prompt will be generated when pairing, enter the pairing code "1234" and click "OK".
Step3:
Successfully paired to the Bluetooth device "Android-Vlink".
Step4:
Open the app. Find the car model you need to connect and click on it.

Step5:
Select "Android-Vlink"

Step6:
Wait for the app to connect to your car.

Step7:
Connected successfully.

15. How to Connect iCar Pro 2S with OBD Fusionon Android
Step1:
Open your phone's Bluetooth Settings, search for and tap "Android-Vlink".
Step2:
A request pairing prompt will be generated when pairing, enter the pairing code "1234" and click "OK".
Step3:
Successfully paired to the Bluetooth device "Android-Vlink".
Step4:
Open the app and click on "SETTINGS".

Step5:
Clickon"Preferences".

Step6:
Clickon"Conmmunications".

Step7:
Clickon"Communicationtype".

Step8:
Select"Bluetooth"astheCommunicationType.

Step9:
Click on:"Bluetooth Device".

Step10:
Select the Bluetooth device "Android-Vlink".

Step11:
AfterselectingtheBluetoothdevice,returntothehomepageandclickon"CONNECT".

Step12:
Connected successfully.

16. How to Connect iCar Pro 2S with Caristaon Android
Step1:
Openyourphone'sBluetoothSettings,searchforandtap"Android-Vlink".
Step2:
A request pairing prompt will be generated when pairing, enter the pairing code "1234" and click "OK".
Step3:
SuccessfullypairedtotheBluetoothdevice"Android-Vlink".
Step4:
Open the app and click on:"Connect".

Step5:
ClicktheOBD2adapter"vLinkerMC+".

Step6:
PickOBD2device"Android-Vlink".

Step8:
Connected successfully.

17. How to Connect iCar Pro 2S with OBD Auto Doctoron Android
Step1:
Open your phone's Bluetooth Settings, search for and tap "Android-Vlink".
Step2:
A request pairing prompt will be generated when pairing, enter the pairing code "1234" and click "OK".
Step3:
Successfully paired to the Bluetooth device "Android-Vlink".
Step4:
Open the app "OBD Auto Doctor" and click "Extras".

Step5:
Click on "Connectivity".

Step6:
Select "Bluetooth" as the connection type.

Step7:
Click "Search Bluetooth devices".

Step8:
Choose"Android-Vlink".

Step9:
After selecting the correct device, return to the home page.

Step10:
Click the Connect button in the upper right corner.

Step11:
Wait for the app to connect to the vehicle.

Step12:
Connected successfully.

18. How to Connect iCar Pro 2S with Car Scanner ELM327 OBD on Android
Step1:
Open your phone's Bluetooth Settings, search for and tap "Android-Vlink".
Step2:
A request pairing prompt will be generated when pairing, enter the pairing code "1234" and click "OK".
Step3:
Successfully paired to the Bluetooth device "Android-Vlink".
Step4:
Open the "Car Scanner" and click the Settings button in the top right corner.

Step5:
Click on "Adapter OBDII ELM327".

Step6:
Select "Bluetooth" as the connection type.

Step7:
Click on "Device name".

Step8:
Select the device "Android-Vlink".

Step9:
After selecting the correct device, return to the home page.

Step10:
Click on "CONNECT".

Step11:
Wait for the app to connect to the vehicle.

Step12:
Connected successfully.

Posted by: jean at
07:25 AM
| No Comments
| Add Comment
Post contains 1478 words, total size 29 kb.
32 queries taking 0.0779 seconds, 210 records returned.
Powered by Minx 1.1.6c-pink.

