


May 17, 2023
Foxflash/kt200programmers can read and write this sid807evo of psa as well as Ford and Volvo.
OBD:
SID807EVO confirmed working by obd.
Here’s some feedback:
Ford c max sid807evo Read and Write via obd ok, Dtc off
FORD 2011 SID807 evo obd read ok, write mod ok. Checksum manually, program did not ask if it should correct or not
But boot mode is recommended for sid807 evo.
Boot mode:
SID807evo Boot read, boot write ok, Checksum by tool.
KT200/Foxflash SID807EVO Boot Pinout
SIEMENS CONTINENTAL 807/807EVO [T1797 INT.F] –PSA
Step 1: Read and Write ECU
Connect with the multifunction cable the following pinout and the boot shown below
Use the driver:
→ TOOLS BOOT MODE
→ INFINEON TRICORE Boot
→ SAK TC1797

Note:
Some hardware versions boot in the manner shown on the next page.

Attention:
On some ECUs and for tools with version firmware< 70 it is only possible to use this type of boot:

Example:
Peugeot Partner 2015 Sid 807Evo Dpf Egr off read write success in boot mode


If need to read and write Ford & Volvo SID807EVO withFoxflash/kt200, follow boot pin here:
SIEMENS CONTINENTAL SID807/807EVO – [T1797 INT.F] – Ford, Volvo
Step 1: Read and Write ECU
Connect with the multifunction cable the following pinout and the boot shown below
Use the driver:
→ TOOLS BOOT MODE
→ INFINEON TRICORE Boot
→ SAK TC1797
Attention:
Some hardware versions boot as on the following page.
ATTENTION:
If the password error message appears at the beginning of the reading, proceed as follows:
Step 2: Password Search
Disable boot mode by removing all connections on the pcb.
Connect the following pinout.
Use the driver:
→ TOOLS BOOT MODE
→ INFINEON TRICORE Tool Password
→ OBD PASSWORD SID807 FORD – VOLVO
→ Click on "Find Password” and follow the software messages.

Now that the password has been found it’s possible to read and write the control unit as described in STEP 1.
Posted by: jean at
08:43 AM
| No Comments
| Add Comment
Post contains 323 words, total size 11 kb.
May 16, 2023
Tutorial: how to bleed the Brakes on your Toyota/Lexus using Toyota Techstream software on a laptop.
So many ways to bleed brakes, just adding this one to the tool belt. Seems like an efficient way to push a higher volume of fluid so may be a good option for a full flush, especially when time is short.
Model example:Land cruiser LC200 series.
Background:
Finish a complete break upgrade on a Land cruiser 200 series.
Procedure:
Get a cheapmini vci cableand proper software version.
Here v12 (older version has the Unitiny feature) was used and set it up on VMware Win7 32bit.
Insert mini vci obd2 cable into car

Connect the vehicle, now go into the ABS vehicle stability control on traction
Go to Unitiny->Air Bleeding


It tells us here that this function is used to purge air from the hydraulic braking system
and then we just follow our prompts.

I am going to start with the rear left line which is the furthest line from the master cylinder.


i’ll hit the next button and it says here perform the following operations.
open the bleeder plug.
you see the bleeder plug is open.


because we’ve got gravity dripping fluid through it.
press the next and wait for the timer and it says note do not depress the brake pedal.
now we’ll hit our next button and you can hear funky stuff happening under the bonnet.
now it says please perform the following operations close the bleeder plug
close off our bleeder pug press next
wait for timer


hit our next button and it says resetting what that actual resetting is i’m not sure but it must have something to do with the master cylinder.
air bleed is complete. press next to select another line or press exit to exit the function.
i’m going to hit next i’m going to do that right rear line again and i will show you what it looks like at the master cylinder.

here’s what it looks like at the wheel cylinder

and our air bleed is complete on that right rear line.
now i will continue to do this process i will repeat it about five times per wheel cylinder just to make sure that i get all of that air out.
i’ve got plenty of fluid i’m pushing dot four fluid through it now.
now the front left is a little bit different in that it asks you to hold the brake pedal
then press next let the timer run its course and then release the brake pedal and press next that’s quite interesting so it looks like it doesn’t actually bleed fluid through the wheel cylinder


and let’s try the front right same thing.
press and hold the brake pedal hit next, without releasing the bleeder plug then release the brake pedal and hit next.
so on those two front wheel cylinders i will open the bleeder plugs and just let gravity bleed through there and push any air out that might be sitting in those wheel cylinders.


CAUTION: If air is bled without using theTechstream,damage or accidents may result. Therefore, always use the Techstream when bleeding air.
Worked great for me.
http://blog.obdii365.com/2023/05/16/bleed-the-brakes-on-toyota-with-mini-vci-techstream/
Posted by: jean at
09:00 AM
| No Comments
| Add Comment
Post contains 539 words, total size 19 kb.
May 15, 2023
Yanhua Mini ACDP not only release modules for keys and odometer but also for gearbox reflash/cloning.
Here comes the ACDP gearbox module list.
| No. | Module | Support Gearbox Model | Car brands |
| 1 | Module 11BMW EGS Reflash | 1. BMW E series 8HP
2. BMW F/G series 8HP 3. BMW F series 6HP |
BMW |
| 2 | Module 13VW/Audi Gearbox clone | DQ200 (0AM/OCW)
DQ250 (02e/0D9) DL382 (0CK) DL501 (0B5) VL381 (0AW) |
VW Audi Seat Skoda |
| 3 | Module 14MPS6 gearbox clone | Volvo C30, C70, S40, S80, V40, V50, V60, V70, XC60, XC70 etc gearbox clone | Volvo |
| 4 | Module 16Mercedes Benz gearbox clone | 1. VGS-FDCT/VGS2-FDCT gearbox clone (dual clutch)
2. VGS2-FCVT 722.8 gearbox clone 3. VGS2-NAG2/VGS3-NAG2 (722.9-2, 722.9-3) gearbox reflash |
Mercedes Benz |
| 5 | Module 19SH725XXX gearbox clone | All, ZF 8HP, VW 0DE, 7DCT and DKG | BMW, Benz, Land rover, VW, Audi, Rolls-royce, Porsche, Bentley, Aston Martin, Lamborghini, Maserati, Jeep, Chrysler, Buick, |
| 6 | Module 22GM 6T/6L Gearbox Clone |
|
GM, Buick, Chevrolet |
| 7 | Module 26Ford DPS6 gearbox clone | Ford DPS6 gearbox clone | Ford Focus Ecosport Fiesta Aspire Figo, etc |
| 8 | Module 28ZF 9HP gearbox clone | Support Jaguar, Land rover, Chrysler, Dodge, Fiat, Honda, Jeep and other models of the ZF-9HP gearbox boot mode cloning. | Jaguar, Land rover, Chrysler, Dodge, Fiat, Honda, Jeep etc |
| *All modules requireACDP hostto work with. | |||
Posted by: jean at
06:59 AM
| No Comments
| Add Comment
Post contains 247 words, total size 4 kb.
May 12, 2023
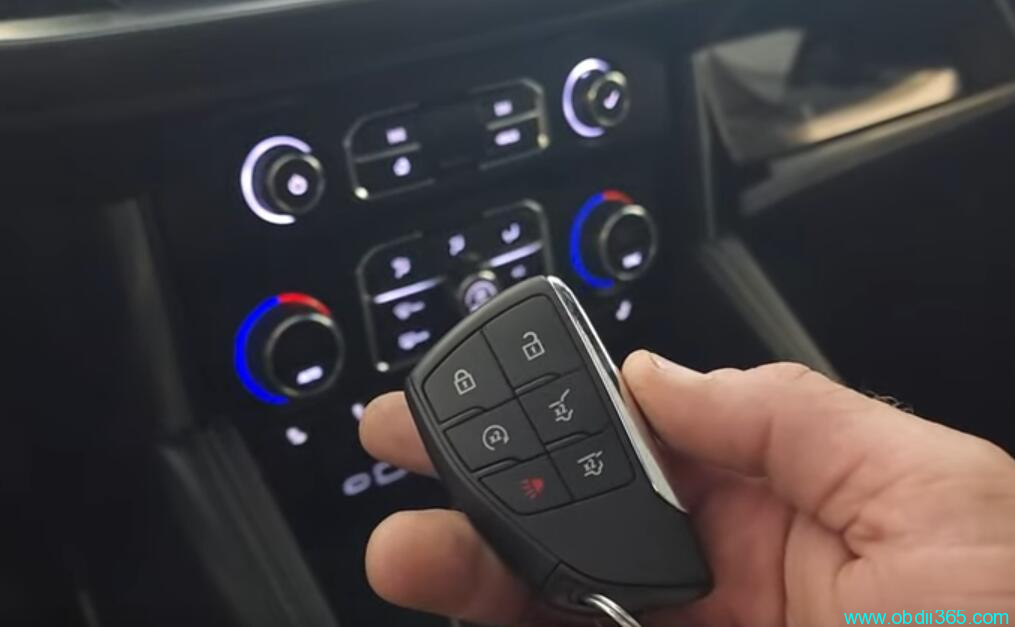
OBDSTAR is good on new GM CAN FD system key programming. Here is an example of 2022 Chevrolet Tahoe Key withobdstar x300 dp plus.
It is 2022 Chevy Tahoe. Autel cannot do it. It cannot bypass the security code.
AutoPro pad and OBDSTAR will do this.
OBDSTAR requires aCAN FD adapter.
Make sure you have device and CAN FD adapter well connected.

If failed to communicate via auto detect, go for manually select instead.
Chevy->USA->Tahoe-> 2021- > without Pincode


Read key number. There are 2 keys programmed.


SelectProgram Keys.
This function requires network connection.
Turn on the ignition switch
Configure system

Put the new proximity key into the sensing area in the second round hole of the cup holder.

Take the other keys out of car.
Press and hold the start button for more than 2 seconds.


Insert new key, press Start button.
Test new keys.
Posted by: jean at
08:42 AM
| No Comments
| Add Comment
Post contains 156 words, total size 12 kb.
May 11, 2023
Free Download Subaru Select Monitor SSM4 2019.07 Full diagnostic software
Password:carspecssm2019
Compatible devices:vxdiag subaru,openport 2.0and other j2534 adapter. Test by your side.
Change the date to 2019.07 before installation and select the region after installation. then there is the possibility of change.

Posted by: jean at
08:32 AM
| No Comments
| Add Comment
Post contains 51 words, total size 2 kb.
May 10, 2023
Here’s the solution toOBDSTAR X300 DP plus,x300 pro4, key master 5,odomaster,p50,dc706etc 7 inch tabletsscreen freezes boot logo flashing and non-responsive status problem.
Solution:
Flash the tablet.
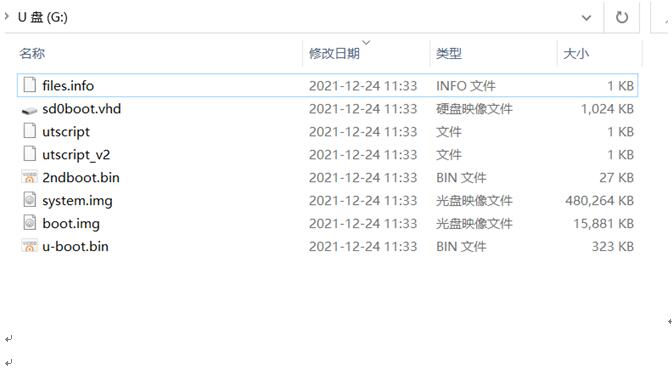
Download reflashboot files.
How to flash obdstar x300 dp plus & other OBDSTAR 7 inch tablets?
BackupDP Software
Warning: Upgrading the firmware will clean up all the settings in the device and all the software in the DP. Users who have expired cannot download the software again through the one-click upgrade, so the software in the device needs to be backed up.
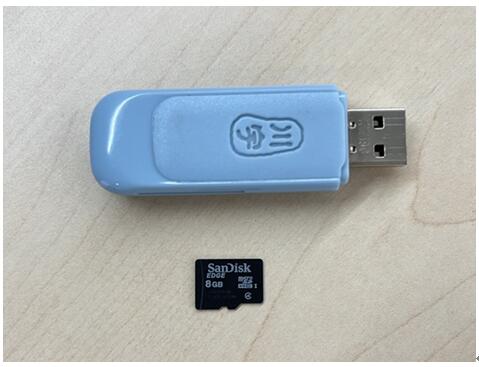
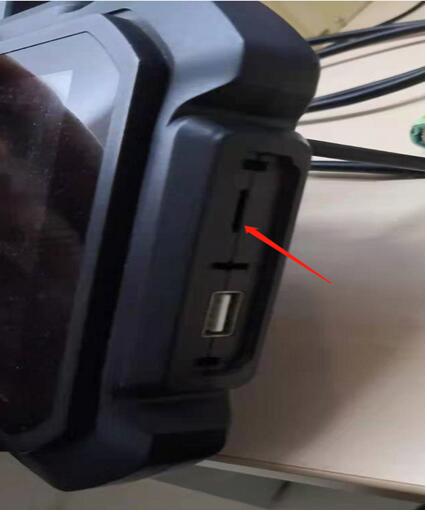
1. Insert a TF card with a capacity greater than 16G into the device to back up the DP software.
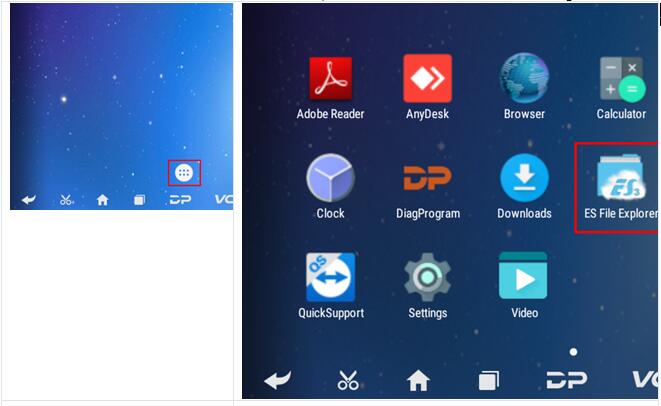
2. Click the main menu button on the main screen, select and enter the ES file manager.
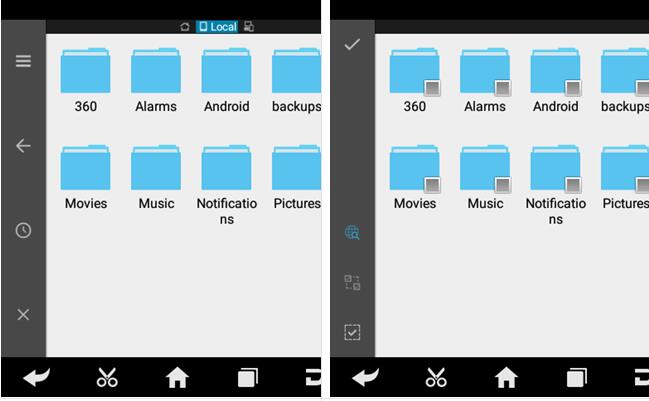
3. Locate and long press the DP folder in the main interface of the ES file manager that opens, and then click the copy button.
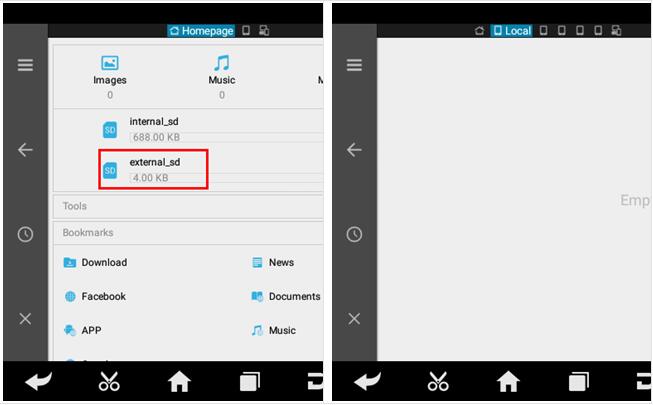
4. Click the menu button, expand the local area, and select the homepage.

5. Select and click the external TF card, and then click the paste button. Wait for the copy to complete. After the firmware upgrade is complete, just overwrite the DP directory from the TF card to the device.
Preparations
1. Download firmware file above to be upgraded.
The firmware file name format is: dpXX.zip.
2.
A TF card with a capacity greater than 1G and a TF card reader. All files inside the card will be cleared during the operation, please backup first.
Making upgradable TF card
1. After inserting the TF card into the card reader, insert the card reader into the USB port of the computer.
2. Format TF card
Warning: All files in the TF card will be erased, if there are important files in the TF card, please back them up before operating.
3. Decompress the "dpXX.zip ” and copy decompressed files to the formatted TF card
Updating the firmware
Warning: please plug in the power adapter for the device and ensure that the power indicator is on. Do not power off during the upgrade process.
1. Insert the TF card into the device.
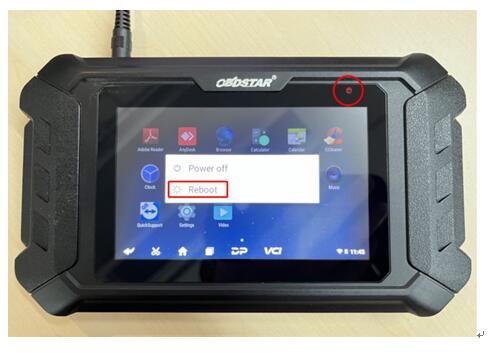
2. Make sure the device is plugged in and the power light is on. Long press the device power button and select Reboot
3. The device will automatically perform a firmware upgrade, Please wait.
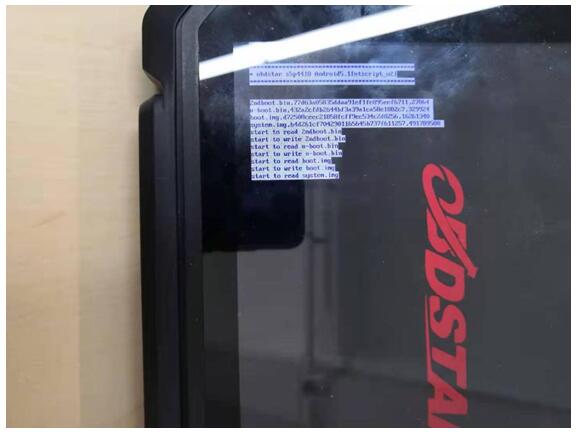
4. When the screen displays "update successful”, remove the TF card from the device. Long press the power button to turn off, then long press the power button to turn on.
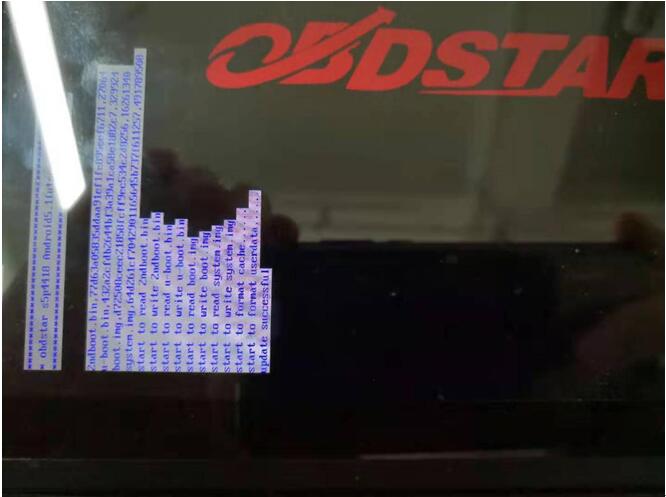
5. Firmware upgrade is completed.
Posted by: jean at
07:36 AM
| No Comments
| Add Comment
Post contains 429 words, total size 5 kb.
May 09, 2023
Launch X431 release new Energy Battery Pack adapters and activation card for specific electric vehicles to perform battery pack analysis. The EV Diag Kit is compatible with the X431 PAD V andPAD VII.
How to activate Energy Battery Pack on PAD VII/Pad V?
1. User has already purchasednew energy battery pack diagnostic configurationof the X-431 PAD V/X-431 PAD VII from obdii365.com and received the Activation Card of new energy detection expansion package and diagnostic adaptor cables.
2. Choose either of the following methods to activate it on diagnostic scanner.
Method 1: via Job Menu
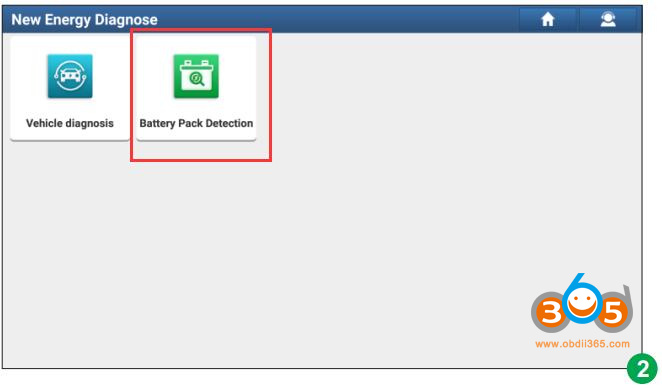
1).Update the main diagnostic app of the diagnostic scanner to V7.03.025 (X-431 PAD V) / V7.00.021 (X-431 PAD VII) or above and a new module "New Energy Diagnose” will appear on the Job menu. Refer to figure 1.

2).TapNew Energy Diagnoseto enter the following screen.

*Note: Vehicle Diagnosis in figure 2 covers all new energy vehicle diagnostic software included in the original product configuration. See figure 3

3).TapBattery Pack Detection, the system will identify whether the current user account has activated the battery pack diagnostic configuration or not.
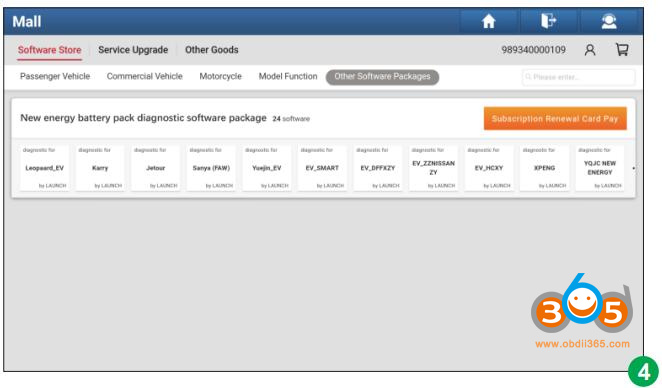
A.If not activated, it will navigate to the Mall module directly. See figure 4. TapSubscription Renewal Card Payand enter the 24-digit password to activate it.
After it is successfully activated, please go toSoftware Updateto download and install the diagnostic software of the battery pack.

B. If already activated but not downloaded the battery pack diagnostic software, it will go to Software Update to download. See figure 5.

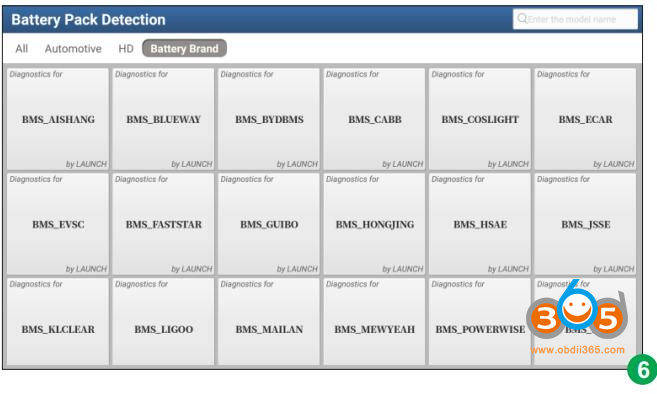
C. If already activated and downloaded the battery pack diagnostic software, it will enter the battery pack brand selection screen. See figure 6.

Method 2: via Mall
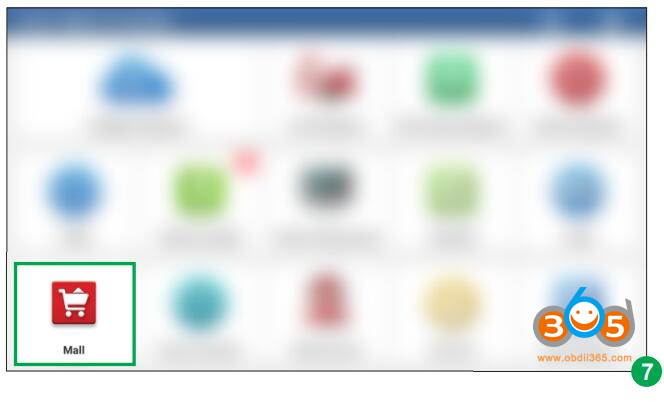
1).Update the main diagnostic app of the diagnostic scanner to V7.03.025 or above and tap Mall on the Job menu. See figure 7.

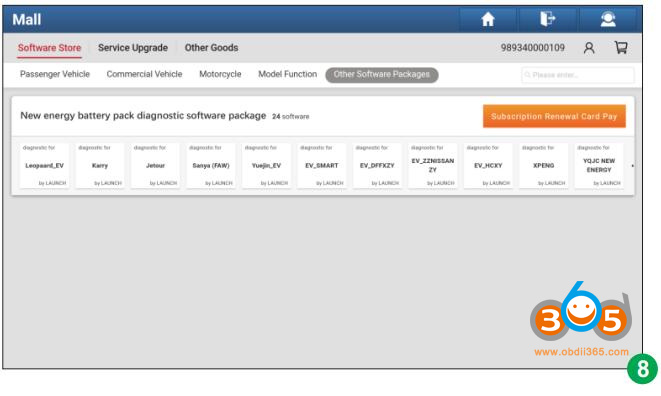
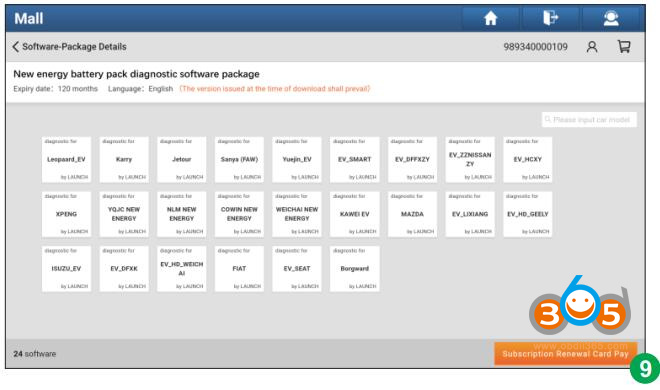
2).TapOther Software Packages, and then tapNew energy battery packdiagnostic software package to enter figure 8.

3).TapSubscription Renewal Card Payto enter figure 9.

4).TapSubscription Renewal Card Pay, enter the 24-digit password and tap Confirm to activate it. See figure 10 & 11.


5).After it is successfully activated, please go toSoftware Updateto download and install the diagnostic software of the battery pack.

www.obdii365.com
Posted by: jean at
06:38 AM
| No Comments
| Add Comment
Post contains 369 words, total size 14 kb.
May 08, 2023
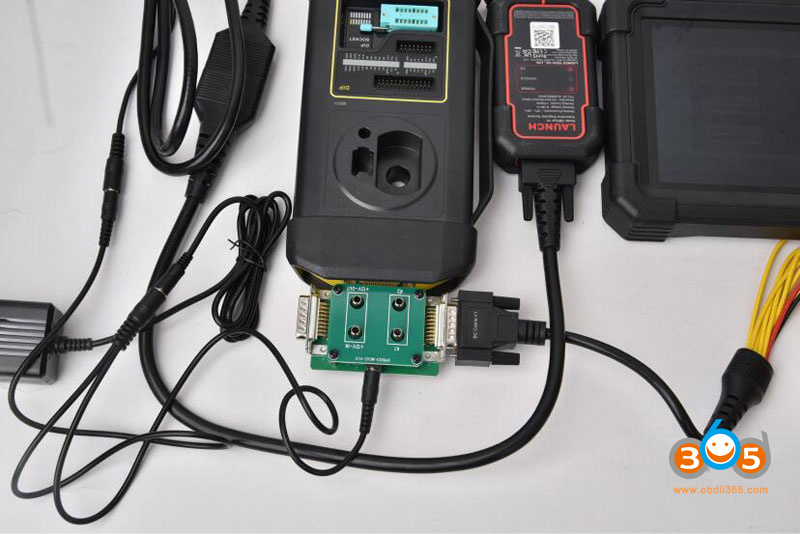
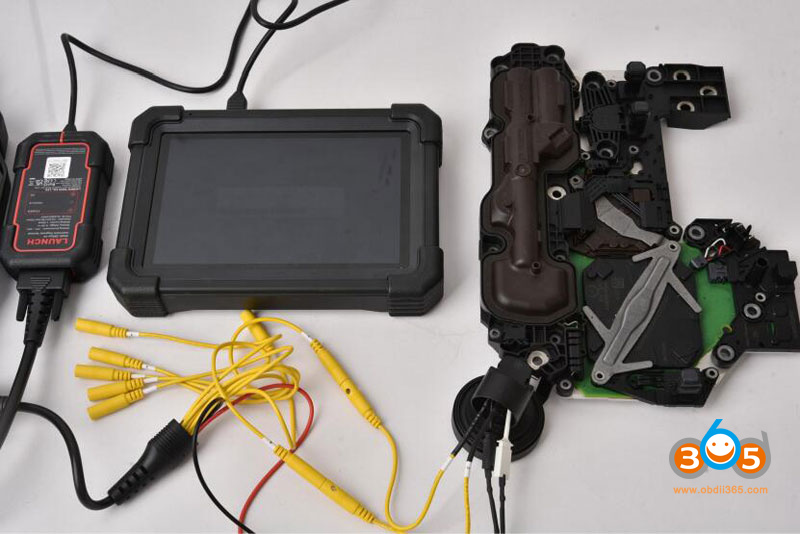
Here is the instruction on connecting Launch X431 IMMO series tablets (IMMO PAD/IMMO PRO/IMMO PLUS/IMMO Elite) with DBScar and X-prog3 immobilizer programmer.
*DBScar & x-prog3 are included in the immo tablet package.

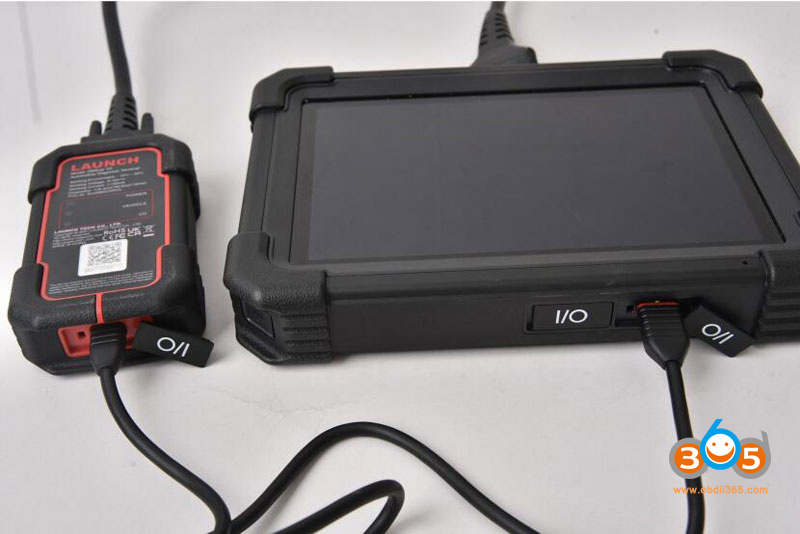
Connect DBScar VCI with main cable

Connect DBScar VCI with X431 IMMO tablet via USB cable

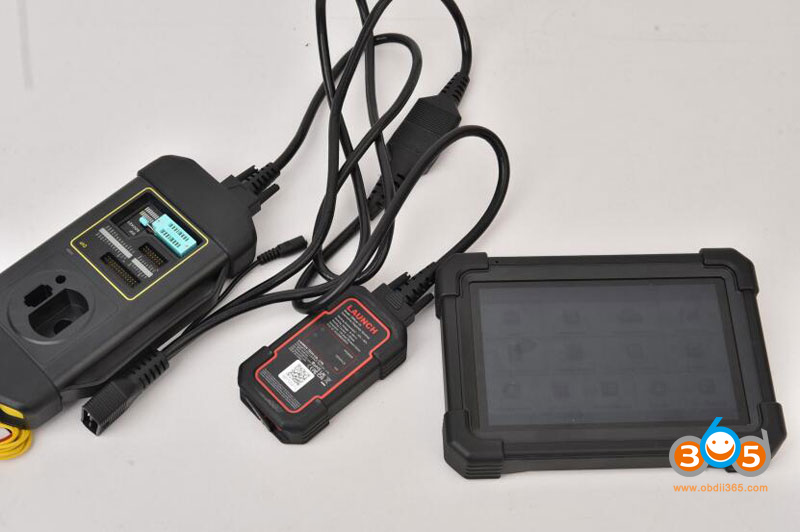
Connect DBScar VII with X-prog 3 with the extension cable ( the cable with the port to connect the power )

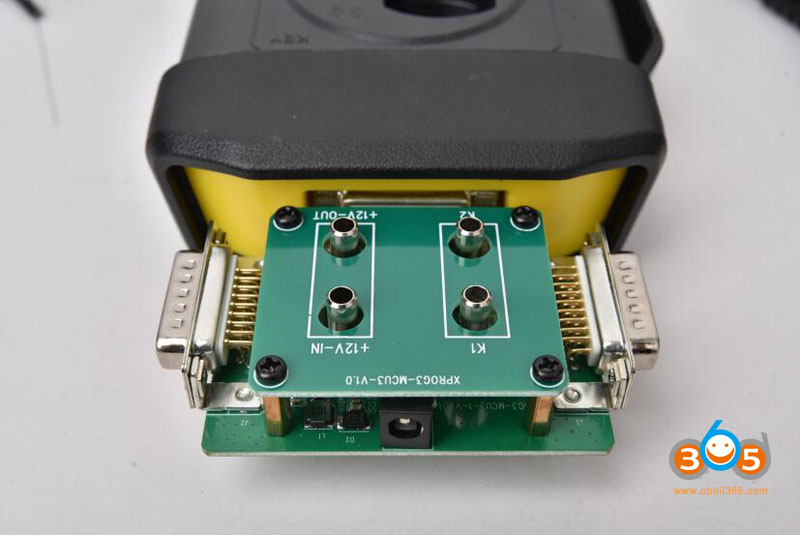
if haveMCU V3 cable, connect MCU adapter via DB26 diagnostic connector of X-PROG3

Connect power cable. The power cable needs to connect X-PROG 3 well ( use the cable in Step 3, if you connect MCU-V3 board , just connect MCU-V3 board directly ) , then connect the Bench model Cable connect to X-prog 3 or MCU-V3


Posted by: jean at
08:42 AM
| No Comments
| Add Comment
Post contains 155 words, total size 8 kb.
May 06, 2023
Xhorse released a new MVCI Pro J2534 passthru cable in May 2023. What’s the difference between new MVCI Pro and old MVCI cables?
Check table comparison below:
| Item | Xhorse MVCI Pro | Xhorse MVCI |
| Image |  |
 |
| Product status | Released in May 2023 | discontinued |
| D-PDU Protocols | Yes | No |
| J2534 Protocols | Yes | Yes |
| Toyota Techstream | Yes | Yes |
| Honda HDS | Yes | Yes |
| Subaru SSM4 | Yes | No |
| Ford IDS | Yes | No |
| Mazda IDS | Yes | No |
| VAG ODIS | Yes | No |
| Volvo VIDA | Not yet | Yes |
| Firmware | remains to be confirmed | V1.4.1 |
| Firmware PCB | remains to be confirmed | - |
| Update | Update by link | – |
| Driver | MVCI Pro driver | MVCI driver |
| Operating system | Win7, Win8, Win10 | WinXP, Win7 |
| *MVCI Pro does not have CD software, software download by link.
*Keep adding new compatible software to MVCI pro j2534. |
||
The old mvci does not supports D-PDU protocols, it is not compatible with VAG, Ford, Mazda and many other car brands.
Posted by: jean at
07:50 AM
| No Comments
| Add Comment
Post contains 158 words, total size 4 kb.
May 05, 2023
Good news! Launch X431 V+ and X431 Pro5 10 inch diagnostic scanners newly release Topology Mapping function in May 2023.
Launch X431 V+: requires software versionV7.00.012and up.
Launch X431 Pro5: requires software versionV7.03.014and up.
LAUNCH X431 tablets show different health statuses in different colors and shows the structure of communication between modules. In the aspect of ease of use, it enables you to press the system module to access the system and display the relevant DTCs.

Upcoming functions:
1. Multi-system read VIN
Refers to reading the VIN code of multiple systems of the vehicle, and comparing whether there is any difference. The main application scenario is to check whether the vehicle is stolen or modified
Estimated release date: End of May
2. Multi-system reading mileage
Refers to reading the mileage of multiple systems of the vehicle and comparing whether there is any difference. The main application scenario is to check whether the mileage of the vehicle has been changed
Estimated release date: End of May
3. Hidden function
The existing function is equivalent to making a shortcut to the existing function in reset, which is the same as the Oil Reset function in Reset
Estimated release date: End of June
Posted by: jean at
06:41 AM
| No Comments
| Add Comment
Post contains 206 words, total size 2 kb.
32 queries taking 0.0717 seconds, 208 records returned.
Powered by Minx 1.1.6c-pink.

