


March 12, 2021
A Mercedes Benz Xentry DAS software user feedback:Xentryworks, Das problem and this is the wrong with the DAS software "This software does not accept more hardware changes…â€


And this is my Xentry DAS software version:

Obdii365.com Technical Support:
Please send teamviewer to see it remotely
And when he helped me fix the problem by team viewer, I took a screenshot two images showing they are very skilled with this problem troubleshooting.


In 2 minutes, the seller’s engineer replied:
das software problem has been resolved.
You have 12/2018 Xentry software, and the DAS software is not activated, I helped you activate DAS and it will work.
And you can read the guide on how to activate 12/2018 DAS software:
http://blog.obdii365.com/2018/11/27/activate-2018-12-mb-sd-connect-c4-xentry-openshell/

Big thanks to them for quickly help me solve the problem.
For your information, suggest you own the newest version03/2021 Mercedes Benz Xentry DASsoftware forsd connect c4.
Posted by: jean at
07:51 AM
| No Comments
| Add Comment
Post contains 155 words, total size 5 kb.
March 11, 2021
Question:
The Autel APB112 smart key emulator is designed to collect the data send from the ignition coil, aiming to identify the ignition coil troubles and decode the data of the vehicle key chip.
It an also emulate the vehicle key chip.
Autel APB112 expands the tablets’ already significant coverage and functionality by enabling you to quickly. Add keys to Toyota and Lexus vehicles in an All Keys Lost scenario.
Top advantages of APB112:
-
- Time saving. APB112 takes 2-5 mins, no need to wait 16 minutes or more.
- You can add-a-key which doesn’t erase other keys so if they have more keys at home they don’t need to re-add them.
- If you have a bad steering lock you can’t reset for AKL this is the only way to make a key. If you try to program the steering lock it will ask you to tap the key and if you try to make a key it will say it can’t because you don’t have a working steering lock.
- You can start the car at no cost if they just want to drive it home where they have spare keys.
- Can do Hyundai Kia (calculate ID 46 pin code) and even Subaru
How to connect APB112 key simulator?
-
-
- Connect the APB112 smart key simulator to Autel Diagnostic Device with the supplied USD cable;
- Complete the connection, status indicator lights solid blue, indicating that the APB112 smart key simulator is working properly. Then it will communicate with the diagnostic device automatically.
- According to the selected vehicle system function, the APB112 smart key simulator application is automatically upgraded on the Autel diagnostic device;
- In order to decode the chip, please place the smart key simulator close to the ignition coil for data collection. After decoding, the original car chip data can be copied;
- The emulator key chip can generate various types of key chipsby performing subsequent upgrades as needed.
-

Demo:Program Toyota Camry 2016 All Smart Keys Lost with Autel IM508 & APB112
4). So far I’ve used the APB112 with just the 508, ‘17 Tacoma, 18 Camry, 13 Lexus all smart keys,worked perfect didn’t use either XP200 or XP400.</div
Done with IM508 and APB112
APB112
1. Back up Immobilizer
2. Make simulator key
3. Add key
15 min ‘s job.

11). Just used it today on a 2013 Hyundai Elantra worked awesome first time using it! With the help of tech support
12). I just bought one last week, Had a 2015 GS350 AKL that took 20 minutes in and out, could’ve done it faster and been otw to the next job in half the time with the APB112 if I had it two weeks ago. So I bought it. Will definitely come in handy with further updates.
13). Used it for lost keys on a 17 Subaru impreza keyed ignition H key. Read eeprom and had to use APB112 to generate key.

14). 100% worth every penny. I do AKL on a 2012 Prius
15). I used this on a Lexus where another locksmith had tried before me and locked it out after reset. I was shocked it worked
16). Yeah it works perfect even on hyundai honda subaru
17). Works great, did a Camry had to try without the adapter because I did not have it and I waited the 16 min but for some reason it failed came back the next day and did it with this no problem
1
5 minutes in and out..
for lost key, without the emulator occupies reset immo box and wait for 16 minutes, with the emulator only makes a back of the data, and generates a key and so you can only add, the process alone It takes 5 minutes..

Posted by: jean at
09:20 AM
| No Comments
| Add Comment
Post contains 1073 words, total size 10 kb.
March 10, 2021
Question:
You download sps on PCMCIA card then cut from card read.

Follow the description below carefully to ensure success.
1. Connect TECH2 scan tool to the data link connector.
2. Start TECH2 and select F5: Service Programming System (SPS).
3. Select F0: Request Information.
4. Then select: model year, vehicle type, group, system
5. Follow the instructions in TECH2.
6. Disconnect TECH2 from the vehicle and connect it to the COM port of the computer (flat cable).TIS2000must be installed on the computer.
7. Check that the software of the computer is newer than that of EDC 15/PSG 16. If so, download it to TECH2.
8. Disconnect TECH2 from the computer and reconnect it to the vehicle.
9. Start TECH2 and select F5: Service Programming System (SPS).
10. Select F1: Program control module.
11. Follow the instructions in TECH2.
12. Wait until programming is complete. This takes approx. 7 minutes.
13. Once programming is complete: switch off the ignition.
14. Test start the engine.
15. Read and clear any DTCs in the control unit. A DTC will be generated because the pump control unit loses communication with EDC 15/PSG 16 during programming.
16. Final check:
Clear DTCs in all systems.
Execute one operating cycle (run the vehicle at varying engine load and speed for five minutes).
Evaluate the operating cycle (check that DTCs were not regenerated).
http://blog.obdii365.com/2021/03/09/gm-saab-psg16-pump-sps-programming-via-tech2/
Posted by: jean at
05:52 AM
| No Comments
| Add Comment
Post contains 358 words, total size 4 kb.
March 09, 2021
First comes withLaunch X431 V/X431 V+/X431 PRO/ PRO3/ PAD2Wireless PrinterSetup
procedure . Then how to print Health Reports wirelessly from Launch x431 V scan tool.
Part 1: Launch X431 V /X431 PRO/ PRO3/ PAD2 Wireless Printer Setup
Firstly, you have to set up a printer plugin for the first time you use it, it should prompt you to install the correct one, be sure that you’ve selected correct printer and click the print icon.
Step 1. Android devices do not have "drivers†built into the tablet, so you haveto download your wireless printers’ specific app from either "google play store†or the printer manufacturer’s website.

Step 2. Install the wireless printer app onto the X431 tablet and follow the on screen instructions.

Step 3. Configure the app you installed on the tablet to your wireless printer

Step 4. You can now "share†any images, screenshots and X431 diagnostic reports via the app to your own wireless printer.
- To access this menu press the "share†icon and then select your printer app.

Part 2. How to print Health Reports wirelessly from Launch x431 V scan tool
You can see, I have already completed the health report for this vehicle, now I need to click on "Report†at bottom and enter the relevant information, click on "ok†and it will give me a PDF version.


Next I choose "Save as PDFâ€.

Now I can exit the launch software, I have Adobe Reader installed, I open reader and find the file, after it loads I go to the menu at the top right corner and click on "Printâ€.


That’s it. I hope it helps.

Enjoy!
Posted by: jean at
07:12 AM
| No Comments
| Add Comment
Post contains 282 words, total size 7 kb.
March 03, 2021
HaveMercedes Benz 2014 Eand2020 GLS, planning to invest one proper diagnostic scanner to pull out the fault code because I strongly suspectdriver’s seat seatbelt latch. WhichBenz scannerget that granular with its data to point to where the code is originating from.
- ICarsoft MB2 review
I also have two Benz’s and I like the ICarsoft MB2. it has more capability than a generic scanner and covers everything I could fix myself and works as a generic OBD2 reader. you can add chips specific to other cars, and it’s priced at around 150 dollars.
Xentryis obviously better and there are more professional scanners that can read more codes on more cars, but they are usually twice as much, I found the Icarsoft to be the happy medium .
- Launch X431 V+review
In the shop I have a Launch X431 V+ tablet scanner thatdoes (so far) everything that xentry does AND it covers pretty much every other auto maker out there. Hasn’t let me down yet. Cost about $1K new, includes 2 years of updates. I’ve used it to repair my Chevy airbags, fueling issues on the wife’s jeep,my W211 and have coded some features into and out of my new-to-me W212.
I haven’t run into anything on the Benz/Chevy/Jeep it can’t do. I haven’t any experience with STAR/Xentry, but I get the sense that it takes a bit different route to get where you want to go but it gets there.
So far, I’veturned off the seatbelt warning chime and disabled the function that moves the front passenger seat forward and upright when the rear seat back is folded down. Since my car doesn’t have the ECO on/off, I haven’t looked to see if it can flip that bit. I don’t doubt that if it can be done via Xentry, it can be done with the Launch. From the product description and from looking around in its database I know it’ll teach the car about new parts likeSBC brake modules (on the W211), airmatic shocks, steering angle sensors, new batteries, etc.

- Xentryreview
"Coding†can really only be done via MB Star SD Connect C4 Xentry online or Vediamo on W212 and newer chassis’. There are "settings†that can be set offline in Xentry or certain generic scan tools. Settings like: parktronic beep tone and volume, automatic headrest preset, front seat position when folding rear seats, enable/disable TPMS, etc…
HOWEVER, most of us with Xentry are using a "clone SDS (MB Star diagnostic system)†and recent events at MB have made it difficult to be able to use the online functionality. That online functionality is required for many module replacements, software updates and SCN coding.
but you can use Vediamo or pay someone to "loginâ€. Otherwise, all diagnostic functions are done "offline†in Xentry.
As far a the ECO start/stop, I don’t know as I’ve never looked for it as neither of our W212s have it. Maybe its there, maybe not. I bet it can be done in Vediamo, which is MBs engineering software for coding and its not the most user friendly and can leave a module "bricked†if done incorrectly.
Supplement:
I was playing around with Xentry on a ’18 E400… ECO start/stop parameters are in the ECU, front SAM and rear SAM. However none have manual settings to enable/disable the feature I could see. This conforms [not possible via Xentry] to what I’ve been told by a friend [tech] working for MB USA.
One interesting thing I saw in the manual settings for the front SAM, which included: headlight cleaning, trunk illumination, and a few others was they were password protected. Similar in fashion to SCN or software updates, where Xentry connects online for access and variant coding. The language was like: request your local Mercedes…. for special password.

Image name: sdconnect c4 plus DoIP with Xentry software
Alright, what’s your option?
welcome leave message atwww.obdii365.com
Posted by: jean at
08:52 AM
| No Comments
| Add Comment
Post contains 650 words, total size 6 kb.
March 02, 2021
Guided Functions:
The Guided Functions are advantaged with their easy operations. A guided functions is composed of multiple basic functions, freeing users from trouble such as looking up channel number and login code. Every guided function has detailed operation guidance and operating condition statement. Targeted on different car models and configurations, there are related operation guidance that provides corresponding tips, auto log-in, matching, setting and coding. Having guided functions means having the company of an expert who can provide idea, help looking up maintenance manual and test functions while repairing a car. Till today, among the comprehensive diagnostic tools globally, very rare of them support all guided functions of Volkswagen and Audi.
Support products:
LAUNCH X431Products above PRO3. (LAUNCH PRO MINI,X431 V,X431 V+, Pad III, PAD V)
Supported Car Models:All series of Volkswagen and Audi, all system, up to the year 2019.
Supported Guided Functions:
Service Regeneration,Particle Filter(DPF)
Adapt Injector Correction Value
Reset Engine Control Adaptation Values
Throttle Learning
Fill Coolant Circuit
Adapt Values,SCR system
Activating/Deactivating Cruise Control System
Basic Setting Of Transmission
Basic Setting of Sensors (-G85/-G200/-G201/-G251)
Basic Setting/Bleeding Brake System
Initial A/C Compressor Run-In
Adaptation Automatic Locking At 15 km/h
Distance Control System Calibration
Deactivate Or Activate Airbags And Belt Tensioners
Adaptation Menu Key Multifunction Steering Wheel
Adapting Service Intervals
Service Interval Display ,Resetting
Transport Mode, Switching Off/On
Level Control System Basic Settings
Brake Pad Change
Headlight Beam Adjustment
Battery Adaptation
Rear View Camera System Calibration
Driver Assistance Systems Front Sensor System Calibration
and so on
Test function:
1. Touareg electronics parking brake (Handbrakereplacement)
[Execution Background]
1. This function ensures safe and effective maintenance on electronics parking brake system.
2. Including: Put handbrake on installation position, checking basic settings of parking brake system (reviewing handbrake clearance), handbrake adaptation and calibration. Using devices without guided functions will not perform basic settings adaptation and calibration.
Using devices with guided functions will perform basic settings, adaptation and calibration. Notice, guided function executes when internet connected and corresponding car model package downloaded.
[Operation Instruction]
1, Ignite the car, connect LAUNCH connector, select Volkswagen model software(V28.55 and above) and enter, the main menu will show as below:
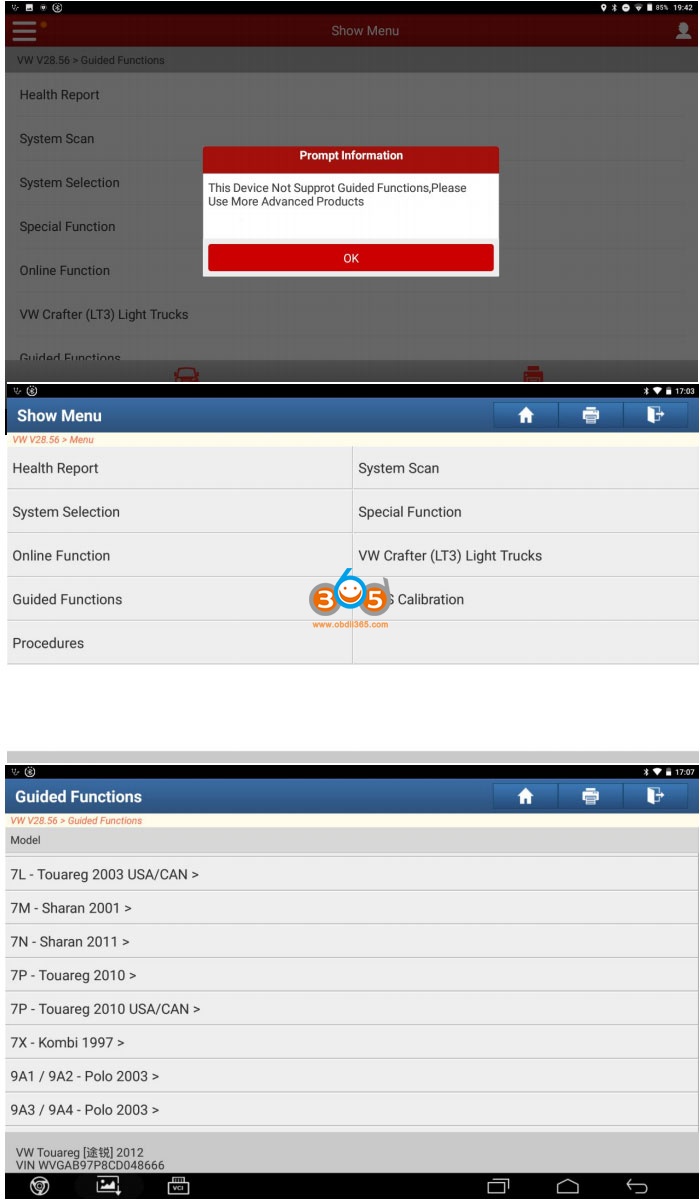
Select Guided Functions
Select 7P- Touareg 2010>
Select car model by the information in the following image, download corresponding package:

Enter
Select ‘System Selection’
Select ‘53 Parking Brake’
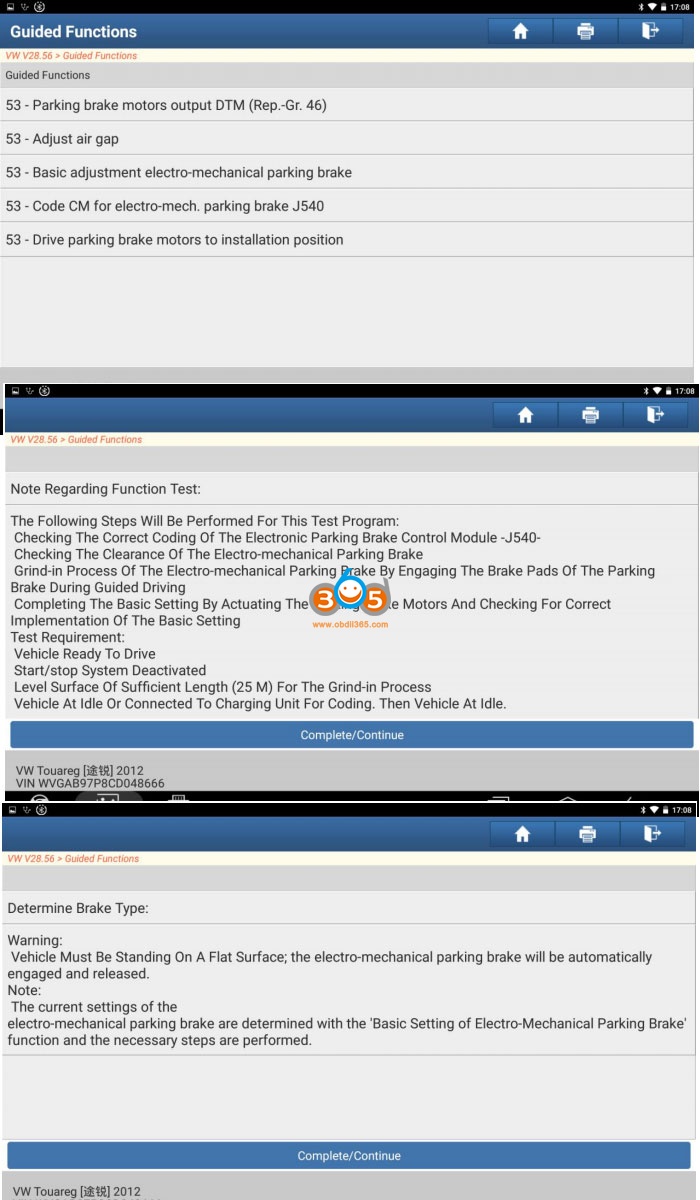
Select ’ 53-Basic adjustment electro-mechanical parking brake’
Complete the checking, click Complete/Continue
Select ‘Complete/Continue’

Ensure Voltage Supply, select ‘ Complete/Continue’
Select ‘Yes’
Please Wait…
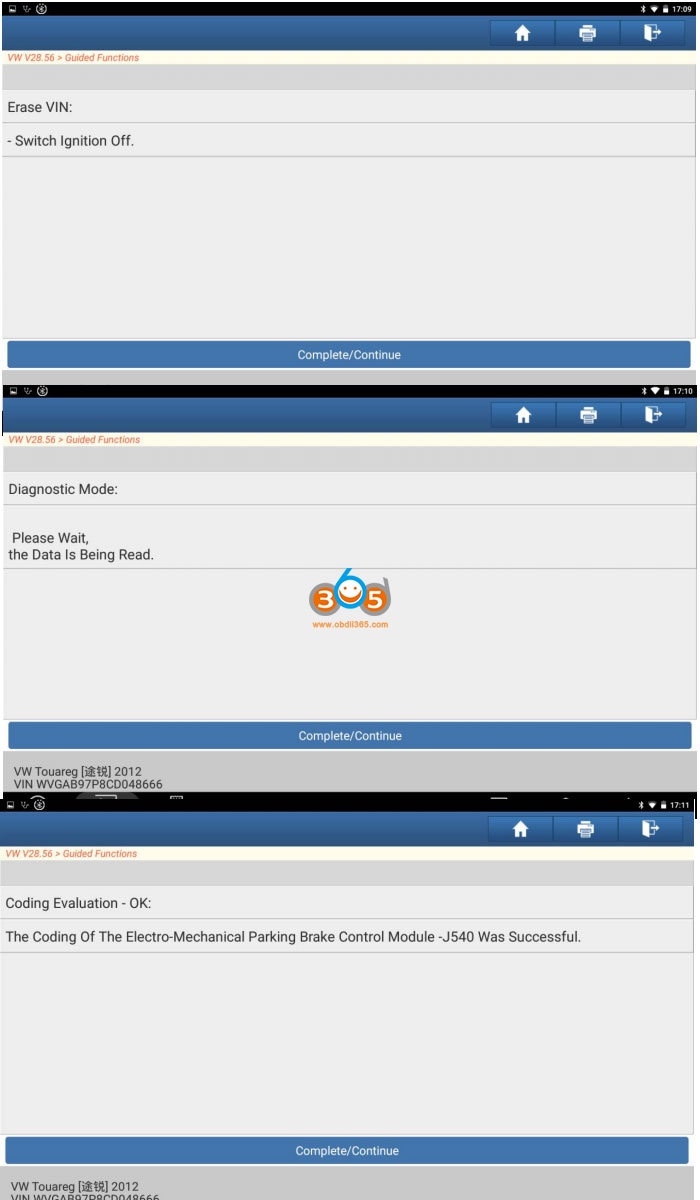
Ignition Off
Keep Ignition switch off, wait.
Switch on Ignition
Wait…
Complete Auto-coding. Select ‘Complete/Continue’
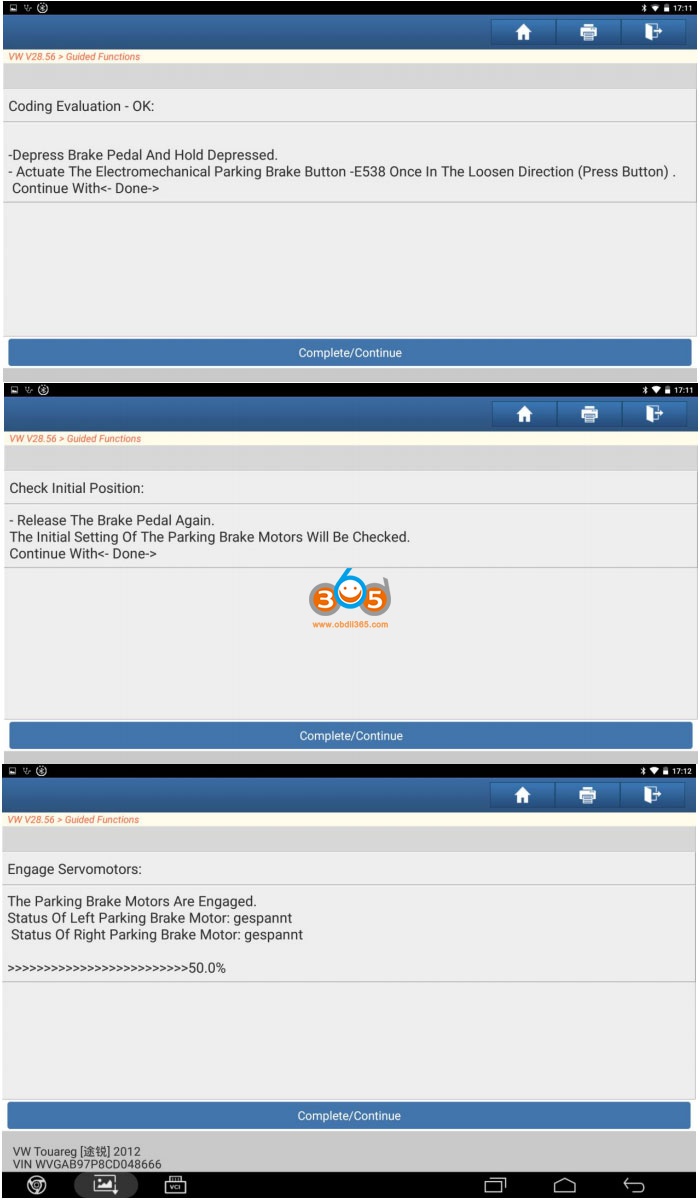
Actuate the Electromechanical Parking Brake Button, select ‘Complete/Continue’
Release the brake pedal, select ‘ Complete/Continue’
Checking brake clearance,wait…
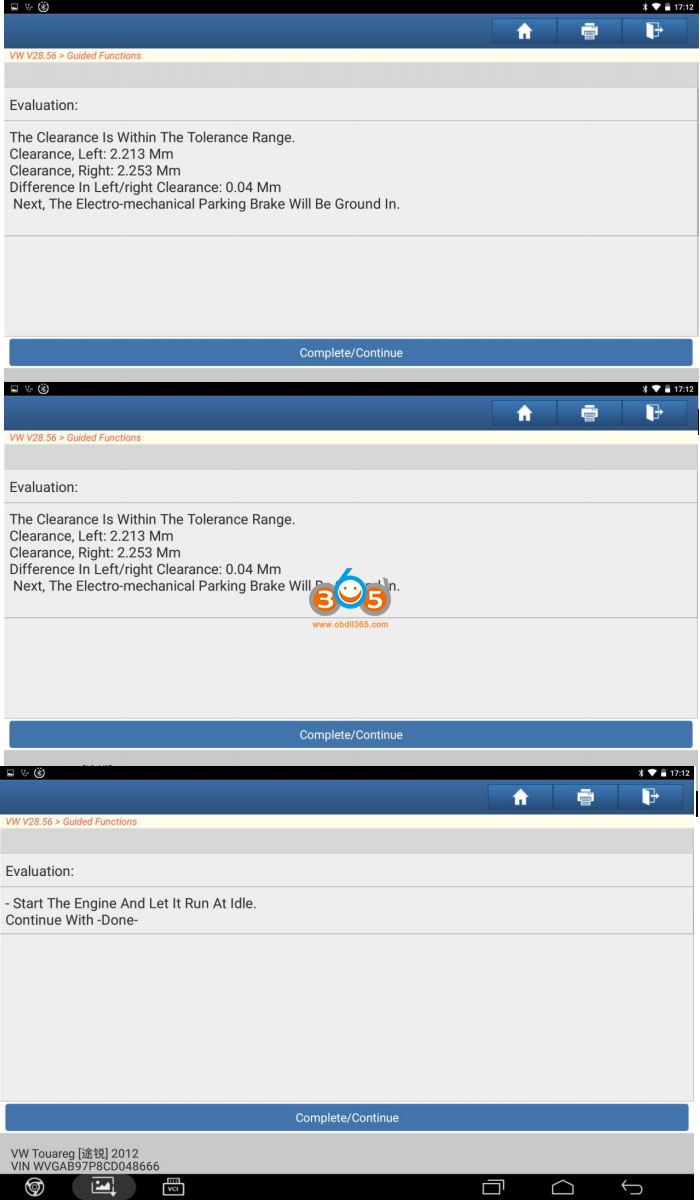
Read clearance. The process will continue when the clearance is within the tolerance range. If not, uninstall back motor and adjust the clearance repeatedly till clearance is within the tolerance range. Then continue executing and select ‘ Complete/Continue’
Switch the Ignition off.
Leave ignition off, stay several seconds
Start the engine and let it run at idle

Start the Grind-in process of the Parking Brake System, select ‘Complete/Continue’
Please strictly follow the tips, then select ‘Complete/Continue’
Fully stop the vehicle
Follow the tips, keep your car moving during the procedure.
Select ‘Complete/Continue’
Drive the vehicle before the countdown ends, keep the speed on 10Km/h
Drive off now, select ‘Complete/Continue’
Please Wait…
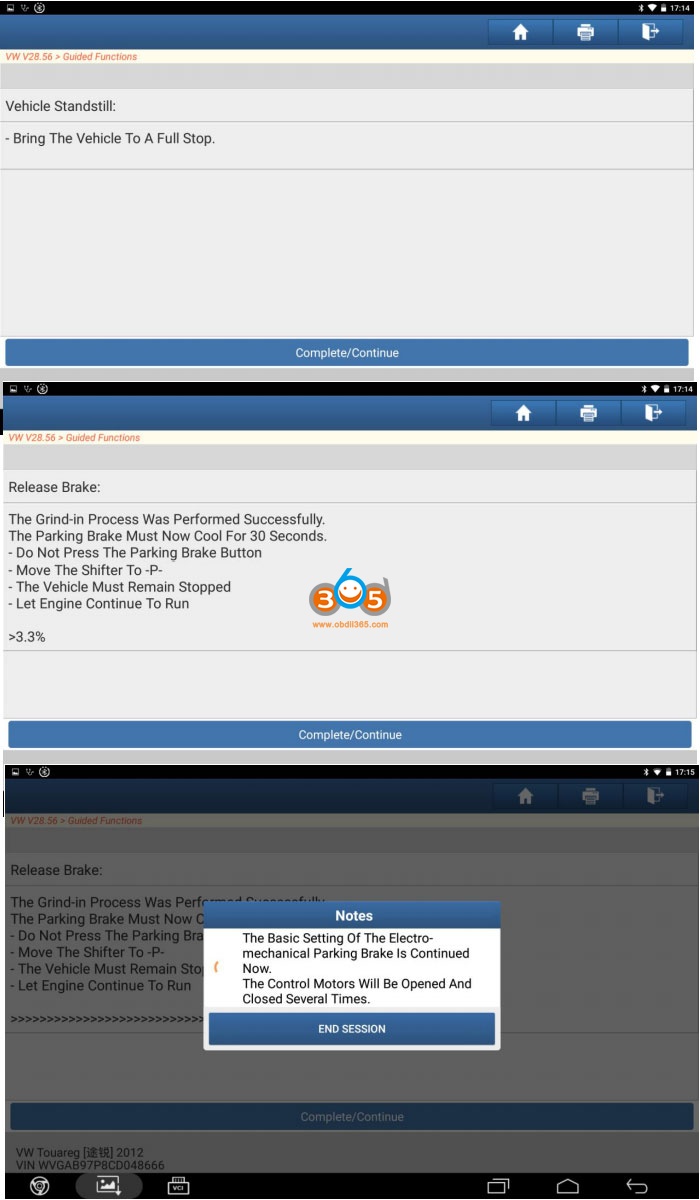
Fully stop the vehicle. Repeatedly operate the Grind-in process till it succeeds. A complete process takes 8 successful Grind-in
Wait 30s, cool the parking brake.
Please Wait…

Basic setting completed.
Full process completed.
2. Gearbox Basic Settings
[Execution Background]
Gear learning and resetting on gearbox after gearbox fixing or gearbox ECU replacement.
The operation is complicated when use devices without Guided Functions. To do the setting, corresponding documents of various car models, specified conditions and channel number are necessary.
Using devices with Guided Functions, you can operate simply by following the instructions.
3.[Operation Instruction]
Ignite the car, connect LAUNCH connector, select Volkswagen model software(V28.55 and above) and enter, the main menu will show as below:
Car model: 3G Passat 2015>2018, 6 modes automatic transmission 09G

Select 3G-Passat 2015>
Select model according to the following information:
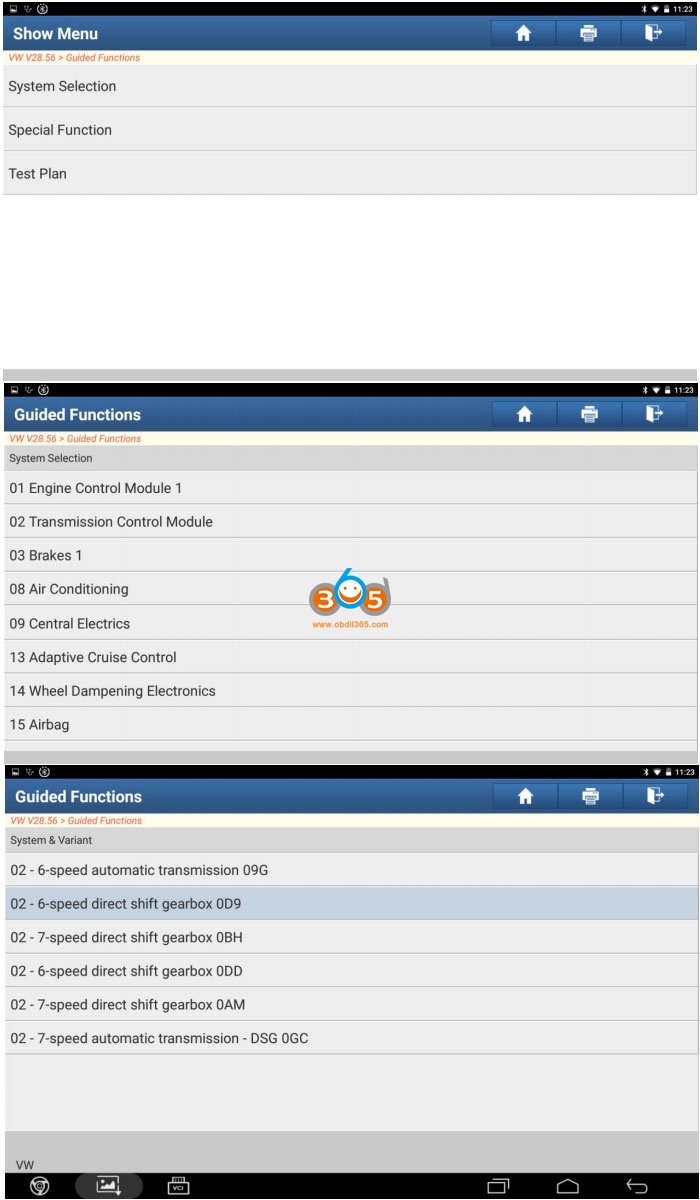
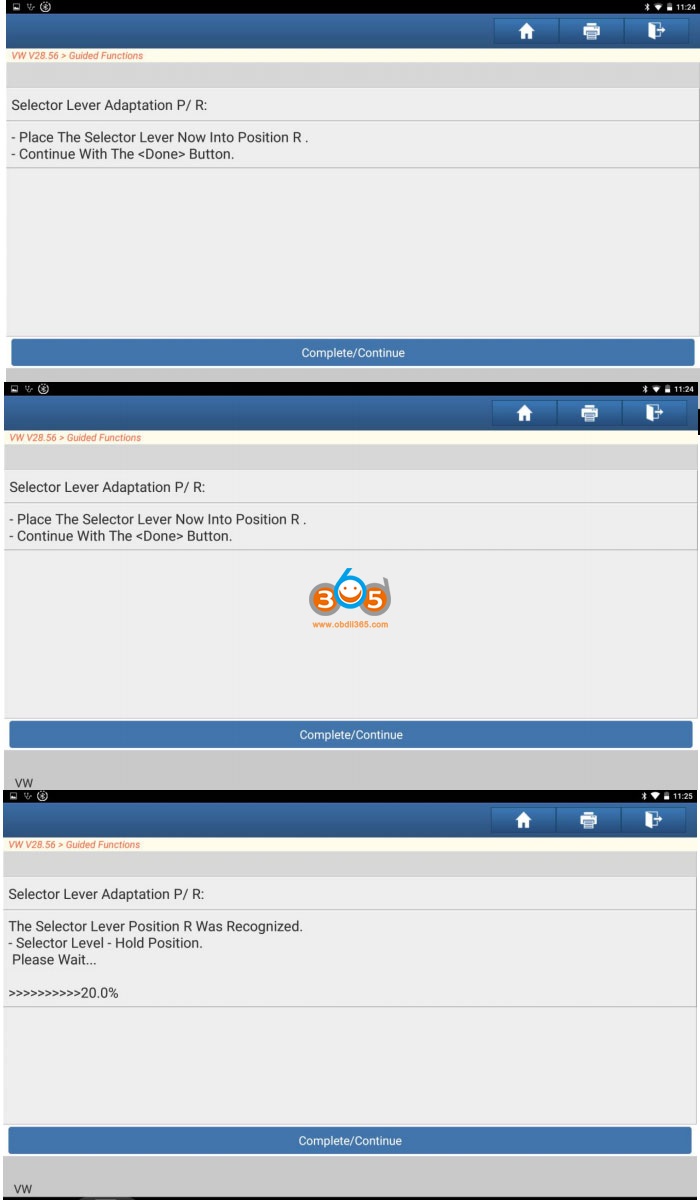
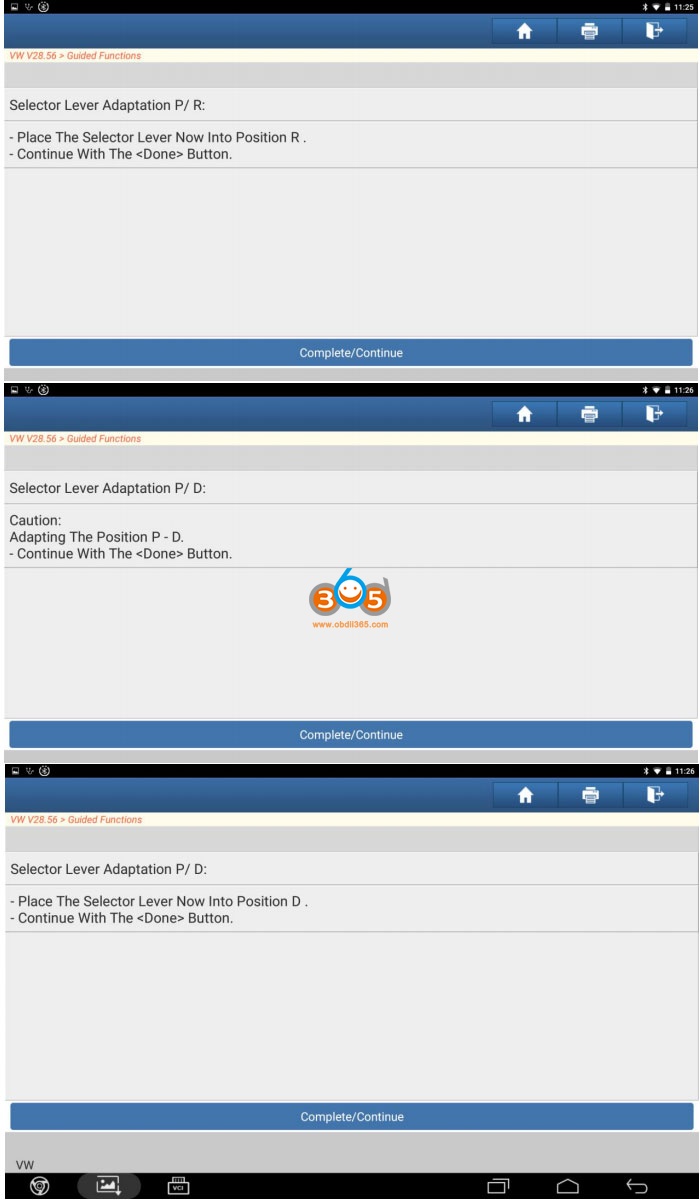
Select ‘System Selection’
Select ‘02 Transmission Control Module’
Select ‘02 -6-speed automatic transmission 09G’

Select ‘0002-J217-Basic setting’
Operate by notes, position on P mode, select ‘Complete/Continue’
Before basic setting, all static error codes should be cleared. Select ‘Complete/Continue’
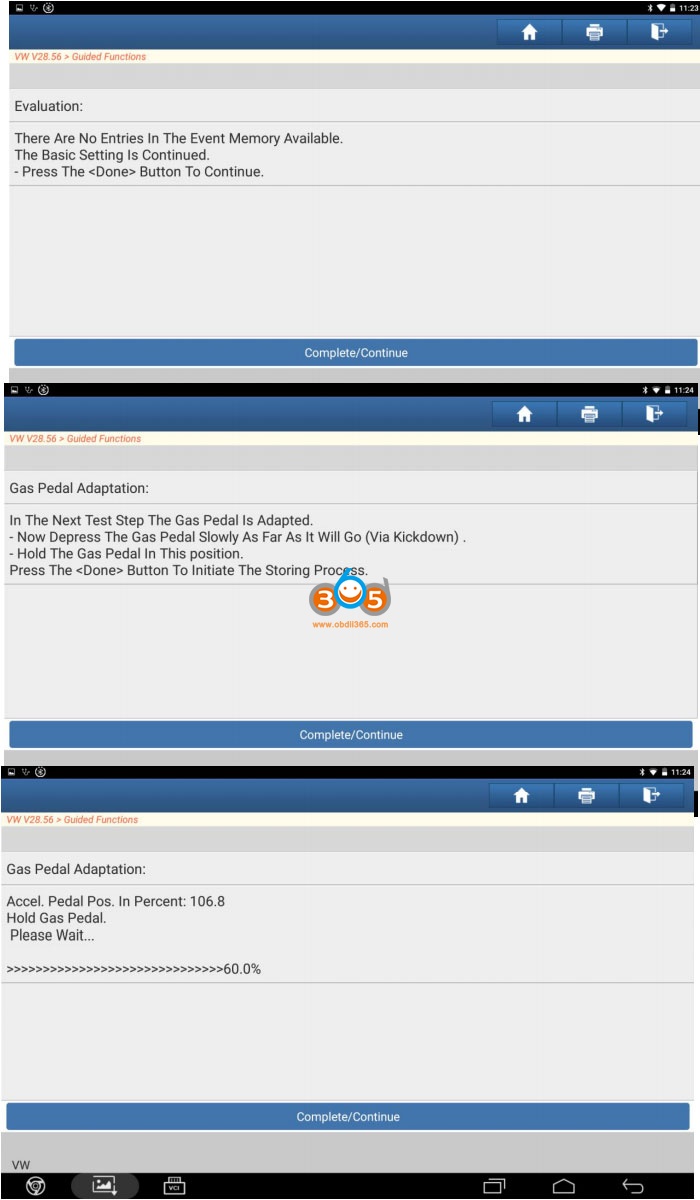
Select ‘Complete/Continue’
Wait a few seconds
Gear oil temperature should be over 65 Celsius (149 Fahrenheit), select ‘Complete/Continue’

Select ‘Complete/Continue’
Mode adaptation. The procedure will process 3 times. Please follow the note and change modes.
Select ‘Complete/Continue’
Select ‘Complete/Continue’
Operate by the requirement, select ‘Complete/Continue’
Please Wait…
Select ‘Complete/Continue’
Select ‘Complete/Continue’
Operate by the requirement, select ‘Complete/Continue’
Wait a few seconds…

Select ‘Complete/Continue’
Select ‘Complete/Continue’
Operate by the requirement, select ‘Complete/Continue’
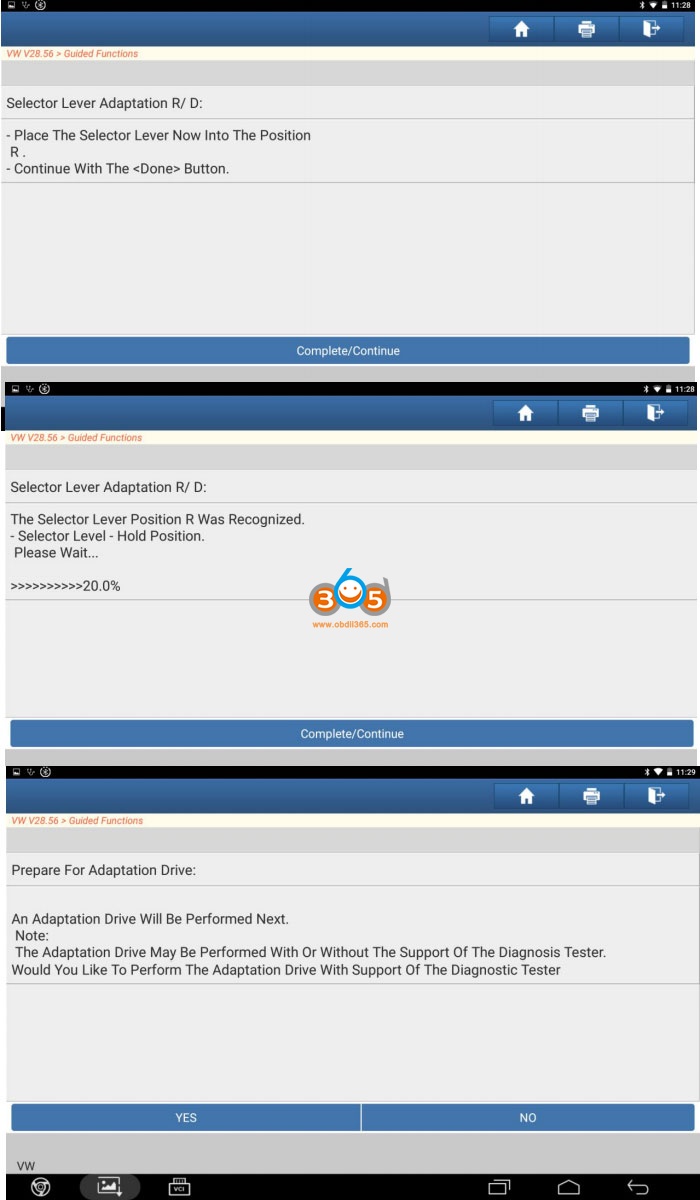
Mode Learning completed, prepare for Adaptation Drive, Operate by the note, select ‘Yes’
Select ‘Complete/Continue’
Select ‘Complete/Continue’
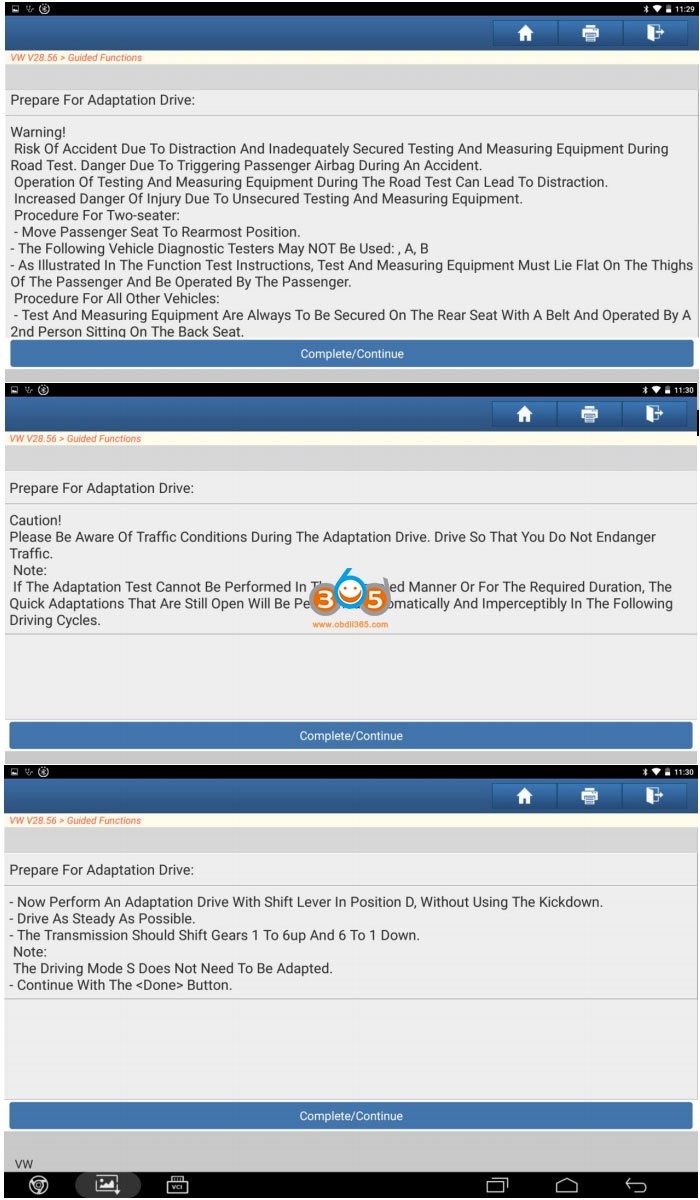
Select ‘Complete/Continue’
Drive in Driving Mode D so as to shift as smoothly as possible from Gears 1 to 6 and 6 to1.
The 1 to 6 shifting part will be taken as reference.
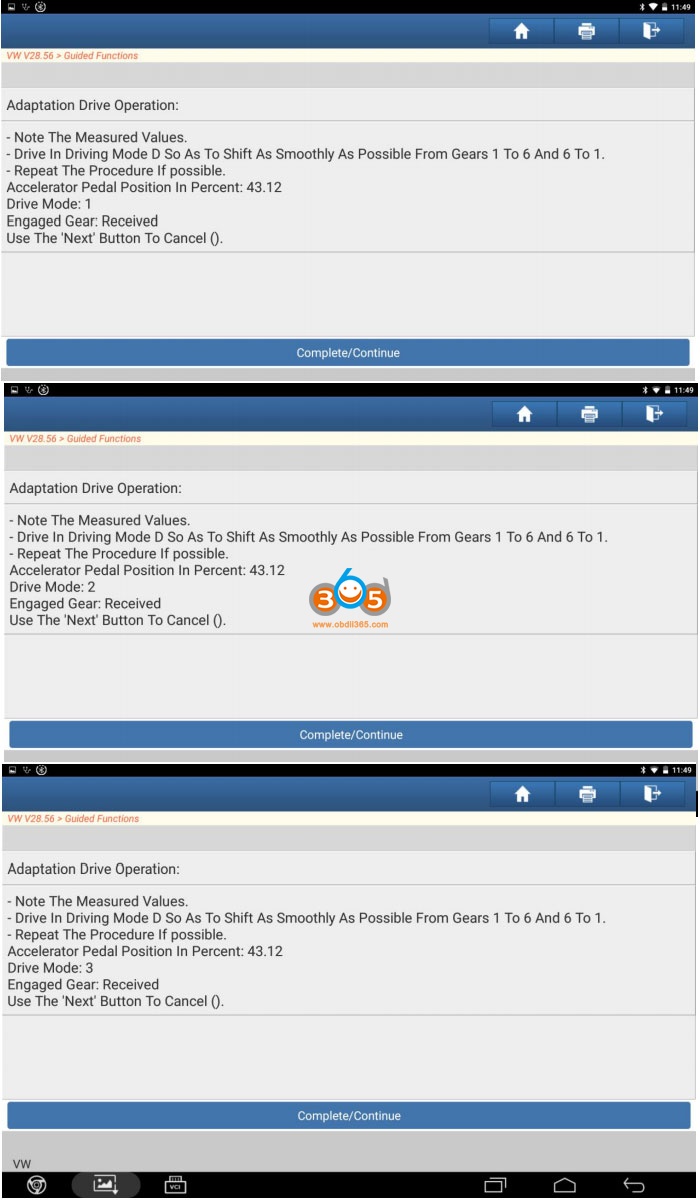
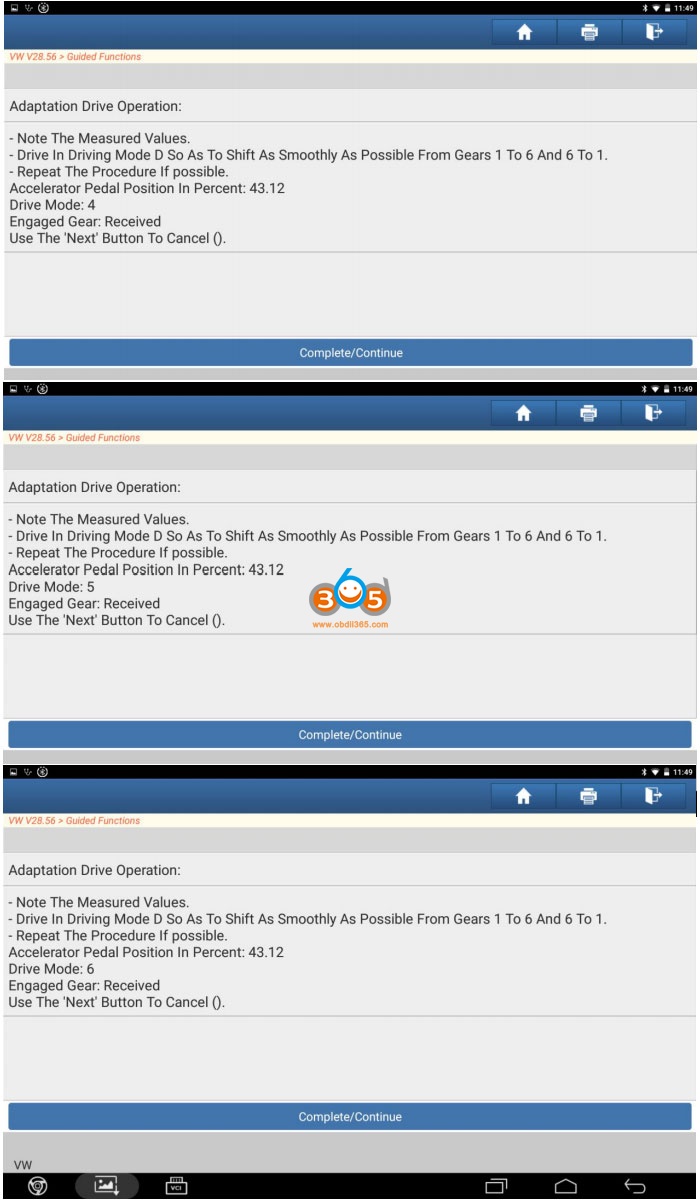
Select ‘Complete/Continue’
Select ‘NO’
Select ‘Complete/Continue’

Select ‘Complete/Continue’
The whole procedure ends.
https://www.obdii365.com/wholesale/brand-launch-x431/
https://www.obdii365.com/upload/service/21022816145802548722.pdf
Posted by: jean at
05:43 AM
| No Comments
| Add Comment
Post contains 859 words, total size 25 kb.
32 queries taking 0.462 seconds, 202 records returned.
Powered by Minx 1.1.6c-pink.

