


July 14, 2022

https://www.obdii365.com/wholesale/2018-new-mini-vci-cable-for-toyota.html
Installed TechStream v14.20.019 onto the laptop and found some drivers for the mini-vci. Techstream works fine on Windows 10 64 bit since the OS is backwards compatible with most 32 bit programs. The problem was not having all the drivers and such for the mini-vci cable. Windows installed a driver but there was no communication with the trucks ECUs.
Fought this all morning Sunday and finally found the correct information to get everything working. Part of the problem was that i did not install software for the cable yet. They got me the download link I needed for the missing software. Once I had that, I followed the directions that are included, along with some other posts that I found on various forums via google searches. Finally got the cable working and TechStream was able to communicate with the 4runner 2003.
Made changes to the customization settings that are available, like turning off the DRL, setting the remotes to unlock all doors with a single click instead of the double it had been and a few other minor changes that I found I wanted since the options were there. Everything was great until I drove the truck. VSC TRAC and VSC OFF lights were now on solid.
Spent another couple hours fighting this. Finally got it figured out with the help of my friends. Turns out that there is a chance that whenever you connect ANY OBDII type device, including the mini-vci while running TechStream, it will trip a C1336 code. That means that the VSC TRAC system calibration has been undone and needs to be reset. Unfortunately, you can't do the recalibration using TechStream. You either need the fancy Toyota tools to do it or you do it manually using a couple wires and following a few steps that are provided in the repair manual. I used the couple wires method and was able to perform the zero point calibration, turning off the dash lights. All was fixed again.
Toyota TechStreamis pretty cool, lets you set various customizations like I pointed out above and also check and verify the health of all the ECUs in the truck. There are several and each one can have it's own issues. I didn't have any codes on any of them, excepting the C1336 which took forever to show up. I had to have the truck running, TechStream hooked up and monitoring things and then move the truck a couple feet forward and back to get the code to finally show up. It will also come in handy for if I ever need to replace the brake master or vacuum booster reservoir thing, I think it's called the accumulator or something. TechStream can bleed vacuum off and reset the zero point calibration for that as well. Basically, it's a must have tool for these ECU laden, newer Toyota vehicles.

Posted by: jean at
06:55 AM
| No Comments
| Add Comment
Post contains 510 words, total size 4 kb.
July 13, 2022
Has anyone been able to get TechStream working with their 2022? Our customer has good lock with the mini vci techstream cable.
Techstream review on 2022 Tundra:
I’m using mini vci cable firmware 1.4 and Techstream version 17.00.020. This page has links to download both the Techstream 17.00.020 installer and the crack patch.
Free Download Toyota Techstream V17.00.020 Software, Patch and Driver
I bought this one off obdii365.com. Ships from China. Took about 2 weeks.
https://www.obdii365.com/wholesale/2018-new-mini-vci-cable-for-toyota.html
Latest TechStream runs just fine on Windows 10. I haven’t tried Windows 11 though. You will need to disable any 3rd party anti-virus software and also Windows Defender as it will detect the OBDII cable driver installer as a virus (which it could well be). I run TechStream on a spare laptop that was wiped and Windows re-installed.
It connects to my ‘05 4Runner without problem.
Finally got my new 2022 Toyota Tundra Platinum truck. I can confirm that my cable with firmware version 1.4 (when used with Techstream v17) can successfully connect to and change settings on the 22 Tundra.
I’ve used techstream on my 2022 just fine. Used it to disable the seatbelt chime. Not only can it be disabled, it can be enabled/disabled per seat. Driver, front passenger, rear left, rear center, rear right.
There are so many… for example the sensitivity of the auto headlamps and auto dimming, seat heater strength, door lock/unlock settings, hvac controls, and a bunch of other settings that are also customizable via the instrument panel menus.

Posted by: jean at
07:23 AM
| No Comments
| Add Comment
Post contains 260 words, total size 3 kb.
July 12, 2022
Obdii365.com provides different versions of carprog software including V8.21 v9.31 v10.05 and v10.93 download free.
Free DownloadCarprog V8.21
Resource 1:online version, need activation with keygen
needs activation but you will automatically get token renew after it used up.
You can also activate thru keygen by yourself.
https://mega.nz/file/SngCkZ4B#tjJA__mUbnyrKDLOPOtXu14GoMaYdXhTQj-1ha2kBfU
8.21 can only be used with carprog version8.21with firmware (perfect online version clone)
.jpg)

Operation system: WinXP, Win7, Win8 and Win10
If don’t have keygen, follow instrution below to send the hardware ID to get the activation code
Resource 2: No activation needed
CarProg8.21includedwithlib,exe,firmwarewithnoactivationneeded.Extract4zipandthenopenzipfileandextract.
Adding Carprog Antenna Fix:

1. replaced 150k with 15k (resistor)
2+3+4 here we need to solder a capacitor with approximately 6-7 nF(put one or combine from 2-3 capacitors)
5. removed 100 nF capacitor
6. removed 100 pF capacitor
in position 2 it was a 2.8nF capacitor
in pos 3 it was 0.5 nF cap
in pos 4 it was 100 nF cap
after done flashing you would have to replace HC125 to HC125M as marked in step 4..Other wise it will never actually write to anything.
Free Download Carprog V9.31
https://mega.nz/file/izJymBRZ#7gxFEYgtNajeSiMJLaVgcYyhs7vdjCG9xKifQOedJXw
Free Download Carprog V10.05
https://mega.nz/file/Kyo1zB5D#gsP4mDtDFGQ-Obffan1uG2uuTp5Nsnhz0FFr8Ll50ow
Free Download Carprog V10.93
https://mega.nz/file/6uJjEaqZ#ni_eUK8by0F2Ry56pByINEtdqu-rWbZvWFnXOgq6MG0
What are the differences among each carprog versions?
Carprog full v7.28 vs. Carprog v8.21 vs. Carprog v9.31
Carprog full V8.21 vs V10.93
1. Carprog 8.21 is online version with all software activated.carprog V10.93is offline version, no network connection, only some software activated, many functions don’t work properly.
2. car prog v8.21 included much more authorization, all function can be activated by keygen/activator
Read also:
Posted by: jean at
07:57 AM
| No Comments
| Add Comment
Post contains 297 words, total size 7 kb.
July 11, 2022
The AK90+ is a clever tool, but that tether cable has problems that result in "pin no touch†messages. You can follow the solutionhereto fix this problem. If you are reasonably handy & can solder, you can have it reliable in about an hour.
0.) Order 2 of this socket [Part Number 2057-PLCC-52-AT-NO about $6.50 US from digikey (#2 is in case you screw up ..you know you do).
1.) Chop the socket from the end of the cable with scissors. keep as much cable length as you can
2.) Salvage the white shrink wrap intact if you can. Its useful later. Stretch it as little as possible.
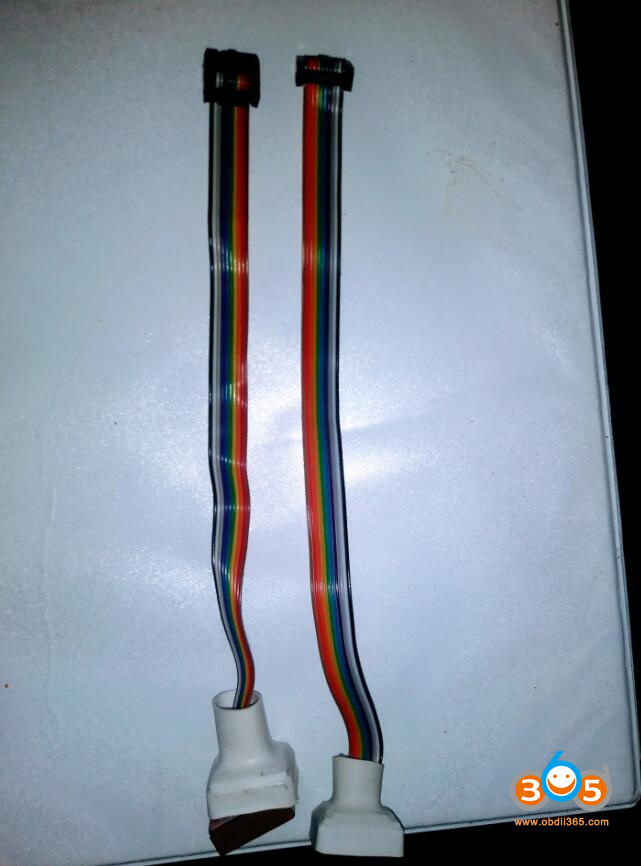
3.) Compare the 2 known cable pattern photos below & pick the matching socket pin-out.
4,) Carefully separate the wires for about 1 inch
Either blue or green will appear on your solder map. Don’t strip the un-used B or G, we’ll need that as a strain relief.
trim down 50% length from the unused pins. I folded mine over being careful not to touch. It gets them out of the way of the wires and stopper
Strip all other wires 1/4 in & twist the wires in each then tin.
>>> Don’t forget to thread the white shrink <<<<<
Solder the wires in place. I used needle nose to make a ‘U†around each pin. I alternated pins across the socket to keep the wires from bending to the breaking point.
Once about half the wires are soldered, use a little "Shoe goo†from Walmart or similar to anchor the unused "Strain relief†wire (blue for me) to the middle of the socket. adjust its length to relieve tension on the wires, solder the remainder.
Almost done!You can shrink the white plastic back down on the socket .. but don’t melt the socket! a tiny amount (use toothpick) of Shoe-goo is a fine alternative.
finallycut your white shrink a bit under 1/8th all the way around the socket.Use a new razor blade straight-on to keep it consistent. the shrink cuts easily. So do your fingies.
Now we need to add a little handle, because you still have to jockey the socket in place and we need to relieve strain on the wires too.
If you live in the USA go to Ace Hardware , go to the parts bins and select the 50 cent black rubber cork. That’s the one that fits well. Use a little shoe goo from Walmart
or silicone rubber to secure the cork reasonable deep into the shrink. If you don’t have Ace where you live you are on your own.
If you aren’t used to cable building, seek out original post with more detailed instructions or contact me; if I’ve time I’ll make a cable for you .. you’ll pay for parts (about 10.00)
(yourAK90+will work every time).
Finally Mark the flat corner on the shrink with a sharpy. Always line it up with the flat corner of the chip. When you insert the socket it should be more of a "slide in from a side†then finesse the other sides down a little. The socket I specified has much springier pins so if you are gentle it will work almost every time.
Dont forget to remove any red coating on the processor pins. You can use alcohol, acetone on a qtip, or a thin nail file if you must .. but wipe it with a q-tip if you do that.
OK now you’ve got the con .. over and out.
Read this addendum
Arecent cable issue was discovered by the fanatic known as "sidewaysâ€.
Avariant of the OEM AK90+ cable wire color key has been found.For those who have the variant, my "how-to†pin out map would be incorrect.
Before you make the changes you must chose the soldering schema matching YOUR AK90+ cable.
Here is a side by side of both possible cables. Plug the connector into the AK90, then determine if the left-most wire is brown or black. Then step down and pick the schema that matches your cable.IMPORTANT:my soldering schemas are shown as if the socket is sitting on top of the EWS Chip.
If you’ll be building a cable, scan the photos & drawings, then skip t the bottom for a few pointers .

Use this solder plan if your cable matches the photo on the left. (Left wire of the cable is Black (when plugged into the AK90)

Use this solder plan if your cable matches the photo on the right. (Left wire of ribbon is Brown when plugged into the AK90) .

Addendum:
The processor pin-out below is only for those who are curious & want to know the purpose of each processor pins connected to the cable. You can make a working cable without looking at it.

Posted by: jean at
06:35 AM
| No Comments
| Add Comment
Post contains 818 words, total size 10 kb.
July 08, 2022
Question: I am trying to read JLR all key lost 2018+ withLonsdor K518ISE, this kprog2 adapter pinouts looks different from machine instructions, if there is any additional plus or cables need to purchase
see label don’t match the pinouts.


Solution:
Follow the wiring diagram in the instructions to connect. Don’t care about the text onkprog2 adapter.


then connect Dupontline to KPROG2, the other end to FS-01 board.


Posted by: jean at
07:12 AM
| No Comments
| Add Comment
Post contains 75 words, total size 6 kb.
July 06, 2022
What’s the difference between the new Orange5 Super Pro and Orange5 plus v1.35 clone?


Table Comparison:
| Item | Orange5 Super Pro | Orange5 Plus |
| Software version | V1.35 | V1.36 and orange 5 super pro v1.35 full function. |
| Software Language | English, Russian | English, Russian |
| USB Dongle | No | Yes,Dongle use to 08-airbag and 09-dashboard modules |
| Software license | MTRK (Included in Orange-5 base)
TMS (Included in Orange-5 base) M08V NEW Immo HPX 9V0 NEC V850ES/SJ3 V850ES/SG3 UART NEC V850E2 |
MTRK (Included in Orange-5 base)
TMS (Included in Orange-5 base) M08V NEW Immo HPX 9V0 NEC V850ES/SJ3 V850ES/SG3 UART NEC V850E2 NEW New license: MCU ( Infineon,ST and MicroChip) Renesas: H8SX,HD64F,V850 UART,V850 SPI,RH850 V3,RL78 Special_05 AIRBAG Dash Fujitsu F-DASH Tractor EEPROM A/B/C/D/E modules |
| Infineon MCU | 9 brands | 21 brands |
| ST MCU | 136 | 140 |
| Microchip MCU | 318 | 361 |
| Renesas | 10 types | 17 types, H8SX, HD64F, V850 UART, V850 SPI, RH850 V3, RL78 with license |
| Airbag | 4 car brands | 70 brands, 2020 database with wiring diagram, Help menu |
| Dashboard | 4 car brands, | 97 brands, 2020 database incl cars, motorcycles, ATVs, scooters,tractors |
Scripts comparison:
Super pro supports more scripts and Wiring diagrams,v1.36 just about60MB,but super pro is2GB.

PCB Comparison:
Orange 5 Super Prouses high-quality ACTIA board SmartFusion2 chip.
The orange 5 uses regular board and chip.


Function Comparison:
The differences between orange 5 super pro and orange 5 plus:
We have more chip models than others in Infineon, ST and MicroChip of MCU, as shown in the figures:


Posted by: jean at
07:38 AM
| No Comments
| Add Comment
Post contains 436 words, total size 18 kb.
July 05, 2022
PCMTunerbench/boot cable cannot be connected with DSG gearbox ECUs’ round connector directly. You may need some modifications i.e read VL381 shown image below.

But with theGodiag gt105 & gt107DSG gearbox adapter set, you are allowed to connect pcmtuner bench/boot cable with gearbox on bench.

GT105 is a breakout box to check DSG connection status and GT107 is a DSG read/write adapter. The GT107 DSG adapter can be used withkess v2, pcmflash, ktm bench and pcmtuner etc gearbox programmers.

Godiag gt107 DSG gearbox pinout diagrams
VAG DSG/CVT
DQ200MQB/G2 (0CW)
DQ250MQB (0D9)
Reading, writing, checksum correction
VL381/DL382 (0AW/0CK)
DL501/G2 (0B5)
DQ200 (0AM)
DQ250E/F (02E)
VL300/V30 (01J/0AN)
Writing, checksum correction
DQ200/MQB/G2 Boot (EEPROM)
DQ250E/F/MQB Boot (EEPROM)
DL501/G2 Boot (EEPROM)
VL381 Boot (EEPROM)
DL382 Boot (EEPROM)
Honda UDCT Boot (Continental TC1782/EEPROM)
Reading, writing
DQ200/MQB/G2 Boot (MICRO)
DQ250E/F/MQB Boot (MICRO)
VL381 Boot (MICRO)
DL501/G2 Boot (MICRO)
DQ500 (0BH/0BT)
VL300/V30 BSL (FLASH)
VL300/V30 BSL (EEPROM)
DQ250C (02E)
DL382 Boot (MICRO)
Honda UDCT Boot (Continental TC1782/MICRO)
Reading, writing, checksum correction.


How to connect Godiag gt107 with PCMTuner?


How to connect GT107 with Kess v2?

Posted by: jean at
07:23 AM
| No Comments
| Add Comment
Post contains 186 words, total size 9 kb.
July 01, 2022
Here obdii365.com will demonstrate how to copy VAG Megamos 48 key transponder withAutel MaxiIM KM100key tool via OBD.Don’t need to collect data and upload to the server to calculate likexhorse key tool maxdoes.Only network connection and an ID modifiable blank key are required to copy ID48 just like IM508 IM608 does.
Go toIMMO- Auto VIN- Detect VIN- Control Unit- Immobilizer- Instrument- Copy Megamos 48 Key


A blank key must be a cloned key (ID is modifiable)
Insert the start key and then turn the ignition switch to ON
the instrument screen turns black screen which is normal, it will reset automatically later
Reading immo data


select the key ID already exists in the vehicle in the drop-down list to perform key cloning operation


Place a blank key chip into theAutel KM100induction coil
Clone key in the process
Copy key succeed.

Posted by: jean at
07:47 AM
| No Comments
| Add Comment
Post contains 185 words, total size 11 kb.
32 queries taking 0.1367 seconds, 204 records returned.
Powered by Minx 1.1.6c-pink.

