


June 12, 2026
Q: Where to get the OBDSTAR C4-08 adapter kit for Benz VGS4-500-NAG2 gearbox TCU? It is out of stock everywhere.
OBDSTAR has modified the VGS4 TCU function and menu. You don’t need the C4-08 kit anymore.
For VGS4-0-NAG2 Gearbox:
OBD/Bench
OBDSTAR has the option to virgin TCU via obd or bench.
-
MB BENZ SIEMENS/CONTINENTAL VGS4-0-NAG2 Reset Virgin (Renew) function(OBD/BENCH).
OBDSTAR has aOBDSTAR TCM-012bench fast cable for VGS4-0-NAG2 without soldering.

Use C4-07 adapter kit if needed to transfer VGS4 data in Jtag mode.
For VGS4-500-NAG2 Gearbox:
Bench mode: useOBDSTAR TCM-014bench fast cable.
-
MB BENZ SIEMENS/CONTINENTALVGS4-500-NAG2Read Data, Data Transfer(Personalization), Write VIN functions(OBD/BENCH);
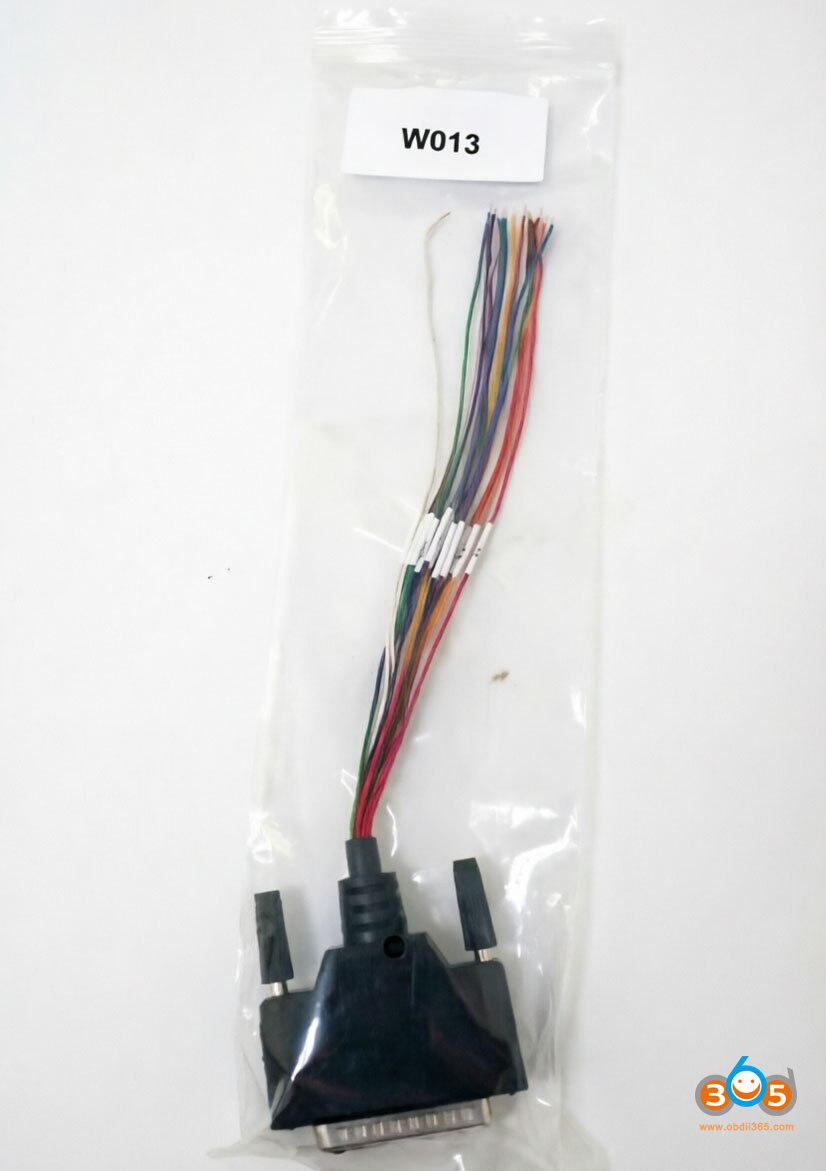
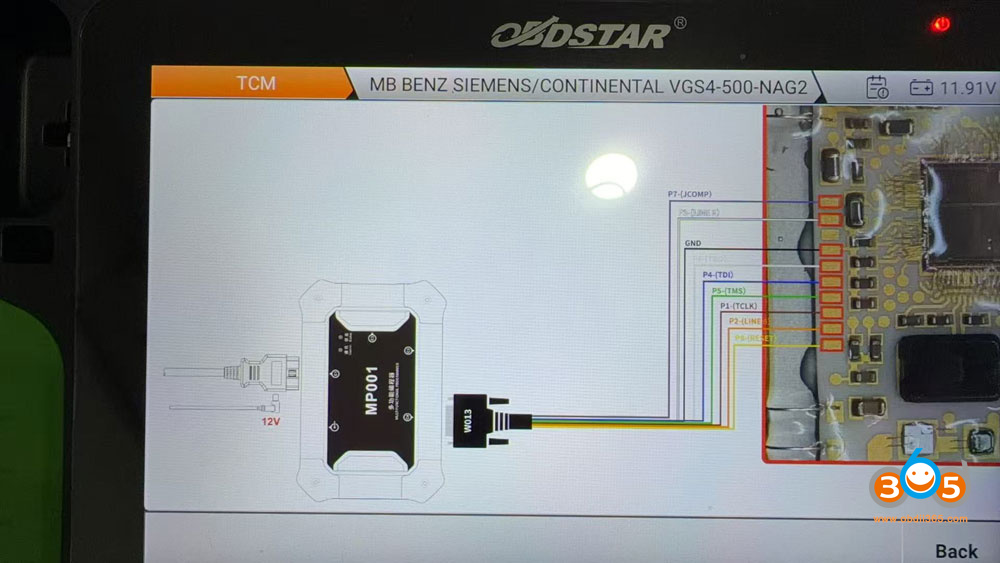
Jtag mode: No need to use C4-08 adapter. Use theW013 cable. G3 or DC706 will show you the wiring diagram.
-
MB BENZ SIEMENS/CONTINENTALVGS4-500-NAG2Read Data, Virgin (Renew), Data Transfer (Personalization), Write VIN functions(JTAG);


FYI:
VGS4 Compatible tools:
– Autel im508s/im608 ii just updated
– Obdstar DC706- confirmed
– Abrites- Confirmed
– Launch x431 x-prog3-confirmed
-Diag code ExtremeVGS4- yet to confirm
Posted by: jean at
08:44 AM
| No Comments
| Add Comment
Post contains 168 words, total size 4 kb.
June 11, 2026
Problem:
It is a Renault Clio 4 2018 with all smart card lost.
Some one try to added card but unfortunately the HFM is become blank.
Now I don’t have the pin original from the HFM or Card.
How can i resolve this problem?
Best way;
Go dealer and say after empty battery this problem is starts. The can flash the module and the car starts fine!
But if you say after key learning, they will tell you to buy new HFM module.
Updated:
Problem solved.
1-i take other Clio 4 and i read her HFM Bench mode (Dflash and Pflash).Autel IM608 XP400 ProandOBDSTAR G3will read the HFM module.
2-i write this files in my HFM and i programmed my HFM in the other Clio 4.
3-i virgin ECM and EPS
4-i bring a emulator for ESCL
5-i paired all components with diagnostic tool.
and car starts.
Posted by: jean at
08:30 AM
| No Comments
| Add Comment
Post contains 155 words, total size 1 kb.
June 10, 2026
The new generationVXDIAG VCX CAN FDJ2534 scanner previously only supported GM and Ford/Mazda models. Good news—the device is now also compatible withVAG software. Here we explain how to activate the VAG authorization for VCX FD.

1.Activate License
PurchaseVXDIAG VAG Software License $35
Provide your VCX FD serial number to us activate software license manually.
2. Install driver
Download the correct VX Manager V1.9.1 for VCX FD.

InstallVW ODIS 6154driver and keep driver up-to-date.

3. Install Software
VXDIAG VAG license does not come with odis software by default.
Contact your supplier to download and install the software.
The VCX FD is compatible with odis-s 25.3 and odis-e v18 software.
Posted by: jean at
07:47 AM
| No Comments
| Add Comment
Post contains 117 words, total size 4 kb.
June 09, 2026
Problem:
Generated and madeKeydiy KD FGB25MQB49 5D dealer key withKD-X4successfully. But cannot detect frequency with KD-X4. Tried read frequency with xhorse device, still no frequency. Any solution?


Solution:
Need to program andlearn key in car first.
The frequency can only be detected after the programming and key learning in car are completed.
Posted by: jean at
07:27 AM
| No Comments
| Add Comment
Post contains 61 words, total size 4 kb.
June 05, 2026
Problem:
Skoda Octavia 2016 add key Full MQB ! I have the all the data pulled out.Autel IM508can’t make the dealer key seems it is not accepting thisXhorse MQB key. It says keyless but i assume it is the right one. It is a bladed key. Anyone used this key or generated any other key for this car?


Solution:
You cannot generate an Xhorse key with Autel. Likewise, you cannot generate an Autel key with Xhorse.
Xhorse MQB keys can only be precoded with Xhorse tools.
Use Xhorse tools or change remote brand. Use Keydiy remote or OEM.
Don’t use xhorse remote with Autel. KD remote works fine, but try to do dealer key input cs manual.
Xhorse stopped accepting third-party companies to use their remotes.
You can make xhorse dealer key only with xhorse hardware.
Switched to KD, aftermarket or OEM key.
People use KD remotes without problem.
Check:KD ZB smart remote
Posted by: jean at
08:41 AM
| No Comments
| Add Comment
Post contains 162 words, total size 4 kb.
June 04, 2026
If you’re working on a 2024, 2025, or 2026 Toyota Corolla Cross and need to read immobilizer data or erase keys without adding a new key, you may need to access the vehicle’s bypass connector.
Where to find the bypass location on this model. The process is straightforward and requires no special tools.
Step-by-Step Instructions:
-
Open the glove box– Start by opening the passenger side glove box.
-
Release the latches– There are two latches holding the glove box in place. Release them both.
-
Drop the glove box down– Once the latches are undone, lower the glove box completely to access the area behind it.
-
Locate the top plug– Behind the glove box, you will see a series of connectors. The one you need is thetop white connector.
-
Connect the bypass (Toyota 30 pin cable)– Remove the top plug and connect your bypass module to this port.
This method allows you to read the necessary data and erase keys without needing to add a new key. Once the bypass is connected, you can complete the job as usual.
Quick Tip:
Make sure the vehicle is a 2024–2026 Toyota Corolla Cross, as the connector location may vary on other models or years.


Posted by: jean at
07:15 AM
| No Comments
| Add Comment
Post contains 209 words, total size 6 kb.
June 03, 2026
Important Security Update for Unlocking VAG SFD security gateway ofLaunch X431 diagnostic scanners.
The Volkswagen Group (VAG) has introduced updated security protocols for unlocking protected functions via SFD (Vehicle Diagnostic Protection).
To comply with these standards and prevent any service interruptions on Volkswagen, Audi, Skoda, or Seat vehicles etc.,Multifactor Authentication (2FA) via Google Authenticatorisnow MANDATORY.
Start Date:
May 25, 2026
Affected Systems and Software:
Every diagnostic device used to activate or unlock VAG SFD gateway.
The New Requirement
- Multifactor Authentication (2FA) is now MANDATORY as part of the unlocking process and has been added via Google Authenticator.
- Specifically, a temporary 6-digit verification code must be entered for each SFD unlocking. Access to the ECU is only granted after successful verification.
- Users who have not yet linked a device will be required to complete a one-time setup during the unlocking process.
Step-by-Step Guide:
1.Start the SFD-Unlock Procedure
2.[Initial setup only] Scan the QR shown using the Google Authenticator app.
3. The Google Authenticator app shows a generated 6-digit verification code. The code is temporary.
4. Enter the verification code into the device used for SFD-activation.

Posted by: jean at
07:57 AM
| No Comments
| Add Comment
Post contains 191 words, total size 2 kb.
June 02, 2026
If you work with Ford or Mazda vehicles, you’ve likely encountered two common transponder chip types: theID83 (4D-DST80)and theID63 (4D-DST40).Here we will make a comparison between 40-bit and 80 bit transponder chips in Ford PATS systems 2005-2011.
Why Convert Instead of Generating?
Most modern key programming tools allow you to generate a new chip of any type. However, there are situations where you might already have a specific chip on hand — for example, a DST80 — but your vehicle requires a DST40. Instead of discarding the chip or searching for a different blank, you canreconfigure it manually/automaticallyusing the right device.
This is especially useful for locksmiths and auto technicians who buy chips in bulk and want maximum flexibility.
1. QUICK GUIDE
Ford 40-Bit ↔ 80-Bit (When the Key WON’T Program)
For technicians just starting out who get stuck without knowing why
The Problem (More common than it seems)
In certain Ford models between 2005 and 2011 (Especially the Ranger and F-150):
– The key appears to be the correct one
– The procedure is correct
– But it simply won’t program
DIAGNOSTIC SIGNALS
- The key turns but the engine doesn’t start
- Security light flashes rapidly or stays on
- The scanner does not recognize the key as programmed
- Error appears during programming or it doesn’t complete
- Another key works without problems
Often, it is NOT the equipment.
It is NOT the procedure.
It is the transponder’s bit type.
A Key Fact Few People Know:
40-Bit → Reads as 4D (63)
80-Bit → Reads as 4D (83)
Typically, H92 keys or equivalents are used.
However, the system sometimes requires the other bit type.
2. Practical Solution:
Switch from 40-bit to 80-bit.
Or from 80-bit to 40-bit.
There isn’t always a logical explanation, but it works in practice.
- The key won’t program
↓ - Reads the transponder
↓ - Verifies 40 Bit or 80 Bit
↓ - Converts the necessary bit
↓ - Tests and verifies programming
↓ - Solution completed
| 40 BIT 4D (63) |
80 BIT 4D (83) |
|
|---|---|---|
| Identification in Xhorse | 4D (63) | 4D (83) |
| Common Use | Most frequent | Less frequent |
| Compatibility | Not compatible with 80 Bit | Not compatible with 40 Bit |
| Ford Systems (2005–2011) | Some models | Some models |
| Solution | Convert to 80 Bit | Convert to 40 Bit |
Chips Explained
| Chip ID | Common Name | Memory Type | Typical Use |
|---|---|---|---|
| ID83 | 4D-DST80 | 80-bit | Ford, Mazda (older models, some F150s) |
| ID63 | 4D-DST40 | 40-bit | Ford, Mazda (different immobilizer versions) |
BEST PRACTICES BEFORE REPLACING COMPONENTS
- Always verify the bit type (40 or 80).
- Confirm the transponder with a reliable tool.
- Try converting the bit before buying another key.
- Ensure stable batteries and good connection are used.
- Do not install new parts without first ruling out bit incompatibility.
3. STEPS (Using Xhorse Key Tools, i.eKey Tool Max)
Bit Conversion Without Re-reading the Key or Transponder
1). Go to "Clone Transponder”
2). Select "Read Transponder”
3). Tap "Edit” (bottom center)
4). Select "DST+”
5). Scroll down to the very bottom
6). P30 must be set to0000
DO NOT re-scan the key or transponder
7). Tap the zeros and enter:
0046 = Convert to 40-Bit
0846 = Convert to 80-Bit
![]() . Tap "OK”
. Tap "OK”
9). Tap the pencil icon (on the right side)
10). You should see: "Write Complete”.
Can You Convert Back?
Yes. The process works in reverse. If you need to turn a DST40 chip back into a DST80, follow the same steps but change the value from 0046 back to 0846 (or whatever your tool requires for DST80). The Xhorse Key Max allows two-way conversion between these two chip types.


STEPS (Using Keydiy Key Tools, i.eKD-X2/KD-X4)
1). Read Transponder
2). Select "Chip Editing”
3). Select "DST+”
4). KD will will give you options: select "Convert to DST40” or "Convert to DST80”
5). Hit "Agree”
6). Exit and auto detect transponder again.
Keydiy tools also allow two-way conversion between these two chip types.


Final Verification
Return to "Clone Transponder”
Read the transponder again
Confirm that it now shows as 4D (63) or 4D (83), depending on your requirements.
Key Tip for Future Programmers
If a Ford key fails to program:
DO NOT buy a replacement just yet
Check the 40 / 80-Bit setting first.
Important Tips
Not all chips are rewritable. This method works with cloneable DST80 and DST40 chips. OEM or locked chips may not allow manual overwriting.
Write, don’t Convert. Some tools have both a "Convert” and a "Write” function. For manual editing, always use Write after changing values.
Generate as an alternative. If you don’t have a chip to convert, the Xhorse tool can also generate a brand-new DST40 or DST80 chip from scratch. Conversion is just one option.
www.obdii365.com
Posted by: jean at
08:43 AM
| No Comments
| Add Comment
Post contains 780 words, total size 16 kb.
June 01, 2026
Here comes a problem:
It’s a 2017 Skoda MQB model with an EDC17C74 ECU. All keys have lost. A customer was trying to make key withOBDSTAR X300 Classic G3programmer on bench.
He connected the ECU to the G3 on bench and read the EEPROM successfully, but the strange thing is that he can also read the FLASH successfully, but when it reads the sectors, it goes super fast, and the BLUE LED on the MP001 barely flashes to indicate communication with the ECU. It’s like the ECU is being read incorrectly, and when he used the special "decrypt immo data” option, the CS is really strange.


Here is the clue.
Edc17C74 and CP74 are Immo 6 and have the SHE sector.It reads ok, but these ECUs have SHE sector security hardware extension. No tool in the world can decrypt it and no way to decode it. You cannot read CS code.
What is IMMO6 SHE?
IMMO6(or WFS6) refers to the 6th generation of theVolkswagen/Audi Group (VAG) immobilizer system, whileSHEstands for Secure Hardware Extension—a hardware-based security layer used in modern ECUs. Part of immo data is stored not in eeprom but in SHE – which you can’t read.
The SHE (Secure Extension Hardware) module implements advanced AES-128 encryption and dynamic challenge-response authentication, making it highly resistant to hacking or unauthorized ECU cloning.
How to Program MQB All Keys Lost with IMMO6 SHE ECU?
Solution 1:
Order dealer key for 120€ and program with online software ODIS.
Solution 2:
Order dealer key and use mlb tool to add key.
For example:
Use the dealer key to read immo then leave dealer key with CS code. Key already has sync then you can make more keys if you want.
Order a dealer key, read immo data on the dealer key withVVDI MLB Tool (MQB adapter)orKD-MP tool, and make dealer key and learn keys.
Solution 3:
Make ecu immo off, and when add on calculation time another car cs code to fill the sync calculation and make key and oem ecu immo off.
Posted by: jean at
06:40 AM
| No Comments
| Add Comment
Post contains 351 words, total size 6 kb.
May 29, 2026
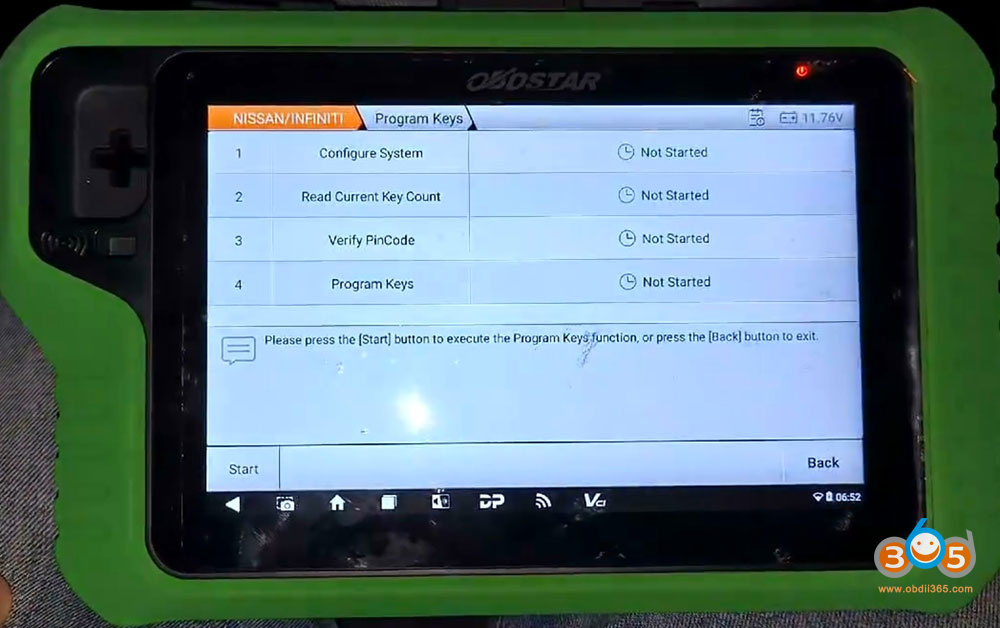
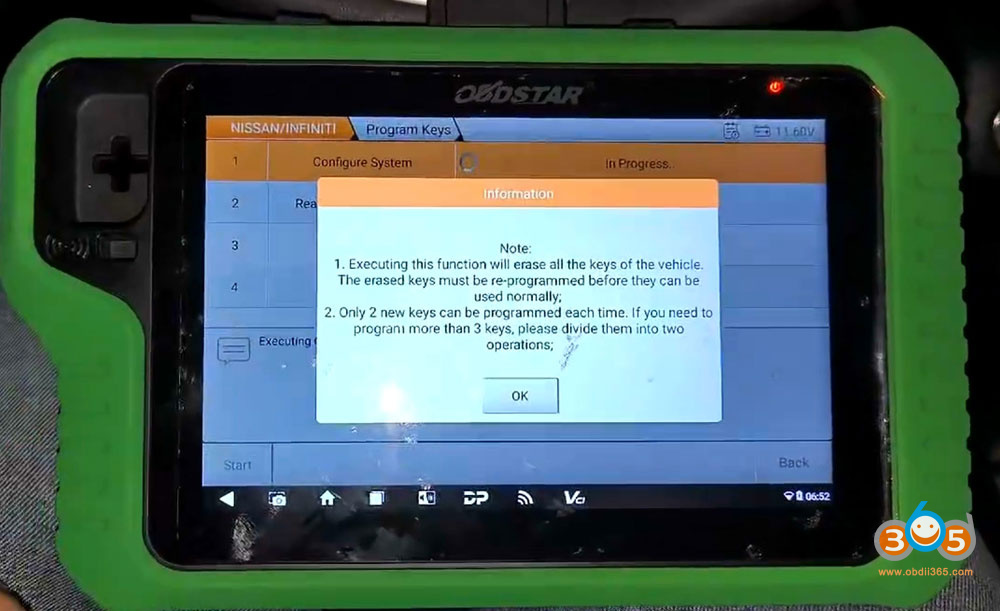
OBDSTAR X300 Classic G3programmed 2025 Nissan Magnite proximity smart key successfully.
Go to Nissan, select the model and Proximity function.
Select Program Keys.
This function requires network connection.


Follow 4 steps to program keys.
Press Start button to execute key programming function.
1. Configure system
Executing this function will erase all the keys of the vehicle.
Only 2 new keys can be programmed each time.
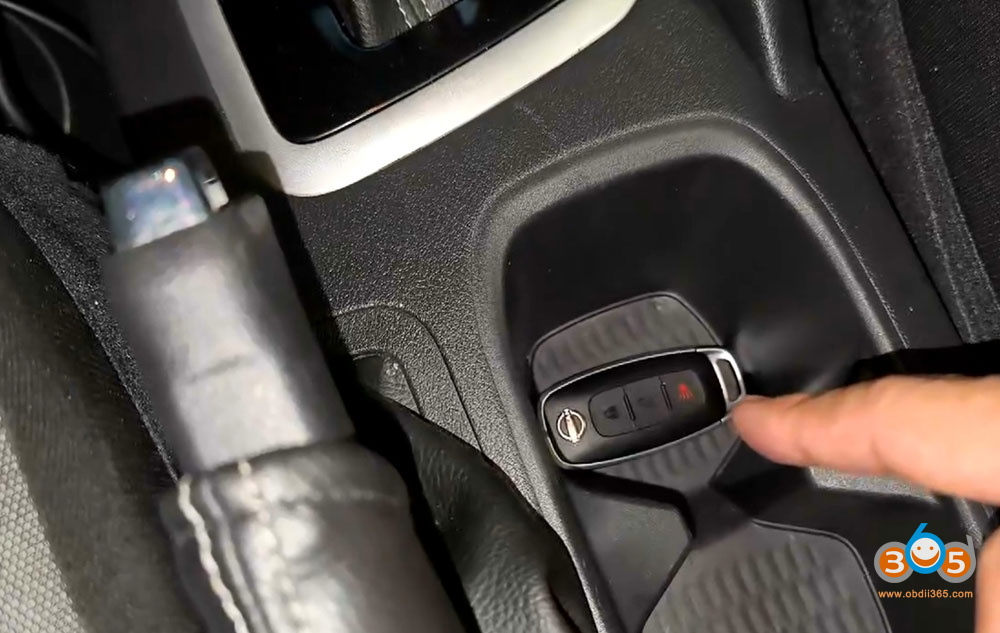
Insert the original key into the slot.


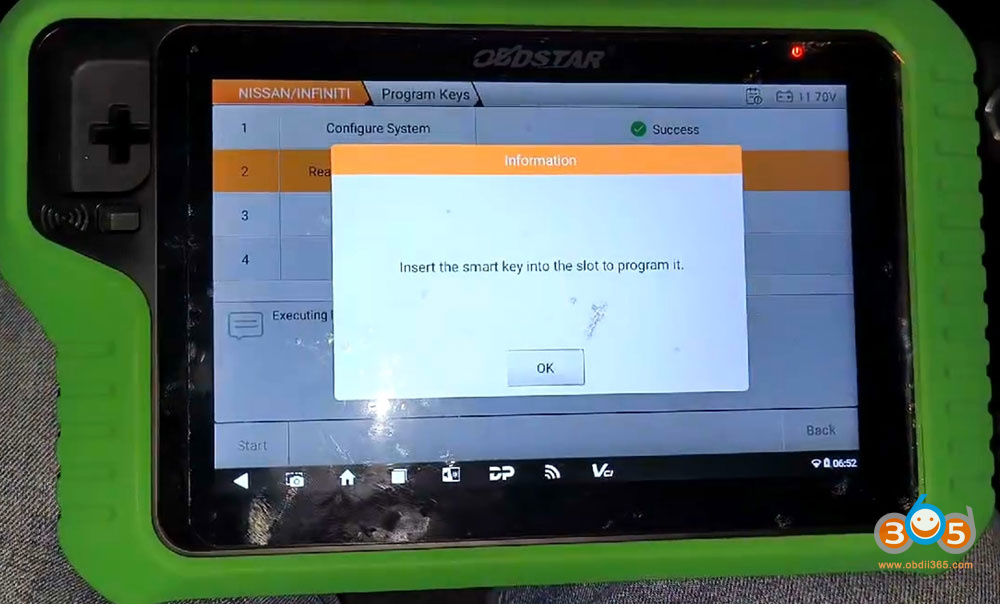
2. Read current key number
G3 read current number of key: 1.
Insert new smart key into the slot.
2 keys detected.


3. Verify PIN Code
G3 asks to enter a 32-digit PIN code.
This code must be obtained from a 3rd party provider using the VIN.

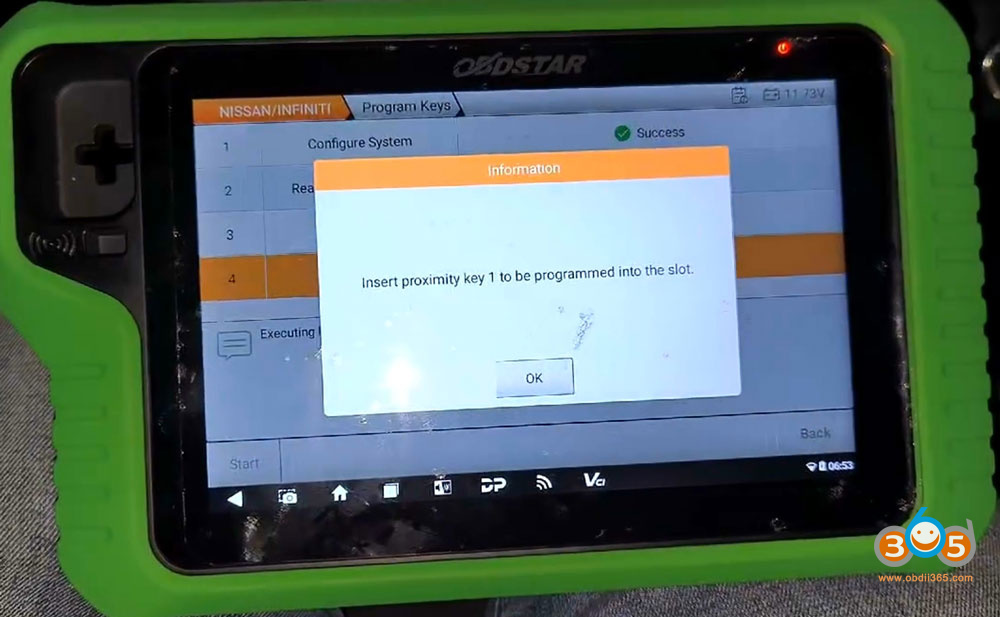
4. Program keys
Insert the proximity key 1 to be programmed into the slot.
Program key 1 successfully.


Insert a new proximity key to be programmed into the slot.
Program 2nd key successfully.


Test both keys.
Posted by: jean at
07:48 AM
| No Comments
| Add Comment
Post contains 164 words, total size 14 kb.
32 queries taking 0.0985 seconds, 210 records returned.
Powered by Minx 1.1.6c-pink.

